




Five Costly Mistakes To Avoid During Apple Watch Series 9 Screen Teardown

Five Costly Mistakes to Avoid During Apple Watch Series 9 Screen Teardown: 7 Critical Warnings Every Technician Must Know
Introduction
The Apple Watch Series 9 is a powerful smartwatch with a compact design and advanced internal technology. However, repairing its damaged display isn’t as simple as removing a traditional smartphone screen. Its thin construction, delicate display cables, adhesive seals, sensors, and tightly packed internal components make every repair step important.
A small mistake during disassembly can turn a straightforward screen repair into an expensive replacement job. This guide explains the most common teardown mistakes, how to avoid them, and why professional repair techniques matter.
Whether you’re an experienced technician, an electronics repair student, or a smartwatch owner researching screen replacement, understanding these risks can help protect the device and improve repair results.
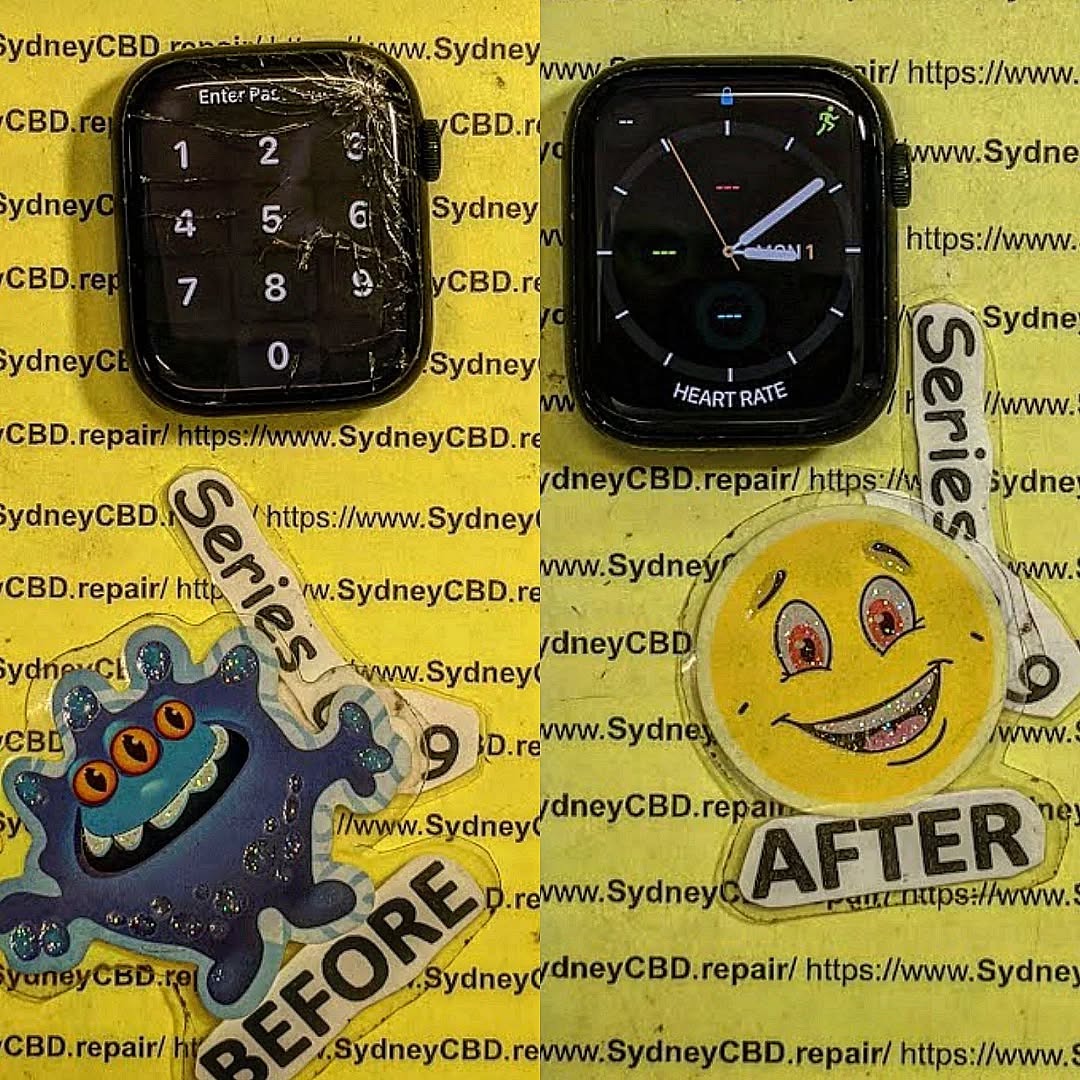
Understanding the Apple Watch Series 9 Screen and Its Repair Challenges
The Apple Watch Series 9 is one of Apple’s popular smartwatch models, offering a bright Retina display, advanced health features, and a compact design. Available in 41mm and 45mm sizes, it combines sophisticated electronics with a carefully engineered enclosure.
However, this compact construction creates challenges when the screen becomes cracked, unresponsive, or damaged.
Unlike a traditional smartphone, a smartwatch doesn’t provide much working space. The display sits close to other sensitive components, and its internal cables are extremely small. Even a minor mistake during disassembly can damage parts that were working perfectly before the repair began.
The Apple Watch Series 9 uses an Always-On Retina LTPO OLED display. OLED technology delivers deep blacks, strong contrast, and excellent colour reproduction. Unfortunately, OLED panels can be vulnerable to pressure, bending, and uneven force.
Why Is Apple Watch Screen Teardown Difficult?
There are several reasons why technicians need to approach this repair carefully:
- Compact internal construction: Components are packed into a small enclosure.
- Strong display adhesive: The screen is secured firmly to the watch housing.
- Delicate flex cables: Display connections can tear or become damaged during lifting.
- Sensitive internal electronics: Excessive heat and accidental electrical contact can cause failures.
- Water resistance considerations: Opening the enclosure compromises its original adhesive seal.
The Series 9 has a 50-metre water-resistance rating under ISO standard 22810:2010 and an IP6X dust-resistance rating. However, these ratings shouldn’t be confused with a guarantee that a repaired watch will retain its original protection.
Apple explains that water resistance can diminish over time and isn’t permanent. You can read more through its official Apple Watch water-resistance guidance.
What Happens During a Screen Teardown?
A typical display replacement involves several stages:
- Inspecting the watch for physical damage.
- Removing the watch bands and preparing the enclosure.
- Carefully softening the display adhesive.
- Separating the screen from the housing.
- Managing the display’s internal connections.
- Inspecting connectors and surrounding components.
- Installing the replacement display.
- Applying fresh screen adhesive.
- Testing the watch before final closure.
Each stage requires attention. Rushing through even one step can create additional problems.
Important: The following procedures are intended as educational repair guidance for trained technicians. Battery damage, electrical faults, and loss of sealing can create safety and reliability risks. When in doubt, use a qualified repair provider.
Mistake 1: Applying Excessive Heat During Screen Removal
High-risk mistake
One of the most common problems during smartwatch display replacement is applying too much heat.
The screen adhesive must be softened before the display can be separated from the case. However, this doesn’t mean that applying maximum heat is the fastest or safest approach.
The Apple Watch Series 9 contains several sensitive components, including the OLED display, battery, sensors, and internal circuitry. Excessive heat can affect these components and create additional repair complications.
Why Excessive Heat Is Dangerous
When a technician uses an uncontrolled heat source, the temperature may become uneven across the display.
This can create several problems:
- OLED panel damage.
- Display discolouration.
- Adhesive spreading into unwanted areas.
- Damage to nearby internal components.
- Battery overheating.
- Increased risk of display separation problems.
A particularly costly mistake is concentrating heat on one small section for too long.
The adhesive may soften in that location, but the surrounding areas can remain firmly attached. Applying additional pressure to compensate can crack the display.
How to Avoid Heat-Related Damage
Professional technicians should use controlled heating equipment designed for small electronic devices.
A suitable repair approach includes:
1. Inspect the display first
Check for cracks, raised glass, unusual screen colours, and signs of battery swelling. A swollen battery requires special attention and should not be exposed to unnecessary heat or pressure.
2. Use controlled heating
An appropriate heating pad or specialised repair tool offers better temperature control than an uncontrolled heat gun.
3. Allow the adhesive to soften gradually
Avoid rushing the process. If the screen remains firmly attached, reassess the adhesive rather than forcing the opening tool underneath it.
4. Monitor the device throughout the procedure
Heat should be applied carefully and consistently. Never assume that a particular heating duration is safe for every damaged watch.
Heat Gun vs Controlled Heating Equipment
| Equipment | Advantages | Potential problems |
|---|---|---|
| Controlled heating pad | More consistent heating | Requires suitable temperature settings |
| Repair heating platform | Designed for electronics | Incorrect settings can still cause damage |
| Hair dryer | Easily available | Less precise temperature control |
| Heat gun | Fast heating | Can overheat delicate components |
A controlled heating method is generally preferable to directing concentrated hot air at the watch.
Professional Technician Tip
If the display doesn’t separate after the adhesive has softened, stop and reassess.
Never use additional force simply because the repair is taking longer than expected.
Remember, replacing one damaged screen is much cheaper than damaging the display circuitry or battery during removal.
Mistake 2: Using Sharp Metal Tools to Force the Screen Open
High-risk mistake
Another expensive mistake is using inappropriate opening tools.
Some technicians believe that a thin metal blade will make display removal easier. While metal tools can sometimes be useful for specific electronics repairs, forcing a sharp blade underneath a smartwatch display creates unnecessary risks.
The Apple Watch Series 9 has a compact enclosure with very little clearance between the screen and internal components.
A sharp tool can cause serious damage before the technician even realises what’s happened.
The Hidden Risks of Metal Opening Tools
1. Scratching the display assembly
A metal blade can scratch internal display surfaces or damage the screen edges.
2. Damaging the display flex cables
The display cables are delicate. An opening tool inserted too deeply can cut or tear them.
3. Scratching the housing
The aluminium or stainless-steel enclosure can become scratched during aggressive prying.
4. Damaging internal components
The tool can accidentally contact nearby circuitry or other sensitive parts.
5. Creating additional repair expenses
A damaged connector or internal component may turn a simple display replacement into a much more complicated repair.
What Tools Should Technicians Use?
A professional repair workstation should include:
- Thin plastic opening picks.
- Non-conductive opening tools.
- Precision tweezers.
- ESD-safe tools.
- A suitable heating platform.
- A magnification system.
- A clean, organised repair surface.
Plastic opening picks are useful because they reduce the risk of scratching and shorting components compared with sharp conductive tools.
However, plastic tools aren’t completely risk-free. They can still damage cables if inserted too deeply or used with excessive force.
The Correct Approach to Screen Separation
The goal is to separate the adhesive without applying unnecessary pressure to the display.
A technician should work slowly and maintain control over the opening tool.
If resistance increases, stop.
The adhesive may not be sufficiently softened, or the tool may be approaching a sensitive section.
Never twist the tool aggressively to create additional space.
Why Magnification Matters
Small cracks and cable damage aren’t always visible to the naked eye.
Using a microscope or suitable magnification system helps technicians identify:
- Torn flex cables.
- Damaged connector contacts.
- Small glass fragments.
- Adhesive contamination.
- Scratches around the enclosure.
This is particularly useful when working with previously repaired devices.
Professional Recommendation
Use the correct opening equipment rather than improvising with household knives, razor blades, or oversized metal tools.
The quality of the tools directly affects the technician’s ability to control the repair.
A few extra minutes spent separating the display carefully can prevent hours of additional troubleshooting.
Mistake 3: Pulling or Twisting the Display Flex Cables
Critical component warning
The third major mistake happens when technicians lift the display without considering its internal connections.
The display isn’t simply a glass panel that can be removed and placed aside. It connects to the internal electronics through delicate flex cables and connectors.
These connections carry the signals required for screen operation.
If a cable becomes stretched, folded, twisted, or torn, the replacement process can become much more complicated.
Why Display Flex Cables Are So Delicate
Flex cables are designed to fit inside extremely compact electronic devices.
They can bend within their intended installation path, but that doesn’t mean they’re resistant to pulling or sharp folds.
During screen removal, a technician might accidentally lift the display too quickly.
This can place tension on the cable before the connector has been safely accessed.
The result may include:
- A completely black display.
- Flickering or intermittent screen operation.
- Touchscreen problems.
- Partial display failure.
- Damaged connector contacts.
- A watch that requires further board-level diagnosis.
Common Flex Cable Handling Errors
| Mistake | Possible consequence |
|---|---|
| Lifting the display too quickly | Cable stretching |
| Pulling the screen sideways | Connector damage |
| Twisting the display | Flex cable tearing |
| Using metal tweezers aggressively | Cable puncturing |
| Ignoring connector orientation | Incorrect reconnection |
How to Protect Display Connections
Step 1: Understand the cable layout
Before lifting the display completely, identify the location and direction of its connecting cables.
Use a model-specific repair guide rather than assuming that every Apple Watch generation has identical internal construction.
Step 2: Support the display
Don’t allow the screen to hang freely from its cables.
Keep the assembly supported while accessing the internal connections.
Step 3: Avoid unnecessary movement
The display should only move as much as required for the repair.
Step 4: Inspect connectors
Before reconnecting a replacement display, inspect the connectors under magnification.
Look for bent contacts, debris, damaged insulation, or signs of corrosion.
Step 5: Confirm proper seating
Connectors should be aligned correctly before pressure is applied. Never force a connector into position.
What If the Display Stops Working After Reassembly?
A black screen doesn’t automatically mean that the replacement panel is defective.
Possible causes include:
- An improperly seated connector.
- A damaged display flex cable.
- A faulty replacement screen.
- A damaged connector socket.
- An underlying logic board problem.
A technician should diagnose these possibilities systematically rather than immediately ordering another display.
Why Professional Testing Is Important
A successful screen replacement requires more than making the display light up.
Technicians should also inspect touch response, brightness, colour reproduction, screen stability, and overall device operation.
This helps identify problems before the watch is returned to its owner.
Mistake 4: Ignoring Battery Safety During the Teardown
Safety-critical mistake
The fourth mistake can be one of the most dangerous: overlooking battery safety while working on the Apple Watch Series 9.
A smartwatch battery is much smaller than a smartphone battery, but that doesn’t make it harmless.
Lithium-ion batteries store energy in a compact space. If the battery is punctured, crushed, bent, or overheated, it can become unstable.
Depending on the damage, the battery may swell, leak, overheat, or enter thermal runaway.
Why Battery Safety Matters During Screen Replacement
The battery is positioned close to other internal components. During a display repair, technicians may need to work around battery connections and other tightly packed parts.
An accidental tool slip can damage the battery or create an electrical short.
This is particularly concerning when a watch has previously suffered impact damage.
A damaged battery may not show obvious signs of failure before disassembly.
Five Battery-Related Warning Signs
Look for these problems before beginning a repair:
- Swollen battery: The battery may push against internal components or cause the display to lift.
- Unusual heat: The watch becomes excessively hot during normal operation.
- Physical deformation: The enclosure or display appears unusually raised.
- Unexpected shutdowns: The watch repeatedly turns off despite having charge.
- Visible damage: There are signs of corrosion, liquid exposure, or internal battery damage.
If swelling or physical battery damage is suspected, stop the repair and follow appropriate lithium-ion battery safety procedures.
How Professionals Reduce Battery Risks
Professional repair technicians should:
- Inspect the device before opening it.
- Disconnect power when safely accessible and appropriate for the model-specific procedure.
- Use non-conductive tools around sensitive electronics.
- Avoid puncturing or bending the battery.
- Keep the workstation free from metal debris.
- Use suitable ESD protection.
- Follow approved procedures for damaged battery handling.
One important detail is that accessing the battery connector may not be straightforward during every Apple Watch screen repair. The correct procedure depends on the model’s internal layout.
Never assume that a battery can be disconnected without first understanding the surrounding construction.
What Happens If a Battery Is Accidentally Damaged?
A damaged lithium-ion battery can present a fire and injury risk.
If a battery begins swelling, smoking, hissing, or becoming unusually hot, stop working on the device. Avoid handling or pressing it, move away from the immediate hazard, and follow local emergency and battery-safety guidance.
Don’t continue the repair simply to finish the display replacement.
Why Battery Inspection Should Be Part of Every Repair
Customers often bring in a smartwatch because the display is cracked.
However, the original impact may have affected more than the glass.
A professional inspection can reveal:
- Battery deformation.
- Damaged internal brackets.
- Loose connections.
- Liquid contamination.
- Signs of previous repair attempts.
Identifying these issues early helps prevent unexpected failures after the new screen is installed.
Technician takeaway: A screen replacement should never compromise battery safety. Protecting the battery is just as important as protecting the new display.
Mistake 5: Reusing Damaged Adhesive or Poorly Sealing the Display
Long-term reliability risk
The fifth mistake often happens near the end of the repair.
The replacement screen has been installed, the display turns on, and everything appears to work. However, the technician decides to reuse the old adhesive or applies an unsuitable replacement adhesive.
This shortcut can cause problems long after the customer leaves the repair centre.
Why Display Adhesive Is Important
Apple Watch Series 9 uses a tightly fitted display assembly.
Adhesive helps secure the screen to the enclosure and contributes to the device’s original environmental sealing.
When the original display is removed, the adhesive is disturbed.
Even if some adhesive remains attached to the housing, it shouldn’t automatically be considered suitable for reuse.
Old adhesive may contain:
- Dust and debris.
- Glass particles.
- Skin oils.
- Uneven adhesive residue.
- Sections that have lost their bonding strength.
These contaminants can prevent the replacement display from sitting correctly.
What Happens When the Screen Is Poorly Sealed?
Incorrect adhesive installation can create several problems.
1. Display lifting
Weak bonding may allow sections of the display to separate from the housing.
2. Dust entry
Gaps around the display can provide an entry point for dust.
3. Moisture exposure
A compromised seal increases the risk of moisture entering the device.
4. Uneven screen alignment
Incorrect adhesive thickness can cause the screen to sit unevenly.
5. Future display damage
A poorly seated screen may experience uneven pressure during everyday use.
The Correct Adhesive Replacement Process
A professional approach should include:
1. Remove old adhesive carefully
The housing and display seating surfaces should be cleaned without scratching or damaging them.
2. Inspect the enclosure
Check for dents, deformation, cracks, and other damage that could prevent proper screen installation.
3. Select model-compatible adhesive
Use adhesive designed for the correct Apple Watch Series 9 size and display assembly.
The 41mm and 45mm versions should not be treated as interchangeable.
4. Position the new adhesive accurately
The adhesive should be aligned with the intended bonding surfaces.
5. Check screen positioning
Before applying final pressure, verify that the display is correctly positioned.
6. Allow the adhesive to bond
Follow the adhesive manufacturer’s recommended installation and curing instructions.
Can a Repaired Apple Watch Still Be Water Resistant?
This is one of the most important questions customers should ask.
The original Apple Watch Series 9 carries a 50-metre water-resistance rating. However, opening the watch can compromise its original seal.
Installing replacement adhesive doesn’t automatically restore the original factory water-resistance performance.
Even an apparently perfect repair cannot establish the device’s original water-resistance rating without appropriate validated testing.
Apple’s guidance also explains that water resistance can diminish over time.
For this reason, customers should avoid swimming, showering, or exposing a repaired watch to water unless its protection has been appropriately verified.
Professional Adhesive Checklist
| Inspection point | What to verify |
|---|---|
| Old adhesive | Completely removed |
| Housing | Free from damage and debris |
| Replacement adhesive | Correct model and size |
| Display alignment | Even and properly positioned |
| Bonding | Secure across the intended surface |
| Final inspection | No visible gaps or lifting |
The bottom line is simple: a screen replacement isn’t complete just because the display works. Proper installation and sealing are essential for long-term reliability.
Seven Critical Warnings Before Starting an Apple Watch Series 9 Teardown
Avoiding the five major mistakes is an excellent starting point. However, experienced technicians should also follow additional precautions before opening the watch.
These seven warnings help establish a safer and more organised repair process.
Warning 1: Confirm the Exact Watch Model
Apple Watch models can look similar from the outside.
However, their internal construction, display dimensions, and replacement parts can differ.
Before ordering a replacement display, confirm whether the device is the 41mm or 45mm Apple Watch Series 9.
Check the model information and physical markings.
Never assume that a screen designed for another Apple Watch generation will fit correctly.
Warning 2: Back Up Important Information
Before any repair, encourage the customer to maintain an up-to-date backup through their paired iPhone and iCloud settings.
A display replacement shouldn’t normally require erasing personal information, but unexpected hardware problems can occur during repair.
Preparing for unexpected outcomes is always better than risking important information.
Warning 3: Check Apple Pay Considerations
Display replacement may affect Apple Pay functionality.
The iFixit Series 9 screen replacement guide specifically warns that replacing the screen can cause Apple Pay issues and recommends removing Apple Pay account information before the repair and adding it again afterward.
Follow the applicable account-security and device instructions.
Read the Apple Watch Series 9 screen replacement guide for model-specific information.
Warning 4: Work in an ESD-Safe Environment
Electrostatic discharge can damage sensitive electronic components.
Technicians should use appropriate ESD protection, including a properly grounded work surface and suitable wrist strap.
Avoid working on carpets or surfaces that generate static electricity.
Warning 5: Keep the Workspace Clean
Small screws, dust particles, and broken glass can create major problems.
Use an organised repair mat and separate small components during disassembly.
A clean workstation also makes it easier to identify missing parts during reassembly.
Warning 6: Don’t Assume the Original Water Resistance Remains
Once the screen has been removed, the original adhesive seal has been disturbed.
Never promise that the watch will retain its factory water resistance simply because new adhesive has been installed.
Be transparent with customers about the limitations of post-repair sealing and testing.
Warning 7: Test Before Final Closure
Before completing the repair, perform the appropriate functional checks.
Where the model-specific procedure permits, connect and test the replacement display before final sealing, then power the watch down again before continuing the installation.
Check the display, touchscreen, and relevant device functions.
Finding a problem before final closure is much easier than reopening a fully assembled watch.
Professional Tools and Techniques for Better Screen Teardown Results
Having the right tools makes a major difference in smartwatch repair quality.
A technician doesn’t need an enormous collection of equipment. Instead, the priority should be precision, reliability, and compatibility with small electronic devices.
Essential Repair Equipment
| Tool | Main purpose |
|---|---|
| Controlled heating equipment | Softens display adhesive |
| Plastic opening picks | Helps separate bonded surfaces |
| Precision tweezers | Handles small components |
| ESD-safe workstation | Reduces static discharge risks |
| Digital microscope | Inspects cables and connectors |
| Fine-tip cleaning tools | Removes adhesive residue |
| Model-compatible adhesive | Secures the replacement display |
| Precision repair mat | Organises components |
Why a Microscope Is Worth Using
A microscope can reveal problems that are difficult to identify without magnification.
For example, a connector may appear undamaged to the naked eye but have a bent contact or small piece of debris.
Magnification allows technicians to inspect:
- Flex cable edges.
- Connector contacts.
- Display connection points.
- Corrosion.
- Adhesive contamination.
- Small cracks in surrounding components.
This is especially valuable when dealing with devices that have already undergone unsuccessful repairs.
Why Replacement Screen Quality Matters
Not all replacement screens deliver the same performance.
A low-quality display may have:
- Poor brightness.
- Inconsistent colours.
- Unreliable touch response.
- Uneven illumination.
- Shorter operating life.
- Compatibility problems.
Before installing a replacement, technicians should verify the supplier, part compatibility, and available quality information.
A cheaper display isn’t always the better purchase.
A Professional Pre-Installation Checklist
- Confirm the replacement screen matches the correct watch size.
- Inspect the new display for physical damage.
- Examine the display connectors.
- Remove old adhesive residue.
- Check the enclosure for deformation.
- Confirm the internal components are correctly positioned.
- Ensure the battery and other components show no signs of damage.
- Prepare the correct replacement adhesive.
Taking a few extra minutes to complete these checks can prevent avoidable callbacks and repeat repairs.
Troubleshooting Common Apple Watch Series 9 Screen Teardown Problems
Even experienced technicians can encounter unexpected problems during a repair.
The important thing is to identify the cause before attempting another repair step.
| Problem | Possible cause | Recommended action |
|---|---|---|
| Screen won’t separate | Adhesive remains bonded | Stop and reassess controlled heating |
| Display cracks during removal | Excessive pressure | Review opening technique |
| New display remains black | Connector or display fault | Inspect connections and replacement panel |
| Touchscreen doesn’t respond | Damaged cable or incompatible screen | Perform systematic diagnosis |
| Screen lifts after installation | Poor adhesive bonding | Inspect alignment and adhesive |
| Watch overheats | Battery or electronic fault | Stop operation and investigate safely |
| Moisture appears inside | Compromised sealing | Arrange professional inspection |
What If the Replacement Display Is Black?
First, don’t immediately assume the new display is defective.
A black screen can result from several issues.
The technician should inspect the display connector, verify the replacement part, and check for signs of damage around the connection point.
If the connector and screen appear correct, further electronic diagnosis may be required.
What If the Screen Has Touch Problems?
Touchscreen failure can result from a faulty replacement assembly, damaged flex cable, connection problems, or an underlying electronic fault.
Check the entire assembly rather than focusing on the display glass alone.
What If the Display Lifts After Installation?
A lifting display usually indicates a bonding or alignment issue.
Potential causes include:
- Old adhesive residue.
- Incorrect adhesive dimensions.
- A deformed watch housing.
- Poor display positioning.
- Insufficient bonding.
Don’t simply apply extra adhesive around the outside of the display.
The underlying installation problem should be identified and corrected.
DIY Apple Watch Series 9 Screen Repair vs Professional Repair
Many smartwatch owners consider replacing their own screens to save money. While DIY repair information is available, the Apple Watch Series 9 presents several challenges that shouldn’t be underestimated.
The decision depends on the owner’s experience, available tools, replacement part quality, and willingness to accept the risks.
Advantages of DIY Screen Replacement
DIY repair can offer some benefits:
- Greater understanding of smartwatch construction.
- Opportunity to learn electronics repair.
- Potential savings on labour costs.
- Control over replacement parts.
- Access to educational repair resources.
However, these benefits depend on having the correct equipment and technical knowledge.
Disadvantages of DIY Repair
The potential disadvantages include:
- Accidental display damage.
- Battery safety risks.
- Damaged internal connectors.
- Incorrect adhesive installation.
- Possible Apple Pay functionality issues.
- Uncertain water-resistance performance.
- Additional expenses if the repair fails.
A replacement display may seem inexpensive initially, but damaging another component can quickly increase the total repair cost.
Why Professional Repair Can Be the Better Choice
Professional repair centres have experience working with delicate electronics and compact devices.
They can assess whether the problem is limited to the display or whether additional components have been affected.
A professional service may also include:
- Initial device inspection.
- Display and connector diagnosis.
- Careful screen removal.
- Replacement display installation.
- Adhesive replacement.
- Functional testing.
- Final quality inspection.
The main advantage is that the repair is approached as a complete technical process rather than simply swapping one component.
DIY vs Professional Repair Comparison
| Consideration | DIY repair | Professional repair |
|---|---|---|
| Technical experience | Depends on owner | Experienced technician |
| Specialised tools | Must be purchased | Usually available |
| Display installation | Owner-managed | Technician-managed |
| Battery safety | Owner-managed | Professional procedures |
| Adhesive installation | Depends on skill | Experienced installation |
| Troubleshooting | Requires personal knowledge | Professional diagnosis |
| Repair warranty | Depends on supplier | Depends on repair provider |
For a valuable smartwatch, professional assessment is worth considering, particularly when the display is severely cracked or the device has suffered impact or liquid damage.
Frequently Asked Questions About Apple Watch Series 9 Screen Teardown
1. Is Apple Watch Series 9 screen replacement difficult?
Yes. Screen replacement requires careful handling because the display is attached with adhesive and connected to delicate internal components. The small enclosure also limits working space. Technicians need appropriate heating equipment, precision opening tools, and experience with compact electronics.
2. Can excessive heat damage the Apple Watch Series 9 display?
Yes. Excessive or uneven heating can damage the OLED panel and potentially affect nearby components. Technicians should use controlled heating equipment and avoid concentrating heat in one area for too long.
3. Can I use a razor blade to remove the Apple Watch screen?
Using a razor blade is not recommended as a general opening method. Sharp metal tools can scratch the enclosure, damage internal components, or cut delicate flex cables. Appropriate plastic opening picks and model-specific techniques offer better control.
4. What happens if I damage the display flex cable?
A damaged flex cable can cause a black screen, flickering, intermittent operation, or complete display failure. Depending on the damage, the display assembly or connector may require further repair. A technician should inspect the connection under magnification.
5. Does replacing the Apple Watch Series 9 screen affect Apple Pay?
It can. The iFixit Series 9 screen replacement guide specifically warns that screen replacement can cause Apple Pay issues. Follow the guide’s precautions and Apple’s applicable security instructions before beginning the repair.
6. Will my Apple Watch Series 9 remain waterproof after screen replacement?
You shouldn’t assume that it will. The Series 9 originally has a 50-metre water-resistance rating, but removing the display disturbs its original adhesive seal. Replacement adhesive doesn’t automatically restore factory water resistance. Avoid water exposure unless the repaired device’s protection has been appropriately verified.
7. Should I replace the old screen adhesive?
Yes. Old adhesive should be carefully removed and replaced with suitable adhesive designed for the correct model and screen size. Reusing contaminated or damaged adhesive can result in poor bonding, screen lifting, and reduced protection against dust and moisture.
8. Can a cracked Apple Watch Series 9 screen damage other components?
Yes. Broken glass can expose internal components to debris and moisture. A strong impact may also damage the display connections, battery, enclosure, or internal electronics. A proper inspection should identify any additional damage before replacement.
9. Is it better to replace the screen or the entire Apple Watch?
It depends on the extent of the damage, the device’s overall condition, replacement part availability, and repair cost. If only the display is damaged and the remaining components are functional, screen repair may be worth considering. If the logic board, battery, and enclosure are also damaged, replacement may be more economical.
10. How long does an Apple Watch Series 9 screen replacement take?
The time depends on the technician’s experience, the condition of the device, and the availability of suitable parts. iFixit’s model-specific guide estimates approximately 45 minutes to one hour for the screen replacement procedure. Additional diagnosis, adhesive preparation, testing, and troubleshooting may increase the total time.
Conclusion: Avoid These Five Mistakes for a Safer Apple Watch Series 9 Screen Repair

The Apple Watch Series 9 is a sophisticated smartwatch that deserves careful handling during every stage of screen replacement.
Its compact construction, OLED display, sensitive flex cables, lithium-ion battery, and adhesive-sealed enclosure make it a challenging repair for inexperienced technicians.
The five costly mistakes covered in this guide are:
- Applying excessive heat during screen removal.
- Using sharp metal tools to force the display open.
- Pulling or twisting delicate display flex cables.
- Ignoring battery safety during teardown.
- Reusing damaged adhesive or poorly sealing the replacement screen.
Avoiding these mistakes can reduce accidental damage, improve repair quality, and help protect the remaining internal components.
Most importantly, remember that a successful repair isn’t simply about installing a working replacement display. Proper inspection, careful assembly, functional testing, and honest communication about water-resistance limitations are equally important.
For technicians, investing in appropriate equipment and developing careful repair habits can make a significant difference.
For smartwatch owners, choosing an experienced repair centre can help prevent a small screen problem from becoming a much bigger expense.
A careful teardown today can prevent a costly repair tomorrow.
David from Sydney CBD Repair Centre – The Best place to fix mobile phones as 7 Years In A Row! Top Mobile Phone Repair In Sydney. More than 2000 Positive Reviews on Google and Same Day Repairs.
We take pride in delivering exceptional repair services for all major phone brands including Apple, Samsung, Google, and more. Our expert technicians use only genuine parts and offer 90days warranty on repairs. Located in the heart of Sydney CBD, we’re your one-stop solution for all mobile device repairs.
Our commitment to excellence has earned us the trust of thousands of satisfied customers. Whether it’s a cracked screen, battery replacement, or water damage repair, we handle it all with professional care and expertise. Walk in today and experience why we’re Sydney’s #1 choice for mobile phone repairs.
Visit us for:
✓ Same Day Express Repairs
✓ Genuine Parts Guarantee
✓ Professional Technicians
✓ Competitive Pricing
✓ 2000+ 5-Star Google Reviews
✓ 7-Time Award Winner for Best Phone Repairs
Sydney CBD Repair Centre – Where Quality Meets Reliability.
Call: +61280114119
Website: https://SydneyCBD.repair/locate-us

