




TOTAL SHATTER! Google Pixel 9a OLED Panel and Fingerprint Sensor Alignment Repair

TOTAL SHATTER! Google Pixel 9a OLED Panel and Fingerprint Sensor Alignment Repair – Ultimate Expert Guide with 12 Professional Tips
Introduction
A shattered display doesn’t always mean your smartphone is beyond saving. The Google Pixel 9a OLED Panel and Fingerprint Sensor Alignment Repair process requires precision, patience, and professional equipment to restore the phone’s display quality and biometric security.
In this guide, you’ll discover how experienced repair technicians replace damaged OLED panels, correctly align the in-display fingerprint sensor, perform comprehensive testing, and ensure your Google Pixel 9a works exactly as intended after repair.
The Google Pixel 9a continues Google’s reputation for delivering an excellent Android experience with an impressive OLED display, smooth software, and dependable camera system. However, despite its premium construction, the display remains one of the most vulnerable components.
A severe impact can completely shatter the OLED panel while simultaneously affecting the under-display fingerprint sensor. Unlike older smartphones that used separate fingerprint scanners, modern Pixels integrate the biometric reader beneath the OLED display. This means replacing the screen isn’t simply about installing a new panel—it also requires accurate fingerprint sensor alignment and extensive testing.
Professional technicians understand that every fraction of a millimeter matters during a Google Pixel 9a OLED Panel and Fingerprint Sensor Alignment Repair. Even a slight misalignment may result in slower fingerprint recognition, inconsistent unlocking, or complete biometric failure.
Fortunately, modern repair procedures and specialized equipment allow experienced repair centers to restore both display quality and biometric functionality.
Throughout this guide, we’ll explain every stage of the repair process, discuss the technology inside Google’s OLED displays, and reveal why professional repairs consistently outperform rushed DIY attempts.
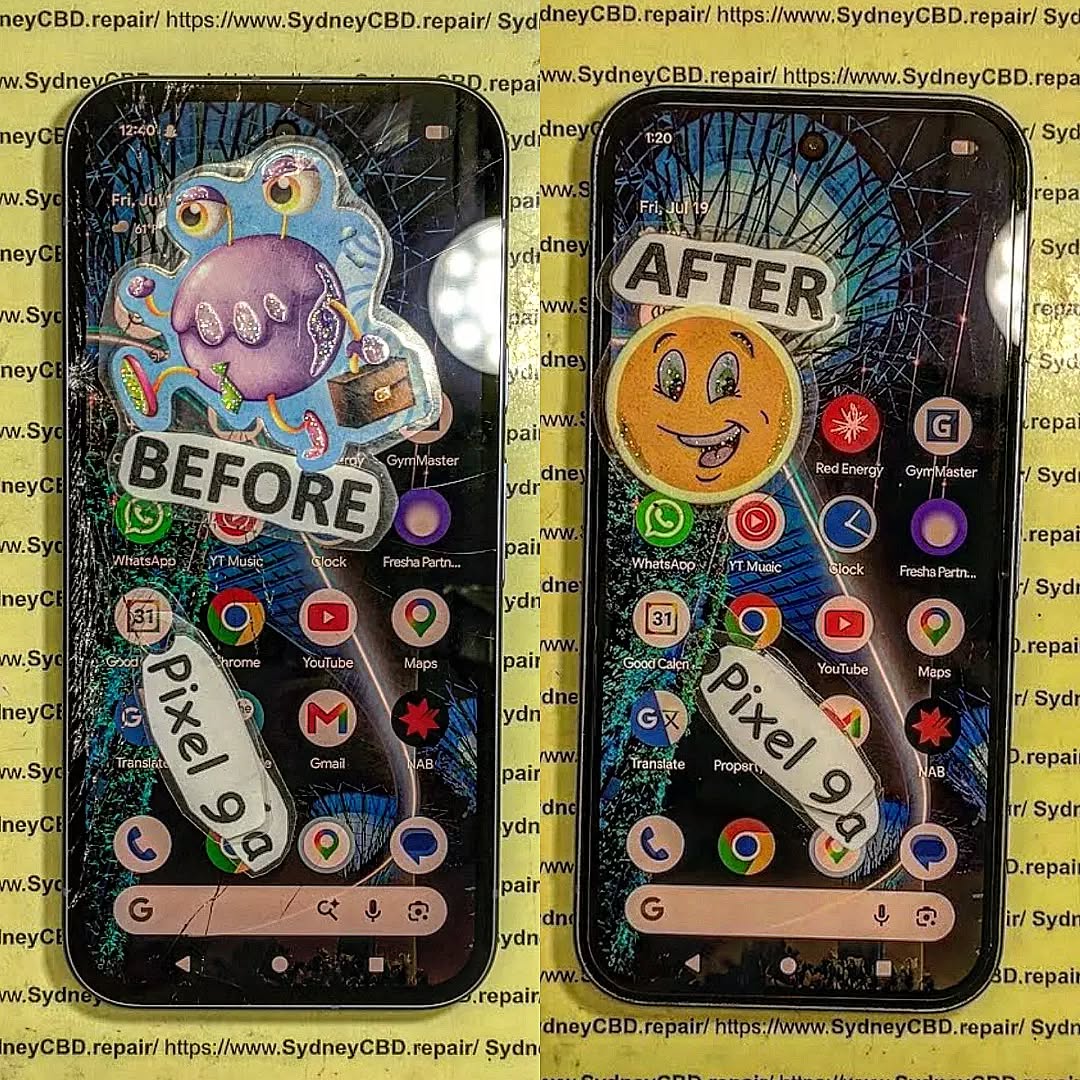
Understanding Google Pixel 9a OLED Panel and Fingerprint Sensor Alignment Repair
Why Modern Smartphone Repairs Are More Complex
Smartphones have evolved dramatically over the last decade. Manufacturers now combine multiple technologies beneath a single display assembly, creating thinner devices while improving security and image quality.
The Google Pixel 9a is no exception.
Its display assembly contains several interconnected components:
- OLED display panel
- Digitizer layer
- Under-display fingerprint sensor
- Display flex cables
- Adhesive sealing system
- Protective glass
- Display controller circuitry
When the front glass shatters, the damage often extends beyond what is visible. Internal OLED layers may crack, touch functionality can become unreliable, and the fingerprint reader may lose proper alignment.
Unlike LCD displays, OLED technology consists of millions of self-emitting organic pixels. Each pixel produces its own light, creating exceptional contrast and deep blacks. However, these organic layers are extremely delicate and can suffer permanent damage from impacts.
This is why technicians carefully inspect the phone before ordering replacement parts.
Common Causes of OLED Damage
Several situations commonly result in a broken Pixel 9a screen:
Accidental Drops
The majority of repairs begin with a simple accident.
Examples include:
- Falling from a pocket
- Slipping off a table
- Dropping during exercise
- Falling onto concrete
Even if only one corner absorbs the impact, internal OLED layers may crack.
Pressure Damage
Many users unknowingly damage their phones by:
- Sitting on the device
- Carrying it in a tight pocket
- Packing it beneath heavy objects
- Closing it inside a backpack
Pressure can fracture the OLED without obvious external damage.
Water Exposure
Although the Pixel 9a offers water resistance, damaged glass compromises the protective seal.
Moisture entering through cracks may cause:
- OLED discoloration
- Flickering
- Dead pixels
- Fingerprint sensor malfunction
- Corrosion
Previous Poor Repairs
Improper installation can also create problems.
Common mistakes include:
- Incorrect adhesive placement
- Bent flex cables
- Low-quality replacement screens
- Damaged fingerprint modules
- Missing waterproof seals
Professional repair centers inspect previous repairs before beginning work.
Google Pixel 9a Display Technology Explained
Why OLED Displays Look Better
OLED stands for Organic Light Emitting Diode.
Unlike traditional LCD panels, OLED screens don’t require a backlight.
Instead, every individual pixel creates its own illumination.
Benefits include:
- Superior contrast
- Perfect black levels
- Faster response times
- Better battery efficiency with dark themes
- Richer colors
- Slimmer construction
These advantages make the Pixel 9a display one of its standout features.
However, OLED technology also demands greater care during repairs.
Components Hidden Beneath the Display
Most people only see the front glass.
Technicians see something much more complex.
The display assembly contains multiple precision-engineered layers:
| Component | Purpose |
|---|---|
| Cover Glass | Protects internal layers |
| Touch Digitizer | Detects finger movement |
| OLED Panel | Produces the image |
| Polarizer | Improves visibility |
| Fingerprint Sensor | Reads fingerprints through the display |
| Display Flex Cable | Transfers display signals |
| Adhesive Frame | Secures the screen |
| Waterproof Seal | Helps resist moisture |
Every one of these components must work together perfectly.
If just one layer is damaged or incorrectly installed, the repair may not perform as expected.
Why Fingerprint Sensor Alignment Is Critical
One of the biggest challenges during a Google Pixel 9a OLED Panel and Fingerprint Sensor Alignment Repair is ensuring the fingerprint sensor is positioned precisely beneath the new OLED panel.
If alignment is even slightly off, users may experience:
- Slow fingerprint recognition
- Failed authentication
- Multiple scan attempts
- Reduced biometric accuracy
- Intermittent unlocking issues
Professional repair technicians use alignment guides, precision fixtures, and post-repair testing to ensure the sensor communicates correctly with the replacement display.
This attention to detail helps restore the fast and reliable fingerprint performance users expect from the Pixel 9a.
The Importance of Genuine-Quality Replacement Parts
Not all replacement screens are manufactured to the same standard.
High-quality OLED panels offer:
- Accurate color reproduction
- Smooth touch response
- Consistent brightness
- Proper fingerprint sensor compatibility
- Better durability
- Longer service life
Lower-quality aftermarket displays may initially appear acceptable but can develop issues such as poor brightness, inaccurate colors, excessive battery consumption, or unreliable fingerprint recognition.
For this reason, reputable repair centers prioritize premium-quality components and thoroughly test every installation before returning the device to the customer.
Professional Diagnostic Process Before Repair

Before removing a single screw, experienced technicians perform a complete diagnostic assessment. This step ensures that hidden damage is identified early and prevents unnecessary part replacements.
A shattered display can sometimes hide additional internal issues. For example, a strong impact may damage the battery connector, camera modules, charging port, or motherboard. Repair professionals never assume the display is the only damaged component.
Initial Visual Inspection
The first inspection focuses on identifying obvious signs of damage.
Technicians carefully check:
- Cracked front glass
- OLED bleeding
- Green or purple lines
- Dead pixels
- Touch responsiveness
- Bent frame
- Loose buttons
- Rear glass condition
- Camera lens damage
- Speaker grille condition
Every observation helps determine the safest repair strategy.
Functional Testing Before Disassembly
Whenever the display still functions, technicians perform several operational tests.
These include:
| Test | Purpose |
|---|---|
| Touch Test | Confirms digitizer performance |
| Brightness Test | Detects OLED inconsistencies |
| Fingerprint Test | Checks biometric operation |
| Camera Test | Rules out impact damage |
| Charging Test | Confirms USB-C functionality |
| Speaker Test | Verifies audio performance |
| Vibration Test | Ensures haptic motor works |
| Wireless Test | Checks Wi-Fi and Bluetooth |
Documenting these results provides a benchmark for post-repair verification.
Preparing for Google Pixel 9a OLED Panel Replacement
Proper preparation significantly reduces the risk of accidental damage during repair.
Professional workshops maintain clean, organized workstations equipped with specialized tools designed for modern smartphones.
Essential Professional Tools
A successful repair often requires:
- Precision screwdriver set
- Plastic opening picks
- Nylon spudgers
- Heat pad or controlled heat gun
- OLED-safe suction tool
- ESD-safe tweezers
- Isopropyl alcohol (high purity)
- Adhesive removal tools
- Replacement adhesive gasket
- Display alignment fixture
- Magnification lamp
- Anti-static wrist strap
Using the correct tools protects delicate internal components while improving repair accuracy.
Why Battery Disconnection Comes First
One of the most important safety procedures is disconnecting the battery before removing or installing the display.
Skipping this step can lead to:
- Short circuits
- Damaged display connectors
- Motherboard failure
- Fingerprint sensor faults
- Component overheating
Professional technicians always isolate the battery before disconnecting display flex cables, reducing the risk of electrical damage.
Removing the Damaged OLED Display
Removing the broken display is one of the most delicate stages of the repair.
Excessive force can damage:
- Display connectors
- Frame edges
- Antenna cables
- Fingerprint sensor assembly
- Internal flex cables
To avoid these issues, technicians soften the factory adhesive using carefully controlled heat.
Step 1: Heating the Adhesive
The phone is evenly warmed around the display edges. Controlled heat softens the adhesive without overheating the OLED or internal battery.
Too much heat can warp plastic components or weaken waterproof seals, so temperature management is critical.
Step 2: Separating the Display
Using thin plastic opening picks, the display is slowly lifted from the frame.
Professionals avoid inserting tools too deeply because hidden flex cables can easily be damaged.
The adhesive is gradually released around the perimeter until the screen can be safely opened.
Step 3: Disconnecting the Display
Once access is gained, technicians disconnect the display flex cable using non-conductive tools.
The damaged OLED assembly is then completely removed.
At this stage, the frame is inspected for:
- Bent edges
- Adhesive residue
- Dust particles
- Glass fragments
- Frame distortion
A perfectly clean surface is essential for installing the new display.
Installing the New OLED Panel
Installing a replacement OLED panel involves much more than simply attaching a new screen.
Every step must be completed with precision to ensure long-term reliability.
Frame Preparation
Old adhesive is completely removed from the frame.
The technician then:
- Cleans the surface with isopropyl alcohol.
- Removes microscopic dust.
- Checks for frame warping.
- Ensures the display sits perfectly flat.
Even tiny debris can create pressure points that may crack the new OLED over time.
Applying New Adhesive
A fresh adhesive gasket is installed to secure the display and help restore the phone’s resistance to dust and moisture.
Professionals carefully align the adhesive to avoid:
- Gaps
- Air pockets
- Uneven pressure
- Display lifting
Correct adhesive placement also supports proper fingerprint sensor performance by maintaining the designed distance between the OLED panel and the sensor.
Positioning the OLED Panel
The replacement OLED is gently lowered into position using alignment guides.
Technicians ensure:
- Flex cables are not pinched.
- The display sits evenly.
- The borders are symmetrical.
- Pressure is distributed uniformly.
Once positioned, controlled pressure is applied to activate the adhesive bond.
Fingerprint Sensor Alignment Repair
The under-display fingerprint sensor is one of the most critical components of the repair.
Unlike traditional fingerprint scanners mounted on the back or side of a phone, the Pixel 9a sensor must accurately read fingerprints through the OLED display.
This requires precise positioning.
Why Alignment Matters
Even slight misalignment can affect:
- Recognition speed
- Scan accuracy
- Enrollment success
- Unlock reliability
- Payment authentication
A professionally aligned sensor delivers a seamless user experience comparable to the original factory setup.
Calibration and Verification
After the display is installed, technicians verify that the fingerprint sensor communicates correctly with the new OLED panel.
The process includes:
- Inspecting the sensor’s physical position.
- Confirming proper cable connections.
- Testing fingerprint enrollment.
- Unlocking the device multiple times.
- Checking recognition from different finger angles.
- Confirming compatibility with secure applications.
If any inconsistencies are detected, the display alignment is reviewed before the repair is considered complete.
Comprehensive Post-Repair Testing
Professional repair doesn’t end when the new screen is installed.
A complete quality assurance process ensures every feature operates correctly.
Display Quality Checks
Technicians inspect:
- OLED brightness
- Uniform color reproduction
- Black level consistency
- White balance
- Dead pixels
- Pixel defects
- Flickering
- Refresh smoothness
These tests confirm the replacement panel meets high performance standards.
Touchscreen Accuracy
Every area of the screen is tested for responsiveness.
This includes:
- Multi-touch gestures
- Edge sensitivity
- Swipe accuracy
- Typing responsiveness
- Long-press detection
- Pinch-to-zoom functionality
Any dead zones or inconsistent touch response are addressed before returning the device to the customer.
Final Functional Checklist
Before completing the repair, technicians verify:
| Component | Status Checked |
|---|---|
| OLED Display | ✓ |
| Touchscreen | ✓ |
| Fingerprint Sensor | ✓ |
| Front Camera | ✓ |
| Rear Cameras | ✓ |
| Face Unlock | ✓ |
| Charging Port | ✓ |
| Speakers | ✓ |
| Microphones | ✓ |
| Wi-Fi | ✓ |
| Bluetooth | ✓ |
| NFC | ✓ |
| Proximity Sensor | ✓ |
| Ambient Light Sensor | ✓ |
| Vibration Motor | ✓ |
Only after all systems pass inspection is the repair considered complete.
Waterproof Resealing After the Repair
Modern Pixel phones are designed with water-resistant seals around the display, cameras, speakers, and charging port. When the screen is removed, the original adhesive barrier is broken. A proper Google Pixel 9a OLED Panel and Fingerprint Sensor Alignment Repair must include resealing procedures to restore the device’s resistance to dust and moisture.
Why Resealing Matters
Many users assume that a new screen automatically restores water resistance. Unfortunately, that is not the case.
A phone with a poorly installed display may allow moisture to enter through tiny gaps around the frame. Over time, this can lead to:
- Corrosion on the motherboard
- Fogging inside camera lenses
- Speaker distortion
- Charging port failure
- Fingerprint sensor malfunction
Professional repair centers use factory-style adhesive gaskets and controlled compression techniques to minimize these risks.
The Resealing Process
The resealing procedure typically involves:
- Cleaning the frame thoroughly
- Applying a new precision-cut adhesive gasket
- Aligning the OLED panel perfectly with the frame
- Applying even pressure across the display
- Allowing adequate curing time for the adhesive
This process helps the adhesive form a consistent bond around the entire perimeter of the device.
Important Limitation
No independent repair shop can legally guarantee the exact original factory IP rating after a screen replacement. However, a high-quality professional repair can come very close to the original sealing performance when genuine-grade adhesives and correct installation procedures are used.
For official information about Google Pixel water resistance, refer to Google’s support documentation:
Google Pixel Support
DIY vs Professional Repair: The Honest Comparison
The internet is full of videos showing screen replacements completed in minutes. While these videos can be educational, they rarely show the failed repairs, damaged connectors, or fingerprint calibration issues that occur afterward.
DIY Repair Advantages
A DIY repair may offer:
- Lower upfront cost
- Convenience of repairing at home
- A learning experience for hobbyists
However, the risks increase significantly with OLED devices.
Common DIY Mistakes
Technicians frequently see phones that were damaged during attempted home repairs.
Typical problems include:
- Torn display flex cables
- Broken fingerprint sensor assemblies
- Bent frames
- Cracked replacement screens during installation
- Missing waterproof seals
- Stripped screws
- Damaged motherboard connectors
A single mistake can turn a simple screen replacement into a much more expensive repair.
Professional Repair Advantages
Professional repair centers provide:
What you get with a professional repair
- Correct OLED panel installation
- Precise fingerprint sensor alignment
- ESD-safe handling procedures
- Proper adhesive application
- Comprehensive post-repair testing
- Warranty coverage
- Access to genuine-quality replacement parts
For a device as sophisticated as the Pixel 9a, professional repair is usually the safer long-term investment.
Preventing Future OLED and Fingerprint Sensor Damage
Once your phone has been repaired, protecting the new display becomes the next priority.
Use a Quality Tempered Glass Protector
A tempered glass protector absorbs impact energy before it reaches the OLED panel. Look for a protector that is specifically compatible with under-display fingerprint sensors.
Choose a Protective Case
A good case should provide:
- Raised edges around the screen
- Shock-absorbing corners
- A secure grip
- Protection against twisting pressure
Avoid ultra-thin cases that offer little impact protection.
Keep the Phone Away from Excessive Heat
High temperatures can weaken display adhesives and affect OLED longevity. Do not leave the phone on a car dashboard or in direct sunlight for extended periods.
Avoid Pocket Pressure
Large smartphones are surprisingly vulnerable to bending forces. Try not to sit with the phone in a back pocket, especially after a recent repair when adhesives are still fully curing.
Is Repairing the Pixel 9a Worth It?
This is one of the most common questions customers ask.
For most users, the answer is yes.
Cost Comparison
| Option | Typical Cost |
|---|---|
| Professional OLED + fingerprint repair | Moderate |
| Buying a brand-new Pixel 9a | High |
| Buying another premium smartphone | Very High |
A professional Google Pixel 9a OLED Panel and Fingerprint Sensor Alignment Repair usually restores the phone to near-original functionality at a fraction of the cost of replacement.
When Repair Makes the Most Sense
Repair is particularly worthwhile if:
- The motherboard is undamaged.
- Cameras still function correctly.
- The battery remains healthy.
- The frame is not severely bent.
- You are satisfied with the Pixel 9a’s performance.
Because Google provides excellent software support, a repaired Pixel 9a can continue receiving updates for years, making repair an environmentally and financially smart choice.
Frequently Asked Questions (FAQs)
1. Can the fingerprint sensor work normally after a screen replacement?
Yes. If the sensor is properly aligned and the replacement OLED is fully compatible, fingerprint recognition should perform just like the original display.
2. Will my data be erased during the repair?
A screen replacement normally does not erase data. However, it is always recommended to back up your phone before any repair procedure.
3. How long does a Google Pixel 9a OLED Panel and Fingerprint Sensor Alignment Repair take?
In most professional repair centers, the repair can often be completed on the same day, depending on parts availability and the extent of the damage.
4. Why does my fingerprint sensor fail after a cheap screen replacement?
Low-quality OLED panels may not transmit light correctly to the under-display sensor, and improper alignment can further reduce accuracy.
5. Can a shattered OLED cause battery drain?
Yes. A damaged OLED panel may consume abnormal power if internal layers are shorted or if the display controller is malfunctioning.
6. Is the phone still water resistant after repair?
A professional resealing process helps restore resistance to dust and moisture, but the original factory IP rating cannot be guaranteed after the device has been opened.
7. What is the biggest risk of attempting this repair at home?
The most common catastrophic failure is damaging the display connector or fingerprint sensor assembly, which can significantly increase the final repair cost.
Conclusion

A completely shattered Pixel 9a display can look catastrophic, but in many cases the device is fully recoverable. The key is understanding that modern OLED smartphones are not simply “glass replacements.” The display, touch layer, and biometric hardware are all interconnected.
A successful Google Pixel 9a OLED Panel and Fingerprint Sensor Alignment Repair requires:
- Accurate diagnostics
- Safe battery disconnection
- Careful OLED removal
- Precision adhesive application
- Exact fingerprint sensor positioning
- Comprehensive post-repair testing
- Proper waterproof resealing
When these steps are performed by experienced technicians using genuine-quality parts, the result is a phone that looks, feels, and performs remarkably close to factory condition.
If your Pixel 9a has suffered severe screen damage, don’t assume it belongs in the recycling bin. Professional OLED and fingerprint sensor restoration can often bring the device back to life, preserve your data, extend the phone’s lifespan, and save hundreds of dollars compared with buying a new handset.
David from Sydney CBD Repair Centre – The Best place to fix mobile phones as 7 Years In A Row! Top Mobile Phone Repair In Sydney. More than 2000 Positive Reviews on Google and Same Day Repairs.
We take pride in delivering exceptional repair services for all major phone brands including Apple, Samsung, Google, and more. Our expert technicians use only genuine parts and offer 90days warranty on repairs. Located in the heart of Sydney CBD, we’re your one-stop solution for all mobile device repairs.
Our commitment to excellence has earned us the trust of thousands of satisfied customers. Whether it’s a cracked screen, battery replacement, or water damage repair, we handle it all with professional care and expertise. Walk in today and experience why we’re Sydney’s #1 choice for mobile phone repairs.
Visit us for:
- ✓ Same Day Express Repairs
- ✓ Genuine Parts Guarantee
- ✓ Professional Technicians
- ✓ Competitive Pricing
- ✓ 2000+ 5-Star Google Reviews
- ✓ 7-Time Award Winner for Best Phone Repairs
Sydney CBD Repair Centre – Where Quality Meets Reliability.
Call : +61280114119
Website: https://SydneyCBD.repair/locate-us

