




Garmin Forerunner 255 Cracked Screen Replacement Process From Start To Finish

Garmin Forerunner 255 Cracked Screen Replacement Process From Start To Finish: 9 Essential Steps for a Safe Repair
Introduction
A Garmin Forerunner 255 is built for runners, cyclists, swimmers, and fitness enthusiasts who depend on their watch every day. However, even a durable sports watch can suffer damage from a hard impact, accidental drop, cycling accident, or contact with a rough surface. When the glass cracks, the damage can be more than cosmetic.
The Garmin Forerunner 255 cracked screen replacement process requires careful handling because the watch contains a display assembly, battery, sensors, buttons, seals, and delicate internal connections. Unlike replacing the glass on some smartphones, a smartwatch repair can involve much tighter tolerances and more complicated sealing.
Garmin lists the Forerunner 255 with a 1.3-inch, 260 × 260 pixel sunlight-visible transflective memory-in-pixel display and Corning Gorilla Glass 3. The watch is also rated at 5 ATM for water resistance.
That combination makes the Forerunner 255 practical for sports, but a damaged lens should still be addressed promptly. A crack can spread, allow moisture or debris to enter, and make the display harder to read.
This guide explains the repair journey from diagnosis and preparation to component replacement, reassembly, testing, and post-repair care. It is written primarily as an informative repair guide rather than a recommendation to dismantle the watch at home.
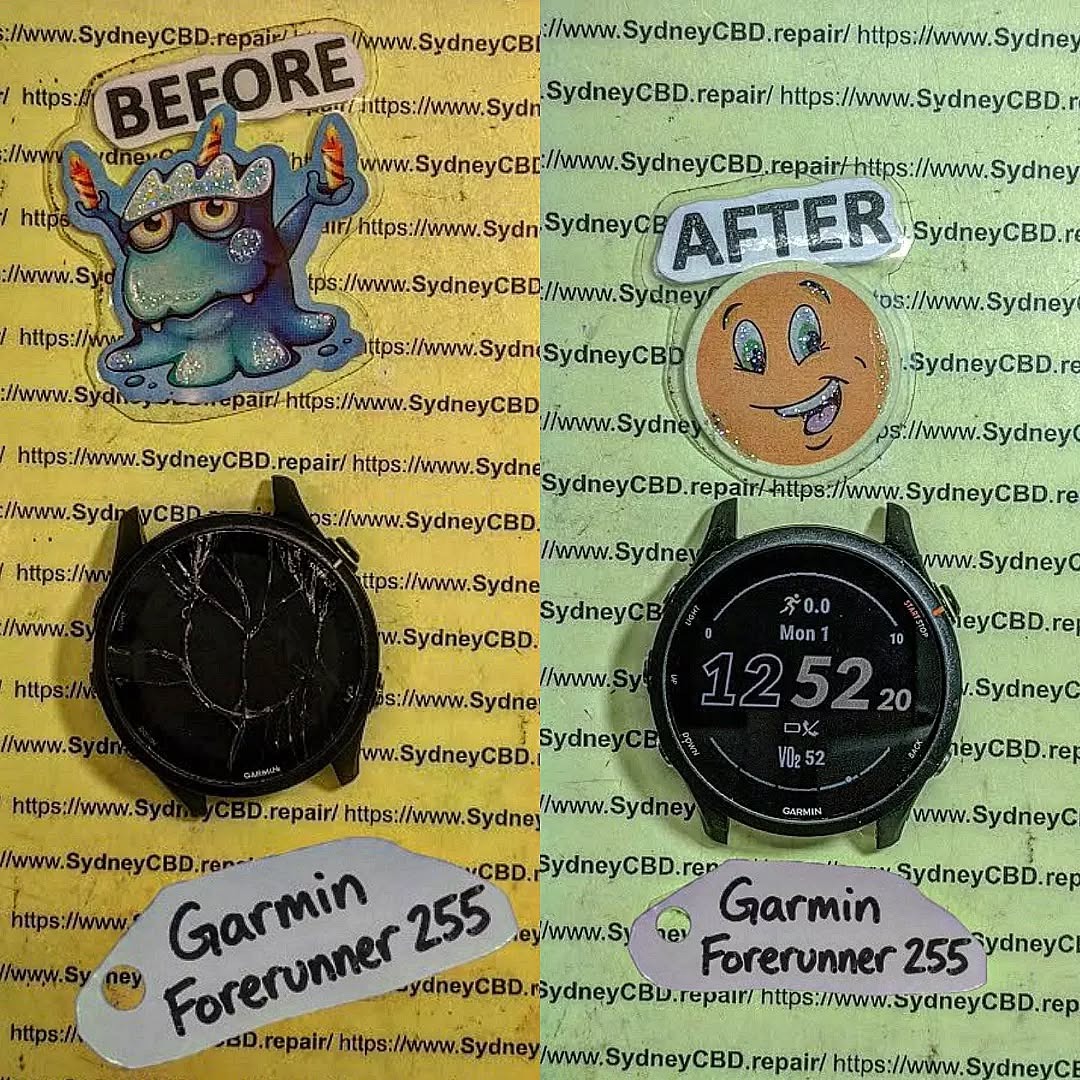
Understanding Garmin Forerunner 255 Screen Damage
The first step in a successful Garmin Forerunner 255 cracked screen replacement is determining exactly what has been damaged.
A visible crack doesn’t always mean the entire display has failed. In some cases, the outer lens may be damaged while the display continues to show information normally. In other cases, the impact can damage the display assembly underneath the glass.
The distinction matters because the appropriate repair method depends on the construction of the replacement part and the equipment available to the technician.
Why Does a Cracked Forerunner 255 Screen Need Attention?
It can be tempting to keep using a watch after a small crack appears. After all, if the buttons work and the screen still displays your pace, why repair it immediately?
The problem is that cracks can become larger over time.
A damaged surface can also create sharp edges. Sweat, dirt, sunscreen, and moisture may reach areas that were previously protected. The risk becomes more important when the watch is regularly used for running, swimming, hiking, or other outdoor activities.
Garmin specifies the Forerunner 255 as having a 5 ATM water rating. However, that rating should not be treated as a guarantee that a previously opened or physically damaged watch will retain its original water resistance.
That’s an important distinction.
A factory-sealed watch and a repaired watch aren’t necessarily equivalent from a sealing perspective.
Glass Damage vs Display Damage
A technician normally begins by checking whether the problem is limited to the external lens or whether the display itself has been affected.
Common symptoms of surface damage include:
- A visible crack with otherwise normal image quality
- Normal button operation
- No lines across the display
- No dark patches
- No flickering
- No unusual colours
- Normal startup and shutdown
More serious symptoms can include:
- Missing sections of the image
- Vertical or horizontal lines
- Flickering
- Black areas
- Distorted graphics
- Display failure
- Damage around the edges of the panel
- Intermittent operation
If the display is functioning normally, the repair assessment may be different from a situation where both the glass and display assembly are damaged.
Signs That Internal Components May Also Be Damaged
A strong impact can transfer force beyond the screen.
For example, a drop onto a hard floor can potentially affect:
- The outer glass
- The display assembly
- Internal connectors
- The casing
- Buttons
- Battery connections
- Sensor components
The watch should therefore be tested before deciding which component needs replacing.
A professional technician shouldn’t simply look at the crack and immediately begin removing parts. A proper diagnosis reduces unnecessary component replacement and helps identify hidden problems.
Why the Forerunner 255 Requires Careful Handling
The Forerunner 255 is designed as a compact sports watch, not as a device intended for frequent disassembly.
Its official specifications include a fiber-reinforced polymer bezel, Gorilla Glass 3 lens, built-in sensors, a lithium-ion battery, and a proprietary charging system.
That means the repair process has to account for more than the visible screen.
A rushed repair can result in a watch that looks fine but has problems with buttons, charging, sensors, display performance, or enclosure sealing.
In other words, replacing the broken component is only half the job.
Preparing for Garmin Forerunner 255 Screen Replacement

Before the watch is opened, preparation is critical. A good repair starts with diagnosis, documentation, and controlled disassembly.
Back Up Important Data
Before any physical repair, it’s sensible to synchronise the watch with Garmin Connect.
Activities and other information that have already synchronised can generally be accessed through the associated account. This is particularly useful if the device needs to be reset or replaced during the repair process.
If the watch is still working, synchronise it before proceeding.
It’s a simple step, but it can save a lot of frustration later.
Record the Watch’s Condition
Before opening the watch, document its condition.
A technician may check:
- Display brightness
- Screen clarity
- All physical buttons
- Charging
- Battery behaviour
- GPS functionality
- Heart-rate sensor operation
- Bluetooth connection
- Vibration
- Backlight
- General startup and shutdown
Photographs of the damaged watch can also be useful for documenting the original condition.
Tools Used During a Professional Repair
The exact equipment depends on the repair method and replacement component. However, professional repair environments commonly use items such as:
- Precision screwdrivers
- Plastic opening tools
- Fine-point tweezers
- ESD-safe equipment
- Magnification
- Controlled heating equipment
- Cleaning materials
- Replacement adhesive or sealing materials
- Test equipment
- Suitable replacement components
The important point is that tools should be appropriate for small electronics.
Using a large metal screwdriver, excessive force, or uncontrolled heat can create additional damage.
Why Heat Must Be Controlled
Adhesive may need to be softened during certain repair procedures. However, excessive heat can damage electronics, seals, plastics, adhesives, or the battery.
A professional repair environment uses controlled temperatures and gradual heating rather than simply applying a hot-air source directly to the watch.
This is one of the areas where experience matters.
Prepare a Clean Workspace
Small smartwatch components can be difficult to see and even harder to recover after they fall onto a cluttered workbench.
The repair area should be:
- Clean
- Well lit
- Organised
- Static-conscious
- Free of liquids
- Large enough to separate removed components
A magnetic parts tray or labelled container can help prevent small components from becoming mixed up.
Garmin Forerunner 255 Cracked Screen Replacement: Step-by-Step Process
The exact internal procedure can vary depending on the replacement assembly and repair method. Therefore, the following describes the professional workflow at a high level rather than presenting it as an official Garmin service manual.
Step 1: Perform the Initial Inspection
The technician first examines the entire watch.
The purpose isn’t simply to confirm the crack.
The technician also looks for:
- Bent or damaged casing
- Cracks around the bezel
- Loose buttons
- Signs of liquid exposure
- Display abnormalities
- Battery swelling
- Sensor damage
- Previous repair marks
If there is significant structural damage, a screen replacement alone may not resolve the underlying problem.
Step 2: Power Down and Prepare the Watch
If the watch can be powered down normally, this should be done before disassembly.
The technician then prepares the device for opening while taking precautions around the internal battery and electronic connections.
The watch should not be placed on a wet or conductive surface.
Step 3: Carefully Open the Enclosure
Opening a smartwatch is one of the most delicate stages.
The goal is to separate the relevant components without damaging:
- The casing
- Buttons
- Internal cables
- Sensors
- Battery
- Sealing surfaces
A technician works slowly rather than forcing the enclosure apart.
This is where the old saying “measure twice, cut once” fits surprisingly well.
Step 4: Inspect the Internal Components
Once access is available, the technician checks the internal condition.
The screen may not be the only component affected by the original impact.
Internal inspection can reveal:
- Broken connectors
- Loose components
- Signs of moisture
- Contamination
- Impact damage
- Battery abnormalities
If something else is damaged, it should be identified before a replacement screen is installed.
Step 5: Disconnect the Relevant Components
The damaged screen or display assembly must be separated from the appropriate internal connections.
This requires precision.
Connectors are small, and forcing a connector can damage the socket or flexible circuit.
For that reason, professional technicians normally use suitable plastic or precision tools and work under magnification when necessary.
Step 6: Remove the Damaged Screen Assembly
Once the relevant connections have been safely separated, the damaged component can be removed.
Old adhesive or bonding material may need to be carefully loosened.
The technician should avoid transferring unnecessary force into the motherboard, battery, sensors, or case.
Step 7: Clean and Prepare the Mounting Area
Before the new component is installed, the mounting surface should be inspected and prepared.
Old adhesive residue may need to be removed carefully.
The surface must be clean enough for the replacement component to sit correctly.
A poor mounting surface can cause:
- Uneven fitting
- Gaps
- Movement
- Poor sealing
- Cosmetic defects
Step 8: Install the Replacement Component
The replacement screen or display assembly is positioned carefully.
Alignment is important.
The component should sit evenly within the enclosure without excessive pressure.
Once positioned correctly, the relevant connections are re-established.
The watch should then be tested before final closure whenever the repair procedure allows for safe intermediate testing.
Step 9: Reassemble and Secure the Watch
After successful testing, the enclosure is reassembled.
The technician checks that:
- The display sits evenly
- Buttons operate correctly
- No cables are trapped
- The case closes correctly
- The exterior remains clean
- The replacement component is secure
This final physical inspection is just as important as the initial diagnosis.
Reassembly, Sealing, and Water-Resistance Considerations
One of the most misunderstood parts of smartwatch repair is water resistance.
A Forerunner 255 is officially rated at 5 ATM. But that specification applies to the product as designed and manufactured, not automatically to every watch after a third-party opening and repair.
Why Sealing Matters
The enclosure’s sealing system helps protect internal electronics from environmental exposure.
If the original seal is disturbed during repair, simply closing the watch again doesn’t necessarily restore the factory condition.
A professional technician should therefore inspect the sealing surfaces and use appropriate replacement sealing materials when applicable.
Don’t Immediately Go Swimming After Repair
After a screen repair, avoid assuming the watch is ready for swimming simply because the display is working.
Unless the repair has been performed and verified using an appropriate water-resistance testing process, treating the repaired watch as water resistant can create unnecessary risk.
For runners, gym users, and everyday wearers, keeping the watch away from unnecessary moisture immediately after repair is a sensible precaution.
Testing the Watch After Screen Replacement
A repair isn’t complete when the screen lights up.
The device should be tested thoroughly.
Display Test
The technician checks:
- Brightness
- Uniformity
- Pixel operation
- Viewing clarity
- Backlight behaviour
- Graphics
- Flickering
- Dead areas
The display should behave consistently across different screens and menus.
Button Test
The Forerunner 255 relies heavily on physical controls.
Every button should be checked individually.
The technician should verify that each press produces the expected response and that no button feels unusually stiff, loose, or inconsistent.
Charging Test
The watch should also be connected to its charger.
Garmin lists a proprietary plug charger as the charging method for the Forerunner 255.
Charging should be checked for:
- Proper connection
- Charging indication
- Stable charging
- Unexpected disconnection
- Abnormal battery behaviour
Sensor and Connectivity Tests
Where appropriate, the technician can check functions such as:
- Heart-rate monitoring
- GPS
- Bluetooth
- Vibration
- Activity tracking
The purpose is to confirm that the original repair hasn’t introduced another problem.
Common Mistakes During Garmin Forerunner 255 Screen Repair
Even a straightforward-looking smartwatch repair can go wrong.
Using the Wrong Replacement Part
Not every Forerunner component is interchangeable.
The standard Forerunner 255, 255 Music, and 255S versions have differences, including display sizes and physical dimensions. Garmin’s specifications show the standard 255 with a 1.3-inch display, while the 255S Music uses a smaller 1.1-inch display.
Always verify the exact model before sourcing a component.
Applying Too Much Force
Small components don’t respond well to brute force.
If something doesn’t separate easily, the technician should stop and determine why rather than simply pulling harder.
Using Excessive Heat
Heat can damage components that aren’t visibly connected to the repair area.
Controlled heating is safer than improvisation.
Reusing Damaged Seals
A damaged or compressed sealing material may not provide the same protection after reassembly.
Skipping Final Testing
A watch that displays the time isn’t necessarily fully repaired.
The buttons, charging system, sensors, connectivity, and other functions should be checked.
DIY Repair vs Professional Garmin Forerunner 255 Repair
DIY repairs can be tempting when replacement parts appear inexpensive online.
However, there are several factors to consider.
A professional repair may provide:
- Proper diagnostic testing
- Appropriate tools
- Controlled heating
- Better component handling
- Cleaner reassembly
- Post-repair functional testing
- Better assessment of sealing concerns
DIY repair may make sense for someone with appropriate electronics repair experience and equipment. For someone without that background, opening a compact sports watch can turn one damaged component into several damaged components.
In short, if the watch is important for training, navigation, health tracking, or daily use, professional assessment can reduce the risk of avoidable damage.
How Much Does Garmin Forerunner 255 Screen Replacement Cost?
There isn’t one universal price for every repair.
The final cost can depend on:
- Exact Forerunner model
- Damage severity
- Replacement component availability
- Display assembly type
- Labour
- Testing
- Sealing requirements
- Warranty
- Repair location
An inspection is therefore useful before accepting a quote.
For owners deciding between official service and an independent repair provider, it is worth comparing the repair scope, parts, warranty, turnaround time, and treatment of water resistance rather than comparing price alone.
How to Prevent Another Cracked Screen
Once your Forerunner 255 has been repaired, a few simple habits can reduce the chance of another accident.
Use Protection During High-Risk Activities
Consider additional protection during:
- Hiking
- Mountain biking
- Contact sports
- Manual work
- Construction work
- Outdoor adventures
Keep the Watch Away From Hard Impacts
Even Gorilla Glass 3 isn’t unbreakable.
The watch can still crack if it hits a hard edge at the wrong angle.
Clean the Watch Regularly
Sweat and dirt can accumulate around the case and buttons.
Gentle cleaning can help maintain the watch without exposing it to unnecessary chemicals or aggressive treatment.
Don’t Ignore Small Cracks
A small crack might remain stable for a while, but there’s no guarantee.
If the damage is growing, becoming sharp, or affecting visibility, have the watch assessed.
Frequently Asked Questions
1. Can a cracked Garmin Forerunner 255 screen be replaced?
A damaged Forerunner 255 can be assessed for screen or display assembly repair. The exact repair depends on whether the damage is limited to the external lens or extends to the display and internal components.
2. Is the Garmin Forerunner 255 screen made of Gorilla Glass?
Yes. Garmin lists Corning Gorilla Glass 3 as the lens material for the Forerunner 255.
3. Is the Garmin Forerunner 255 waterproof after screen replacement?
You shouldn’t automatically assume so. The Forerunner 255 is rated at 5 ATM, but opening the enclosure can affect the original sealing. Proper repair and appropriate water-resistance testing are important if maintaining water resistance is a priority.
4. Can I replace the Garmin Forerunner 255 screen myself?
Technically, an experienced electronics repairer may be able to perform the work, but smartwatch repair requires precision tools, careful handling, and appropriate replacement components. An inexperienced DIY repair can cause additional damage.
5. How long does a Garmin Forerunner 255 screen replacement take?
Turnaround depends on the repair provider, component availability, the extent of damage, and whether additional faults are discovered during inspection. Some repairs may be completed quickly when the correct replacement component is available.
6. Does a cracked screen affect GPS?
A cracked lens doesn’t necessarily mean the GPS system has failed. However, if the original impact caused internal damage, other functions can potentially be affected. Testing the watch after repair is therefore important.
7. Should I repair a cracked screen or replace the whole watch?
The answer depends on the repair cost, overall condition of the watch, availability of replacement components, and the extent of damage. Comparing the total repair cost with the value and condition of the existing device can help you make an informed decision.
8. Can a repaired Forerunner 255 still be used for swimming?
Don’t assume that a repaired watch retains its original water resistance. Ask the repair provider whether the enclosure has been properly resealed and whether water-resistance testing is available.
9. What should I do if the screen is cracked but still working?
Back up or synchronise your data, avoid exposing the damaged watch to unnecessary moisture, and arrange an inspection. Continued use may be possible, but further damage can occur depending on the severity and location of the crack.
Conclusion

A Garmin Forerunner 255 cracked screen replacement isn’t simply a matter of removing broken glass and installing a new piece. A successful repair involves diagnosis, careful disassembly, correct component selection, controlled handling, precise installation, proper reassembly, and comprehensive testing.
The Forerunner 255 is designed with a Gorilla Glass 3 lens, a 1.3-inch MIP display, a fiber-reinforced polymer bezel, and a 5 ATM water rating. Those specifications make it a capable training watch, but physical damage can still compromise the screen and enclosure.
If the display is cracked, don’t ignore the problem indefinitely. First determine whether the damage is cosmetic or functional. Then consider the repair method, component quality, warranty, testing process, and sealing implications.
Most importantly, the repair should leave you with more than a working screen. The goal is a fully functioning watch that responds correctly, charges normally, tracks activities properly, and is ready for everyday training again.
When handled correctly, screen damage doesn’t necessarily mean the end of a Forerunner 255. With proper assessment and careful repair, the watch can potentially return to regular service and continue supporting your running and fitness goals.
David from Sydney CBD Repair Centre – The Best place to fix mobile phones as 7 Years In A Row! Top Mobile Phone Repair In Sydney. More than 2000 Positive Reviews on Google and Same Day Repairs.
We take pride in delivering exceptional repair services for all major phone brands including Apple, Samsung, Google, and more. Our expert technicians use only genuine parts and offer 90days warranty on repairs. Located in the heart of Sydney CBD, we’re your one-stop solution for all mobile device repairs.
Our commitment to excellence has earned us the trust of thousands of satisfied customers. Whether it’s a cracked screen, battery replacement, or water damage repair, we handle it all with professional care and expertise. Walk in today and experience why we’re Sydney’s #1 choice for mobile phone repairs.
Visit us for:
✓ Same Day Express Repairs
✓ Genuine Parts Guarantee
✓ Professional Technicians
✓ Competitive Pricing
✓ 2000+ 5-Star Google Reviews
✓ 7-Time Award Winner for Best Phone Repairs
Sydney CBD Repair Centre – Where Quality Meets Reliability.
Call : +61280114119
Website: Sydney CBD Repair Centre

