




Garmin Venu 3s Complete Teardown and Screen Replacement Bench Walkthrough

Garmin Venu 3S Complete Teardown and Screen Replacement Bench Walkthrough: 15 EXPERT STEPS TO MASTER A PRECISION RESTORATION!
Introduction
A damaged smartwatch screen doesn’t necessarily mean it’s time to replace the entire device. The Garmin Venu 3S is a compact piece of wearable technology with delicate internal components, a high-quality AMOLED display, and precision electronics that require careful handling.
In this comprehensive repair walkthrough, we’ll explore the internal construction, professional teardown preparation, screen replacement process, and essential quality checks involved in restoring a Garmin Venu 3S.
Whether you’re a smartwatch enthusiast, an aspiring technician, or someone researching professional watch repair, this guide will help you understand what happens on a specialist repair bench.
Important repair note: This is a technical bench walkthrough, not a claim that every internal screw, connector, or adhesive arrangement has been independently verified on every Venu 3S production revision. Actual disassembly should be guided by the specific watch’s construction and an appropriate model-specific service procedure. Opening the watch can compromise its factory water resistance.
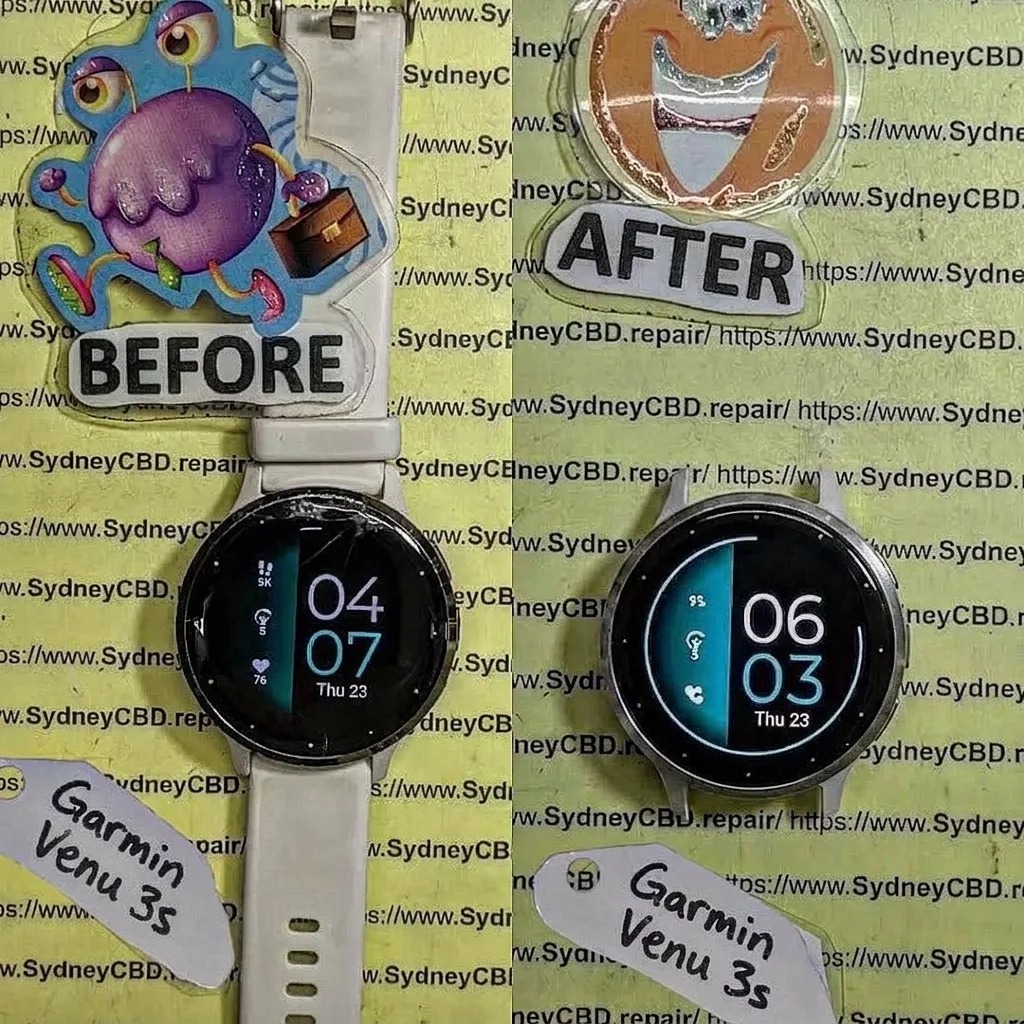
1. Understanding the Garmin Venu 3S Before Teardown
Before starting a repair, technicians need to understand exactly what they’re working with.
The Garmin Venu 3S is a compact smartwatch designed for fitness tracking, everyday health monitoring, smartphone connectivity, and lifestyle convenience. Its smaller body makes it attractive to users who prefer a lightweight wearable without sacrificing important features.
However, its compact construction also creates challenges during repairs.
Unlike a traditional wristwatch, the Venu 3S contains several electronic systems packed into a relatively small enclosure. The display, battery, motherboard, sensors, charging contacts, and internal connections must all be protected throughout the repair.
1.1 Garmin Venu 3S Display Specifications
The Venu 3S uses a 1.2-inch AMOLED touchscreen with a resolution of 390 × 390 pixels.
Its display delivers:
- Bright and vibrant colours.
- Deep black levels.
- Clear text and graphics.
- Responsive touchscreen operation.
- Excellent contrast for everyday viewing.
- A compact circular viewing area.
The display is protected by Corning Gorilla Glass 3.
This combination creates a premium viewing experience, but damage to the display assembly can affect both image quality and touch functionality.
1.2 Important Internal Components
Publicly documented internal component information provides a useful starting point for understanding the device.
| Component | Description |
|---|---|
| Main processor | NXP i.MX RT555 |
| Secondary controller | Ambiq Apollo3 |
| Internal storage | Samsung 8 GB eMMC |
| Battery | 220 mAh lithium-ion |
| Battery voltage | 3.87 V |
| Battery energy | Approximately 0.85 Wh |
| Display | 1.2-inch AMOLED |
| Resolution | 390 × 390 pixels |
These details are based on publicly documented teardown analysis of Garmin’s regulatory photographs, rather than a complete independent retail-unit teardown.
1.3 Why the Smaller Watch Design Matters
A smartwatch doesn’t offer the same working space as a smartphone.
Technicians must deal with:
- Extremely short flex cables.
- Small electrical connectors.
- Thin adhesive layers.
- Closely positioned components.
- Limited space for opening tools.
- Delicate sensor assemblies.
Even a small mistake can damage a connector or create a fault that wasn’t present before the repair.
The golden rule: Never rush a smartwatch teardown. Precision is more important than speed.
2. Diagnosing Garmin Venu 3S Screen Damage
Before opening the device, a technician must establish whether the problem is actually related to the screen.
A black display doesn’t automatically mean the AMOLED panel has failed. The cause could be a battery issue, charging fault, software problem, damaged flex connection, or motherboard failure.
2.1 Common Display Problems
| Symptom | Possible cause |
|---|---|
| Cracked front glass | Physical impact |
| Black screen | Panel or electrical failure |
| Green or coloured lines | AMOLED damage |
| Flickering display | Panel or connection fault |
| Dead pixels | Display damage |
| Touchscreen failure | Digitizer or connection fault |
| Partial image | Damaged display circuitry |
| Screen separating from case | Adhesive failure or internal pressure |
2.2 Testing Before Disassembly
Start with basic external checks.
- Inspect the screen under good lighting.
- Check the charging cable and charging contacts.
- Attempt a normal power cycle using the appropriate Garmin instructions.
- Observe whether the watch vibrates or produces other signs of operation.
- Check whether the display responds to touch.
- Record any visible lines, discolouration, or flickering.
If the watch powers on but the screen remains black, further diagnosis is required.
2.3 Screen Damage Versus Motherboard Failure
This distinction is important.
For example, a watch may vibrate and communicate with a connected phone while its display remains completely dark. That suggests the device could still be operating internally.
However, it doesn’t prove that the display itself is the only damaged component.
A technician should examine the power supply, display connection, and relevant circuitry before ordering a replacement.
2.4 When a Screen Replacement Is Appropriate
A display replacement may be suitable when:
- The AMOLED panel has visible physical damage.
- The image is distorted.
- Touch functionality has failed because of display assembly damage.
- The display remains defective after appropriate electrical checks.
- The remaining electronics are operating correctly.
If the fault is located on the motherboard, installing a new screen might not solve the problem.
3. Preparing the Professional Repair Bench
A successful Garmin Venu 3S screen replacement begins long before the watch is opened.
Professional technicians prepare their workstations to reduce contamination, prevent static electricity damage, and protect delicate components.
A clean working environment also makes it easier to identify small screws, connectors, and adhesive fragments.
3.1 Essential Repair Tools
The following equipment may be required, depending on the actual enclosure construction and replacement assembly.
| Tool | Purpose |
|---|---|
| Precision screwdriver set | Removing model-specific fasteners |
| Plastic opening picks | Separating bonded surfaces |
| Fine-tip tweezers | Handling small components |
| ESD-safe mat | Protecting electronics |
| ESD wrist strap | Reducing static discharge risk |
| Controlled heating equipment | Softening suitable adhesives |
| Soft cleaning brushes | Removing loose contamination |
| Microfibre cloth | Cleaning display surfaces |
| Inspection microscope | Examining small connectors |
| Display testing equipment | Checking replacement functionality |
| Suitable replacement adhesive | Rebonding the enclosure |
Avoid using ordinary kitchen knives, large metal screwdrivers, or excessive heat.
These tools can scratch the enclosure, damage the display, or puncture the battery.
3.2 Electrostatic Discharge Protection
Electrostatic discharge, commonly called ESD, is an invisible threat during electronics repair.
A technician might touch a circuit board and unintentionally transfer static electricity into sensitive components.
The result can range from an immediate electrical failure to an intermittent fault that appears later.
For this reason:
- Use a grounded ESD workstation.
- Wear a suitable ESD wrist strap.
- Handle circuit boards by their edges.
- Avoid touching exposed electrical contacts.
- Keep loose metal objects away from the work area.
3.3 Managing Heat Correctly
Adhesive can make smartwatch disassembly difficult.
Controlled heat may help soften suitable bonding materials, but excessive heat is dangerous.
The battery, OLED display, sensors, and plastic components can all be affected by poor temperature control.
Never apply uncontrolled heat directly to the battery.
A professional technician should use a controlled method appropriate to the device and monitor the temperature throughout the process.
3.4 Protecting the Work Area
Place the watch on a soft, clean surface.
Keep small parts in a labelled tray and separate components as they’re removed.
It’s also helpful to photograph the watch before opening it. These photographs provide a reference during reassembly.
Professional tip: A well-organised repair bench prevents avoidable mistakes. Small components are much easier to manage when every tool has a designated place.
4. Initial Inspection and Recording the Watch’s Condition
The first practical stage of the Garmin Venu 3S teardown is a complete inspection.
A technician should never assume that a cracked screen is the only problem.
A watch dropped onto a hard surface may have suffered additional damage to its enclosure, charging contacts, sensors, or internal connections.
4.1 Record the External Condition
Inspect the following areas:
- Front glass and display.
- Circular bezel.
- Watch housing.
- Side buttons.
- Rear sensor window.
- Charging contacts.
- Strap attachment points.
Look for cracks, dents, scratches, corrosion, and signs of previous repair work.
4.2 Check the Buttons
The physical buttons should operate normally.
A button that feels unusually soft or difficult to press could indicate mechanical damage or contamination.
Don’t force a stuck button.
4.3 Inspect the Rear Sensor Area
The rear of the watch contains important monitoring hardware.
Depending on the function being tested, this area may include optical health sensors and charging contacts.
Check for:
- Scratches.
- Dirt accumulation.
- Moisture residue.
- Damaged contact surfaces.
- Cracks around the sensor window.
These checks help establish a baseline for post-repair testing.
4.4 Document Existing Damage
A professional repair record should include:
| Inspection area | What to record |
|---|---|
| Display | Cracks, lines, black areas |
| Touch | Responsive or unresponsive |
| Housing | Dents and scratches |
| Buttons | Normal or damaged |
| Charging | Successful or unsuccessful |
| Sensors | Visible condition |
| Battery | Swelling or unusual behaviour |
| Water exposure | Reported or suspected |
If battery swelling is suspected, stop the repair and handle the device using appropriate damaged-battery procedures.
5. Safe Garmin Venu 3S Disassembly
This is one of the most important stages of the entire repair.
The Garmin Venu 3S is a compact wearable. Its internal layout doesn’t provide much room for aggressive prying or careless tool movement.
Unlike certain larger electronics, a smartwatch can be difficult to open without damaging the original enclosure or compromising its seals.
5.1 Understand the Enclosure Before Opening
First, establish the correct opening method for the exact device revision.
Don’t assume the Venu 3S uses the same disassembly procedure as a Garmin Forerunner, Fenix, Vivoactive, or older Venu model.
Similar-looking watches can have completely different internal construction.
The repairer should consult model-specific documentation wherever available.
5.2 Controlled Separation
If the applicable service procedure requires opening a bonded enclosure, the technician should:
- Inspect the housing for cracks and deformation.
- Identify the intended opening seam.
- Apply controlled heat only where appropriate.
- Use a suitable non-metal opening tool.
- Work gradually around the approved separation area.
- Avoid inserting tools deeply into the enclosure.
- Stop immediately if unexpected resistance is encountered.
Never force the housing apart.
An opening pick that travels too far can damage a flex cable, battery, sensor connection, or other internal component.
5.3 Protecting the Display
The AMOLED panel is one of the most delicate parts of the watch.
If the screen is already cracked, broken glass can create additional hazards.
Wear eye protection and suitable gloves where necessary.
Avoid pressing against damaged glass, especially around exposed edges.
5.4 Disconnecting Electrical Components
Once access has been safely established, the technician must identify the relevant electrical connections.
The correct disconnection order depends on the actual internal layout.
Where the service procedure permits, isolate the battery before handling other display-related electrical connections.
Use plastic tools designed for electronics connectors.
Never pull a ribbon cable by its flexible section.
Instead, identify the connector locking mechanism and release it correctly.
5.5 Organising Removed Components
Place removed parts in a clean, organised area.
Photograph connector positions and cable routing before disturbing them.
This helps prevent incorrect installation during reassembly.
Important: Don’t assume that a generic Garmin teardown video represents the exact Venu 3S opening sequence. A similar-looking watch isn’t necessarily internally identical.
6. Examining the Internal Components
Once the enclosure has been safely opened, the next task is internal inspection.
The objective isn’t simply to remove the broken display. It’s to understand the condition of the entire device before installing replacement hardware.
6.1 Mainboard Inspection
The mainboard contains important processing and communication components.
Technicians should inspect the accessible board surfaces for:
- Corrosion.
- Cracked components.
- Damaged connector housings.
- Missing components.
- Burn marks.
- Liquid residue.
- Signs of previous repair attempts.
Use magnification where necessary.
A visual inspection cannot detect every electrical fault, but it can identify many problems before additional work begins.
6.2 Understanding the Battery
The Venu 3S uses a compact 220 mAh lithium-ion battery.
Its limited physical size makes careful handling especially important.
Never insert a sharp metal tool underneath a battery.
Do not bend, crush, puncture, or twist the battery.
If the battery is swollen, leaking, unusually hot, or physically damaged, stop the repair and follow appropriate battery safety procedures.
6.3 Checking the Sensor Connections
Smartwatches rely on sensors for important everyday functions.
These may include heart-rate monitoring, activity tracking, and other health-related measurements.
A damaged connector can cause problems that appear unrelated to the screen.
For example, a watch might display information correctly but fail to record certain sensor readings after an unsuccessful repair.
6.4 Identifying Liquid Damage
Liquid exposure can create corrosion around connectors and electronic components.
Look for:
- White or green residue.
- Discoloured contacts.
- Corrosion around shields.
- Sticky deposits.
- Unusual marks around the enclosure.
Don’t assume that a watch is safe because it powers on after water exposure.
Corrosion can develop over time and create intermittent electrical faults.
6.5 Creating an Internal Inspection Report
| Component | Inspection priority |
|---|---|
| Mainboard | Corrosion and visible damage |
| Battery | Physical condition |
| Display connector | Contact and locking condition |
| Flex cables | Tears and creases |
| Charging system | Contact condition |
| Sensors | Physical and electrical condition |
| Enclosure | Seal and adhesive condition |
A careful inspection at this stage can prevent unnecessary screen replacements and repeat repairs.
7. Removing the Damaged Display Assembly
Display removal requires patience, precision, and an understanding of the replacement assembly.
The Venu 3S screen is not simply a flat piece of glass that can be pulled away from the watch.
Its display and touch functions are associated with delicate electronic connections.
7.1 Identify the Display Assembly
Before removal, determine whether the replacement part includes:
- AMOLED display.
- Touch digitizer.
- Protective glass.
- Display flex cable.
- Additional mounting components.
- Bezel or frame components.
Different suppliers may sell different configurations.
A bare replacement panel isn’t necessarily equivalent to a complete display assembly.
7.2 Separate the Adhesive Carefully
If the display is bonded to the housing, the technician must follow an appropriate controlled separation procedure.
The objective is to release the adhesive without applying pressure to the active display area.
Never use excessive force.
Avoid inserting metal blades near the battery or internal flex cables.
If the original display is shattered, remove loose fragments carefully and prevent glass dust from entering the watch.
7.3 Handle the Flex Cable Correctly
The display flex cable is a critical connection between the screen and the electronics.
It can be damaged by:
- Excessive bending.
- Pulling.
- Twisting.
- Incorrect connector release.
- Sharp tool contact.
- Repeated folding.
Replacement display suppliers also warn against sharply bending screen cables during installation.
7.4 Remove Old Adhesive Residue
Once the damaged assembly is removed, inspect the mounting surface.
Old adhesive must be removed using materials suitable for the enclosure.
Avoid aggressive solvents that could damage plastics, coatings, sensor windows, or other components.
The mounting area should be clean, dry, and free from loose debris.
7.5 Inspect the Display Connector Again
Before installing a replacement, examine the connector under magnification.
Check for:
- Bent contacts.
- Missing pins.
- Contamination.
- Damaged locking mechanisms.
- Torn flex material.
A replacement screen cannot compensate for a damaged motherboard connector.
8. Selecting the Correct Garmin Venu 3S Replacement Screen

Choosing the correct replacement part is just as important as performing the installation.
A cheap or incompatible display can create more problems than it solves.
The Garmin Venu 3S uses a 41 mm case and a 1.2-inch, 390 × 390 AMOLED touchscreen. Its display must not be confused with the larger Garmin Venu 3 screen.
8.1 Check Exact Model Compatibility
Before ordering a replacement, verify:
- Garmin Venu 3S model compatibility.
- Display dimensions.
- Resolution.
- Touchscreen functionality.
- Flex cable positioning.
- Connector compatibility.
- Bezel and colour configuration.
- Included mounting components.
A replacement listing for the Venu 3 doesn’t automatically mean it will fit the Venu 3S.
8.2 Understanding Replacement Part Types
| Replacement type | What it includes |
|---|---|
| Glass-only service | Outer glass, where supported by a specialist process |
| Touch digitizer | Touch-sensitive component |
| Display panel | Screen panel |
| Full display assembly | Display and associated touch components |
| Frame assembly | Display components supplied with a mounting frame |
Some suppliers advertise Venu 3S replacement display assemblies without the original frame. Others list separate touch-panel components.
Always examine the actual package contents before purchasing.
8.3 Genuine, OEM and Aftermarket Screens
Replacement screens can differ considerably in quality.
A technician should investigate the supplier’s specifications, compatibility claims, testing procedures, and warranty.
| Screen category | Important consideration |
|---|---|
| Genuine service part | Confirm authorised sourcing |
| OEM-specification part | Verify manufacturer and specifications |
| Aftermarket assembly | Quality varies by supplier |
| Unverified low-cost part | Higher uncertainty and compatibility risk |
Don’t rely entirely on marketing descriptions such as original quality or premium replacement.
Ask for evidence of compatibility and a clear returns policy.
8.4 Inspect the Replacement Before Installation
Check the replacement for:
- Scratches.
- Cracks.
- Dust beneath protective layers.
- Damaged flex cables.
- Incorrect connector design.
- Uneven display surfaces.
- Manufacturing defects.
A replacement screen should be inspected before it is permanently installed.
8.5 Test Before Final Bonding
Where the connector and service procedure allow safe temporary testing, technicians should test the replacement display before final adhesive installation.
Check whether:
- The watch recognises the display.
- The image appears correctly.
- Brightness is consistent.
- Touch functionality operates.
- No unexpected lines appear.
- The flex cable remains correctly positioned.
Don’t permanently bond an untested replacement.
9. Installing the New AMOLED Screen
Now comes the most exciting part of the repair: installing the replacement display.
However, this stage requires more than simply placing a new panel into the housing.
Correct connector alignment, cable routing, display positioning, and adhesive preparation all influence the final result.
9.1 Prepare the Mounting Surface
Before installing the new screen, inspect the enclosure.
Remove loose adhesive and dust.
Check that the mounting surface is even and free from damaged edges.
Any remaining contamination can create uneven pressure or prevent proper bonding.
9.2 Connect the Display Flex Cable
Position the replacement display close to its intended mounting location.
Keep the flex cable relaxed.
Align the connector carefully and use the correct connection method for its design.
Never force a connector into position.
If it doesn’t align naturally, stop and investigate.
9.3 Check Cable Routing
The flex cable must sit in its intended position.
Avoid:
- Sharp folds.
- Twisted cable sections.
- Trapped cable edges.
- Excessive tension.
- Contact with sharp internal surfaces.
A cable trapped beneath the screen can cause display failure after the watch is closed.
9.4 Check Display Alignment
The circular display should sit evenly within the intended mounting area.
Inspect the surrounding edges for:
- Uneven gaps.
- Misalignment.
- Dust.
- Adhesive contamination.
- Pressure points.
A poorly positioned screen can affect the appearance and long-term reliability of the repair.
9.5 Perform a Preliminary Function Test
Before permanent bonding, perform the available electrical checks.
| Test | Expected result |
|---|---|
| Power-on | Watch starts normally |
| Image | Clear and consistent |
| Brightness | No unusual dark areas |
| Touch | Responsive across the screen |
| Display stability | No flickering |
| Connector | Securely seated |
If the replacement screen doesn’t work, don’t immediately assume it’s defective.
Recheck the connector, compatibility, and underlying electronics.
10. Adhesive Replacement and Water Resistance
This stage is often underestimated.
A screen replacement isn’t complete just because the display turns on.
The enclosure must also be reassembled correctly.
The Garmin Venu 3S is designed with water resistance, but opening the device can compromise its original sealing system.
10.1 Why Original Adhesive Matters
The original bonding material helps secure the enclosure and contributes to its sealing.
After disassembly, old adhesive may be:
- Stretched.
- Torn.
- Contaminated.
- Compressed.
- Unevenly distributed.
Reusing damaged adhesive can create weak areas.
10.2 Selecting Suitable Replacement Adhesive
The adhesive must be compatible with:
- The enclosure material.
- The display assembly.
- The intended mounting surface.
- The manufacturer’s design requirements.
Avoid ordinary household glue.
Excess adhesive can spread into sensitive areas, contaminate components, or prevent correct screen alignment.
10.3 Applying Adhesive Evenly
A technician should prepare the bonding surface and apply the appropriate replacement material according to its installation requirements.
Important considerations include:
- Correct adhesive thickness.
- Accurate positioning.
- Clean contact surfaces.
- No trapped dust.
- No adhesive inside connector areas.
- Proper curing or setting time.
10.4 Closing the Watch
The display and enclosure must be aligned without placing excessive pressure on the screen.
Any mechanical fastening should follow the applicable model-specific service procedure.
Don’t use excessive clamping force.
The goal is even contact, not maximum pressure.
10.5 Water Resistance Testing
Water resistance is a major concern after smartwatch repair.
Even a small sealing gap can allow moisture to enter the enclosure.
A visual inspection alone cannot prove that a watch is water-resistant.
Professional testing may include suitable pressure or leak-detection equipment, following an appropriate procedure for the device.
Important: A successful pressure test doesn’t automatically establish that the watch has regained its original factory certification. Testing should be performed by a suitably equipped technician, and customers should receive an honest explanation of the result.
Until the repair has been properly evaluated, avoid swimming, showering, and exposing the watch to water.
11. Final Testing: Bringing the Garmin Venu 3S Back to Life
The final stage determines whether the repair has been successful.
A screen that displays a watch face isn’t necessarily a fully restored smartwatch.
Professional technicians should test the display, touchscreen, charging, buttons, connectivity, and relevant sensors.
11.1 Display Quality Testing
Check the replacement panel under different lighting conditions.
Look for:
- Dead pixels.
- Uneven brightness.
- Colour distortion.
- Flickering.
- Black areas.
- Display separation.
- Unusual lines.
Use several different watch faces to examine different colours and screen elements.
11.2 Touchscreen Testing
Test different areas of the touchscreen.
Swipe around the display and select different interface elements.
Check that touch input is consistent across the entire active area.
A screen that responds in the centre but fails near the edges may have a digitizer or installation problem.
11.3 Button Testing
Check the physical buttons individually.
They should feel consistent and operate as intended.
If a button becomes difficult to press after reassembly, inspect the enclosure and surrounding components.
11.4 Charging Test
Connect the appropriate Garmin charging cable.
Confirm that:
- Charging begins.
- The watch recognises the connection.
- Charging remains stable.
- The charging contacts are clean.
- No unusual heating occurs.
11.5 Bluetooth and Smartphone Connectivity
Check whether the watch can communicate with a compatible smartphone.
Test normal synchronisation and notification functions where possible.
A display repair should not interfere with the device’s ordinary connectivity.
11.6 Sensor Testing
Check the available monitoring functions.
Depending on the device’s configuration, these may include:
- Optical heart-rate monitoring.
- Pulse oximeter functionality.
- Activity tracking.
- Step counting.
- Sleep tracking.
- GPS-related functionality.
Some functions require appropriate environmental conditions and user interaction.
Don’t interpret one unsuccessful sensor reading as automatic proof of hardware damage.
11.7 Final Quality-Control Checklist
| Quality check | Completion |
|---|---|
| Replacement screen inspected | Required |
| Display connection checked | Required |
| Screen image tested | Required |
| Touchscreen tested | Required |
| Buttons checked | Required |
| Charging tested | Required |
| Bluetooth tested | Required |
| Sensor functions checked | Required |
| Housing inspected | Required |
| Adhesive and sealing reviewed | Required |
| Water resistance assessment | Where appropriate |
Only after these checks should the technician consider the repair complete.
12. Eleven Common Mistakes That Can Ruin a Garmin Venu 3S Screen Replacement
Even experienced technicians can make mistakes when working with compact wearable electronics.
Here are eleven problems that should be avoided.
Mistake 1: Using Too Much Heat
Excessive heat can damage the display, battery, enclosure, and adhesive.
Use controlled heating and follow an appropriate device-specific procedure.
Mistake 2: Using Metal Tools Aggressively
Metal tools can scratch the enclosure or damage internal components.
Use suitable plastic opening tools whenever possible.
Mistake 3: Pulling the Flex Cable
A flex cable can tear easily.
Always identify the connector’s release mechanism before disconnecting it.
Mistake 4: Ordering the Wrong Display
The Venu 3 and Venu 3S are different devices.
Their screen dimensions and compatibility requirements aren’t interchangeable.
Mistake 5: Skipping Preliminary Testing
Installing an untested screen permanently can waste time and money.
Test compatible replacement assemblies before final bonding whenever possible.
Mistake 6: Ignoring Battery Safety
A damaged or swollen lithium-ion battery can become dangerous.
Never puncture, crush, or aggressively pry against it.
Mistake 7: Leaving Old Adhesive Behind
Old adhesive can prevent even mounting.
Clean the bonding surfaces appropriately before reassembly.
Mistake 8: Trapping the Display Cable
A trapped cable may become damaged when the enclosure closes.
Check cable routing before final assembly.
Mistake 9: Using the Wrong Adhesive
Ordinary glue isn’t a suitable replacement for a properly engineered watch sealing system.
Use an appropriate repair material.
Mistake 10: Skipping Water Resistance Assessment
A watch may appear perfectly sealed but still have a leak.
Use suitable testing equipment where available.
Mistake 11: Failing to Perform Final Quality Checks
A successful screen installation must also preserve normal device operation.
Test the major functions before returning the watch.
13. Professional Repair Versus DIY Screen Replacement
Should you repair your Garmin Venu 3S yourself or take it to a professional?
The answer depends on your technical experience, available tools, replacement part quality, and willingness to accept the risks.
13.1 DIY Repair Advantages
DIY repair can be appealing because:
- You control the repair process.
- You can learn about wearable electronics.
- You may save on labour.
- You can select your preferred parts supplier.
However, those advantages depend on having the right equipment and knowledge.
13.2 DIY Repair Risks
A DIY repair can become expensive if something goes wrong.
Potential problems include:
- Damaged display connectors.
- Battery damage.
- Scratched housing.
- Incorrect replacement parts.
- Touchscreen malfunction.
- Poor adhesive application.
- Loss of water resistance.
A replacement screen is only one part of the total repair cost.
13.3 Benefits of Professional Repair
A specialist repair centre can provide:
- Experienced technicians.
- Precision opening equipment.
- Display compatibility checks.
- Appropriate replacement materials.
- Electrical diagnostics.
- Controlled installation.
- Post-repair functional testing.
- Professional sealing assessment.
13.4 Comparing Both Approaches
| Consideration | DIY repair | Professional repair |
|---|---|---|
| Initial labour cost | Usually lower | Includes service labour |
| Specialist equipment | Must be purchased or available | Usually available |
| Technical experience | Essential | Provided by technician |
| Part compatibility | Customer responsibility | Can be professionally checked |
| Connector damage risk | Depends on experience | Reduced with proper expertise |
| Sealing assessment | Requires equipment | May be available |
| Repair warranty | Depends on supplier | Depends on repair centre |
For a compact AMOLED smartwatch, professional repair is often the safer option when the owner doesn’t already have electronics repair experience.
14. Garmin Venu 3S Screen Replacement Cost and Repair Value
One of the most common questions from smartwatch owners is whether repairing the display is financially worthwhile.
The answer depends on the screen assembly, labour, availability of parts, and overall condition of the watch.
14.1 Understanding Replacement Screen Prices
Online replacement listings vary.
For example, one supplier advertises a Venu 3S display assembly without a frame for approximately US$60. Another supplier lists a different full-assembly product.
These are examples of advertised component prices, not verified repair quotations or guarantees of genuine Garmin parts.
The total repair price may also include:
- Diagnostic labour.
- Screen assembly.
- Adhesive materials.
- Installation.
- Testing.
- Shipping.
- Applicable warranty.
14.2 Factors That Influence Repair Cost
| Factor | Possible cost impact |
|---|---|
| Replacement screen quality | High |
| Part availability | Medium to high |
| Enclosure damage | Medium to high |
| Battery condition | Additional if replacement is needed |
| Motherboard damage | Potentially high |
| Specialist labour | Depends on repair complexity |
| Post-repair testing | Depends on available equipment |
14.3 When Repair Makes Financial Sense
Repair may be worthwhile if:
- The motherboard is functioning.
- The battery remains healthy.
- The enclosure is in good condition.
- A compatible screen is available.
- The repair quotation is reasonable.
14.4 When Replacement May Be Better
Consider replacing the entire watch if it has extensive internal damage, severe corrosion, multiple failed components, or an uneconomical repair quotation.
A proper diagnosis should come before making that decision.
15. Maintaining Your Garmin Venu 3S After Screen Replacement
After investing in a screen replacement, good maintenance can help protect the watch.
15.1 Use a Suitable Screen Protector
A compatible screen protector can reduce the risk of scratches and minor surface damage.
Make sure it doesn’t interfere with touchscreen responsiveness.
15.2 Avoid Hard Impacts
Although Gorilla Glass 3 provides protection, it isn’t indestructible.
Avoid hitting the watch against walls, metal equipment, gym machines, and hard surfaces.
15.3 Keep the Charging Contacts Clean
Dirt and moisture residue can interfere with charging.
Follow Garmin’s cleaning guidance and allow the device to dry appropriately before charging.
15.4 Avoid Extreme Temperatures
Extreme heat and cold can affect battery performance and electronic components.
Store and operate the watch within the manufacturer’s recommended conditions.
15.5 Monitor Display Behaviour
Pay attention to:
- Unexpected flickering.
- New display lines.
- Touchscreen problems.
- Screen separation.
- Unusual battery drain.
If a new problem develops, arrange an inspection rather than repeatedly pressing or heating the display.
15.6 Understand Water Resistance After Repair
Don’t assume that a replacement screen automatically restores the original water resistance.
Follow the repair centre’s testing advice and avoid water exposure until the device has been appropriately assessed.
Frequently Asked Questions About Garmin Venu 3S Teardown and Screen Replacement
FAQ 1: Can the Garmin Venu 3S screen be replaced?
Yes, replacement display assemblies are advertised for the Garmin Venu 3S. However, availability, compatibility, and repair feasibility depend on the specific part and condition of the watch. Professional installation is recommended for users without smartwatch repair experience.
FAQ 2: What type of display does the Garmin Venu 3S use?
The Garmin Venu 3S uses a 1.2-inch AMOLED touchscreen with a resolution of 390 × 390 pixels. It also features Corning Gorilla Glass 3 protection.
FAQ 3: Is the Garmin Venu 3 screen compatible with the Venu 3S?
No. You shouldn’t assume compatibility. The Venu 3 has a larger display and different dimensions. Always purchase a replacement specifically confirmed for the Venu 3S 41 mm model.
FAQ 4: How much does a Garmin Venu 3S replacement screen cost?
Prices depend on the supplier, part configuration, and quality. An online listing has advertised a Venu 3S replacement display without a frame for around US$60. Installation, adhesive, and testing are additional costs.
FAQ 5: Can I replace only the cracked glass?
Glass-only repair depends on the damage and availability of suitable specialist equipment and replacement materials. If the AMOLED panel or digitizer is damaged, a complete display assembly may be the more appropriate solution.
FAQ 6: Will replacing the screen delete my Garmin data?
A display replacement doesn’t inherently require deleting stored data. However, accidental damage, electrical faults, or additional repair procedures can create risks. Where possible, synchronise the watch with Garmin Connect before repair.
FAQ 7: Can I replace the Venu 3S screen at home?
It’s possible for an experienced electronics repairer with suitable equipment and compatible parts. However, the compact enclosure, delicate connectors, and sealing requirements make this a challenging DIY project.
FAQ 8: Does the Garmin Venu 3S use an LCD or AMOLED screen?
It uses AMOLED technology. Some replacement listings use LCD terminology incorrectly or generically. Check the actual replacement panel specifications before ordering.
FAQ 9: Why is my Garmin Venu 3S screen black but the watch still vibrates?
Possible causes include display failure, a damaged display connection, or an electrical fault. Vibration suggests that some internal functions may still operate, but it doesn’t conclusively identify the cause.
FAQ 10: Can a damaged touchscreen be replaced separately?
Some suppliers advertise a separate touch-panel component. Whether this is a suitable repair depends on the screen construction, available parts, and the technician’s repair capabilities.
FAQ 11: Will a screen replacement restore water resistance?
Not automatically. Opening the watch can compromise its original sealing. Correct adhesive installation and suitable post-repair leak testing are important, but no repair should be advertised as factory-equivalent water resistance without supporting evidence.
FAQ 12: How long does Garmin Venu 3S screen replacement take?
The time depends on the damage, part availability, enclosure construction, and repair complexity. Additional time may be required for diagnostics, adhesive preparation, and testing.
FAQ 13: Can I continue using my Garmin with a cracked screen?
It isn’t recommended. Cracked glass can worsen, expose sharp edges, and allow moisture or debris to enter. Arrange an inspection as soon as practical.
FAQ 14: What should I do if the replacement display doesn’t turn on?
Stop the installation process and check compatibility, connector alignment, cable condition, and power-related faults. Avoid repeatedly reconnecting components without following proper electrical safety procedures.
FAQ 15: Can water damage affect the display?
Yes. Moisture can cause corrosion around connectors and electronic components. A display fault following water exposure may require more extensive diagnostics than a standard screen replacement.
FAQ 16: Is professional Garmin Venu 3S repair worth it?
Professional repair can be worthwhile when the watch is otherwise functioning and the screen replacement cost is reasonable. A proper diagnosis and written quotation will help determine whether repair or replacement offers better value.
Conclusion: Restoring the Garmin Venu 3S With Precision and Expertise

The Garmin Venu 3S is a sophisticated smartwatch that combines a compact design with powerful wearable technology. Its AMOLED display, internal processing hardware, battery, and monitoring sensors all work together to deliver an excellent everyday experience.
However, repairing this device requires more than replacing a damaged piece of glass.
A successful Garmin Venu 3S screen replacement involves a complete repair process, including initial diagnostics, careful disassembly, internal inspection, replacement-part verification, display installation, adhesive preparation, and comprehensive quality testing.
The most important lessons from this walkthrough are:
- Always confirm the exact watch model before ordering parts.
- Use a compatible AMOLED replacement assembly.
- Protect delicate flex cables and electrical connectors.
- Follow appropriate battery safety procedures.
- Use suitable replacement adhesive.
- Never assume factory water resistance has been restored.
- Test all major functions before completing the repair.
For smartwatch owners, choosing an experienced repair technician can prevent unnecessary damage and help extend the useful life of an expensive wearable.
At Sydney CBD Repair Centre, we believe that quality repairs begin with accurate diagnosis, professional workmanship, and dependable replacement components.
Whether you’re dealing with a damaged smartwatch, cracked smartphone display, charging problem, or battery issue, choosing the right repair approach makes all the difference.
A damaged screen doesn’t always mean the end of your favourite device. With the right expertise, careful workmanship, and appropriate components, many devices can enjoy a second life.
David from Sydney CBD Repair Centre – The Best place to fix mobile phones as 7 Years In A Row!
Top Mobile Phone Repair In Sydney. More than 2000 Positive Reviews on Google and Same Day Repairs.
We take pride in delivering exceptional repair services for all major phone brands including Apple, Samsung, Google, and more. Our expert technicians use only genuine parts and offer 90days warranty on repairs. Located in the heart of Sydney CBD, we’re your one-stop solution for all mobile device repairs.
Our commitment to excellence has earned us the trust of thousands of satisfied customers. Whether it’s a cracked screen, battery replacement, or water damage repair, we handle it all with professional care and expertise.
Walk in today and experience why we’re Sydney’s #1 choice for mobile phone repairs.
Visit us for:
✓ Same Day Express Repairs
✓ Genuine Parts Guarantee
✓ Professional Technicians
✓ Competitive Pricing
✓ 2000+ 5-Star Google Reviews
✓ 7-Time Award Winner for Best Phone Repairs
Sydney CBD Repair Centre – Where Quality Meets Reliability.
Call: +61280114119
Website: https://SydneyCBD.repair/locate-us

