Huawei’s sub-brand Honor unveiled the Honor 7X in China – an affordable dual-camera smartphone which comes to replace last year’s Honor 6X.
The Honor 6X was launched in the US back at CES 2017, so we expect the Honor 7X will land on the American market at some point in the next few months. In what follows we take a look at the improvements the new Honor 7X brings to the table in a bid to determine whether they are enough to warrant an upgrade from the Honor 6X.
Display and design
The Honor 6X looks quite fine for a device priced around $250 (at launch). It has a metal back, plastic top and bottom edges and a fingerprint sensor located on the back. The front is plain and all-glass – nothing more, nothing less. However, the Huawei 6X belongs to the old school of smartphone design with its prominent bezels and standard 16:9 aspect ratio.
The Honor 6X in the sunlight
But the Honor 7X makes the transition to modern design, and it offers it on the cheap too. The Honor 7X is the first smartphone in the company’s portfolio that comes boasting an edge-to-edge panel, really thin bezels and 18:9 aspect ratio. The phone also takes advantage of a metal body and in combination with the design, you’ll feel like you’re holding onto a pretty premium phone.
The Honor 7X features a larger display of 5.93-inch variety with 2160 x 1080 resolution. In contrast, the Honor 6X bundles a 5.5-inch LTPS IPS LCD panel with fullHD resolution.
Under the hood
The Honor 7X relies on a Kirin 659 processor, an octa-core chipset clocked at 2.36GHz, while its predecessor took advantage of a Kirin 655, also an octa-core SoC clocked at 2.1GHz.
The newcomer will be offered with 4GB of RAM on board and either 32GB, 64GB or 128GB of internal storage. The Honor 6X includes a choice between 3GB and 4GB of RAM and 32GB/64GB of storage. Both take advantage of a microSD card slot for memory expansion up to 256GB.
The Honor 7X relies on a 3,340 mAh battery, while the Honor 6X includes a similar unit. Both phones have a 3.5mm headphone jack.
Unlike last year’s model, the Honor 7X is IP67-certified which means it is water-resistant.
Photography
Naturally, the Honor 7X continues the dual camera legacy and packs a 16-megapixel+2-megapixel combo with phase detection autofocus, LED flash on the back, as well as an 8-megapixel selfie snapper on the front.
This is an improvement from last year’s model which features a 12-megapixel+2-megapixel arrangement on the rear. However, the selfie snapper is the same as on the newer model.
Value
The Honor 7X with Android 7.1 Nougat out of the box will be first launched in China with prices starting at $200 for the 32GB model. The 64GB version will cost a bit more around $260.
Hopefully, Honor will bring the handset across the pond in the upcoming months. Who knows, it might launch it during the next CES event, as it did with its predecessor. Speaking of which, the Honor 6X is currently available for purchase from Amazon with a discounted price. Interested parties can get it as low as $179.99 for the 3GB of RAM+32GB storage variant.
Back in August, a concept design of the Huawei P11 surfaced, courtesy of DBS DESIGNING, well, now we have a new concept Huawei P11 to show you, and this time around it has been designed by the Concept Creator. This design comes in a form of a YouTube video, as it’s usually the case when it comes to Concept Creator’s creations, and if you’d like to check out the whole introduction video, it is embedded down below.
Having said that, this smartphone actually looks quite sleek, as it’s usually the case with concept designs. The Huawei P11 that is shown off in the video down below sports no bezel on the sides, while its top and bottom bezels are extremely thin. The device is made out of metal, while it sports a dual camera setup on the back, next to which you’ll notice a dual-LED flash, dual-tone flash, and a laser autofocus. The device sports a 3.5mm headphone jack on the bottom, where you’ll also notice its loudspeaker, and a Type-C USB port for charging. Huawei’s branding is present on the bottom of the device, and the phone’s fingerprint scanner also lies on the back. Leica branding is also visible on the back of this phone, it’s placed in the upper right corner of the phone’s back side. The phone’s antenna lines are also noticeable on both the device’s top and bottom. This smartphone comes in four color variants, Black, Blue, Red and Green, while all the physical keys are placed on the right-hand side of the phone.
It’s also worth noting that this concept phone sports two front-facing cameras as well, which means it comes with a quad camera setup. The device seems to be quite thin, though exact measurements were not mentioned by the source. The phone’s main camera sensors do not protrude on the back, and its power key comes with a pattern applied on top of it, which means it should be rather easy to locate it by feel, and differentiate it from the volume up and volume down buttons. The designer envisioned 6GB of RAM and 128GB of internal storage for this smartphone. That’s more or less it, the Huawei P11 is not scheduled to arrive for another couple of months, it will probably arrive in February, so stay tuned for some actual rumors and leaks which will start arriving in the coming weeks / months.
Rip your own DVDs and you won’t have to worry about Wi-Fi or the cloud!
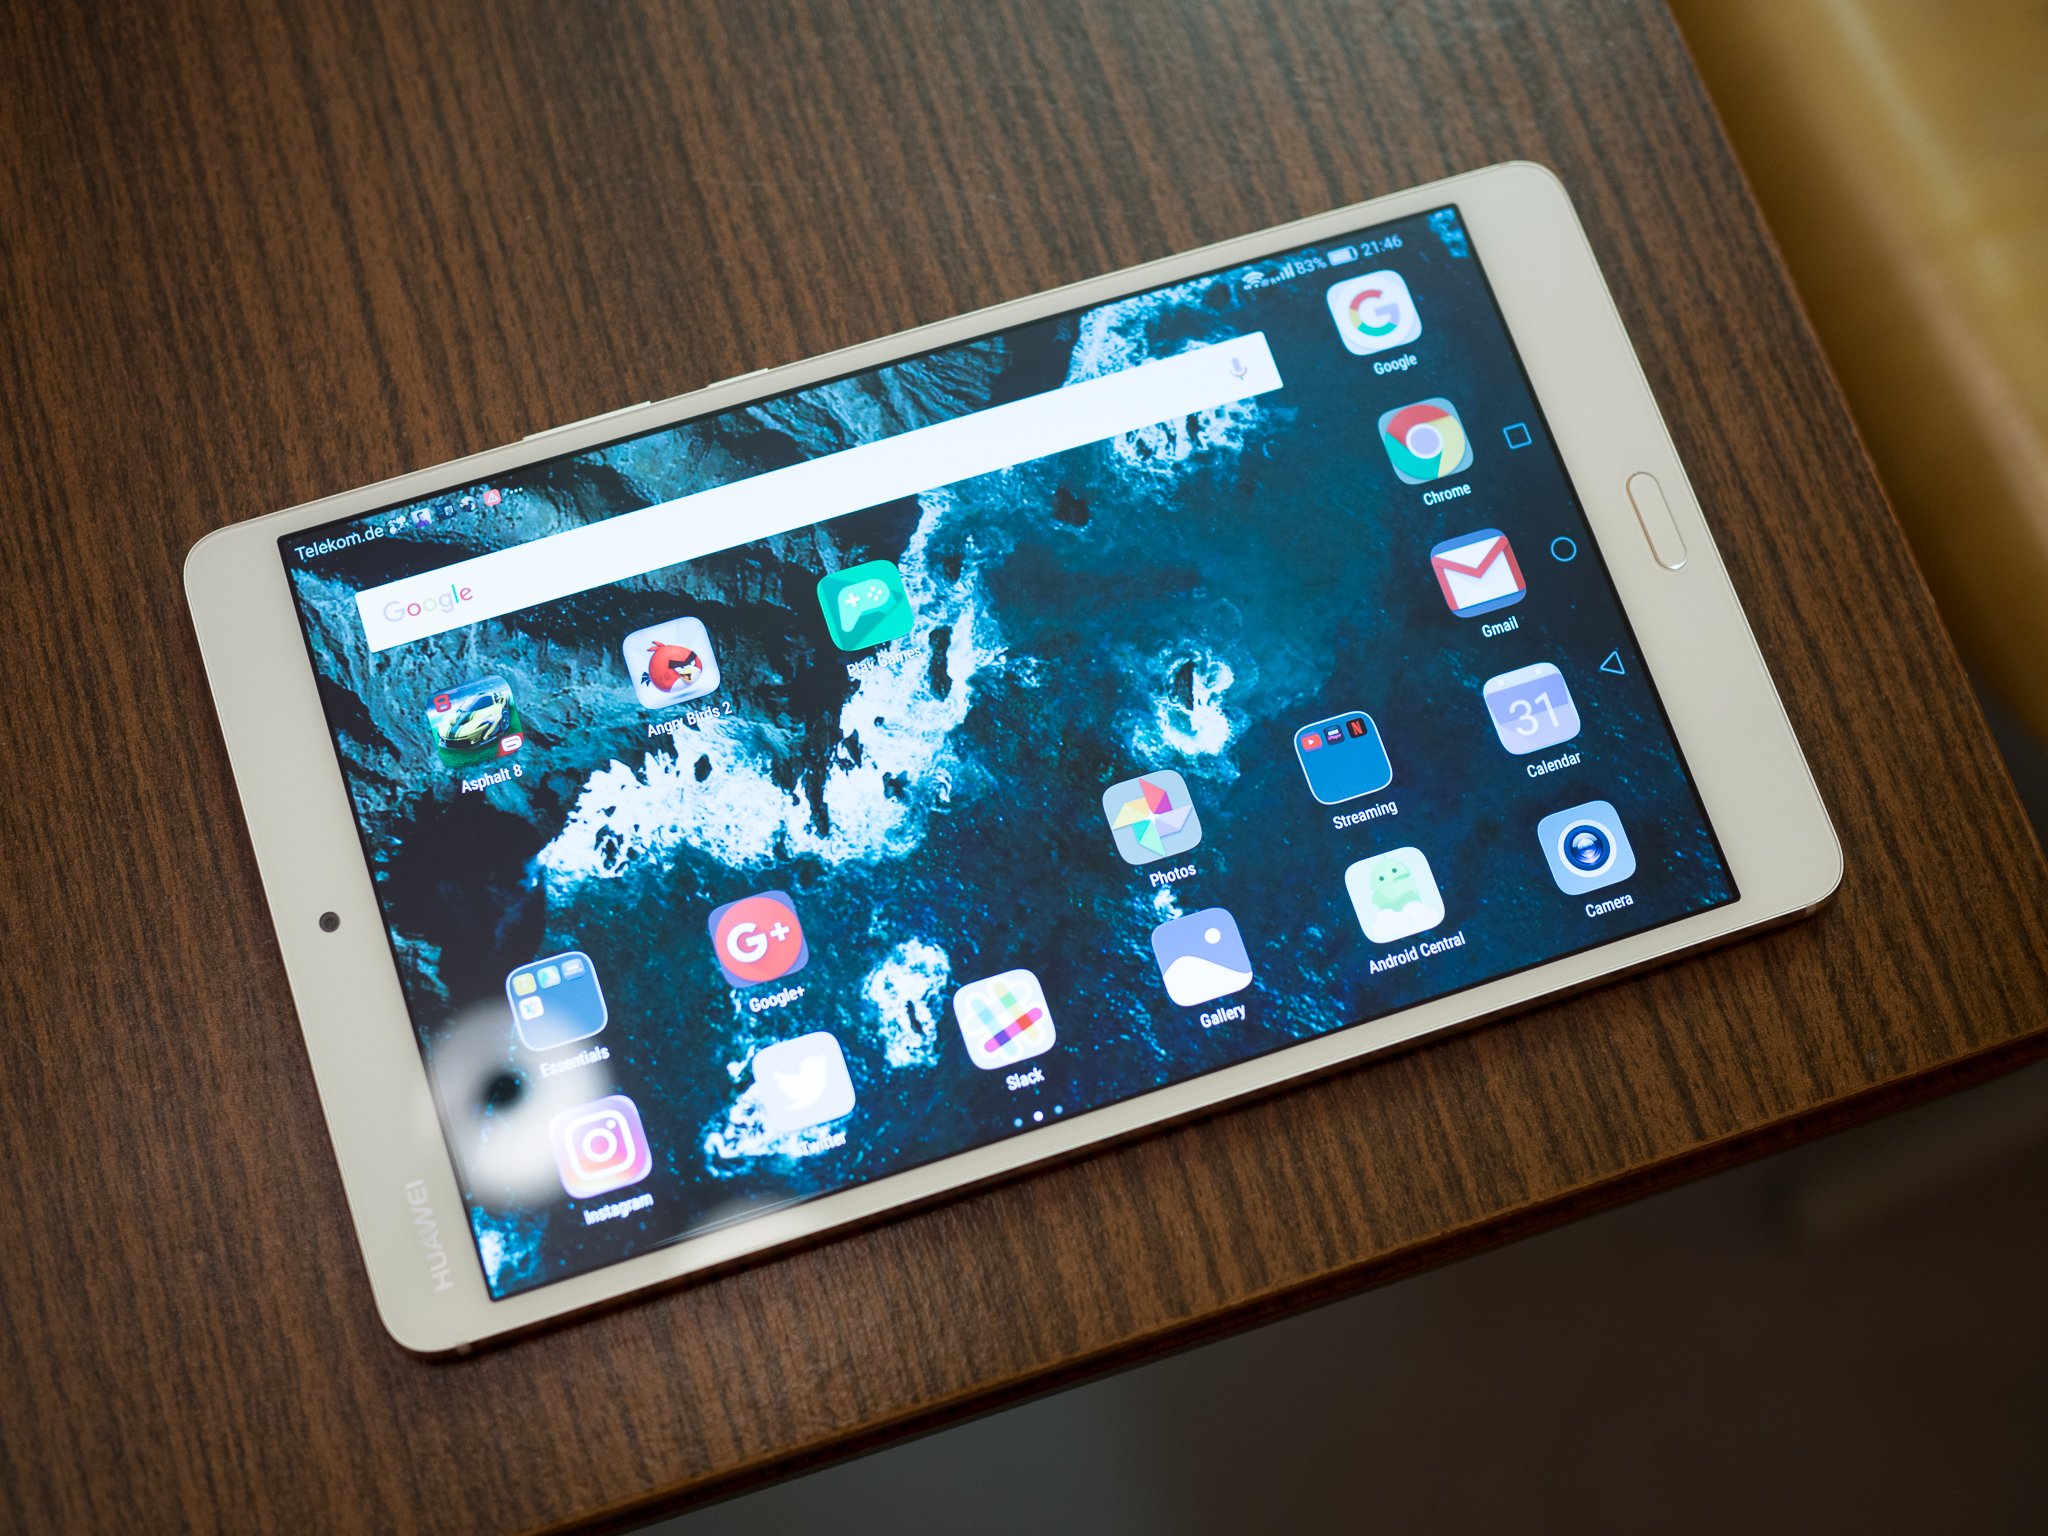
There are a lot of Android tablets that have an amazing screen. The Huawei Mediapad M3 is a great example. A 2560×1600 display is awesome for a lot of things, but it’s really great for watching movies. It’s like holding a cinema in your hands.
There are also a lot of movies to watch! Places like Netflix, or Google Play Movies or HBO are filled with movies you can stream or download, but a lot of us have movies on disc. While you can attach some portable DVD players to the USB port on some tablets, that’s a pain to set up and makes for another thing to carry around. There’s an easier solution. Rip the movies you already have so you can watch them on your tablet. And the easiest and best way to do it is absolutely free.
Handbrake
If you have done any searching about ripping DVDs for Android, you’ve seen people talk about Handbrake. It’s a free, open-source program for Windows, Mac or Linux that can convert video from one format to another. There are a ton of options if you’re the type who likes to fiddle with things, but it has a built-in setting to take a DVD (either an actual disc or an image of one) and convert it into a file that plays on your Android. It also works great!
To get started, you need to install Handbrake on a computer. A faster computer is better, but it will work on almost any PC or laptop. Unfortunately, it doesn’t work on a Chromebook unless you’ve installed Linux on it.
Your computer will need a DVD drive. Since the people who make laptops would rather they be thin than have a DVD drive built-in, you might need to pick up an external USB DVD drive. The good news: they’re cheap! There are plenty to choose from, and I can recommend LG’s Super Multi Ultra Slim Portable DVD Writer Drive. It has a ridiculous name but a low price, and I use one with my MacBook Pro because it was $50 cheaper than the one from the Apple Store. You can snag it, or any of the hundreds of other models, at Amazon.
Next, you need to download and install Handbrake. You’ll find a bunch of different websites that you can get it from but stick with the official site because most of the others have added garbage programs in the installer. Nobody wants or needs browser toolbars or ad filled video players. Once it’s downloaded, you install it like any other program.
Now you need a DVD. And you need to know that the companies who distribute movies think copying a DVD you paid for shouldn’t be legal. I think those companies need to stay out of my business and can stuff it if they think they get to tell me what to do with things I paid for.
I can’t decide what you think, so I’m just telling you that a guy in a $1,000 suit might say you’re stealing if you copy a $15 DVD you bought. You can also use a copy of a DVD (the ones with folders and a bunch of files) or a previously ripped DVD video. I don’t want to know where or how you got those, but they work just as well as the original.
Now the easy step-by-step:
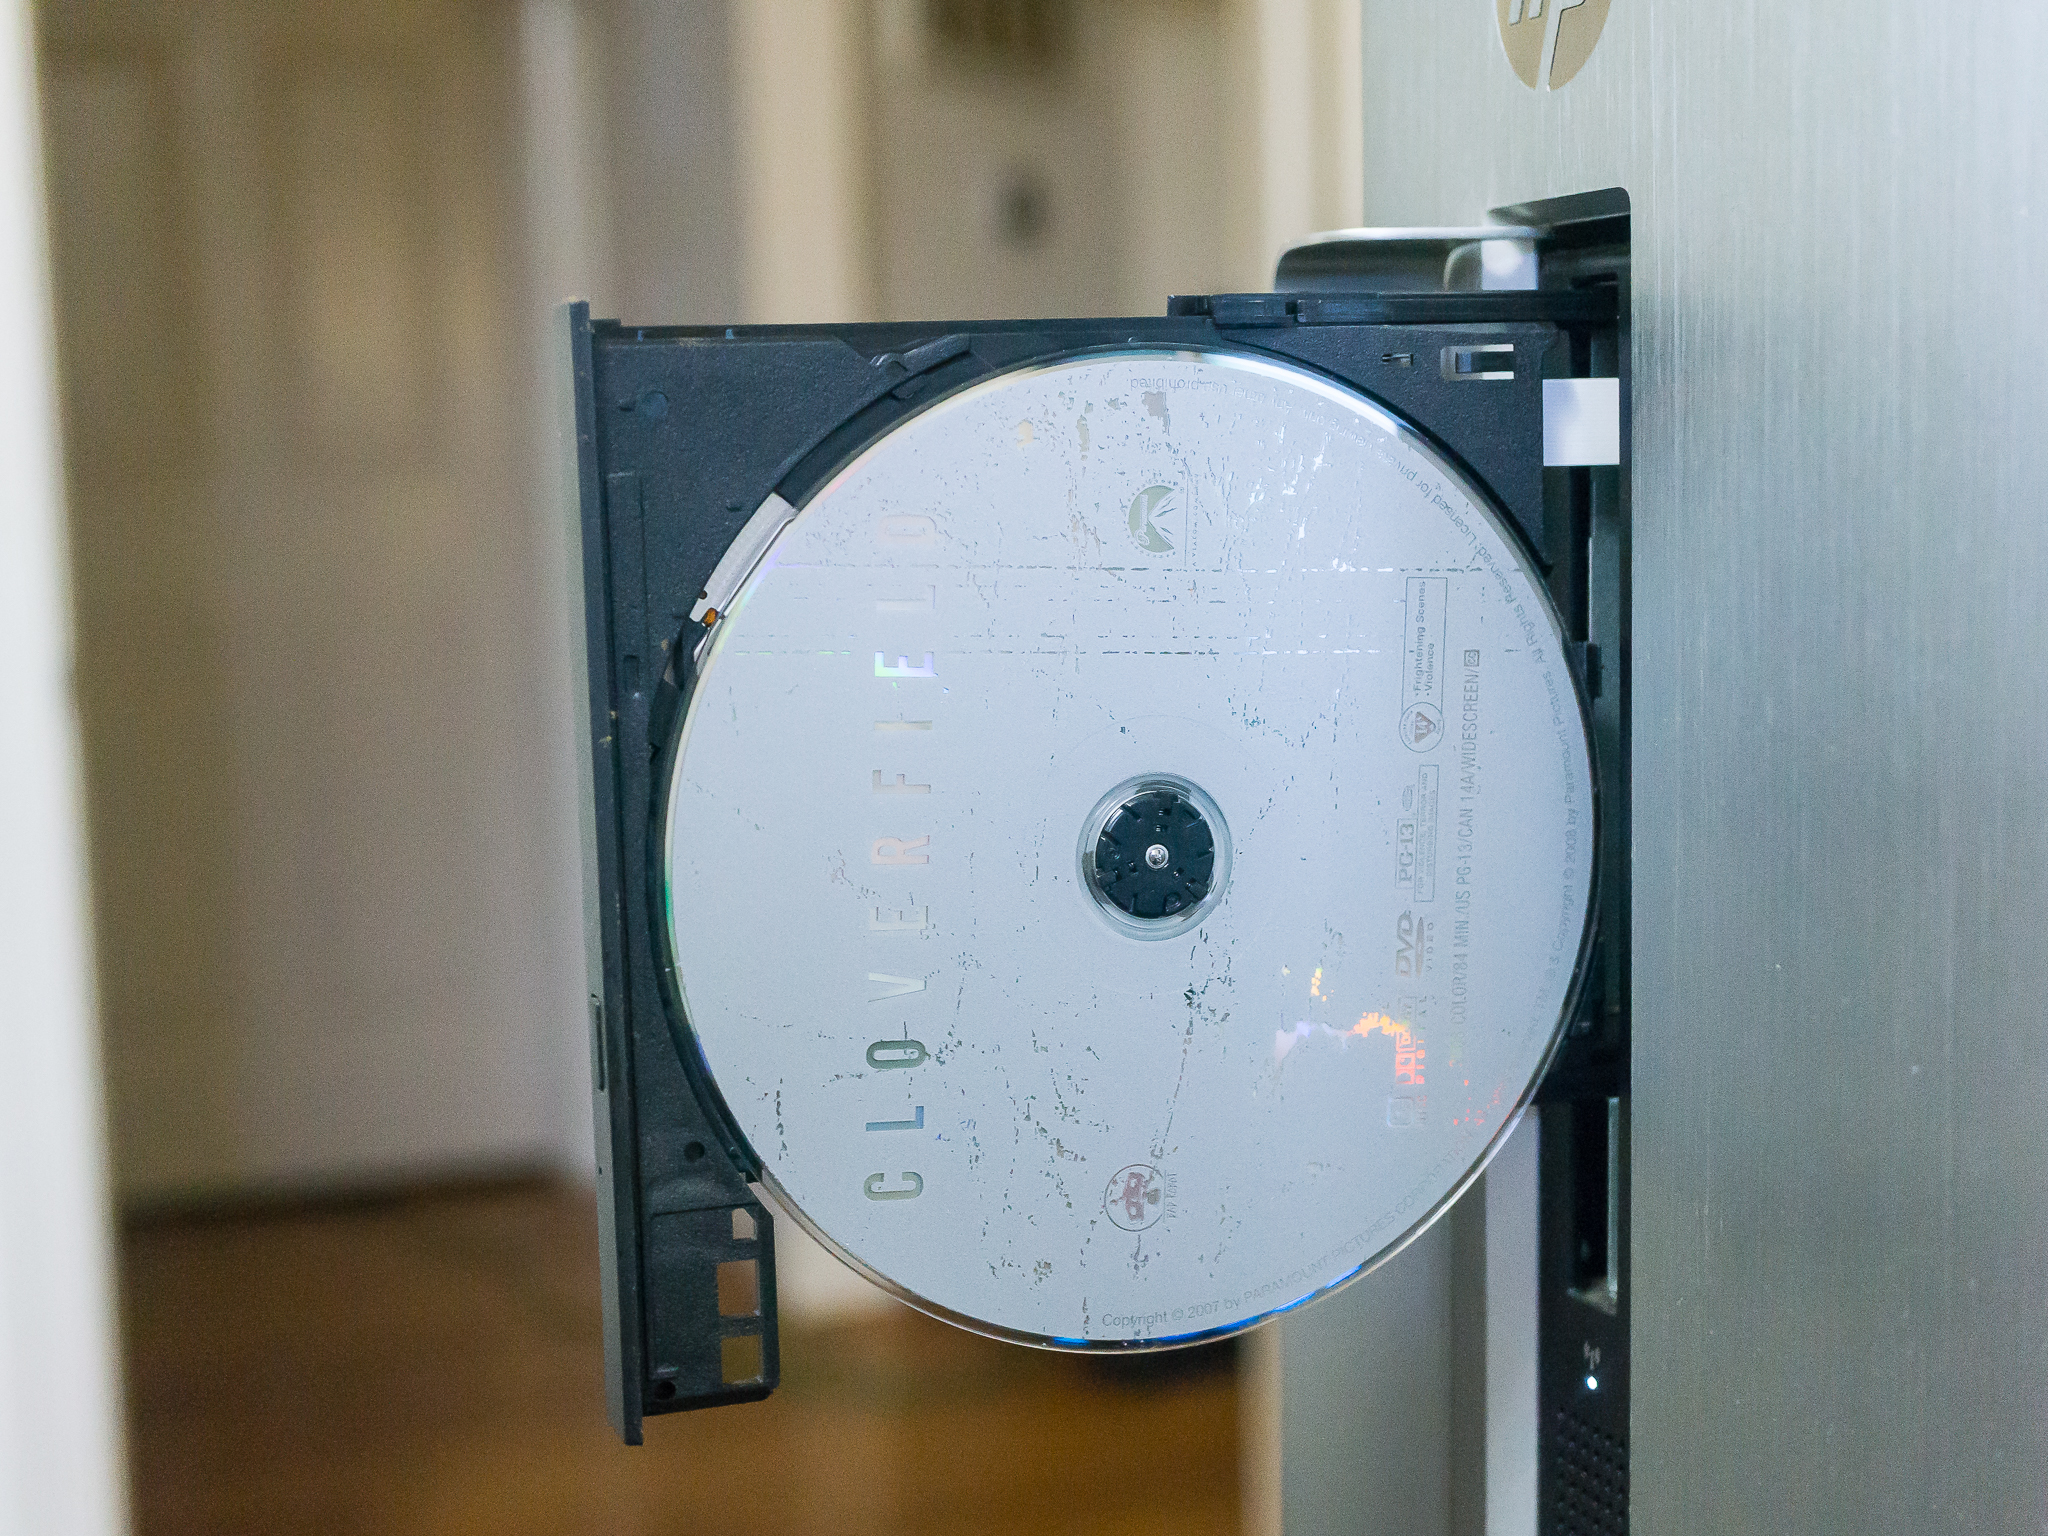
Put the DVD in the drive, and close any video player that might have opened.
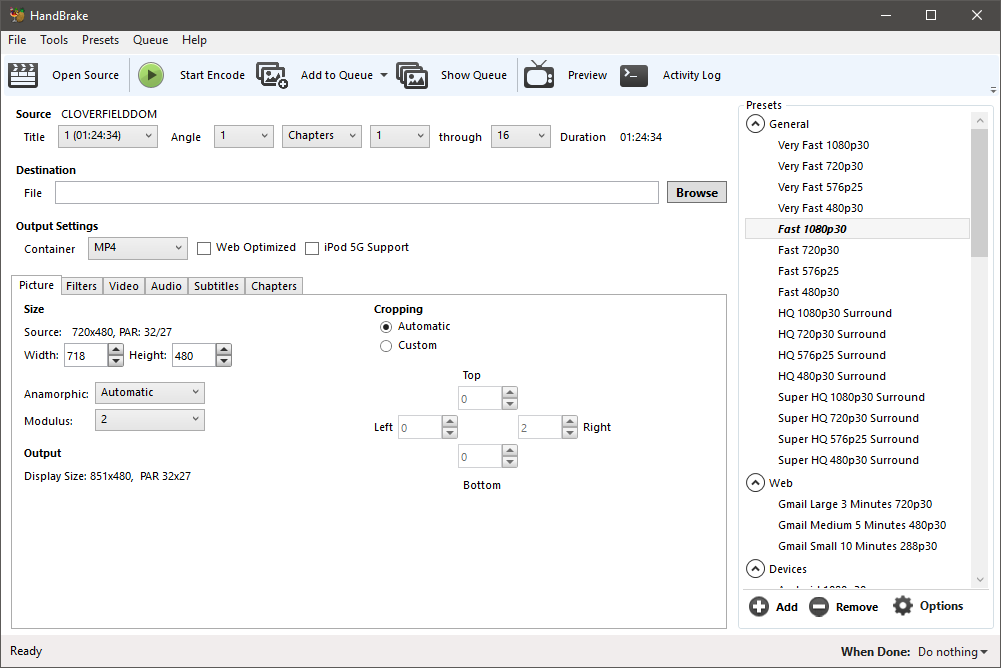
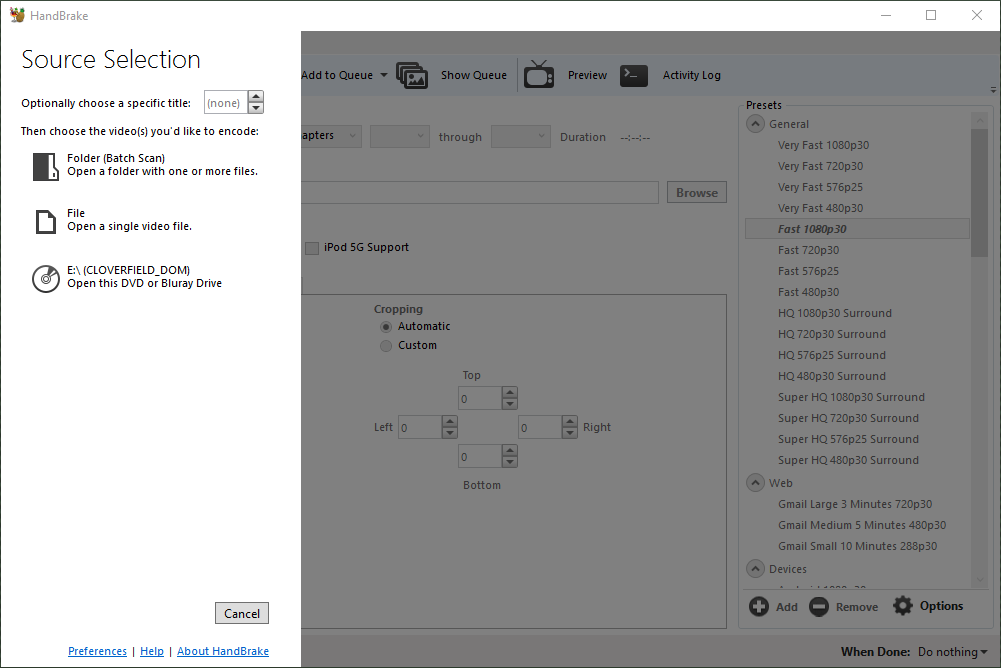
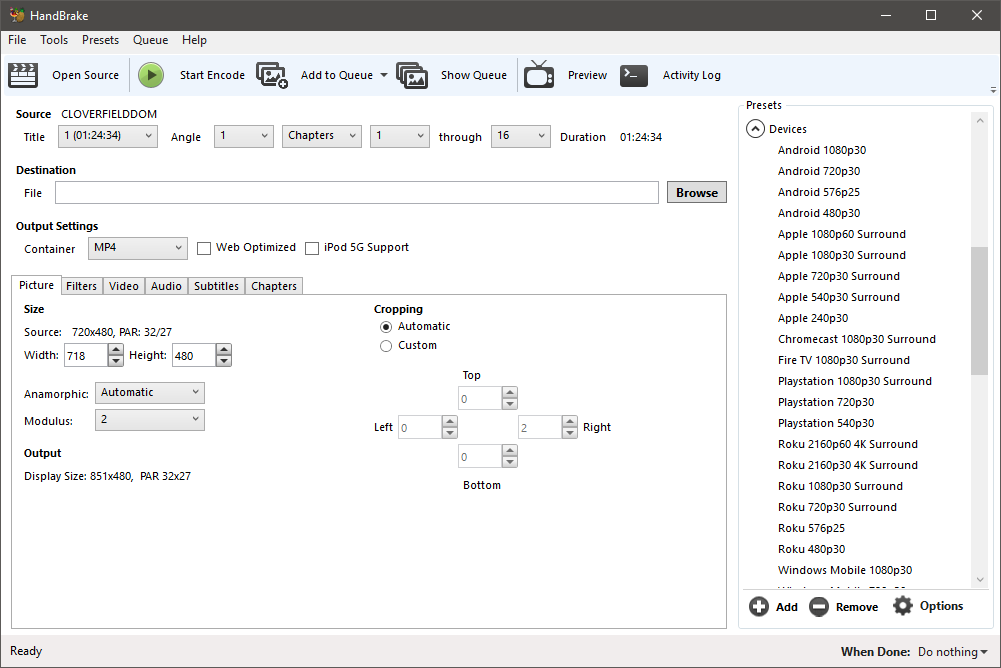
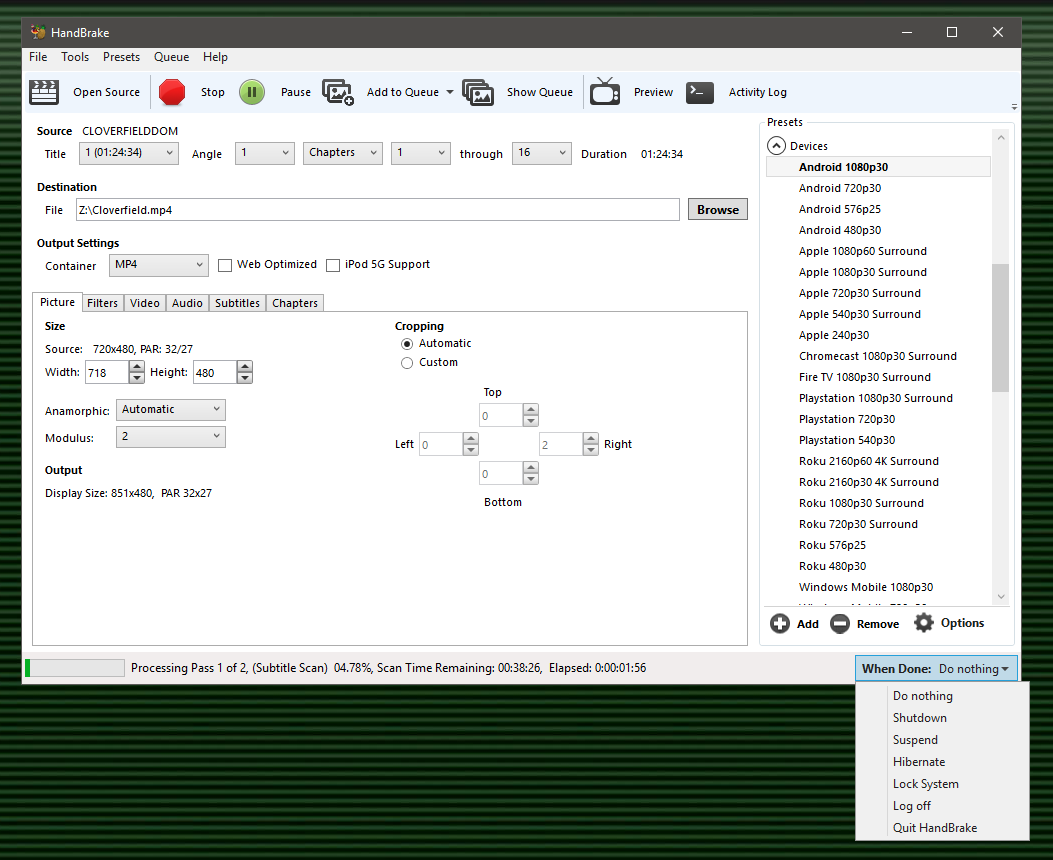
Open Handbrake. On the screen, you see when it starts, it asks you for a source file. That’s your DVD.
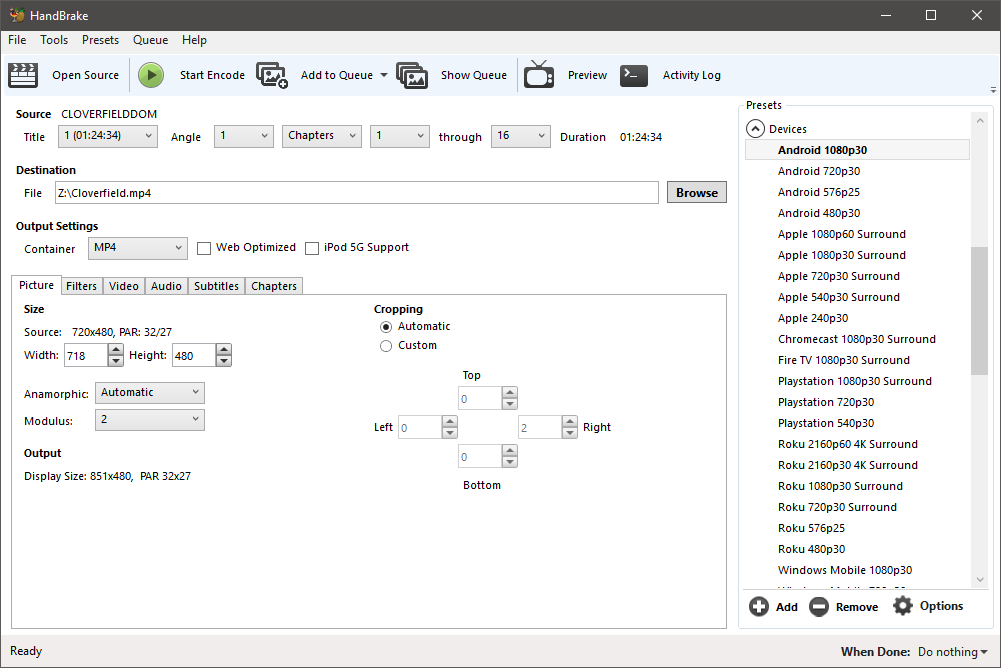
On the right side of the Handbrake window is a list of presets to transcode the DVD into playable formats. Scroll down and you’ll see several presets for Android.
Choose the quality you want your copy to use. I suggest you use 1080p at 30 fps. The copy will look almost as good as the original does with this setting.
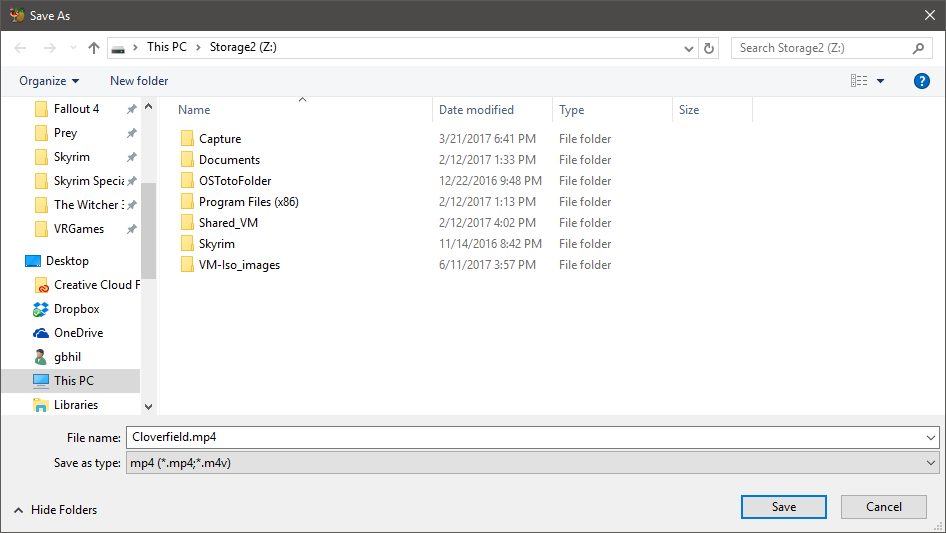
In the middle of the Handbrake window, you need to tell the program where to save the copy. Click the Browse button and choose a place on your computer. This is just like saving any other file so you can save it anywhere.
At the top of the Handbrake window is a Green play button that says Start Encode. Click it.
Wait while Handbrake converts your DVD into a movie you can watch on your tablet.
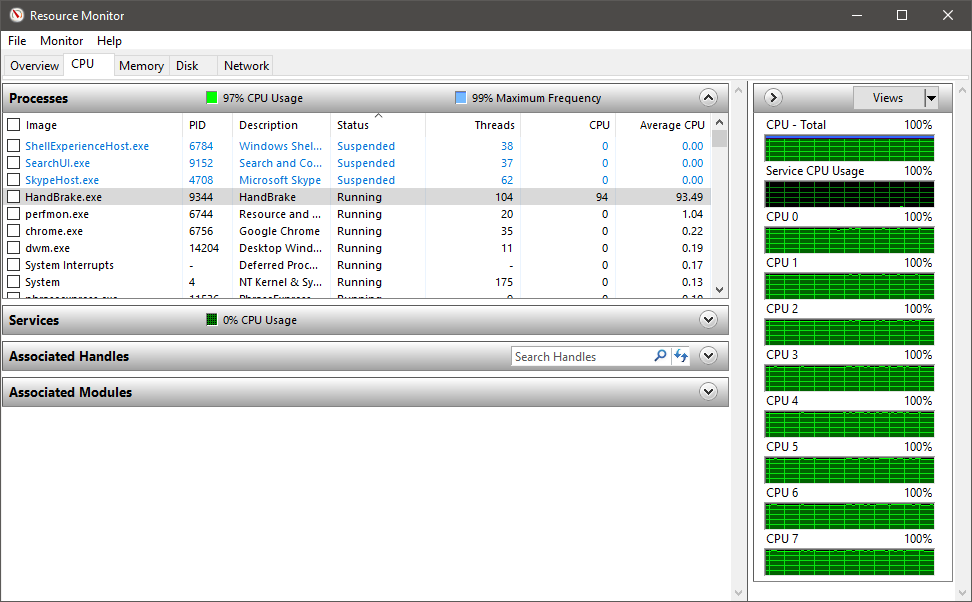
There are a few things you should know. For starters, this might take a while. Some of it depends on the computer you’re using and how powerful it is, but it just takes time to go through every frame of a video and convert it to another format. You can still use your computer while Handbrake is doing its thing, but if you try something like playing a game or working with big files in Photoshop, you can cause Handbrake to error out.
For reference, I used my gaming rig to test things. An 84-minute DVD (Cloverfield, if you’re curious) took about 18 minutes from start to finish. The computer has an overclocked Intel Core i7, 32 GB of RAM, and two NVIDIA 980Ti video cards. A better computer will be able to transcode a DVD a little faster, and a computer with specs that aren’t as good will take a little longer. But don’t worry, even something like a MacBook Air will be able to do this. It will just take five or ten more minutes.
There’s a setting in Handbrake that tells the computer what to do when the transcoding is finished. You can set it to shut everything down so you can go do other stuff while it’s working. When you come back you’ll have a copy of your DVD to play on your tablet and your computer will be shut off.
Handbrake also has a ton of settings. If you use one of the Android presets, you don’t need to touch any of them. Unless you want subtitles, that is. Before you start encoding, click the tab in the center of the Handbrake windows that says Subtitles and look through the dropdown list to see what choices your original DVD offers. Choose one and you’re good to go.
All that’s left is to copy the new video file to your tablet or an SD card so you can watch it with your favorite video player!
Yesterday’s Google event finally brought us the Google Pixel 2 and Pixel 2 XL, the Pixelbook, and the Home Mini/Max but even though the Google fervor is now dying down, there’s still much for Android enthusiasts to look forward to in the coming weeks. The mighty Huawei Mate 10 will soon make its debut on October 16th at a press event in Munich, Germany, and it will be the first public look we will have on Huawei’s upcoming EMUI 6 based on Android 8.0 Oreo. Ahead of this event, we have obtained access to a pre-release firmware build of Android Oreo/EMUI 6 for the Huawei Mate 9, and there are quite a few interesting changes to note for this upcoming update.
The Huawei Mate 9 was unveiled in only November of last year with top-tier hardware specifications, so it’s unsurprising to see this device receive an Android Oreo update. There were hints of early work being done on an Android 8.0 update even as far back as April of this year, though the build that was leaked at that time was fairly barebones. Now, the build that we have obtained is fully functional and can actually install right on top of MHA-L29C432 (the international Huawei Mate 9 variant) so we did just that to start digging in to what’s new in the EMUI 6 update.
EMUI 6 based on Android Oreo for the Huawei Mate 9
The Things You Would Expect
For starters, let’s get the uninteresting details out of the way. As you would expect, most of the required Android Oreo features are available in this build. That means picture-in-picture mode support, the strict background app limitations, notification channels, and even that annoying “app is running in the background” notification that you can thankfully still hide using an app.
We should note that although Huawei implemented notification channels, their notification importance controls is actually a holdover from EMUI 5 and not based on the AOSP version that you may be familiar with. I see this as a boon because it means you don’t need a third-party app to bring back notification importance controls for apps that don’t target Android Oreo.
EMUI 6 Updates
Here is where things get a little bit more interesting. Overall, I would say there aren’t many changes between EMUI 5 and EMUI 6 on the surface, but there are a few new software additions that should make some people happy.
First up, there is a new “screen resolution” option in display settings. This builds upon EMUI 5’s dynamic screen resolution feature called “smart resolution” (which is also present in EMUI 6). While smart resolution would automatically switch between 720p and 1080p in order to conserve power, this new option allows you to manually change between the two resolutions. This method likely beats using the ADB “wm size” command, as that ADB command only adjusts the virtual resolution rather than actually having the display render at a lower resolution.
Next, there is a new button that can be placed on the navigation bar. When the button is enabled, it adds a small arrow to the left side of the navigation bar. Pressing this button will temporarily hide the navigation bar until you swipe up from the bottom. For those of you who like having the stock navigation bar but want to occasionally make use of the full-screen real estate on-demand, this new button beats the ADB command that permanently hides the navigation bar or enables immersive mode. This button isn’t technically new as it is present on the Chinese Huawei Mate 9 firmware, but it’s new to the international variant.
If you aren’t a fan of the software navigation bar, then there is another new navigation option available for you to try. It’s called navigation dock and what it does is it places a movable floating button that can replace the navigation bar for all back, home, or recent button presses. This is distinct from EMUI 5’s “floating dock” as that feature acted like a pseudo-pie control wherein pressing the button would expand a list of available navigation options. EMUI 6’s navigation dock instead uses gesture controls such as slide up to go home, slide right for recents, and touch to go back.
Lastly, in developer options, there is something strange that we found. The usual Bluetooth audio codec customization features are present, as is the ability to switch between various Bluetooth audio codecs—including aptX and aptX HD. aptX and aptX HD are proprietary Bluetooth audio codecs that are owned by Qualcomm, so companies that wish to use them must pay licensing fees to Qualcomm.
We’re not sure why Huawei even made it a selectable option as it doesn’t even work here (picking either of these options simply reverts the selection back to SBC), but then again this is a pre-release build so it’s possible these options will disappear in the final release. Perhaps with root access and a Magisk Module we can enable support for it much like Google Nexus 6P owners can.
Under-the-Hood Changes
You might be wondering by this point why we haven’t yet shown a screenshot of the “About Phone” section. That’s because, like every beta/testing build that Huawei releases internally, the software version is changed to mitigate leaks. Fortunately, it’s rather easy to verify the true software build by taking a peek at the build.prop file. In it, we can see that the following:
and from a separate command, we can find the Linux kernel version
Linux version 4.4.23+(android@localhost)(gcc version 4.9.x 20150123(prerelease)(GCC))#1 SMP PREEMPT Thu Sep 14 04:10:43 CST 2017
So, it’s pretty clear from this information that the Huawei Mate 9 build we have obtained is indeed based on Android 8.0 Oreo (SDK level 26). The Linux kernel version is 4.4, updated from 4.1 in the Nougat-based EMUI 5 on the Mate 9. Furthermore, the security patch level is September 2017 which means that the Mate 9 is safe from the Blueborne vulnerability.
Finally, there are a few things we discovered that are especially interesting to Android enthusiasts. First, Project Treble support is there. Though the kernel sources for the Mate 9 have been available for several months, there aren’t any custom AOSP-based ROMs available for the device. Maybe Project Treble support will change that, maybe not. This is still interesting as it is the first confirmed device that has Project Treble support even though it did not launch with Android Oreo.
Last but not least, here’s a thing that nobody expected to happen: Substratum support in EMUI. Yes, Substratum themes work on EMUI 6. This is all thanks to the Overlay Manager Service (OMS) commits that Sony made to AOSP that have finally made their way in a fully working state in Android Oreo. It’s thanks to this that Google Nexus and Pixel users are able to enjoy full custom theme support using the Andromeda add-on for Substratum. We tested both the command line interface as well as a dark theme in certain apps and can confirm it does indeed work.
Project Treble Support
Substratum Support
Substratum support may not seem as interesting at first glance since Huawei already has its own theme engine, but it should be noted that Substratum will allow you to theme more than just system applications as can be seen in the above screenshot of the Google Messenger application.
That’s all we’ve discovered in this internal, beta build of Android 8.0 Oreo for the Huawei Mate 9. Stay tuned to the XDA Portal as we have more to share about upcoming Huawei and Honor devices. The best way to follow the Portal is by installing the XDA Labs application!
The firmware was discovered by FunkyHuawei.club, a service which lets you install pre-release Huawei firmwares, recover bricked devices, and rebrand/convert China region phones to international variants. The service will support the Mate 10 upon release.
Huawei’s EMUI 5 is a powerful version of Android. Here’s how to make it even better!
Huawei‘s EMUI 5 Android Skin adds a bit of personal flair and functionality to the company’s line of devices while including some additional tools and features aimed directly at helping you get the most out of your device’s battery.
The following tips should help you maximize the battery life of any Huawei device running EMUI 5.0, be it an Honor 6X, Mate 9, or MediaPad tablet.
Most of what we will cover below is found in the EMUI 5Settings app under Battery, which makes sense, of course. If a setting is found outside of that section, we will point it out.
1. Auto-close apps when locked
Rogue apps running in the background will almost always be an area to check when it comes to battery drain. Huawei gives you the option to force close background apps each and every time you lock your EMUI 5 device.
Select the option titled Close apps after screen lock in the Battery settings to view a list of all installed apps on your device, as well as adjust whether you want the app to be closed
Slide the switch next to an app to the Off position to disable force close for that respective app.
Something that’s easy to overlook in this section is the list of apps at the bottom that default to Offand will never force close when your device is locked. For example, Snapchat exempted itself from closing without any input whatsoever from me. And it’s almost always one of the apps I find at the top of my battery usage chart.
2. Power Intensive Apps
EMUI 5.0 provides a list of apps that are using, well, a lot of power. When you open this section of Battery settings, a list of apps that are currently running in the background will fill in. Sometimes there will be only one, other times the list will go on and on.
You can kill any of the apps listed by checking the box to the right, then tap Close at the bottom of the screen.
Tap on the app name itself to adjust whether or not you want to be alerted when it’s using too much power, as well as indicate if you want it to force close at screen lock.
3. Lower screen resolution
As with Samsung’s Galaxy devices, lowering display resolution on a Huawei device can improve battery life. Huawei doesn’t give you an option to pick the exact resolution you want to use, instead, you’re given an option to allow the device to automatically lower screen resolution when it determines it can save battery by doing so.
I currently have the setting enabled and have yet to experience any drastic change in experience.
4. Optimize
Within the Battery settings there’s an Optimize section. Select it and then let the scan complete. Once it’s done, a series of suggestions will populate the screen. Suggestions range from detailing how many apps are running when the screen is off, to screen timeout changes, to disabling vibrate on touch to save more battery.
Don’t take each and every suggestion here as gospel. If you prefer having vibrate on touch-enabled, it can’t be using too much battery. On the other hand, a lot of apps running in the background even after your device is locked is sure to eat into your daily battery life.
Some suggestions are enabled with a single tap of a button, while others offer a shortcut to adjust the setting yourself.
5. Disable notifications on lock screen
Indeed, viewing a notification on the lock screen of your Huawei device without having to manually wake it is convenient. But each time the screen lights up, it’s using a bit more of your battery, and throughout the day and bound to take a toll.
Open the Settings app > Notifications & status bar. Slide the switch next to Notifications turn on the screen to the Off position.
The obvious things, too
Not specific to Huawei, you should always check to ensure things like auto-brightness are turned on (or if you prefer turned off, your screen’s brightness is turned way down), and disable features you aren’t using. An app like IFTTT can be set up to toggle Wi-Fi on/off when you’re away from home or work, for example.
Go into Settings > Apps and disable or delete any non-essential apps, such a crapware that may have carried over from a carrier device. (My Mate 9 is loaded with AT&T apps, even without a SIM in it.)
In other words, do all of the things we recommend for each and every device we cover.
Battery life is still one of the biggest challenges for smartphone makers’ there’s no harm in doing our part to squeeze out every last bit of performance.
Dual camera systems on smartphones have been around for several years now. Some of the earliest examples include the weird 3D camera on the HTC EVO 3D. Then it was HTC again who introduced it in a different form on the One m8. Then LG decided to drop in with its cool wide-angle lens with the G5 and the same year, Apple decided to take in the other direction by adding a telephoto lens on the iPhone 7 Plus. Meanwhile, Huawei had other ideas, with its Leica branded monochrome camera on the P9.
But just how many types of dual camera systems are out there and how do they differ from each other? Most importantly, are they any good or is it just a passing fad? Let’s find out.
The Depth Sensor
We will start with this as this is the most basic form of dual camera system. In this system, the primary camera is accompanied by a second camera whose only function is to 3D map the area in front of the camera. As you may know, we are able to see in 3D because we have two eyes with slightly different perspectives that help us convey depth, especially for things that are close to us.
The HTC One m8
The secondary camera in this system works similarly. With the second camera, the system can now tell roughly how far the objects in front of it are with respect to each other. This information is then used to separate the foreground subject from the background.
The most common use of this technique is to create a shallow depth of field effect. While it’s something that comes naturally to DSLR cameras with their big sensors and big lenses, the small smartphone cameras cannot achieve the same shallow depth of field. So instead, this technique is used to first figure out the borders of the foreground subject and then apply an iris blue effect on everything else. This gives the illusion of shallow depth of field.
Sample from the HTC One m8. Didn’t always work this well.
While sound in theory and occasionally in practice, this technique has its pitfalls. Unless your subject is a cardboard cutout, it will have depth to it and because this depth is not as much as the depth between the entire subject and the background, the camera occasionally ends up blurring the edges of the subject as well. Even when it does work reasonably well, it never quite looks natural, especially since most smartphone cameras that have this feature apply an even blur on everything in the background whereas with a DSLR, the intensity of the blur increases with the distance from the focus point.
Camera systems with a dedicated depth sensor is one of the rarest types of dual camera systems. The first popular use of it was seen on the HTC One m8 but these days only the most basic smartphones, such as the Honor 6X or the Lenovo K8 Plus, can be seen using a dedicated depth sensor lens.
The Monochrome Camera
A slightly more popular implementation of the secondary sensor is the monochrome camera. In this method, the primary camera is accompanied by a mostly identical secondary camera. Both cameras usually have identical sensors, apertures, lenses and focusing systems. The main and usually only difference between the two is that the second sensor lacks an RGB color filter. This means that the sensor cannot capture color information but on the upside, because there is one less thing blocking the sensor, the monochrome camera can capture more light.
Huawei P9
Every time you take a picture, the camera system combines the output of both cameras and layers them into one image. In theory, the two images when combined will have greater detail and reduced noise. Alternately, you can also just shoot from the monochrome camera and get slightly better image quality at the cost of all the color information.
One of the first examples of this system was the Huawei P9 and since then, few other devices have also shipped with this system. To us, the advantages of this system are nebulous at best. While sound in theory, we can’t really say for sure if the feature does really work as advertised. We have seen some good results with this system in the past but its hard to tell if it was the dual camera doing all the work or it was just good image processing system.
Monochrome image from P9
There is no real disadvantage to this system and we do appreciate that it’s the only one of the systems discussed here that tries to do anything about the actual image quality instead of adding additional features but still, we would rather take some zooming ability over marginally improved image quality.
The Wide-Angle Camera
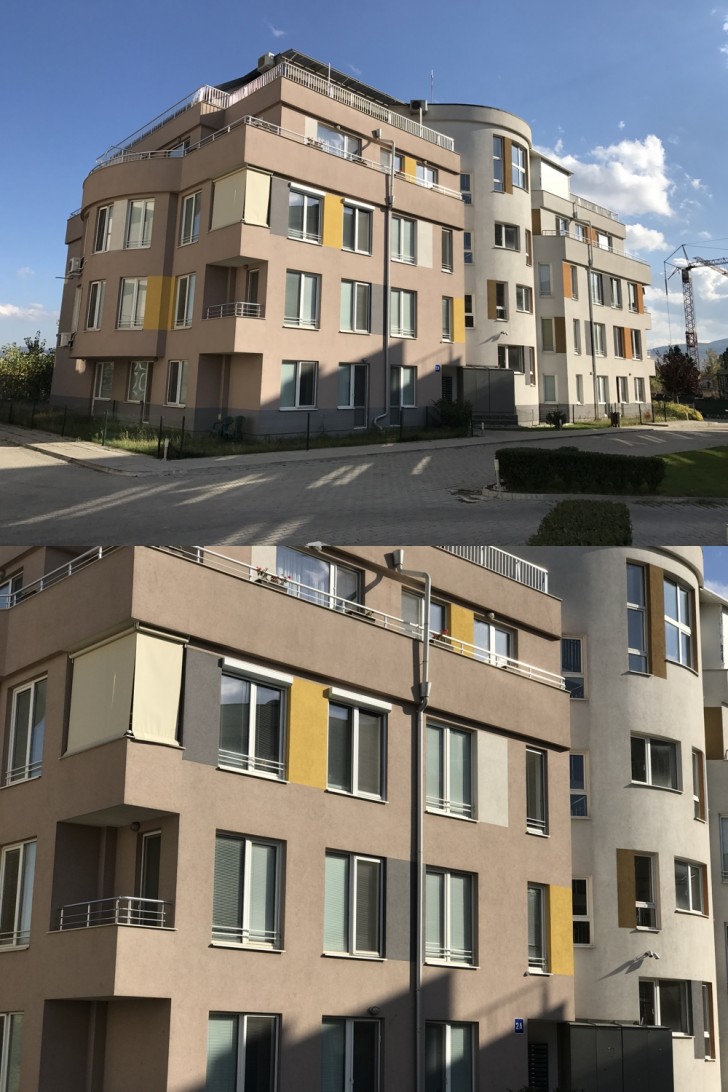
Debuted first on the LG G5 early last year, the wide-angle camera is pretty much what it sounds like. To take LG’s example, the phone had a 16 megapixel, 29mm equivalent f1.8 primary camera and 8 megapixel, 12mm equivalent f2.4 secondary camera. The 12mm focal length gave the secondary camera a crazy wide field of view that allowed the user to capture a much wider area without having to move back or capture interesting perspectives afforded by such a wide-angle lens.
LG G5
We have mainly seen this on LG phones, with Motorola recently incorporating it in the X4, and we are fans of how it works. The wide-angle lens gives a very unique perspective that you simply don’t get at all on smartphone cameras and apart from having practical value (capturing a large group of people from up close) also lets you capture some really cool looking shots.
The early iterations of this system did have its disadvantages. On the G5 and V20, the ultra wide-angle lens image quality was nowhere near as good as the primary camera and also had significant barrel distortion that made it look like the footage from a GoPro with a fish-eye lens. However, LG has been steadily improving the system with every iteration and in its latest avatar on the V30, the secondary lens not only has highly respectable image quality but also significantly less distortion around the edges, making it far more useful.
Wide-angle on top and ultra wide-angle below from G5
With good implementation, this system does have the potential to be a really cool second camera system for particular scenarios and we wish more manufacturers adopted it.
The Telephoto Camera
The most common of all the dual camera systems today is the telephoto camera. In this, the primary camera is paired with a second camera that has a telephoto lens. As you can tell, this is the exact opposite of the wide-angle camera system, wherein it actually lets you zoom into your subject instead of zooming out.
Apple iPhone 7 Plus
Since the iPhone 7 Plus, manufacturers have stuck to using a 2x factor for the second telephoto lens. This means the secondary lens has twice the focal length of the primary lens, giving you an instant 2x optical zoom.
There are many advantages of this system. First is the most obvious, where you get 2x lossless optical zoom. Zooming on smartphones has largely been digital until now but with this you get to quickly move 2x closer to your subject with very little quality loss. Any further zooming is done digitally still but because the digital zoom is now being applied on top of 2x optical zoom, it gives much better results.
Wide-angle above and telephoto below from the iPhone 7 Plus
Shooting with a telephoto lens also has other advantages. Telephoto lenses are more suitable for portraits than wide angle as they have less distortion and is more flattering to the subject. Most manufacturers go one step ahead and also implement the background blur effect that we saw with the very first system we talked about today (the primary lens now acts as the depth sensor). The combination of a telephoto lens and background blur gives far superior results than just applying background blur on wide-angle images.
Of course, this system too has its disadvantages. So far none of the manufacturers have been able to get complete parity between the two cameras. When the iPhone 7 Plus launched last year, it had a much smaller aperture (f2.8) compared to the main camera (f1.8) and no OIS on the secondary sensor. The iPhone 8 Plus ships with similar arrangement (although the sensors are better this year) and even the iPhone X still has f2.4 for the second camera (although it does have OIS). The Note8 was the first phone with a telephoto camera to have OIS but even then it’s still f2.4 (compared to f1.7 on the main lens) and the second sensor is slightly worse even if it has the same resolution.
iPhone 8 Plus Portrait Mode with Studio Lighting
Due to this, there is generally a quality difference when shooting with the telephoto lens. It’s even worse in lowlight, where due to the small aperture, most manufacturers just choose to disable the telephoto camera entirely, and instead when the user taps the 2x button, the camera just does a 2x digital zoom on the primary wide-angle lens. Needless to say, any further zooming is also digitally done on the primary lens. There are ways to force the camera to use the second lens on some phones but the results are generally not worth it.
Still, most of these limitations seem to be temporary and something year after year advancements should take care of eventually. This is still by far the most practical solution of all the systems we discussed today. Not only does it give the user a much needed optical zoom ability but at a pinch also lets them take some pretty decent looking shallow depth of field images.
That’s pretty much it for the dual camera systems. Let us know in the comments which one do you prefer, and if you have any further queries or other topics you’d like us to discuss in the future.
Who knows why, but Google just extended the security update life of the Nexus 6P and Nexus 5X. According to their dedicated support page that shows the schedule of guaranteed updates for both Nexus and Pixel devices, the 6P and 5X will now receive an extra two months worth of security patches.
Previously, Google set the end date for both the Nexus 6P and Nexus 5X at September 2018, or three years from the time that each device first became available on the Google Store. This morning, that date changed to November 2018, giving both phones an additional couple of months of security.
Google hasn’t updated their Android versions months for the 6P or 5X, so you still shouldn’t expect many big updates past the Android Oreo update you just got. However, an extra couple of months of security support is never something you’ll see us complain about.
In mid-2016, Google provided specific timeframes for when Nexus devices would stop receiving new Android version updates. Today, Google is back to update us again, but this time, for when security updates will specifically cease for all current Nexus and Pixel devices.
Before today, all Google provided was a not-so-technical timeframe. The exact words were, “For the longer of 3 years from availability or 18 months from when the Google Store last sold the device.” Yeah, that’s some backwards gibberish, not even sure if it’s English.
Anyway, we now know specifically when all current Nexus and Pixel devices will no longer receive security updates.
Here are the details you’ll need to know. In layman’s, the below dates are when you phone is officially unsupported and you should really consider upgrading.
The Huawei Mate 9 was launched in December last year with Android Nougat out-of-the-box.
Huawei is working on the Android Oreo software update for its Mate 9 smartphone, as per reports. Now, a Huawei Mate 9 has been spotted on Geekbench running on Android Oreo 8.0, lending some credibility to those reports.
As spotted by Androidsoul, if the Geekbench listing is to be believed, Huawei might roll out the Android 8.0 Oreo update to its users in the coming months. The Mate 9, as of now, runs Android 7.0 Nougat out-of-the-box wrapped under Emotion UI 5.0. Apart from the Mate 9, the Huawei P10, Honor 8 Pro, Honor 8, Honor 8 Lite and Honor 6X are expected to get Android Oreo update.
With Android Oreo, some of the features the Mate 9 smartphone will get are the Picture-in-Picture mode, Notification Dots, Android Instant Apps, Longer battery life, Notification channel, among others.
One of the talking points of the Mate 9 is its camera. It comes with one 12-megapixel RGB color sensor and a 20-megapixel monochrome sensor. Co-developed by Leica, the camera comes with dual-core ISP, depth measurement ISP and professional DSP for better image focusing speeds and processing. The camera also supports 4K video recording capabilities.
Huawei Mate 9 specifications, features
The Huawei Mate 9 sports a 5.9-inch full HD (1080p) display. At the heart of both smartphones runs Huawei’s homebrewed Kirin 960 octa-core SoC. Built on the 16nm FinFET process, the chipset features four Cortex A73 cores clocked at 2.4GHz and four Cortex A53 cores clocked at 1.8GHz. It is paired with 4GB of RAM and either 64GB or 128GB onboard storage options.
Connectivity options on the smartphone include Wi-Fi 802.11ac, 4G LTE with VoLTE voice calling support, Bluetooth, GPS and USB Type-C port for charging and data transfer. The Mate 9 has a 4,000mAh non-removable battery.
The phone will be called ‘Mate 10’ outside of China.
Huawei has lost no time in releasing its smartphone to catch up with and compete against Vivo’s X20 and X20 Plus launched just a couple of days back.
Huawei’s new phone is named ‘Maimang 6’ (it will be called ‘Mate 10’ outside of China). The phone has a 5.9-inch IPS full HD display, its screen resolution being 2160x1080pixels. It’s a least bezel display with the aspect ratio being 18:9. Under the hood, Huawei has fitted its in-house CPU, the octa-core Kirin 659. The phone comes with 4GB RAM and 64GB internal memory. Further expansion of the storage is feasible through a microSD card.
The optics department is unique on the Huawei Maimang 6 since it has four cameras, a double camera setup in the rear and a double camera setup in the front as well. The rear camera setup has a 16MP plus a 2MP camera. It is capable of capturing images even in blurred backgrounds. On the front, the combination of 13MP plus 2MP sensors with a f/2.0 aperture lens. In addition, the front camera is supported by the spotlight flash and bokeh effect as well.
The operating system is the Android Nougat version 7.0 with Huawei’s UI EMUI 5.1 skin riding over it. The battery fitted on the Huawei Maimang 6 or Mate 10 is 3340mAh.
The phone has all possible connectivity options, including compatibility for 4G LTE networks. A fingerprint sensor is also present on the rear panel of the phone.
Huawei will make the phone available in three colors, black, gold and blue. Priced at CNY 2, 399 (approx. Rs. 24, 000), the phone will start shipping for Chinese customers from September 30 while the rest of the world may see its equivalent launched in October.
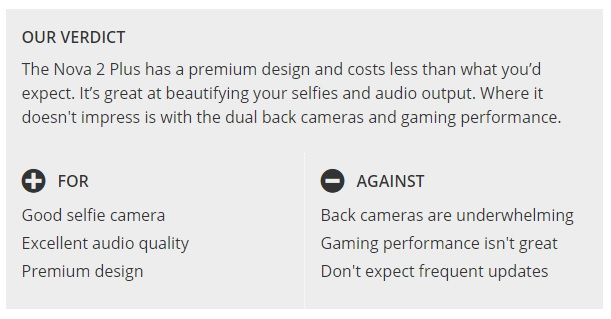
The original Huawei Nova Plus was decent but not necessary a memorable phone. With the follow up, Huawei is focusing on the front camera and audio capabilities.
At AED 1,399 (US$375), the Huawei Nova 2 Plus is cheaper than the likes of Honor 9, but it’s also not at the same performance level as that or the Nokia 8.
Packaged in a white box that looks very much like the one we saw on the Honor 8 last year, the Nova 2 Plus comes with a fast charger, a USB Type C cable and a headset along with the quickstart guide.
Like other Huawei phones we’ve reviewed of late, a translucent case is also bundled to protect the phone. We think it’s great that Huawei is providing basic protection out of the box.
Less is more
The Huawei Nova 2 Plus can be seen as a cheaper version of the Huawei P10 Plus. It has almost identical dimensions and a slightly less premium, yet, a beautiful design.
Instead of the glass strip found on the top of P10 Plus with Leica brand, the Nova 2 plus has a smooth all-metal back.
It’s available in three colors- Graphite Black, Prestige Gold and Aurora Blue. We got that last one for review and it has a nice zen like finish that is achieved by moving the antennae lines on the top and bottom.
HUAWEI NOVA PLUS SPECS
Weight: 169g Dimensions: 153.9 x 74.5 x 6.9mm OS: Android 7.0 Screen size: 5.5-inch Resolution: 1080 x 1920 CPU: HiSilicon Kirin 659 RAM: 4GB Storage: 64GB Battery: 3340mAh Rear camera: Dual 12 + 8 MP Front camera: 20MP
Even though the screen size is 5.5 inches, the Huawei Nova 2 Plus sits comfortably in your hand. And with a weight of 169g, it’s easier to handle than other phones with similar screen sizes.
Huawei has placed the fingerprint sensor on the back of the phone. Although we prefer a fingerprint sensor on the front, the positioning of it on the Nova 2 is well thought out. It sits reasonably below the cameras and in the center making it very easy for your index finger to reach it.
Like the Huawei P10, the fingerprint sensor is extremely quick to recognize and unlock your phone – among the fastest we’ve used. It also allows for gestures such as pulling down the notification shade or browsing your photos. You can even answer calls and take photos by tapping it.
The 5.5-inch screen on the Huawei Nova 2 Plus is FullHD in resolution which is expected from a device at its price point. It’s LED in technology and is bright enough to be used in the outdoor sun, though you will need to crank the brightness levels all the way up when using it outdoors in a place like Dubai. Huawei has also done a good job with colour reproduction, especially when you use one of the bundled theme that brings out the best the screen has to offer.
Design and display
Subtle and elegant design
Display is bright and sharp
While the Huawei Nova 2 Plus has an elegant design, it won’t necessarily turn heads. It’s definitely more premium than what is expected out of a phone in it’s price range, but it’s a phone that will disappear among all other phones that look like it.
At just 6.9mm thickness, the phone sits comfortably in your hands and is easier to use that other phones with a similar screen size. Although there are bezels present on the top and bottom, they don’t feel oversized though most of us will need to use the phone with two hands.
The left side holds the SIM tray which can take one nano SIM and one micro SIM, or a MicroSD card. On the right, you can find a textured power button was well as volume keys that are easy to reach. Moving to the bottom, the Nova 2 Plus features a USB Type-C port along with a 3.5mm jack.
The back holds the dual camera setup along with a flash on the top and the fingerprint sensor below it to the centre. The front of the phone is very generic- a large glass slab with noticeable bezels on the top and the bottom.


The Honor 6X in the sunlight