AirPods are the wireless earbud headphones from Apple which are enjoyed by many iPhone users. Much like iOS devices have firmware updates, so do AirPods, and you may be wondering how you can update AirPods firmware, and how to check and see if your AirPods are up to date.
Managing firmware updates on AirPods is simple, but it’s a bit different from other Apple products as there is no traditional software update menu. Read on to better understand how to update AirPods and how to check the current firmware version of AirPods.
Updating AirPods Firmware
AirPods Firmware will update automatically if they AirPods are stored within their case, near the synced iPhone, and the iPhone is connected to the internet. It just happens automatically when Apple pushes out an update, you don’t actively update the AirPods yourself.
The AirPod firmware update happens seamlessly and quietly in the background, and unlike updating iOS system software or an Apple Watch there is no direct “update now” button to manually trigger the AirPods software update.
If your AirPods haven’t updated to the latest version, be sure the iPhone or iPad is connected online (preferably to wi-fi), put the AirPods in the AirPod charging case for a moment, then pop open the lid. When the menu pops up on the iPhone just swipe it away as usual. Now close the lid on the case and wait a few minutes, if an update is available it should happen automatically sometime within 30 minutes or so.
How to Check AirPods Firmware Version
Assuming the AirPods are actively synced to your iPhone or iPad, you can access an AirPods menu in the Settings app of iOS:
AirPods are the wireless earbud headphones from Apple which are enjoyed by many iPhone users. Much like iOS devices have firmware updates, so do AirPods, and you may be wondering how you can update AirPods firmware, and how to check and see if your
Open the Settings app and go to “General” and then to “About”
Choose ‘AirPods’ to see the AirPods firmware version
If you do not see the AirPods option in the About section then you likely don’t have the AirPods actively synced or paired to the iOS device.
Android Oreo wasn’t a monumental shift in design or user experience, but it introduced Autofill, and that’s enough for us.
Most changes in Android 8.0 Oreo came in the form of under-the-hood improvements, ways of making your phone run faster, cooler and smoother. But Autofill is a change that benefits both users and developers, since it makes it super easy to people to enter usernames and passwords in apps that support them.
But how does it work? And why should you use it? Let us explain.
What is Autofill?
When you load a new phone, there are often dozens of apps to log into, requiring you to remember your unique username and password for each. Google has, for a long time, provided its own password manager, which securely (but not that securely) stores that information in a database in its cloud. The database is mainly used for web pages, but it also works inside apps that use Google’s WebView.
The notion of automatically filling in usernames and passwords for websites and apps is called Autofill. Other apps, too, from LastPass to Everpass to 1Password to Dashlane, perform the same thing, often much better than Google’s own. Before Oreo, these apps offered their own clunky ways of automatically filling in usernames and passwords, often utilizing hacks to get the job done. No more!
In Oreo, Google added a framework for apps like 1Password and Dashlane to prompt users to automatically and securely enter their login information when an app opens for the first time, or when a webpage prompts for authentication. As with default messaging apps, Google forces the system to have a default Autofill service so they’re not competing with one another.
How does it work?
If you’re already a password manager user (and you should be!) setting up Autofill in Oreo is fairly easy. By default, the system chooses Google’s own solution, but it’s very easy to switch to your own once the app is installed. Right now, there are only a handful of popular cross-platform services that support Autofill on Oreo:
Some, like 1Password, are still in beta, while others are available in the public build. Either way, they’re really easy to set up and use.
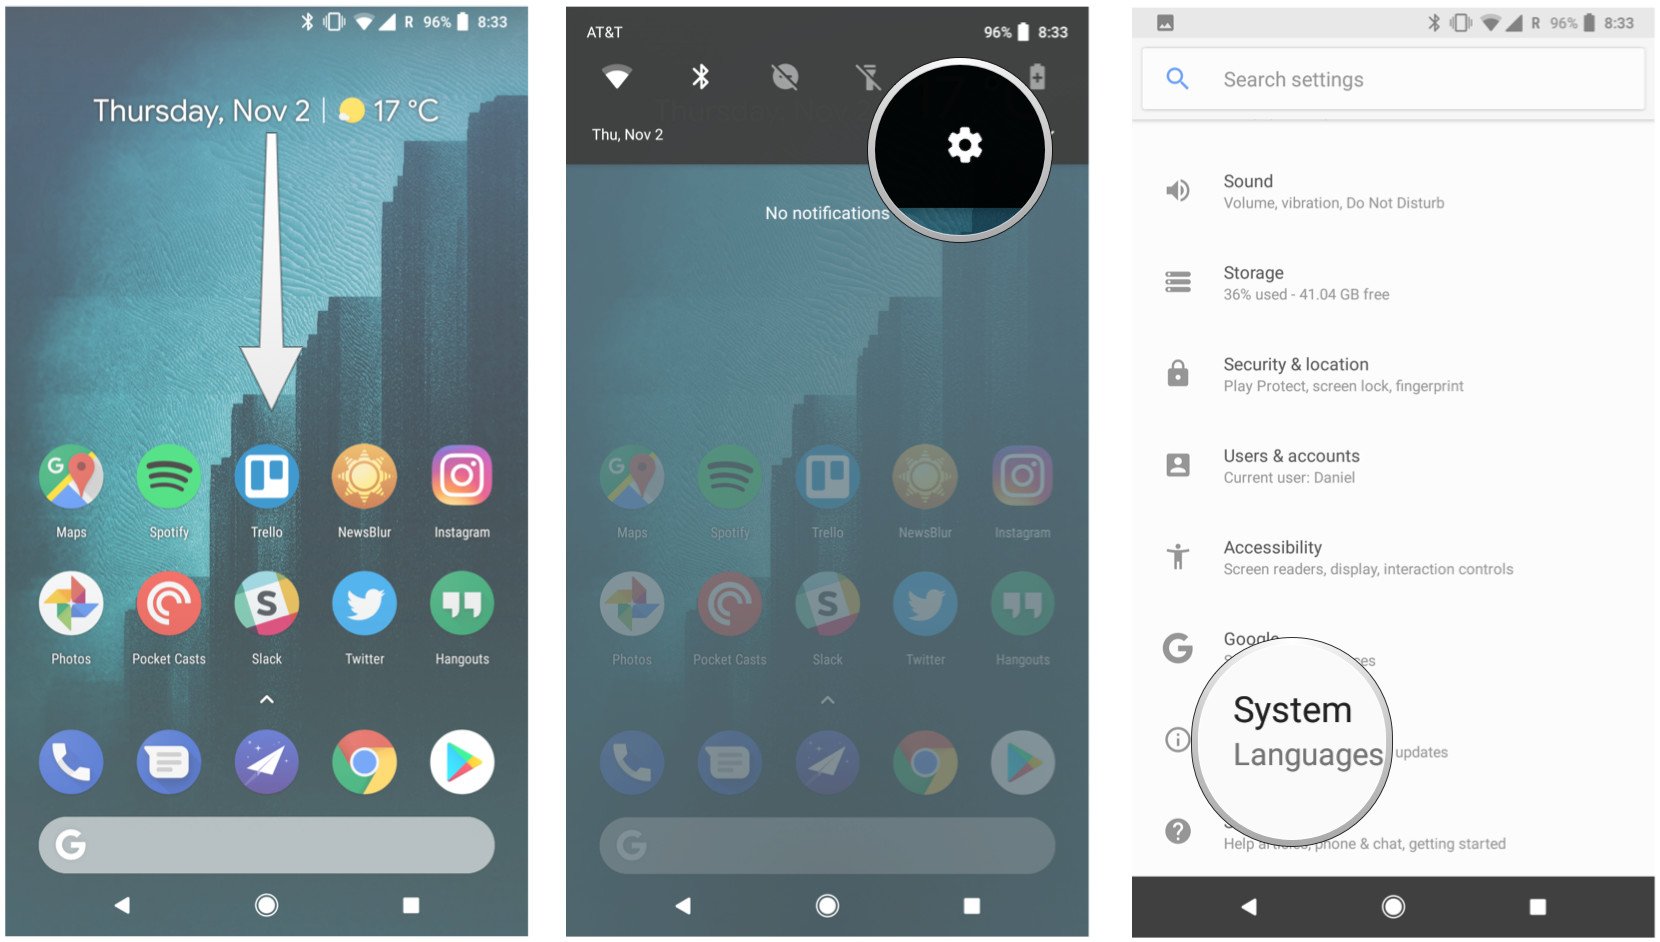
Note: This guide takes you through the steps to enable and change Autofill defaults on the Pixel 2 running Android 8.0 Oreo, but the steps should be similar on most phones running Oreo.
Download and install a supported password manager. (We’re using 1Password here as our example).
To switch to it, swipe down on the notification shade from the home screen.
Select the Settings icon (looks like a cog**.
Scroll down to and tap on System.
Tap on Languages, inputs & gestures.
Expand the Advanced menu by tapping on it.
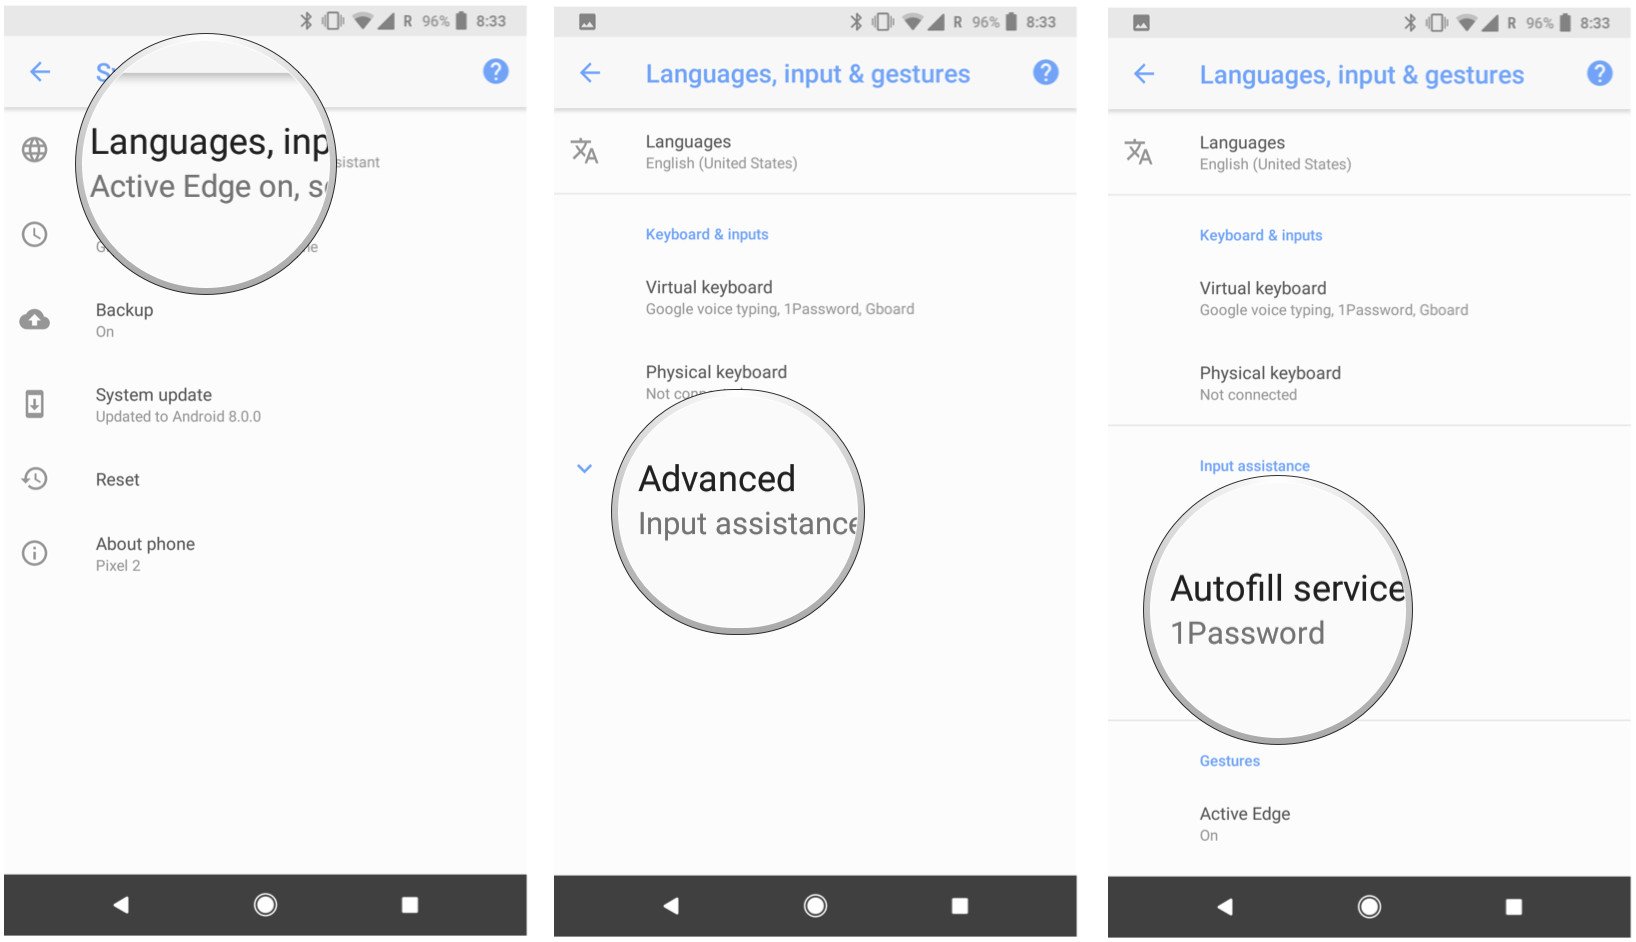
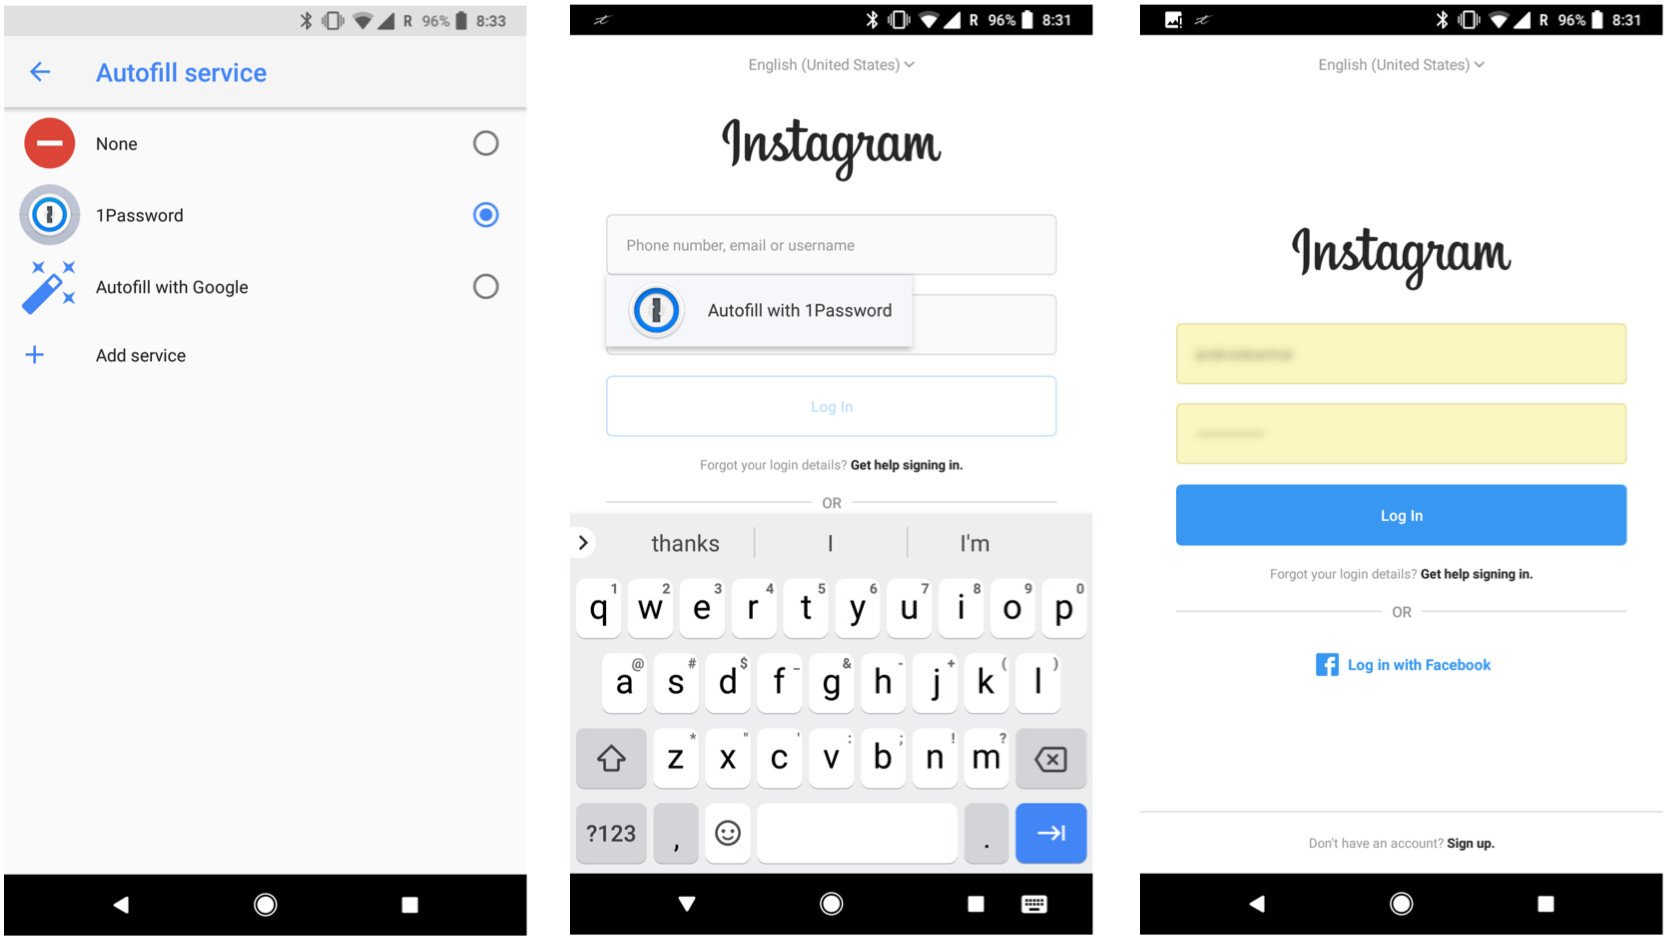
Select Autofill services.
Select your service.
Now, open an app and, when prompted, tap Autofill with 1Password.
Authenticate yourself using a fingerprint or password.
Log in to the app.
That’s it! Now your Autofill prompt will automatically ask you to enter your credentials using a password manager whenever it detects a compatible app.
Why isn’t every app prompting me to use Autofill?
Right now, the Autofull API is a bit buggy, and not every app will prompt you to use the service in every instance. For example, Twitter, which supports Autofill very well, sometimes just forgets it exists and I have to close the app and re-open it for the prompt to appear.
Other apps just don’t support Autofill at all. In that case, you can always open the password manager app separately to copy and paste the username and password, but I know that’s not ideal. If an app you often use doesn’t prompt for Autofill, you may want to contact the developer.
What about saving passwords to a password manager?
Another awesome aspect of the new Autofill feature is that if you have a new username or password, or haven’t logged it into your favorite password manager, once you do so for the first time, the app should prompt you to save the information into the default manager.
In the case of 1Password, it’s prompted me to create entries for apps that are already in my database, but because the Android app has a different “address” than the website, it doesn’t already know it’s in there. Bug? Maybe. Feature? Maybe. Either way, you’ll likely have a few duplicates once you start using the Autofill feature.
Coming next
The whole Autofill experience is supposed to get better in Android 8.1, which should be released to the public in December of 2017. Here’s what Google’s saying about it:
Autofill enhancements — we’ve made it easier for password managers and other Autofill services to use the Autofill framework. For example, we’ve added support for more UI customization of the Save dialog, as well as setAutofillOptions() for users to set credit card expiration using a spinner.
Apple has released iOS 11.1 to the general public. The new version of iOS includes a variety of bug fixes, feature enhancements, security improvements, and other additions to the mobile operating system, making iOS 11.1 a recommended update for iPhone and iPad users running a prior version of iOS 11.
Separately, Apple also released the final version of macOS High Sierra 10.13.1 for Macs, security updates to prior Mac OS releases, watchOS 4.1 for Apple Watch, and tvOS 11.1 for Apple TV.
iOS 11.1 includes over 70 new emoji icons, including dinosaurs, pie, broccoli, bearded people, breastfeeding person, gender neutral characters, wizard, pixies, zebra, scarf, brain, vampires, and a variety of other characters.
Users can download iOS 11.1 now through the Software Update mechanism on their devices, or through iTunes. The easiest way is through the OTA update available on the device in the Settings app.
Back up your iPhone or iPad before installing iOS 11.1 update.
Open the “Settings” app on the iPhone or iPad
Go to “General” and then to “Software Update”
Choose “Download and Install” when iOS 11.1 becomes available
The delta update is around 180mb if you’re coming from a prior iOS 11 build.
Users can also choose to download and update to iOS 11.1 via iTunes by connecting an iPhone, iPad, or iPod touch to their computer, launching iTunes, and installing the update when requested.
Be sure to save the IPSW file with a .ipsw file extension, otherwise iTunes may not recognize it.
iOS 11.1 Release Notes
iOS 11.1 introduces over 70 new emoji and includes bug fixes and improvements.
Emoji
Over 70 new emoji characters including new food types, animals, mythical creatures, clothing options, more expressive smiley faces, gender-neutral characters and more
Photos -Resolves an issue that could cause some photos to appear blurry -Addresses an issue that could cause Live Photo effects to playback slowly -Fixes an issue that could cause some photos to not display in the People album when restoring from an iCloud Backup -Fixes an issue that could impact performance when swiping between screenshots
Accessibility -Improves braille support for Grade 2 input -Improves VoiceOver access to multi-page PDFs -Improves VoiceOver rotor actions for announcing incoming notifications -Improves VoiceOver rotor actions menu when removing an app from the App Switcher -Fixes an issue for some users where alternative keys would not display when using VoiceOver with Touch Typing -Fixes an issue where VoiceOver rotor would always return to default action in Mail -Fixes an issue where VoiceOver rotor would not delete messages
Other improvements and fixes -Adds back support for accessing the app switcher by pressing on edge of display with 3D Touch -Fixes an issue that caused cleared Mail notifications to reappear on Lock screen -Fixes an issue in enterprise environments that prevented data from being moved between managed apps -Fixes an issue with some 3rd-party GPS accessories that caused inaccuracies in location data -Resolves an issue where settings for Heart Rate notifications were appearing in Apple Watch app (1st generation) -Fixes an issue where app icons were not appearing in notifications on Apple Watch
Separately, Mac users will find a 10.1macOS High Sierr3.1 along with security updates to El Capitan and Sierra. Apple Watch users will find watchOS 4.1 available, and tvOS 11.1 is available to download for Apple TV as well. A minor update to iTunes, versioned as 12.7.1, is also available for Mac and Windows PC.
Apple has released macOS High Sierra 10.13.1 to all Mac users running High Sierra. The MacOS High Siera 10.13.1 update includes bug fixes, security improvements, and feature enhancements, and also includes over 70 new emoji icons.
Users who are or were experiencing anyproblems with macOS High Sierra should update to macOS 10.13.1 as it may remedy potential issues or bugs experienced with prior builds.
Separately, Apple has also issued Security Update releases for prior Mac OS versions including MacOS Sierra and OS X El Capitan. A minor update to iTunes 12.7.1 is also available. iPhone and iPad users can alsodownload iOS 11.1 update now, along with watchOS 4.1 for Apple Watch and tvOS 11.1 for Apple TV.
How to Download and Update to macOS High Sierra 10.13.1
Always backup a Mac before installing any software update. The simplest way to install a software update on the Mac is through the App Store update mechanism.
Go to the Apple menu and choose “App Store”
Go to the “Updates” tab and choose to download and update macOS High Sierra 10.13.1 when it becomes available
Prior Mac OS versions will find Security Update 2017-001 Sierra or Security Update 2017-004 El Capitan available in the Updates section of the Mac App Store as well.
Users can also choose to download macOS High Sierra 10.13.1 as an independent update packageif desired by going to the Apple support website:
Note that because 10.13.1 is the first update for macOS High Sierra that a ‘combo’ update is not available for the .1 release, since it is not required to combine prior updates.
macOS 10.13.1 Release Notes
The macOS High Sierra 10.13.1 Update improves the security, stability, and compatibility of your Mac, and is recommended for all users.
This update:
-Adds support for 70 new emoji, including food types, animals, mythical creatures, clothing options, more expressive smiley faces, gender-neutral characters and more. -Fixes a bug where Bluetooth appeared as unavailable during Apple Pay transactions. -Improves the reliability of Microsoft Exchange message sync in Mail. -Fixes an issue where Spotlight does not accept keyboard input.
Enterprise content:
-Improves the reliability of SMB printing. -Makes Touch ID preferences accessible while logged in as a mobile account on MacBook Pro with Touch Bar. -Adds support for unlocking a FileVault-encrypted APFS volume using a recovery keychain file. For details, enter man diskutil in Terminal.
For those with additional Apple devices, Apple has also released small security updates to other Mac OS X releases, a small update to iTunes, iPhone and iPad users can update to iOS 11.1, watchOS 4.1 for Apple Watch, and tvOS 11.1 for Apple TV are all available as well.
The Lenovo K8 series of phones just released in India this past August, but the company has now confirmed that the Lenovo K8, Lenovo K8 Plus, and the Lenovo K8 Note will all receive the Android Oreo update.
The only downside to this announcement is that Lenovo’s slated release time for the update appears to be June 2018 for the Lenovo K8 and July 2018 for the Lenovo K8 Plus and the K8 Note. That’s an unfortunately long time to wait for something that’s already available on some flagship devices and will be just a few months before Google rolls out Android P.
Right now the Lenovo K8 family of phones are exclusive to Amazon in India, where the devices retail for between 10,000R and 14,000R depending on the model you get.
Apple has released iOS 11.1 beta 3 for iPhone, iPad, and iPod touch users who are enrolled in the beta testing programs. Separately, tvOS 11.1 beta 3 and watchOS 4.1 beta 3 are also available for best testing too.
The iOS 11.1 beta 3 software update is available now for developers enrolled in the developer testing program, whereas the public beta testing version is usually soon to follow.
Users enrolled in the beta testing programs can download iOS 11.1 beta 3 now through the Software Update mechanism in Settings app of compatible iPhone, iPad, and iPod touch.
iOS 11.1 focuses on bug fixes and feature enhancements, hundreds of new emojis, re-includes the 3D Touch gesture to access multitasking on iPhone which is missing from the initial iOS 11 release, and will likely include a few new features like Apple Pay Cash.
Additionally, watchOS 4.1 beta 3 and tvOS 11.1 beta 3 are also available for developers and those interested in running beta software on their Apple Watch and Apple TV. Those updates are available through their respective OTA software update mechanisms in Settings as well.
macOS High Sierra 10.13.1 beta 3 has not yet been released for Mac users, but if Apple follows the usual beta release cycle it will debut soon as well.
Some MacOS High Sierra 10.13.x users may wish to downgrade back to macOS Sierra 10.12.x or even Mac OS X El Capitan. Mac users can downgrade from High Sierra to a prior Mac OS release, either by formatting the hard drive and clean installing Sierra or another prior system release, or by relying on a Time Machine backup made prior to the update to macOS High Sierra.
The downgrade method we’ll cover here uses a Time Machine backup to restore to a prior version of macOS and downgrade macOS High Sierra 10.13. If you do not have a Time Machine backup made with a previous version of Mac OS, this will not be possible to follow.
Why downgrade from macOS High Sierra?
For most users, they should not downgrade from macOS High Sierra. Downgrading system software is probably most appropriate as a last resort or a final troubleshooting method, if some particular problem with High Sierra is making the Mac unusable or incompatible with your workflow. There are mixed reports of some Mac users updating to macOS High Sierra and then experiencing a range of problems, from rapid battery life draining, inability for some apps to open, apps crashing, strange performance problems or overall performance degradation, problems with mounting and reading disks, problems with networking connectivity and wi-fi, amongst other issues that could be considered deal breakers.
Important: Keep in mind there is no official downgrade path for macOS. Downgrading macOS High Sierra is accomplished by formatting the target hard drive, thereby erasing everything on it, then restoring from a prior Time Machine backup, or by formatting and then clean installing a prior version of macOS system software onto the computer, and then manually restoring files from some other backup. For our purposes here we will be covering a downgrade by erasing, then restoring from a Time Machine backup made prior to installing High Sierra.
If you do not have a Time Machine backup made prior to installing macOS High Sierra, of the Mac when on Sierra or El Capitan, then you can not proceed with this approach.
How to Downgrade macOS High Sierra to a Prior Mac OS Version
Backup your Mac before beginning this process, it requires erasing the hard drive and removing all data.
Connect the Time Machine backup volume to the Mac if it’s not already attached
Restart the Mac and immediately hold down Command + R keys together to boot into Recovery Mode on the Mac
When the “macOS Utilities” screen appears choose “Disk Utility”
Pull down the “View” menu in Disk Utility and choose “Show All Devices”
Select the hard drive with MacOS High Sierra installed on it, then click the “Erase” button in the tool bar
At the erase drive screen, name the drive and select “Mac OS Extended (Journaled)” as the file system format, click “Erase” when ready – ERASING DESTROYS ALL DATA ON THE SELECTED HARD DISK, DO NOT PROCEED WITHOUT A BACKUP
When the drive finishes formatting, exit Disk Utility to return to “macOS Utilities” screen
At “MacOS Utilities” select the option to “Restore from Time Machine Backup”
Select the Time Machine backup drive connected to the Mac as the backup source and choose to continue with the restore process
At the Time Machine “Select a Backup” screen, choose the most recently available backup that has the version of MacOS you want to restore (macOS Sierra is versioned as 10.12.x, Mac OS X El Capitan is 10.11.x) and select Continue
Choose the destination to restore the Time Machine backup to, this will be the hard drive you formatted earlier
Now choose “Restore” to confirm you want to restore the hard drive to the Time Machine backup
The restore of macOS will begin, this can take quite some time depending on the size of the backup, the speed of the hard drive, amongst other factors. Be prepared to wait a while, and let the entire process complete uninterrupted.
When the restore from Time Machine completes, the Mac will boot back up to the state and with the system version where the restored Time Machine backup was made.
Note that if the process of formatting the hard drive mentioned above is usually only necessary for Mac users who changed their file system to thew new AFPS file system available in macOS High Sierra. If the Mac file system was not changed then a regular old restore from Time Machine is possible without bothering with the additional step to format the drive, but nonetheless the data on the driven will be removed and replaced with the data on the Time Machine backup.
Apple has released iOS 11.0.3 for iPhone, iPad, and iPod touch users running iOS 11. The latest small software update includes bug fixes to iOS and is therefore recommended to all users running iOS 11 on their devices.
Release notes accompanying the iOS 11.0.3 download mention the update fixes an issue here audio and haptic feedback were not working on some iPhone 7 Plus and iPhone 7 devices, and also fixes an issue where some displays were unresponsive to touch on certain iPhone 6s models screens that had been replaced from third party sourcing (perhaps related, we recommend using Apple to replace a broken iPhone screen for best results). It’s unclear if any other bugs or security fixes are included in the iOS 11.0.3 release.
Users can download and install iOS 11.0.3 using OTA with the Settings app, iTunes, or using IPSW firmware files for iOS 11.0.3 with the provided direct download links below.
Download & Install iOS 11.0.3 on iPhone and iPad
The simplest way to download and install the iOS 11.0.3 update is through the Software Update mechanism in iOS Settings. Be sure to backup your iPhone or iPad to iCloud or iTunes (or both) before beginning the software update.
Open the “Settings” app, go to “General” and then to “Software Update”, then choose “Download and Install” on iOS 11.0.3
Users can also update to iOS 11.0.3 with iTunes on a computer with the generic update mechanism, or by using IPSW files.
iOS 11.0.3 IPSW Firmware Download Links
You can download iOS 11.0.3 as IPSW firmware files directly from Apple by using the links below, using IPSW to update iOS is considered advanced and is generally not necessary for most users:
There are mixed reports that updating to iOS 11 has slowed down some iPhone and iPad hardware, or that performance of tasks like opening and interacting with apps is slower after installing iOS 11. If your iPhone or iPad feels slow after installing iOS 11, then you might want to try a few of the tricks we have outlined in this tutorial to speed up your device again.
many of the tricks that help to speed up sluggish performance can also positively impact battery, so if you’re having iOS 11 battery life problems then you may find some cross-benefit to this approach as well.
Speed Up iOS 11 on iPhone and iPad
We’re going to cover a wide variety of tips here to potentially help speed up a device. Aside from the first two tips involving installing software updates and then having some patience and waiting a while, you can follow the others in any particular order.
1: Install Any Software Updates for iOS and Apps
Before going any further, check for software updates both to iOS and to your apps. Software updates can often remedy performance issues and are not to be skipped, particularly if a performance problem is related to a bug or some other problem that has been resolved in an available update.
For getting any updates to iOS 11 (such as iOS 11.0.2, iOS 11.1, etc)
Open the “Settings” app and go to > General > Software Update > and choose to Download & Install any update to iOS 11
For getting updates to apps:
Open the ‘App Store’ app and go to the Updates tab, and install any available app updates
2: Just Updated to iOS 11? Have Some Patience and Wait
If you just updated an iPhone or iPad to iOS 11 and the device feels slow, have some patience. When a major software update arrives on your device, iOS will re-index everything for Spotlight, Siri, Photos, and perform other background tasks. This can lead to the feeling the device is slow because of the increased background activity being performed.
The best thing to do is wait a few days, leave the device plugged into a wall outlet overnight, and let it complete whatever system behavior is necessary. After a night or two things usually behave normally again and performance is often better, and often this fixes battery life problems too.
3: Turn Off iOS Background App Refresh
Background App Refresh allows apps to update themselves in the background. This is nice for multitasking quickness, but it can also lead to a hit in system performance. Turning it off is easy, and most users won’t notice the difference in how apps function anyway.
Open “Settings” and go to > General > Background App Refresh > OFF
4: Disable Siri Suggestions & Siri Look Up
You can often speed up how fast Spotlight behaves, as well as the Notifications screen and elsewhere, by turning off Siri Suggestions and Siri Lookup features.
Open “Settings” and go to > Siri & Search > “Suggestions in Search” to OFF and “Suggestions in Look Up” to OFF
5: Force Reboot the Device
Sometimes forcibly rebooting a device can help performance, particularly if some errant process is going haywire in the background, or some app or other event is out of control
For most iPhone and iPad devices, hold down the POWER BUTTON and the HOME BUTTON concurrently until you see the Apple logo appear on screen.
On iPhone 7 and iPhone 7 Plus, hold down the VOLUME DOWN BUTTON and POWER BUTTON concurrently until you see the Apple logo appear on screen.
Then just wait for the device to boot back up again.
6: Use a Simple Wallpaper
Using a plain or simple wallpaper originating from a small file size image can help to speed things up sometimes. The idea behind using a simple or plain wallpaper is that it requires less memory and system resources to display, thus it can help to speed up drawing and redrawing of the Home Screen of the iOS device.
Open “Settings” and go to > Wallpaper > Select a boring wallpaper, either of a single color or a very small file size
The Home Screen might look a bit more boring when a simple background wallpaper picture, (or not, depending on your taste) but it also might feel a tad faster. Try it out, you can use the simple tiny gray image wallpaper below if you’d like, or find your own.
7: Disable Parallax UI Effects and Reduce Motion
iOS uses various visual effects which look snazzy but require more system resources to draw and render properly. Disabling those system user interface visual effects can improve performance, or at least the perception of improved performance by disabling the animations.
Open “Settings” and go to > General > Accessibility > Reduce Motion and turn ON
* While in Reduce Motion settings, you might want to turn off “Auto-Play Message Effects” too, since those animations in Messages app can also make things feel a bit sluggish sometimes.
When you turn on Reduce Motion, the zipping and zooming effects of opening and closing apps is replaced with a simple subtle fading animation too.
8: Reduce iOS System Transparency Effects
Transparency and blur effects are scattered throughout iOS, from the Dock, to Control Center, to Notifications panels, and more. They look nice, but rendering those blur effects can use system resources and make things feel sluggish sometimes. Turning them off may help the device feel faster:
Open “Settings” and go to > General > Accessibility > Increase Contrast > Reduce Transparency to ON
Using Increase Contrast can make things look a bit plain, but using things like Control Center should feel faster as a result.
9: Make Sufficient Free Storage Space Available on the iPhone or iPad
Having sufficient free storage available is ideal for optimal performance of an iPad or iPhone. Generally speaking it’s a good idea to have 10% or more free storage available. So if you have a 32GB device, then having 3 GB of free space or more is desirable. This is so there is plenty of available space for caches, updating apps and iOS itself, and performing other system functions.
Open “Settings” and go to > General > then choose “Storage” (now labeled as iPhone Storage or iPad Storage, respectively)
Once you’re in the Storage management section of your device, you can either follow the recommendations to free up storage space, or delete unused or old apps, or take other actions necessary to free up storage on the iPhone or iPad.
This is important, and if your iPhone or iPad is full or very low on storage, performance will suffer, plus you won’t be able to install updates to apps or system software, and other strange behavior can occur like locking a user out of their email, data being mysteriously removed from the device, amongst other curiosities. Always aim to have some storage space available.
10: Reset iOS System Settings
Resetting your iOS device settings may speed up performance for some users. Be aware if you reset device settings, you will need to make configurations to all of your custom settings changes again, like many covered previously in this article.
Open Setttings and go to General > Reset > Reset All Settings
11: Backup & Restore iOS
A common troubleshooting trick is to backup a device to iTunes or iCloud, then restore iOS. This can sometimes fix obscure performance issues, and if you contact Apple to troubleshoot a device they will likely want you to perform this action as part of their process.
You can backup to iTunes, or iCloud, or both. Always backup before beginning a restore process.
Using iTunes with the device connected to the computer, you then choose to “Restore” the device. Or you can choose to Restore directly on the device itself and select either iCloud or iTunes backup to restore from.
Some users may also try setting up a device as new which means nothing is on the device at that point. An obvious flaw to that approach is the iPhone or iPad would be lacking any data, images, pictures, photos, notes, apps, contacts, or any other personal information. This is why most users choose to restore from a backup instead of setting up as new. Nonetheless, if you don’t care about that, setting up a device as new can sometimes make it feel snappier.
What about reverting from iOS 11 back to iOS 10?
Some users may wish to downgrade iOS 11 back to a prior version of system software on their iPhone or iPad.
While reverting to the prior iOS release was possible for a while, unfortunately this is no longer an option for most devices, because Apple has stopped signing the iOS 10.3.3 firmware. You can learn about how to check iOS IPSW firmware signing status here if the topic interests you.
The Messages screen in iOS 11 is busier than ever before, displaying a row of colorful icons and iMessage apps on the bottom of every conversation in Messages on iPhone and iPad. While some users will love the quick access to their gifs, message stickers and apps, not everyone is satisfied with having a row of brightly colored app icons and the app drawer showing up with their Message conversations, and many professional users have sought out a way to disable or remove the Messages app icons from the iOS communication client.
If you’d like to hide the Message app icons in iOS 11 on an iPhone or iPad, you can do so with a little trick that hides the app drawer.
How to Hide the Messages App Icons in iOS 11
Open Messages app in iOS 11 if you have not done so already and open a message conversation thread
Tap the gray App Store icon button to hide the Messages app drawer *
The Messages app drawer and row of icons will stay hidden until it is revealed again by tapping the App Store icon again. Additionally, if you use an iMessage app or sticker, the Message dock row of icons will appear again, meaning you’ll have to tap the icon to hide it again.
How to Show the Messages App Icon Drawer in iOS 11
If you’d like to see and access the Message app drawer of icons, simply open a message thread then tap on the App Store icon to reveal the iMessage apps and stickers again.
* Note that some users have reported that tapping and then swiping down on the App Store icon is necessary to hide the iMessage app drawer. Whether or not the behavior is different per device is not entirely clear, but should you have problems hiding the iMessage apps row with the tap method try the press and swipe gesture instead.
This is a less than obvious method of hiding the feature, but like some other parts of modern iOS it’s often a discovery process to learn how to perform a particular function that is discretely implemented. Many users have wandered around searching for an option to disable the app icon drawer in the Messages section of Settings, but there is no app drawer toggle available there, and instead the ability to hide and show the iMessage app drawer is entirely contained within the Messages app itself.
Thanks to the various readers who emailed or left comments, like Lisa, who asked “How do I get the apps off the bottom of my text screen. Who had that bright idea?” for the question and tip idea!