❤ Five new features coming to AirPods Pro 2 this year
![]()
Apple delivered a solid update to its best wireless earbuds last fall with the launch of AirPods Pro 2. Now Apple is turning it up to 11 with five all-new features coming to the gen-two AirPods Pro – no hardware upgrade required.
Adaptive Audio
AirPods Pro 2 currently have three modes of noise control. Noise Cancellation effectively mutes the world around you. Transparency pipes in sounds around you while your ears are plugged. And off… off is what in-ear headphones sounded like before AirPods Pro. Damp and muffled. You’re probably in Noise Cancellation or Transparency.
Enter Adaptive Audio. You may never need the other two modes again.
Adaptive mode “dynamically blends Transparency mode and Active Noise Cancellation together based on the conditions of a user’s environment to deliver the best experience in the moment,” says Apple.
And it works like a charm.
Adaptive Audio lets you enjoy the presence of Transparency while you’re doing dishes then seamlessly adjust to Noise Cancellation when you turn on the vacuum cleaner. You won’t even realize mode switching occurred because audio playback just sounds consistent. The return of ambient sounds around you will wow you when you notice what just happened.
Conversation Awareness
From the very first version in 2017, AirPods have always been great at letting you stop the audio and tune in to the world. With Auto-Pause, you just remove an AirPod from your ear and playback stops. Slick.
Conversation Awareness is a new take on a similar idea.
If you speak with Conversation Awareness turned on, AirPods Pro 2 will be able to automatically lower your volume and enhance the voices of people speaking in front of you. While this is happening, Conversation Awareness will actively reduce background noise behind you.
In other words, it might finally be possible to have a conversation in a bar. What? I’m not tuning you out, I’m doing this because I care! But seriously, this will make jamming to music and saying hello to someone passing by possible without ever touching your AirPods.
Mute or Unmute
Mute or Unmute may not sound as mind-blowing as Adaptive Audio and Conversation Awareness, but it’s just as convenient if you ever use your AirPods Pro 2 on a phone call. Starting later this fall, you’ll be able to easily mute yourself during any call through your AirPods by pressing the stem. Press again to unmute. No need to pull out your phone.
But wait, there’s more. Personalized Volume is a new feature that will rely on machine learning to let AirPods “understand environmental conditions and listening preferences over time to automatically fine-tune the media experience.”
Automatic Switching is a feature for moving between Apple devices that exists today. An update to the feature will see the “connection time between a user’s Apple devices is significantly faster and more reliable,” according to Apple.
So that’s what we have to look forward to with AirPods Pro 2 later this year. Adaptive Audio, Conversation Awareness, Mute or Unmute, Personalized Volume, and Automatic Switching improvements will be available through a free software update starting this fall.
Conversation Awareness on AirPods Pro interrupting your music? Here’s why you may want to turn it off

Adaptive Audio in iOS 17 for AirPods Pro 2 brings multiple improvements with one of the new features automatically switching the headphones to transparency mode and lowering the volume when it hears you talking. While the capability works very well, there are some situations where it’s not helpful. Here’s how to turn off Conversation Awareness on AirPods Pro 2.
Apple highlights three features make up the new Adaptive Audio capabilities for AirPods Pro 2 with iOS 17.
“Adaptive Noise Control” is what “dynamically adjusts the external noise you are exposed to.” “Personalized Volume” adjusts your media’s volume “in response to your environment,” and there’s “Conversation Awareness” which switches to transparency mode and lowers your media volume when you start talking.
While the automatic nature of these three features and how seamlessly AirPods dynamically adjust feels like magic, fortunately, Apple has included separate controls for using Adaptive Noise Control and Conversation Awareness (and Personalized Volume too). That means Adaptive Audio isn’t an all-or-nothing feature.
What can interrupt music and videos with Conversation Awareness?
I’ve been very impressed with Conversation Awareness so far and often, I leave it turned on. However, there are a couple of scenarios where you’ll probably want to turn it off:
- If you want to sing along with your music, you’ll find Conversation Awareness isn’t a good fit
- Laughing can also trigger it, but in my testing, the feature ignores whistling and humming
A slick aspect of Conversation Awareness is it knows when you’re talking with someone versus being near others who are talking.
That means your AirPods only switch to transparency mode and lower your volume when you join a conversation. So you can leave the feature on for things like public transit, close workspaces, etc. without it interrupting your music/content.
How to turn off Conversation Awareness on AirPods Pro 2
Adaptive Audio is only available with AirPods Pro 2. You’ll need the iOS 17 betaon your iPhone along with the AirPods beta installed. With this being a developer beta, install it at your own risk.
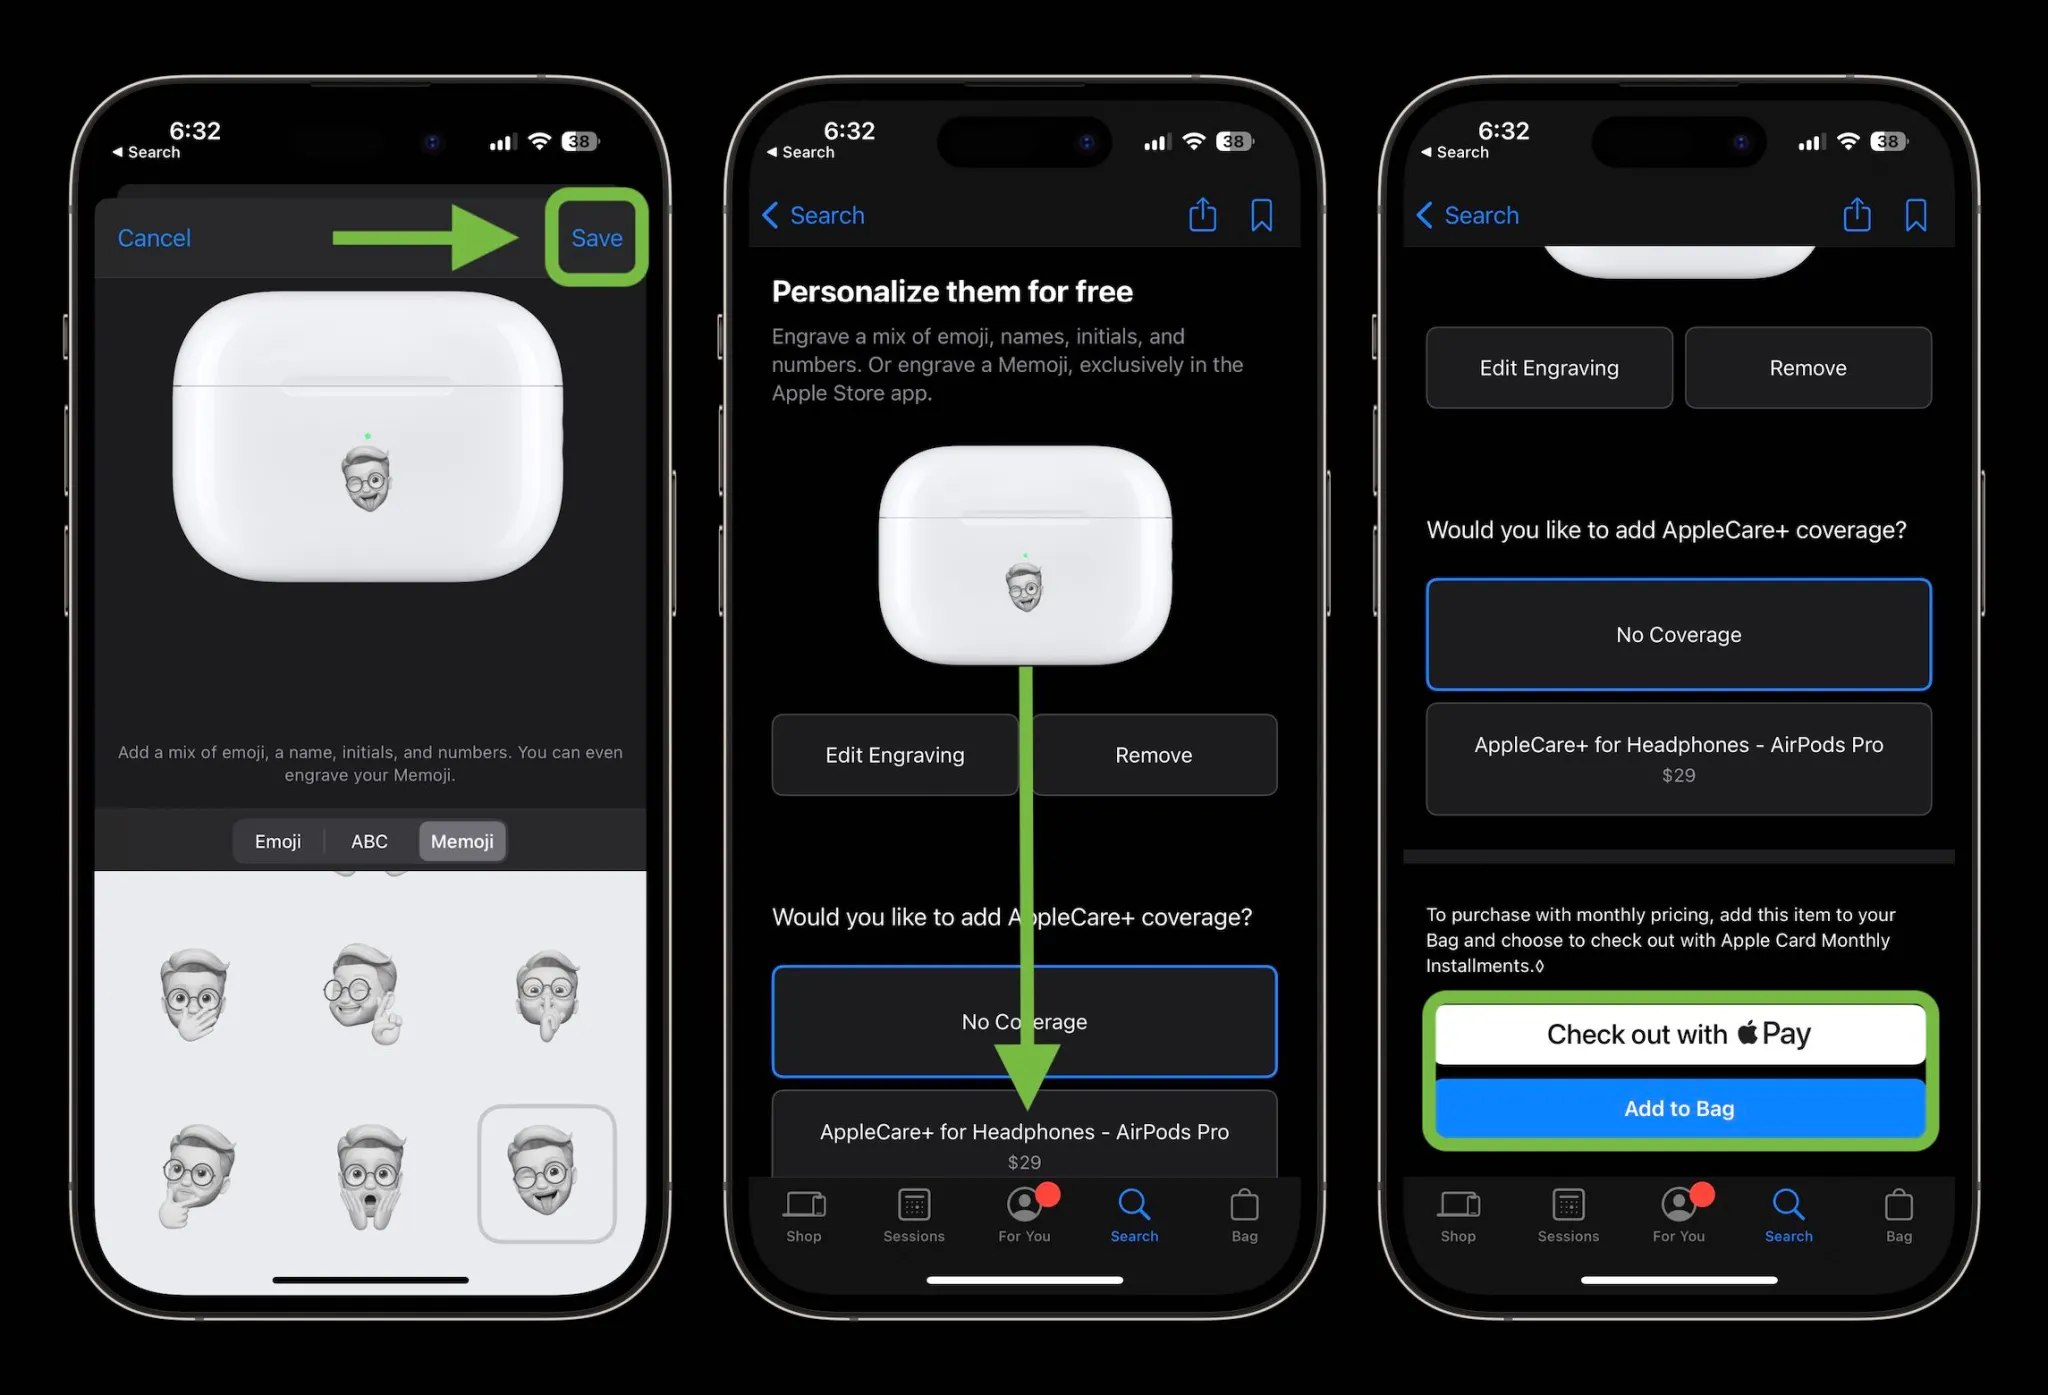
- Open Control Center on your iPhone (pull down from the top-right corner)
- Long press on the volume/AirPods slider (make sure your AirPods are connected)
- Tap Conversation Awareness to toggle it off/on
- Alternatively, you can head to iOS Settings > AirPods > swipe down and under Audio, tap Conversation Awareness
Here’s how it looks to turn off Conversation Awareness:

How to turn on AirPods Pro Adaptive Audio, how it works, more

AirPods Pro 2 get several impressive upgrades alongside iOS 17 with the headlining new capability allowing them to automagically adjust between noise-cancellation and transparency modes, change volume, and make it easier to hear voices. Follow along for how to turn on AirPods Pro Adaptive Audio, how it works, and more.
How AirPods Pro Adaptive Audio works
Apple says that Adaptive Audio is made up of three different automatic features.
First, Adaptive Audio includes “Adaptive Noise Control” which is what “dynamically adjusts the external noise you are exposed to.” Second, “Personalized Volume” adjusts your media’s volume “in response to your environment,” and third there’s “Conversation Awareness” which switches to transparency mode when you start talking and lowers your media volume.
Its been very impressed with how those three aspects of Adaptive Audio combine to offer a slick experience that feels seamless and magical.
I think a lot of that is thanks to a crossfade-like effect which means it doesn’t abruptly switch between modes, it’s a really smooth adjustment/transition between noise cancellation, transparency, and lowering/raising volume.
How to turn on AirPods Pro Adaptive Audio
Adaptive Audio is only available with AirPods Pro 2. You’ll need the iOS 17 beta on your iPhone along with the AirPods beta installed . With this being a developer beta, install it at your own risk.
- After installing the AirPods beta, look for a splash screen asking if you’d like to turn on Adaptive Audio when using your AirPods Pro 2
- If you don’t see that, you can manually turn the feature on
- Open Control Center on your iPhone (pull down from the top-right corner) and long press on the volume/AirPods slider (make sure your AirPods are connected)
- Tap the Noise Control button
- Choose Adaptive
- Now your AirPods Pro 2 will now automatically move between noise cancellation and transparency
- You can also customize your AirPods Pro 2 controls
- With your AirPods connected, open the Settings app on your iPhone > tap your AirPods at the top
- Under Press and Hold AirPods > tap Left or Right (or whichever one says Noise Control)
- The default appears to have AirPods Pro stem presses switch between Adaptive Audio and noise cancellation
- You can add transparency and off to the mix of controls that long presses on your AirPods stem(s) will cycle through
- You can turn off Conversation Awareness while leaving Adaptive Audio turned on
- Alternatively, in iOS Settings > AirPods > swipe down and under Audio, tap Conversation Awareness, Personalized Volume, or Loud Sound Reduction to turn any of them off
Here’s how it looks to turn on AirPods Pro Adaptive Audio:
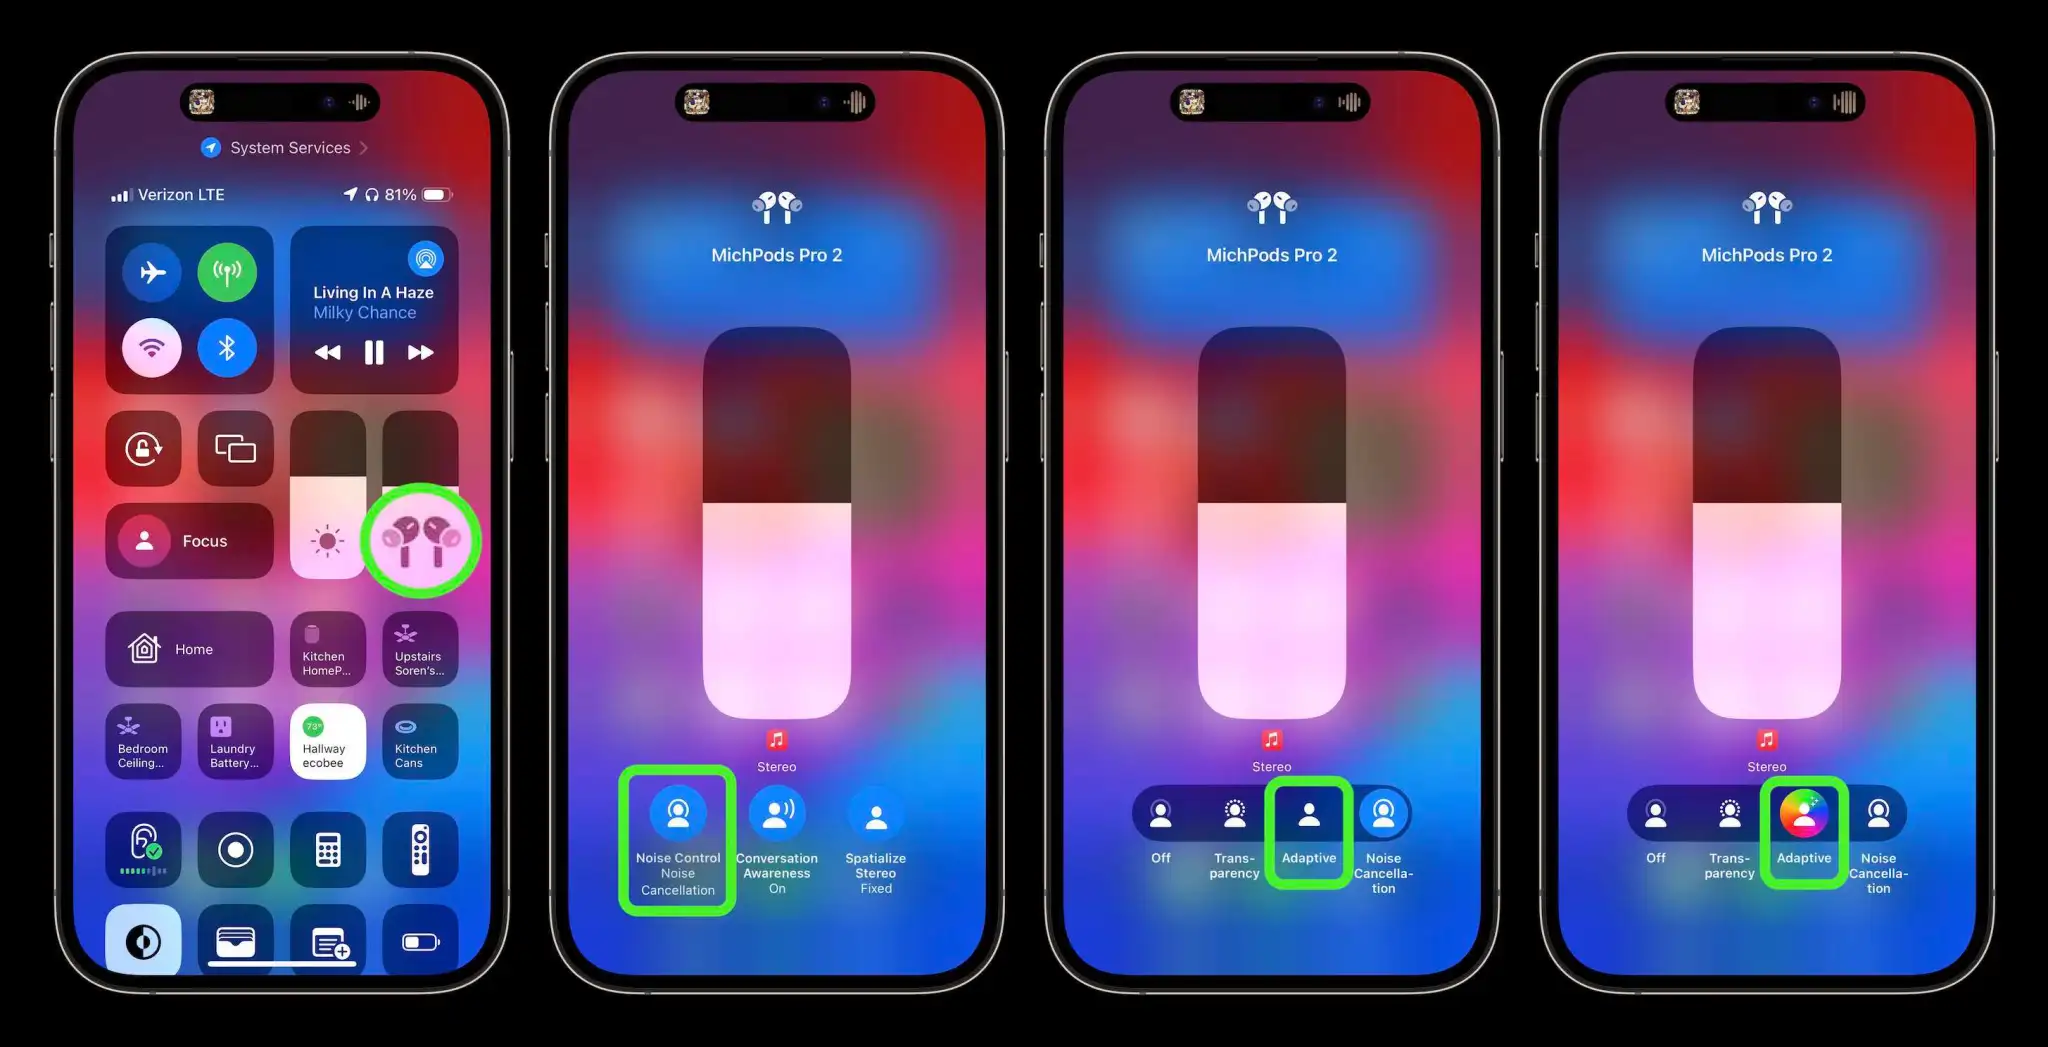
There’s a new unique sound effect that confirms Adaptive Audio is on and you’ll see the color wheel behind the Adaptive icon.
If you leave the AirPods Noise Control settings up while using Adaptive Audio, you can watch it smoothly switch between the different Noise Control modes as sound in your environment changes, you talk to people, etc.
You can also select Adaptive Audio in iPhone Settings > select your AirPods Pro along with customizing what long presses on your stems do:

But in my experience, Adaptive Audio auto adjustments work so well that I don’t need to switch between the audio modes manually anymore – and also means I don’t have to pull an AirPod out of my ear to hear or talk with someone.