This blog post details the journey of a customer from Byron Bay, Australia, who needed his broken Galaxy Note 20 Ultra repaired. He chose to ship the device to Sydney CBD Repair Centre despite being closer to other repair shops because of the company’s reputation for using genuine parts and having exceptional customer service. The document then provides a step-by-step breakdown of the repair process, including the communication with the customer and the shipping of the device back to Byron Bay. The customer’s positive review highlights the company’s efficiency, quality, and customer satisfaction. Finally, the blog post discusses why Sydney CBD Repair Centre is a popular choice for mobile phone repairs, noting their five years as one of Sydney’s top three repair shops, their over 18,000 positive Google reviews, and their ability to offer same-day repairs.
Arthur M., a resident of the beautiful Byron Bay, found himself in a frustrating situation. His Galaxy Note 20 Ultra, the last in the Galaxy Note series to feature an external SD card, had suffered a cracked screen and a dying battery. While there were repair shops closer to him in nearby Brisbane, he made a wise decision. After thorough research, Arthur chose Sydney CBD Repair Centre to restore his beloved device.
Why? Because Sydney CBD Repair Centre is renowned for its professional service, use of genuine parts, and exceptional customer reviews. Arthur was well aware that this would be the best place for his repair, even if it meant sending his phone across hundreds of kilometers.
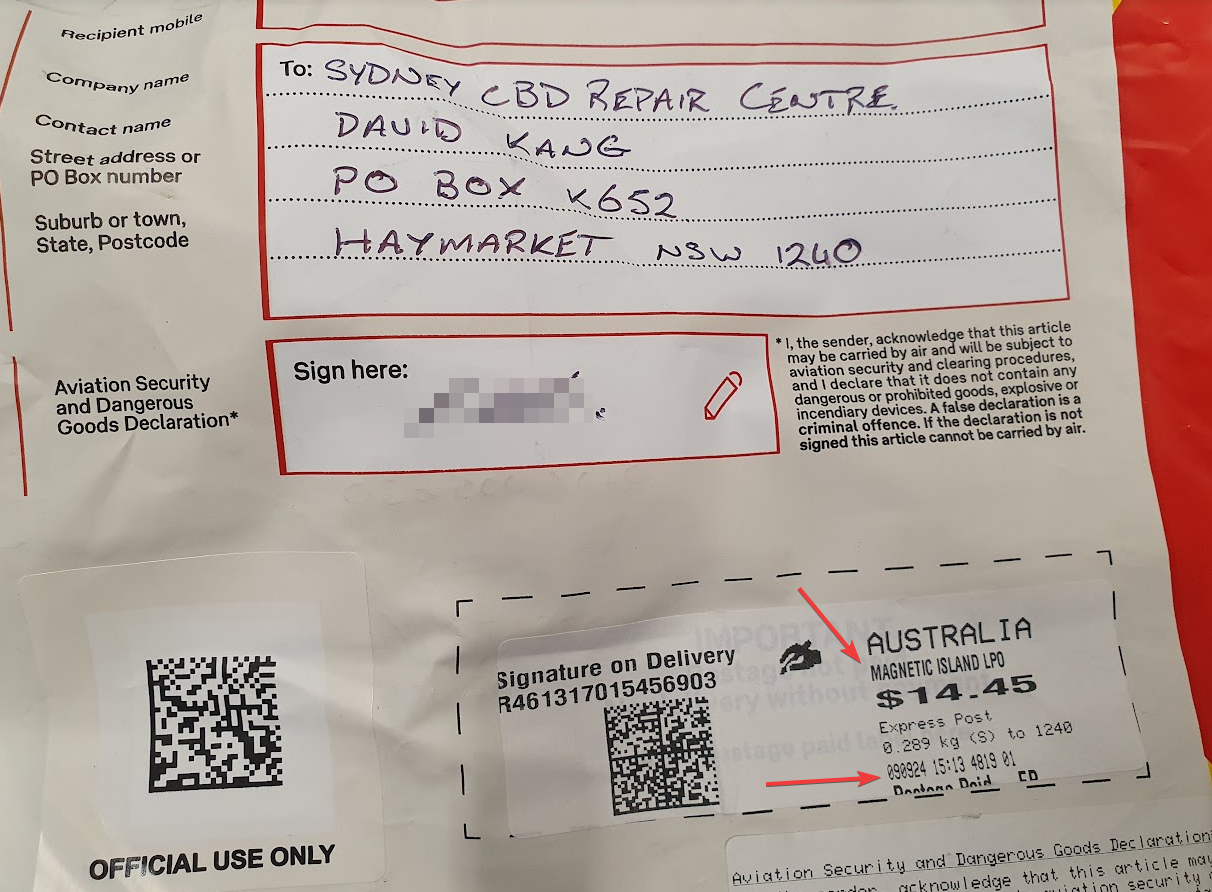
Once Arthur made contact with Sydney CBD Repair Centre, the process was seamless. They gave him detailed instructions about how to ship his device, where to send it, and how to make the payment. Trusting Australia Post with his package, Arthur sent his Galaxy Note 20 Ultra on a journey from Byron Bay to Sydney.
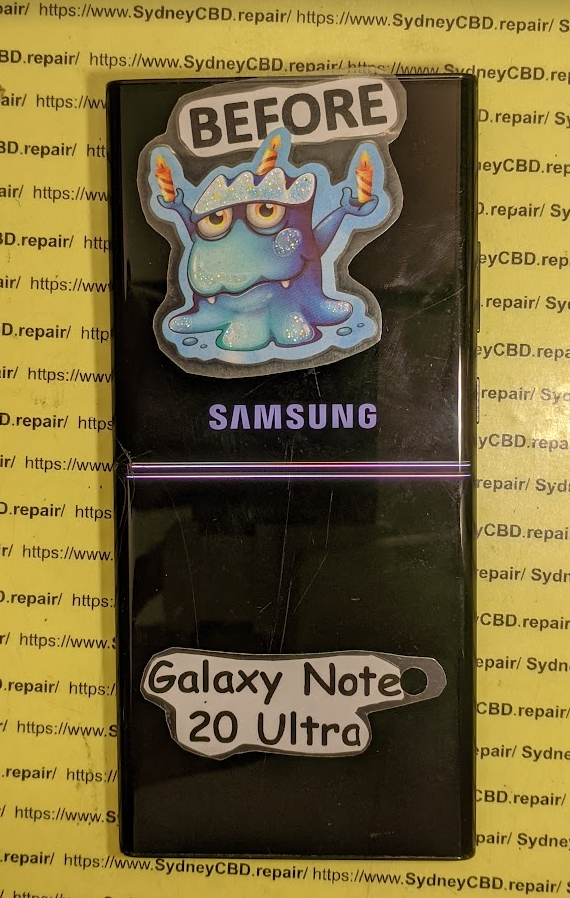
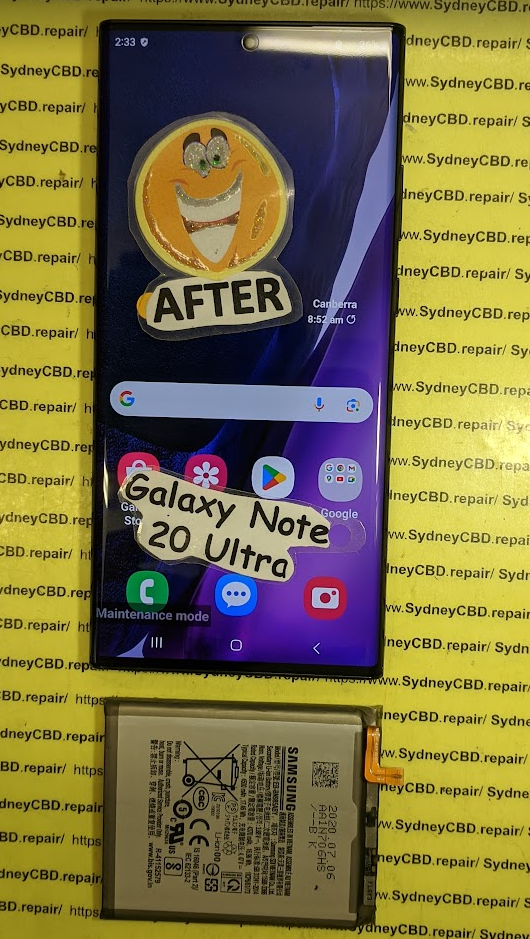
The next part of the story is where David, the expert technician at Sydney CBD Repair Centre, took swift action. That very morning, David replaced the broken screen and battery of Arthur’s phone, ensuring that the S-Pen worked flawlessly. To top it off, a complimentary screen protector was applied for extra protection.
By noon, David contacted Arthur to confirm the repair and verify the return delivery details. On the same day, Arthur’s phone was posted back to Byron Bay, wrapped in secure packaging and ready for the journey home.
Tracking History – Sydney to Byron Bay:
Wed, 25 Sep, 1.04 pm – “We’ve got it,” confirmed by Australia Post. The phone was back on the road to Byron Bay.
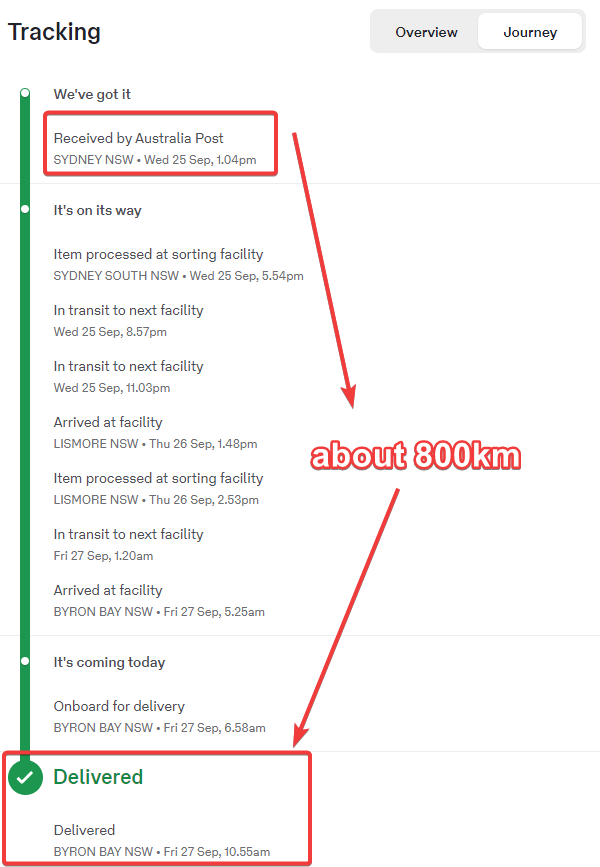
Thu, 26 Sep, 1.48 pm – The package arrived at Lismore.
Fri, 27 Sep, 10.55 am – Delivered! Arthur’s Galaxy Note 20 Ultra was finally home.
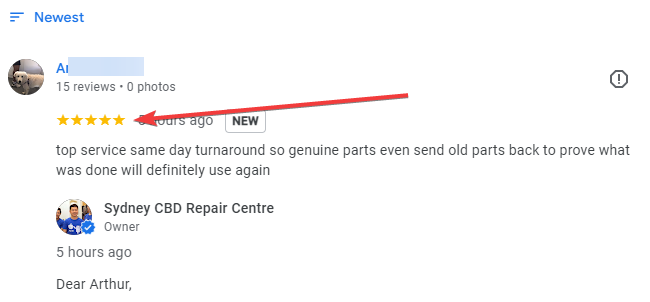
Arthur was ecstatic. His phone looked and worked as if it were brand new. Overjoyed by the fast, reliable service and the genuine parts used in the repair, he left a glowing 5-star review:
“Top service, same-day turnaround! Genuine parts, even sent the old parts back to prove what was done. Will definitely use again!”
For David and Sydney CBD Repair Centre, another happy customer and another Galaxy Note 20 Ultra brought back to life. Arthur’s wise decision to trust the best in the business was clearly worth the extra distance.
sydney-cbd-repair-centre-thank-you2.png
Sydney CBD Repair Centre: Recognized as one of the Top 3 Mobile Phone Repair Shops in Sydney for five years in a row, with over 18,000 positive reviews on Google. Same-day repairs with genuine parts!
How Sydney CBD Repair Centre Became the Go-To Repair Shop for a Galaxy Note 20 Ultra Owner from Byron Bay
Introduction
Byron Bay, a stunning coastal town in New South Wales, is renowned for its breathtaking beaches, laid-back lifestyle, and vibrant community. It’s not the first place you’d think of when it comes to mobile phone repairs, especially considering its distance from major cities like Sydney. Despite Byron Bay being relatively close to Brisbane with plenty of repair options there, one customer with a broken Galaxy Note 20 Ultra made the decision to send his device to Sydney CBD Repair Centre after extensive research.
Why would someone from Byron Bay bypass local and nearby repair shops to send their phone all the way to Sydney? The reasons are simple yet compelling. In this article, we dive into the customer’s journey, why Sydney CBD Repair Centre was the best choice, and how the entire process unfolded smoothly.
The Last of Its Kind: The Galaxy Note 20 Ultra
Why Is the Galaxy Note 20 Ultra So Special?
The Galaxy Note 20 Ultra holds a unique place in the smartphone world. It’s the last Galaxy Note model to feature an external SD card slot, a beloved feature for users needing expandable storage. Combine that with its powerful performance, and many owners still hold onto this model. Even years after its release, it’s a device that can be revitalized with the right repairs, like battery replacements and screen fixes.
The Importance of Keeping the Galaxy Note 20 Ultra in Working Condition
For many, the Note 20 Ultra is not just a phone; it’s a tool for productivity, creativity, and entertainment. The S Pen, powerful processor, and large screen make it ideal for professionals and artists alike. When something goes wrong with this device, finding a repair center that can handle it with care and expertise is essential.
Our customer, Arthur M**, from Byron Bay, knew his Galaxy Note 20 Ultra was worth repairing. After doing his research, he came across Sydney CBD Repair Centre. Despite the distance, Arthur chose this repair center because of its stellar reputation, expertise with high-end Samsung models, and the use of genuine parts.
Genuine Parts and Expertise
The quality of the parts used in a repair can make all the difference. Sydney CBD Repair Centre is known for its use of genuine parts, which reassured Arthur that his Galaxy Note 20 Ultra would receive the best possible care. Plus, with over 18,000 positive reviews and being recognized as one of the top 3 repair shops in Sydney for five consecutive years, the decision seemed clear.
How the Repair Process Worked: A Step-by-Step Breakdown
Step 1: Initial Contact
Arthur reached out to Sydney CBD Repair Centre, inquiring about the repair process. He was quickly provided with all the necessary details: where to send his device, how to make the payment, and what to expect. The communication was smooth and efficient, making the process straightforward.
Step 2: Posting the Device to Sydney
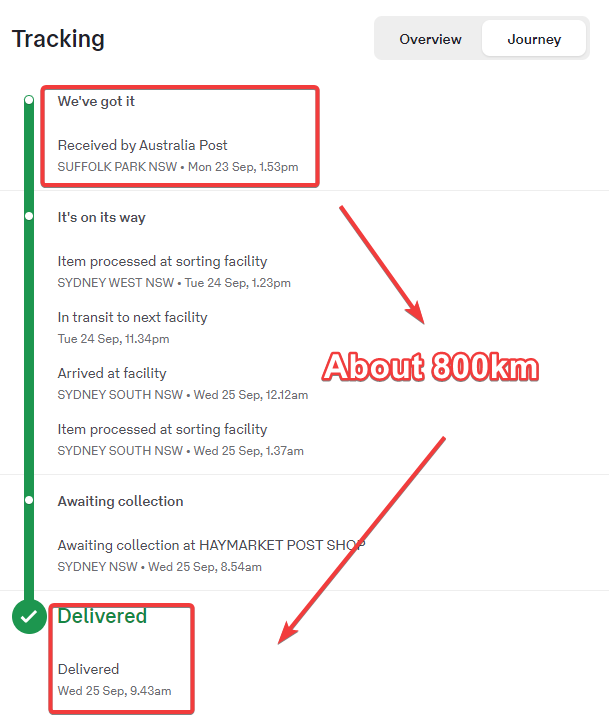
After confirming all the details, Arthur sent his Galaxy Note 20 Ultra via Australia Post. Here’s the tracking history of the device as it traveled from Byron Bay to Sydney:
Received by Australia Post, Suffolk Park NSW – Mon 23 Sep, 1.53 pm
Processed at sorting facility, Sydney West NSW – Tue 24 Sep, 1.23 pm
Arrived at facility, Sydney South NSW – Wed 25 Sep, 12.12 am
Awaiting collection at Haymarket Post Shop, Sydney NSW – Wed 25 Sep, 8.54 am
Once the phone arrived at the repair center, David, one of the top technicians at Sydney CBD Repair Centre, got to work. The phone’s broken screen was replaced with a genuine Samsung screen, and the battery was swapped out for a new one. To ensure everything was working correctly, the S Pen function was tested, and a free screen protector was applied as an added bonus.
Step 4: Communication with Arthur
After completing the repairs, David contacted Arthur to confirm the delivery address and receiver name. The process was swift, and before long, the phone was ready to be sent back.
Step 5: Posting the Device Back to Byron Bay
Arthur’s repaired Galaxy Note 20 Ultra was sent back to Byron Bay the very same day. Here’s the tracking history from Sydney back to Byron Bay:
Received by Australia Post, Sydney NSW – Wed 25 Sep, 1.04 pm
Processed at sorting facility, Sydney South NSW – Wed 25 Sep, 5.54 pm
This review speaks volumes about the quality of the service offered by Sydney CBD Repair Centre. The use of genuine parts, the transparency in sending back the old parts, and the fast same-day turnaround are all key factors that led to this stellar review.
Why Sydney CBD Repair Centre Is the Best Choice for Phone Repairs
5 Years as One of Sydney’s Top 3 Mobile Phone Repair Shops
With a track record of excellence, Sydney CBD Repair Centre has been ranked among the top 3 mobile phone repair shops in Sydney for five years in a row. This achievement is a testament to their expertise, customer service, and consistent quality.
Over 18,000 Positive Reviews
It’s not just Arthur who had a great experience. With over 18,000 positive reviews on Google, Sydney CBD Repair Centre has built a reputation for excellence that spans across thousands of satisfied customers.
Same-Day Repairs
One of the standout features of this repair center is their ability to offer same-day repairs. In Arthur’s case, the repair was done and posted back within the same day, minimizing the time he had to be without his phone.
Conclusion
Arthur’s experience with Sydney CBD Repair Centre highlights the importance of choosing the right repair shop for your device, no matter how far away you are. The combination of genuine parts, expert technicians, and a commitment to customer satisfaction sets Sydney CBD Repair Centre apart from the competition. Whether you’re in Byron Bay or right in the heart of Sydney, this repair center is the go-to destination for quality mobile phone repairs.
FAQs
1. Why should I choose Sydney CBD Repair Centre over local repair shops?
Sydney CBD Repair Centre is renowned for its expertise with high-end devices and uses genuine parts, ensuring your device gets the best possible care. Their excellent customer service and fast turnaround make them worth considering, even if you’re far from Sydney.
2. How long does the repair process take?
In most cases, Sydney CBD Repair Centre offers same-day repairs, meaning your device will be fixed and sent back to you quickly.
3. Do they use genuine parts?
Yes, Sydney CBD Repair Centre uses genuine parts for all repairs, ensuring the highest quality and longevity for your device.
4. How do I send my phone for repair if I’m not in Sydney?
The process is simple. Contact Sydney CBD Repair Centre to receive details on how to send your device via Australia Post. Once your device arrives, it will be repaired and sent back to you promptly.
5. What if I have other issues with my device besides the screen?
Sydney CBD Repair Centre can handle a wide range of issues, from battery replacements to internal repairs. Just let them know what needs fixing, and they’ll provide a solution.
People also ask
What are the benefits of choosing Sydney CBD Repair Centre for Galaxy Note 20 Ultra repairs?
How does the cost of repairing a Galaxy Note 20 Ultra compare to purchasing a new phone with similar features?
What are the long-term advantages of maintaining a Galaxy Note 20 Ultra, considering its unique features like the external memory slot?
📱 **Galaxy Note 20 Ultra Overview**
-The Samsung Galaxy Note 20 Ultra is a high-end smartphone known for its large display, advanced camera system, and integrated S Pen stylus. It was released in August 2020.
💾 **Expandable Storage and S Pen**
-The Note 20 Ultra supports expandable storage via microSD and features an S Pen with 9ms latency, making it ideal for note-taking and drawing.
-If you value the S Pen and expandable storage, repairing might be worthwhile. Consider the repair cost against the price of a new device with similar features.
Here are the factors that influenced the customer’s decision to choose Sydney CBD Repair Centre for their Galaxy Note 20 Ultra repair, based on the provided sources:
Sydney CBD Repair Centre’s positive reputation: The customer, Arthur M., chose Sydney CBD Repair Centre after conducting research and discovering its excellent reputation. The repair center is known for its expertise in repairing high-end Samsung phones and for using genuine parts.
Use of genuine parts: Sydney CBD Repair Centre is known for using genuine parts, which gave Arthur confidence that his phone would receive the best possible care.
Positive customer reviews: Arthur was influenced by the repair center’s overwhelmingly positive reviews. Sydney CBD Repair Centre has over 18,000 positive Google reviews and has been recognized as a top-three repair shop in Sydney for five years running.
The sources also mention that Sydney CBD Repair Centre offers same-day repairs, which was likely a factor in Arthur’s decision. However, the sources do not explicitly state that this influenced his choice.
Sydney CBD Repair Centre differentiated itself from other repair shops by cultivating a strong reputation for professionalism, the use of genuine parts, and positive customer reviews. This emphasis on quality, combined with clear communication and a streamlined repair process, convinced Arthur, the customer from Byron Bay, to entrust his Galaxy Note 20 Ultra to them despite the distance.
Here’s a breakdown of the key factors:
Reputation and Expertise: Arthur’s research led him to Sydney CBD Repair Centre due to their stellar reputation and expertise in repairing high-end Samsung models. They have consistently been ranked among the top 3 mobile phone repair shops in Sydney for five years running, further solidifying their standing.
Genuine Parts: The use of genuine parts was a major deciding factor for Arthur. Sydney CBD Repair Centre emphasizes this, assuring customers that their devices will receive the best possible care. This commitment to quality is further evidenced by their practice of returning the replaced parts to customers, offering transparency and building trust.
Positive Customer Reviews: The abundance of positive customer reviews, exceeding 18,000 on Google, contributed to Sydney CBD Repair Centre’s appeal. These reviews, along with Arthur’s own positive experience, demonstrate a consistent track record of customer satisfaction.
Efficient Communication and Processes: From the initial inquiry to the final delivery, Sydney CBD Repair Centre maintained clear and efficient communication with Arthur. This, coupled with their streamlined repair process and commitment to same-day repairs, ensured a smooth and hassle-free experience for the customer.
In essence, Sydney CBD Repair Centre differentiated itself through a combination of technical expertise, a commitment to quality parts, transparent communication, and a customer-centric approach. This resonated with Arthur, who prioritized these factors over geographical proximity.
Implications of Customer Experience for Sydney CBD Repair Centre’s Success
The overwhelmingly positive customer experience detailed in the sources has several implications for the overall success of Sydney CBD Repair Centre:
Attracting Customers from Afar: Arthur’s willingness to ship his device from Byron Bay to Sydney, bypassing closer repair options, demonstrates the potential for Sydney CBD Repair Centre to attract customers beyond their immediate geographical location. This is largely due to their strong reputation for quality repairs and exceptional customer service.
Building a Loyal Customer Base: Arthur’s positive experience, culminating in a glowing 5-star review and his stated intention to use their services again, highlights how positive customer experiences can translate into repeat business and build brand loyalty.
Generating Positive Word-of-Mouth Marketing: Arthur’s positive review, added to over 18,000 others on Google, contributes to a strong online reputation that can attract new customers. This organic marketing is invaluable for building trust and credibility.
Justifying Premium Pricing: While the sources don’t mention specific prices, the use of genuine parts, same-day service, and excellent customer service potentially allows Sydney CBD Repair Centre to command a premium price point compared to competitors. Customers like Arthur are willing to pay more for the peace of mind and quality assurance that comes with a premium service.
Long-Term Business Growth: Continued positive customer experiences like Arthur’s can lead to sustained business growth for Sydney CBD Repair Centre. Their reputation for quality, speed, and customer care positions them as a leader in the competitive mobile phone repair market.
Title: “A Roadside Rescue for a Google Pixel 7 Pro”
It was another busy afternoon at Sydney CBD Repair Centre, the place known for its unbeatable service, top-tier expertise, and a five-year streak as one of the Top 3 Mobile Phone Repair shops in Sydney. David, the go-to technician, was in the middle of a screen replacement when the door swung open, and a customer hurried in with a phone that looked like it had been through a war zone.
“Hey, is this fixable?” the customer asked, holding up a Google Pixel 7 Pro with a screen so shattered it looked like it had been hit by a truck — or several.
David gave the phone a quick glance and smiled. “Definitely, it’s fixable,” he assured. “What happened to it?”
The customer sighed and shook his head. “I was running across the road, didn’t even realize I dropped it. It was in my back pocket. By the time I noticed, I went back and saw it in the middle of the road — and, man, a bunch of cars had already run over it! A stranger even tried to pick it up, and I had to shout, ‘Hey, wait a sec, that’s my phone!'”
David chuckled. “That’s rough. You’re lucky you managed to get it back.”
“Yeah, I quickly Googled phone repair shops, and your YouTube video popped up! Over 10k subscribers — figured you were the man for the job.”
David grinned, appreciating the nod to his growing online presence. “Well, you’ve come to the right place. I’ll get this screen replaced in no time.”
Within the hour, David had carefully replaced the screen, making the phone look as good as new. To top it off, he threw in a free screen protector, knowing how often phones can slip out of pockets and meet the pavement.
When David handed the phone back, the customer’s face lit up. “Wow! I didn’t think it would ever look like this again. Thanks so much, David!”
David smiled. “Glad you’re happy with it. Just one tip — try not to run while crossing the road. It’ll save your life and your phone!”
They both laughed, and with a new screen and some extra advice, the customer left the shop, fully satisfied with his Pixel 7 Pro restored and ready for use. Another day, another happy customer at Sydney CBD Repair Centre.
In the fast-paced world of modern technology, our smartphones are an essential part of our lives. Whether it’s for communication, entertainment, or work, a reliable device like the Google Pixel 7 Pro is indispensable. However, accidents happen, and sometimes, they happen at the worst possible moment. Imagine being in the middle of a busy street and dropping your Google Pixel 7 Pro, only to watch it get run over by multiple cars. Sounds like a nightmare, right? Fortunately, with the right expertise and service, even such dire situations can have a happy ending.
This article explores how a seemingly catastrophic accident involving a Google Pixel 7 Pro led to a swift and impressive recovery, thanks to Sydney CBD Repair Centre’s skilled technicians and renowned service.
The Incident: A Runaway Phone in the Middle of the Road
A routine day took a sharp turn when a customer entered Sydney CBD Repair Centre with a severely damaged Google Pixel 7 Pro. The device had been accidentally dropped while the customer was crossing the road. Worse yet, before the owner could retrieve it, the phone had been run over by several vehicles.
The customer, distressed by the sight of his shattered screen, hurriedly searched for a repair solution. With over 10,000 subscribers on YouTube and a glowing online reputation, Sydney CBD Repair Centre quickly appeared as the top choice. The decision to visit the shop was made, and the outcome of this seemingly doomed phone was about to take a positive turn.
The Google Pixel 7 Pro is known for its robust build and top-tier specifications, but no device is impervious to accidents. When the phone arrived at Sydney CBD Repair Centre, the screen was shattered beyond recognition. This level of damage often raises concerns about internal components being compromised, including the battery, motherboard, or camera.
Upon inspection, the technician, David, quickly assessed that while the screen was entirely destroyed, the internal components remained intact — a fortunate turn of events, considering the phone had been run over by multiple vehicles. David, known for his expertise, assured the customer that the phone was definitely fixable.
Key Considerations for Serious Phone Damage:
Screen Replacement: The most obvious issue was the shattered screen. A cracked or non-functional screen can render a phone unusable. Thankfully, the Pixel 7 Pro’s display is replaceable, allowing the phone to be restored to its former glory.
Internal Components Check: Despite external damage, phones can sometimes survive major accidents if the internal hardware remains intact. A thorough check ensures no hidden damage, preventing future malfunctions.
Battery Health: After severe impacts, it’s essential to ensure the battery hasn’t been damaged. This can prevent potential issues like overheating or poor performance later on.
The Repair Process: Restoring the Pixel 7 Pro to Like-New Condition
At Sydney CBD Repair Centre, the repair process begins with a detailed evaluation of the phone’s damage. In this case, David moved quickly and expertly to replace the shattered screen. Replacing a Google Pixel 7 Pro screen requires precision, as the phone’s intricate components need to be handled carefully to avoid causing further damage.
The new screen was carefully installed, and after the repair was completed, the phone was powered on to ensure everything functioned as it should. The once unrecognizable Google Pixel 7 Pro was now fully restored, looking as good as the day it was unboxed.
Steps in Screen Replacement for the Google Pixel 7 Pro:
Careful Dismantling: Removing the damaged screen without harming the internal components.
Internal Check: Ensuring no further damage has been caused to sensitive components like the motherboard or camera.
Screen Installation: Applying the new, high-quality screen with precision, ensuring it is perfectly aligned and functions seamlessly.
Final Testing: Checking the phone’s touch functionality, display quality, and internal components for any lingering issues.
Customer Satisfaction: Exceeding Expectations
sydney-cbd-repair-centre-thank-you2.png
When the repair was completed, the customer was astounded by the result. He had come in with a phone that looked like it had no hope of survival, and within an hour, his Google Pixel 7 Pro was not only functional again but also appeared brand new. To add value to the service, David even threw in a complimentary screen protector to help safeguard the phone from future mishaps.
This level of service is what sets Sydney CBD Repair Centre apart from its competitors. The speed, expertise, and attention to detail ensure that even the most damaged devices can be revived, often in less time than expected.
Why Sydney CBD Repair Centre Is the Best Choice for Your Google Pixel Repairs
When it comes to phone repairs, expertise is key. Not all repair shops are created equal, and the wrong technician can turn a minor issue into a major headache. However, at Sydney CBD Repair Centre, you can expect:
Why Sydney CBD Repair Centre Is the Best Choice for Your Google Pixel Repairs
1. Unmatched Expertise
With years of experience repairing all kinds of phones, including the latest models like the Google Pixel 7 Pro, David and his team are known for their high level of skill. This expertise allows them to tackle even the most challenging repairs.
2. High-Quality Parts
All repairs at Sydney CBD Repair Centre use only the highest quality parts, ensuring that your device functions just as well as it did when it was brand new. In this case, the screen replacement was done using a top-tier display that met the original specifications of the Pixel 7 Pro.
3. Fast Turnaround Times
Nobody wants to be without their phone for long, especially when it’s essential to daily life. At Sydney CBD Repair Centre, most repairs are completed within the same day, ensuring minimal disruption to your schedule.
4. Outstanding Customer Reviews
With over 1,800 positive reviews on Google, Sydney CBD Repair Centre has a reputation for exceptional service and customer satisfaction. The shop has been ranked among the Top 3 Mobile Phone Repair Shops in Sydney for five consecutive years — a testament to the quality of work and customer care provided.
Accidents happen, and when they do, it’s important to have a trusted repair shop on hand. Whether it’s a cracked screen or more severe damage, Sydney CBD Repair Centre can handle it with speed, expertise, and exceptional customer service. Don’t let a damaged phone disrupt your life — trust the experts to bring it back to life.
Mark, living on a remote island in Queensland, found himself disconnected from the world when his ROG Phone 7 screen shattered. After reaching out to Sydney CBD Repair Centre, David quickly repaired and returned the phone despite weather delays, restoring Mark’s lifeline with care and precision. The phone’s safe return not only fixed Mark’s device but also renewed his faith in exceptional service, making him another happy customer of Sydney’s top-rated repair shop.
On the remote shores of Horseshoe Bay, a peaceful haven tucked away on Magnetic Island, Queensland, Mark lived a quiet life, far removed from the hustle and bustle of city life. His only connection to the fast-paced world outside was through his beloved ROG Phone 7—a device that had become his lifeline. But disaster struck one fateful day when the screen shattered, leaving him cut off from the digital world he so heavily relied on.
This story is inspired by a real customer’s experience, with the name changed for privacy. I began sharing these stories because each of my customers brings a unique journey to my mobile phone repair shop — stories of loss, love, frustration, and hope. Through their stories, I’ve come to realize that every repair is more than just fixing a phone; it’s about mending moments and memories that mean the world to them.
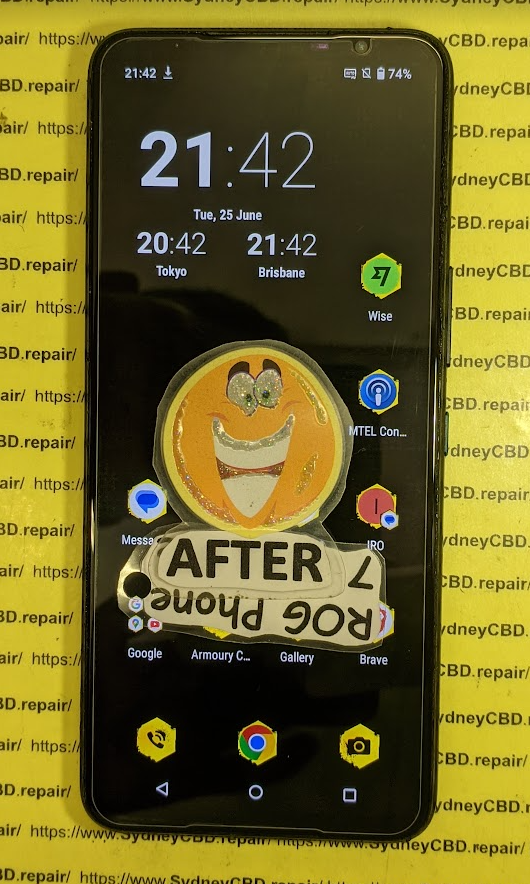
long-distance-rog-phone-7-service.png
Mark knew he needed help, but living on an island, almost 2,000 kilometers from the mainland, made even the simplest task feel like a monumental challenge. Who would be able to fix a specialized gaming phone like his, let alone handle the logistics? He had heard stories of unreliable repairs and endless delays from local shops. But when he stumbled upon Sydney CBD Repair Centre’s glowing reputation—over 18,000 positive Google reviews and recognized as one of Sydney’s top 3 mobile phone repair shops for five consecutive years—he felt a glimmer of hope.
sydney-cbd-repair-centre-thank-you2.png
Without wasting time, Mark sent an email explaining his situation, hoping against hope that someone could help him. That’s when David stepped in. A tech expert with years of experience, David knew this wasn’t just a phone that needed fixing. Mark’s message wasn’t just an inquiry—it was a call for help from someone who felt disconnected, not just from his technology, but from the world.
David replied to the email immediately, outlining exactly what Mark needed to do, including where to send the phone and how to make the payment. Knowing that the ROG Phone 7 was a delicate piece of equipment, David took extra care to ensure the repair process would be smooth and timely.
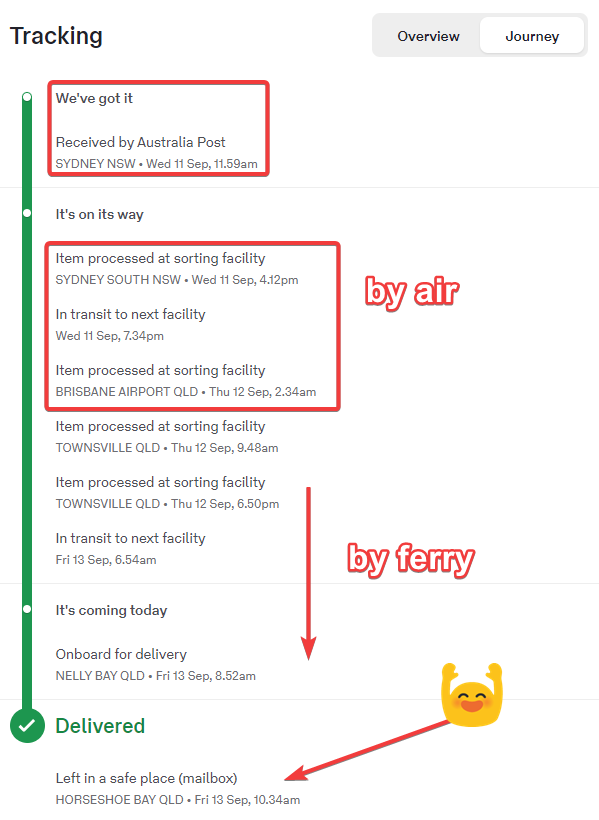
Mark wasted no time posting the phone on a Friday, but the island’s unpredictable weather had other plans. The ferry that would carry the phone to the mainland was delayed due to stormy conditions. It wasn’t until Monday that Australia Post was able to pick it up and send it on its long journey to Sydney.
By Wednesday, after days of waiting and uncertainty, Mark’s phone finally arrived at the Sydney CBD Repair Centre. David, true to his word, wasted no time. He understood how important it was to get the phone back to Mark as quickly as possible. Within an hour, the damaged screen was expertly replaced, and David even applied a tempered glass screen protector to give it extra protection for the future.
But it wasn’t just about the repair. David imagined Mark’s relief when his phone would be returned to him in perfect condition. It wasn’t just a device being fixed; it was a lifeline being restored. The phone was carefully packed and sent out that very afternoon, speeding its way back to Queensland via Express Post.
Thursday came, and Mark’s phone arrived in Brisbane, taking the first step toward home. From Brisbane, it traveled by road to Townsville, and then, on Friday morning, it made its final leg of the journey—by ferry to Nelly Bay and then onward to Horseshoe Bay. It arrived at 10 a.m. sharp, just as David had promised.
Mark unwrapped the package with nervous hands. As he powered up his ROG Phone 7 and saw the pristine screen light up, he couldn’t help but smile. Not only was his phone as good as new, but it had returned to him faster than he ever expected, all thanks to the expert care of David and the team at Sydney CBD Repair Centre.
Mark felt a deep sense of gratitude. In the end, it wasn’t just about fixing a phone—it was about restoring a sense of connection, of reliability, and of trust. The journey of his phone mirrored his own journey of hope, uncertainty, and finally, satisfaction.
Sydney CBD Repair Centre had not only repaired Mark’s phone but had restored his faith in good service and genuine care. No wonder they had been recognized as the best mobile phone repair shop in Sydney for five years in a row, with same-day repairs and over 18,000 glowing reviews from customers who had experienced the same level of care.
As Mark sat down with his phone, once again connected to the world, he knew that this experience wasn’t just a transaction. It was a reminder that, even on a faraway island, good people were willing to go the extra mile for a stranger. And for that, Mark would always remember David and the team who made it all possible.
Another happy customer, another success story for Sydney CBD Repair Centre—the best place to fix mobile phones, where every repair is done with heart.
Choosing the Right Repair Centre: Lessons from Fixing a Broken ROG Phone 7 with a Long-Distance Repair at Sydney CBD Repair Centre
When your phone screen shatters, it feels like your whole world comes to a halt. This is especially true if you own a high-performance device like the ROG Phone 7, a crucial tool for gaming, work, and staying connected. The thought of finding the right repair centre can be overwhelming, and the stakes get even higher if you’re miles away from any major city, like Mark, who lives on a remote island in Queensland. His experience with Sydney CBD Repair Centre offers valuable lessons on choosing the right repair shop, even from a long distance.
rog-phone-7-screen-worthy.png
Trust and Reputation Matter
Mark didn’t have the luxury of walking into a nearby store. Living almost 2,000 kilometers from Sydney in Horseshoe Bay, QLD, he was forced to rely on the power of online reviews and customer feedback to make his choice. Sydney CBD Repair Centre’s impeccable reputation stood out to him—over 18,000 positive Google reviews and a five-year streak of being recognized as one of the top 3 mobile phone repair shops in Sydney. This level of consistent customer satisfaction is not something you can fake, and it speaks volumes about the quality of their service.
When choosing a repair centre, especially from afar, it’s crucial to prioritize reputation. Look for businesses with a strong track record, clear customer feedback, and transparent communication. Sydney CBD Repair Centre, known for offering same-day repairs and premium customer care, provided Mark with the confidence he needed to send his phone such a long distance.
Once Mark reached out via email, David, one of Sydney CBD Repair Centre’s top technicians, responded immediately with all the necessary information. This included instructions on where to send the phone and how to handle the payment. Quick, clear communication is essential when choosing a repair shop. It reassures the customer that their issue is being taken seriously and that the business values their time.
In this case, David not only answered Mark’s questions promptly but also understood the unique challenges of a long-distance repair. Knowing that Mark couldn’t just stop by the shop, David took extra care in providing detailed shipping instructions and assured him of a swift turnaround. This level of attentiveness is crucial when dealing with specialized devices like the ROG Phone 7, which require expert handling.
Professional Expertise and Speed
Despite delays due to bad weather, once the phone arrived at the Sydney CBD Repair Centre, David repaired the ROG Phone 7 screen within just one hour. He even went the extra mile to apply a tempered glass screen protector for additional protection. The repair was done with precision and care, ensuring that the phone would be returned to Mark in perfect working condition.
Expertise is one of the most important factors to consider when choosing a repair centre, especially for high-end devices. Not every repair shop has the skills and knowledge to handle complex gaming phones like the ROG Phone 7. Mark’s decision to trust Sydney CBD Repair Centre paid off when his phone was expertly repaired and sent back to him faster than he ever expected.
Handling Logistics with Care
Long-distance repairs come with logistical challenges. In Mark’s case, a ferry delay caused by stormy weather postponed the delivery of his phone to Sydney by a few days. But once the phone arrived at the repair centre, David and his team ensured it was returned quickly via Express Post. The phone’s return journey involved air transport to Brisbane, a road trip to Townsville, and finally a ferry back to Horseshoe Bay, QLD.
This experience highlights the importance of choosing a repair centre that understands and accommodates long-distance customers. Sydney CBD Repair Centre took great care to track and manage the logistics, ensuring that Mark’s phone arrived back in his hands in just a few days. For long-distance repairs, you need a team that not only fixes your device but also takes care of shipping details and minimizes delays.
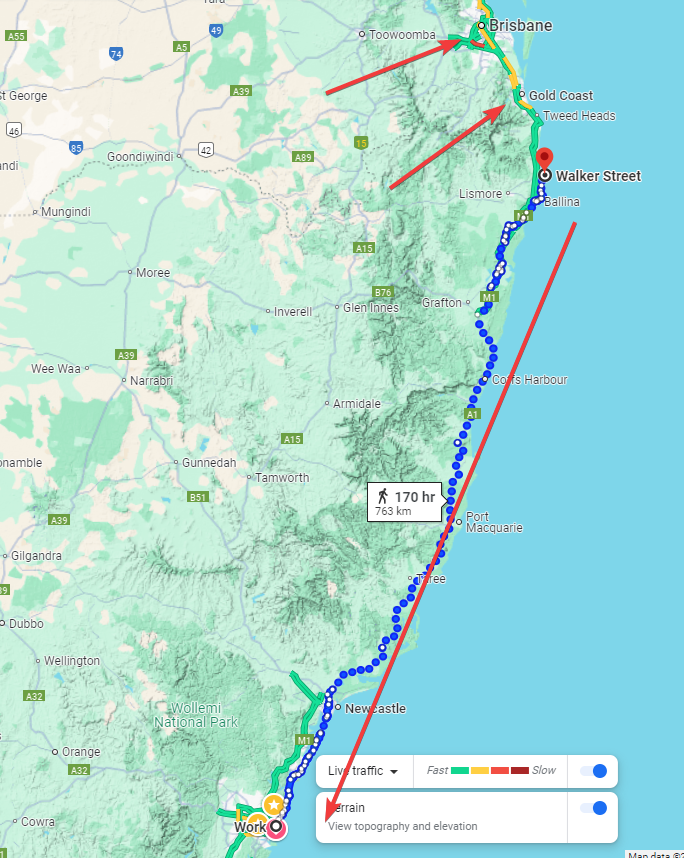
Marks-Decision-Making-Process-map.png
The Emotional Impact of Good Service
For Mark, it wasn’t just about fixing a broken screen—it was about restoring his connection to the world. Living in a remote area, his phone was more than just a device; it was his link to friends, family, and his gaming community. The speed and care with which Sydney CBD Repair Centre handled his repair brought a sense of relief and gratitude.
Choosing the right repair centre can make all the difference, not only in terms of the technical repair but in how it makes you feel as a customer. Sydney CBD Repair Centre’s fast, expert service and personalized care transformed what could have been a stressful experience into a positive one.
Conclusion: A Lesson in Trust and Quality
Mark’s experience with Sydney CBD Repair Centre shows that even from a distance, you can find a repair centre that delivers top-quality service. By focusing on reputation, clear communication, professional expertise, and logistical care, Sydney CBD Repair Centre stands out as the best choice for mobile phone repairs, even for customers who are miles away.
If you’re ever in need of a mobile phone repair—whether you’re around the corner or across the country—consider Sydney CBD Repair Centre. With their consistent track record, expert technicians, and commitment to customer satisfaction, they’ll treat your phone with the same care and attention they gave to Mark’s ROG Phone 7, ensuring you too become another happy customer.
David and the team continue to be Sydney’s top choice for mobile phone repairs, proudly offering same-day services and exceptional care, earning their place as one of the best for five years running.
OPEN 6 DAYS : Weekdays: 10am – 6pm, Saturday: 10am – 2pm
Here are 10 possible FAQs for choosing the right repair center:
How do I know if a repair center is trustworthy?
Look for online reviews, customer feedback, and awards or recognitions. A long history of satisfied customers, like Sydney CBD Repair Centre’s 18,000+ positive reviews, is a strong indicator of trustworthiness.
What should I look for when choosing a repair center for high-end phones?
Ensure the repair center has experience with your specific phone model and uses high-quality parts. Technicians should be skilled in handling delicate devices like gaming phones or premium smartphones.
Is it safe to send my phone to a repair center from a long distance?
Yes, as long as the repair center provides clear shipping instructions and tracks the package. Reliable repair shops will take extra care in managing logistics to ensure safe delivery.
How long does a typical phone repair take?
At Sydney CBD Repair Centre, most repairs, including screen replacements, are done on the same day. However, if you’re sending your phone from a distance, shipping times may vary.
Can I get my phone repaired if I live far away from the repair center?
Absolutely! Many repair centers, like Sydney CBD Repair Centre, offer long-distance services. They’ll provide detailed instructions on how to send your device and return it once repaired.
What should I do if I need urgent phone repairs but can’t visit the repair center in person?
Reach out to the repair center via email or phone for guidance. Many centers, like Sydney CBD Repair Centre, offer fast response times and clear instructions for remote repairs.
Do repair centers offer warranties on repairs?
Yes, reputable centers like Sydney CBD Repair Centre offer warranties on their repairs. Always check the warranty policy before proceeding with a repair.
What if my phone requires special parts or accessories during repair?
Top repair centers use high-quality, compatible parts and may even provide additional protection, like tempered glass screen protectors, as part of the service.
How do repair centers handle delays caused by shipping or weather issues?
A good repair center will communicate any delays and work to minimize them. Sydney CBD Repair Centre, for example, manages logistics carefully, ensuring you stay informed throughout the process.
Can I track my phone’s status during the repair process?
Yes, most reputable repair centers offer updates on your phone’s repair status and provide tracking information for shipping, so you always know where your device is.
Amazing Customer Story Podcast Season 1 : Listen Now
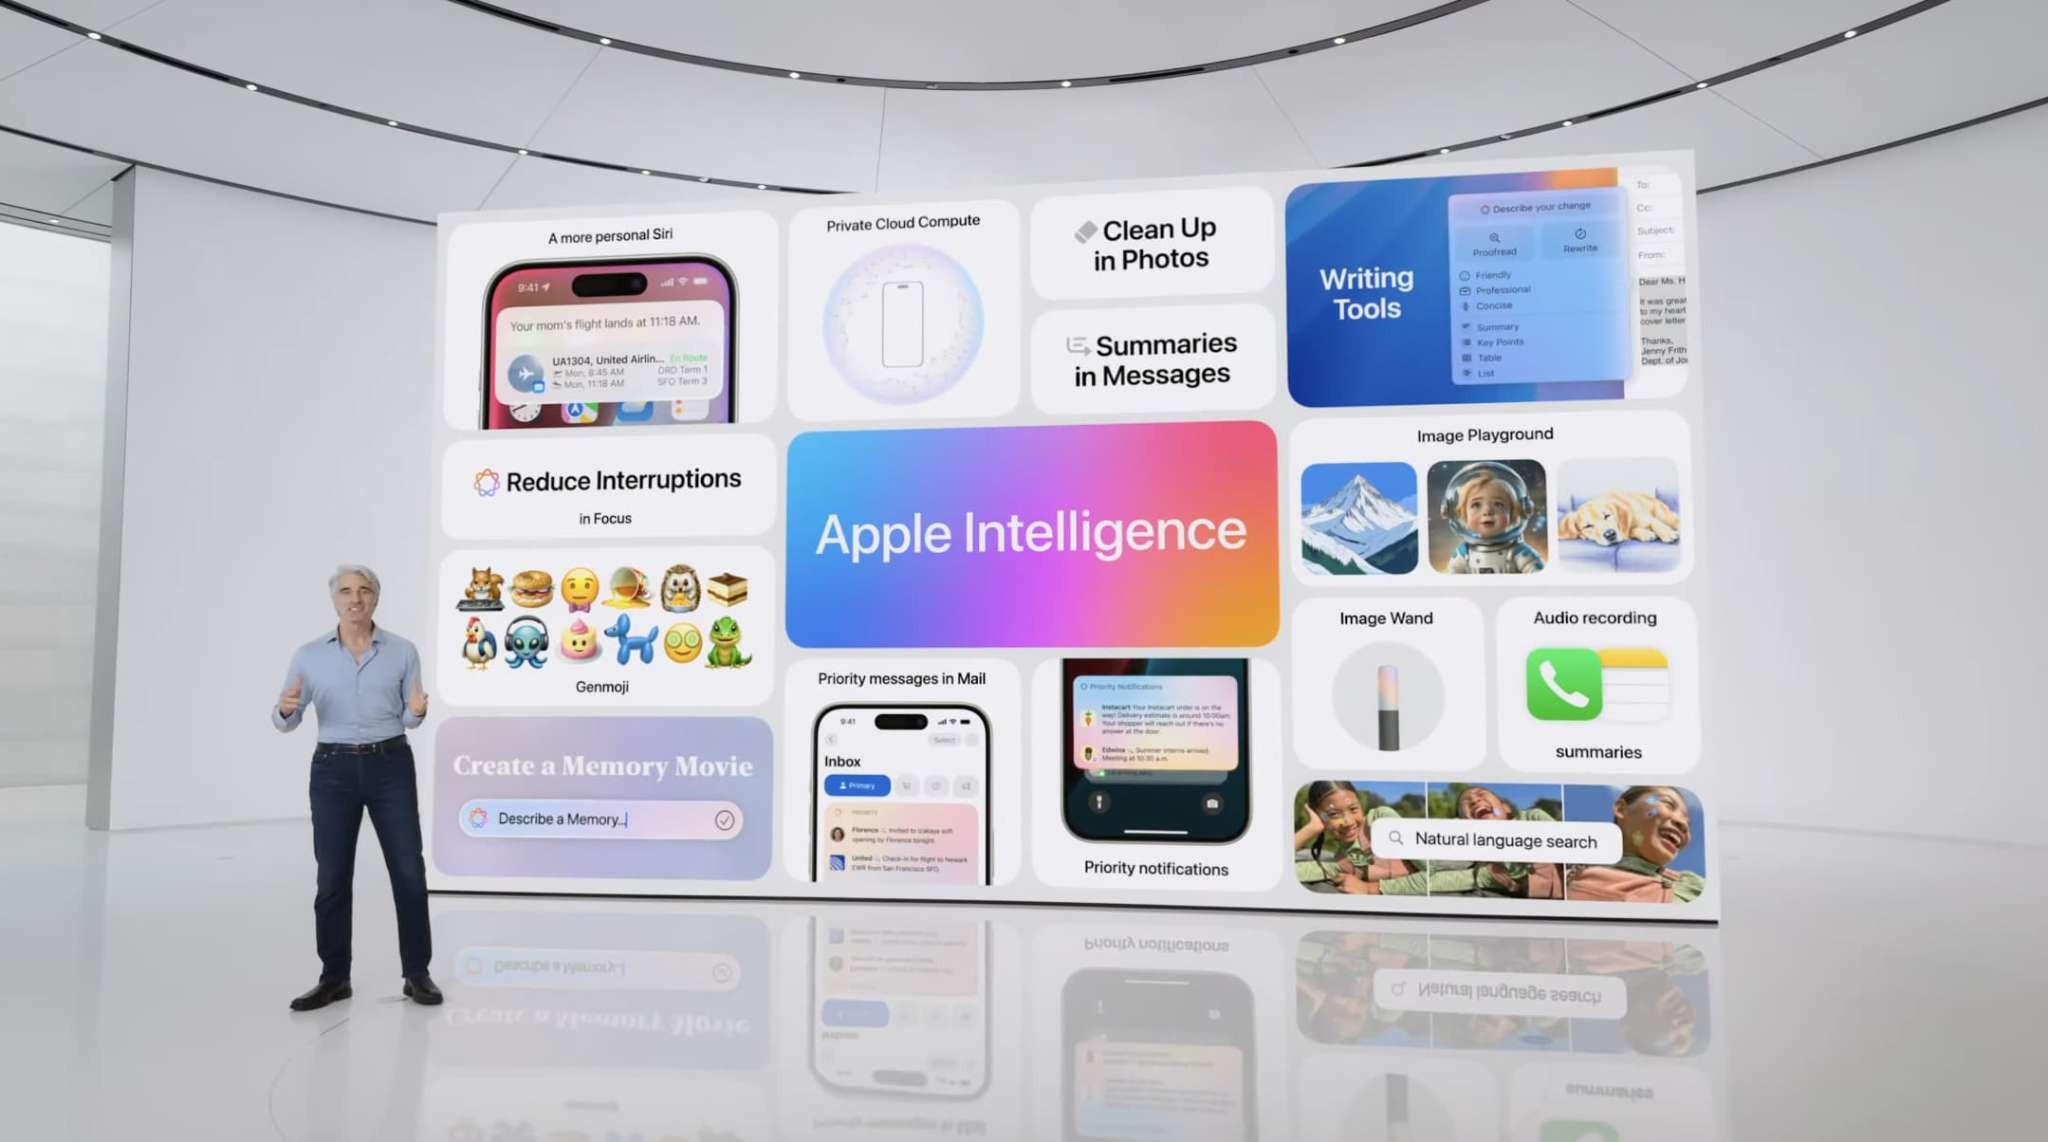
Apple is now rolling out iOS 18.1 beta 2 to developers, two weeks after it began iOS 18.1 beta testing. iOS 18.1 includes the first set of Apple Intelligence features, including a redesigned Siri, Writing Tools, and more.
Here’s everything you need to know about the current iOS 18 beta cycle…
iOS 18.1: Everything you need to know
iOS 18.1 beta 2 is available to developer beta testers with build number 22B5023e. There is no public beta available, and there’s no timetable for when that will change. Additionally, iOS 18.1 only available for iPhone 15 Pro and iPhone 15 Pro Max, the only two iPhone models that support Apple Intelligence.
Meanwhile, iPadOS 18.1 is available to any iPad with an M1 chip or newer, as those are the requirements to run Apple Intelligence on the iPad.
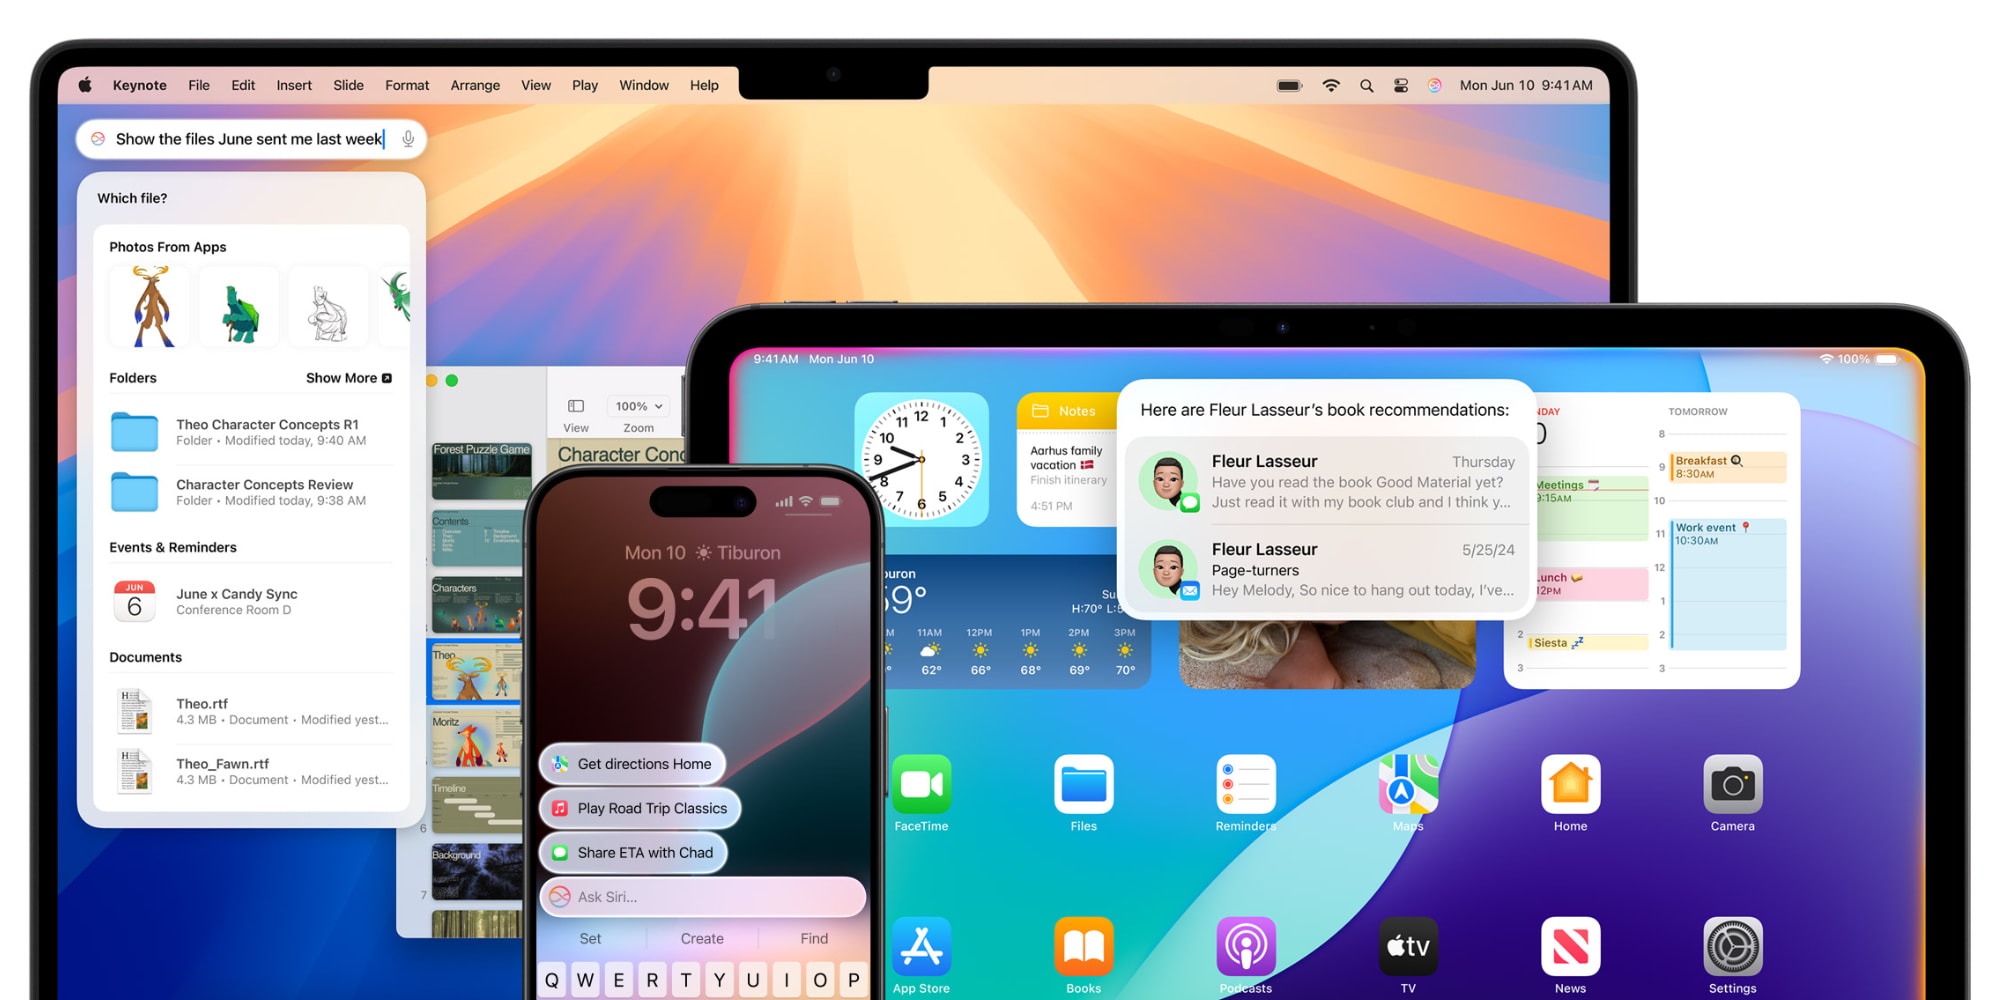
iOS 18.1 includes the first set of Apple Intelligence features, such as Writing Tools for rewriting, proofreading, and summarizing text. Siri has also been completely redesigned and now supports the ability to type to Siri. There are new features in the Mail app, including messages summaries, priority sorting, and Smart Reply. iOS 18.1 also adds a new Reduce Interruptions Focus mode, which uses AI to surface only the notifications that might need immediate attention.
Finally, iOS 18.1 adds new AI-powered features to the Photos app, including natural language search, the ability to search in videos, and support for creating Memories on demand. There are a number of Apple Intelligence features not included in iOS 18.1, such as Genmoji, Image Playgrounds, and ChatGPT integration.
Apple is also continuing to beta test iOS 18.0 with developers and public beta users. Apple released iOS 18.0 beta 5 last week, bringing changes to the Photos app redesign and a new Distraction Control feature for Safari. These features currently aren’t available in iOS 18.1 and it remains to be seen whether today’s release of iOS 18.1 beta 2 changes that.
iOS 18 developer beta 6 now available
Apple has released the latest developer beta for iOS 18. Beta 6 comes less than a week after beta 5 debuted, and confirms releases are ramping up leading into the fall.
iOS 18 developer beta 6 is the newest beta for developers running iOS 18.0. Apple also released a new beta for iOS 18.1 users today with Apple Intelligence features.
Leading up to Apple’s September introduction of the iPhone 16, Apple is working on finalizing iOS 18 for public release. As a result, changes in today’s beta are likely to be few.
The focus of beta 6 is likely on bug fixes and performance improvements.
Apple typically releases weekly betas throughout the month of August. The public launch of iOS 18 should then arrive in mid-September shortly after the iPhone 16 is unveiled, and shortly before it arrives in users’ hands.
We will cover any updates and changes discovered in beta 6. But expect the focus here to be on unseen changes that help your iPhone run more smoothly.
Last week’s beta 5 introduced changes to the redesigned Photos app, a new Safari feature called Distraction Control, and more.
Ahead of the Pixel 9 keynote on Tuesday, Google has posted the livestreams for Made by Google 2024, with the Android channel on YouTube also broadcasting it.
Since the early event was announced in June, Google has emphasized the role of Android and Gemini at this upcoming Pixel event. It reflects how Google this year merged the Android (Platforms & Ecosystems, including Chrome) and hardware (Devices & Services) teams into Platforms & Devices, with Rick Osterloh leading.
Of note this year is how the Android YouTube channel will also be livestreaming the #MadeByGoogle ‘24: Keynote: “Watch now for updates on Google AI and the newest Pixel devices, including the #Pixel9 Pro and Pixel 9 Pro Fold.”
There’s an identical stream on the Made by Google channel, which is the usual home and has more subscribers at 1.64 million subscribers (versus 1.03M). MbG is also responsible for the:
Last year, the main Google channel (12.2 million subscribers) also mirrored it.
Meanwhile, you’ll find a live countdown at the top of the Google Store.
The Made by Google 2024 keynote starts at 10:00 a.m. PT on August 13 or 3:00 a.m. AU Time. This will be streamed live from the Google headquarters in Mountain View, California. It will be followed by an “After Party.”
Apple releases new updates for its software platforms every year, and the highlight of 2024 is Apple Intelligence. Apple’s suite of AI features is now available for beta users. But when will Apple Intelligence release for the public? Here’s when to expect AI to arrive on your iPhone.
iOS 18.1 will kick off Apple Intelligence rollout in October
Apple Intelligence is coming to compatible devices in iOS 18.1, iPadOS 18.1, and macOS Sequoia 15.1.
Before that happens, Apple will first release its major new OS versions following the iPhone 16 introduction. iOS 18, iPadOS 18, and macOS Sequoia are expected to release in mid-to-late September, bringing a host of new features and changes—but no Apple Intelligence.
The first Apple Intelligence features will arrive in updates to those OS versions, roughly a month afterwards.
Fortunately, Apple’s history gives us a solid expectation for when to expect iOS 18.1.
Here is Apple’s recent timing for x.1 software updates:
iOS 17.1: October 25
iOS 16.1: October 24
iOS 15.1: October 25
The pattern is very clear.
If Apple keeps to tradition, iOS 18.1 will release near the end of October, and Apple Intelligence along with it.
October 25 is unlikely to be the exact date this year, because it’s a Friday. Generally Apple doesn’t debut big software updates on Fridays.
More likely, Apple will target October 23 or 24, or possibly Monday, October 28.
In any case, a debut by the end of October seems highly likely considering the pattern of past years.
Staggered rollout of Apple Intelligence features
When Apple Intelligence first arrives at the end of October, only certain features will be included.
Currently in the iOS 18.1 beta, the following AI features are included:
The new Siri with a subset of its AI capabilities
Writing tools such as proof and rewrite
Memory movie generation in Photos
Smart reply in apps like Messages and Mail
Intelligent summaries for notifications
Webpage summaries in Safari
Priority messages in Mail
Natural language search in Photos
It is possible more AI features will make their way into iOS 18.1 in future betas, but currently this is everything offered.
Which leaves a lot of question marks for other AI features.
Apple’s ChatGPT integration is likely coming in iOS 18.2 in December. Image generation tools like Genmoji and Image Playground are big unknowns. They might make it into 18.1, or get pushed to 18.2 or even later.
Several new Siri capabilities won’t debut until 2025. Then, not long after, it will be time for WWDC 2025. That event will undoubtedly bring announcements of all-new Apple Intelligence features to come in iOS 19.
Is your device compatible with Apple Intelligence?
Not every device that can install iOS 18.1, iPadOS 18.1, and macOS Sequoia 15.1 will be getting Apple Intelligence.
Due to the high level of computing power needed to run AI features, Apple Intelligence is limited to a select number of modern devices. These include:
iPhone 15 Pro and Pro Max
iPads with an M1 chip or later
Macs with an M1 chip or later
It is also expected that all iPhone 16 models will also support Apple Intelligence, including the standard 16 and 16 Plus.
Wrap-up
When Apple Intelligence arrives in iOS 18.1, iPadOS 18.1, and macOS Sequoia 15.1, it will just be the beginning.
Apple plans to label its AI features as ‘beta’ even after their public release. That’s because there will be improvements and upgrades regularly in the works.
But you have to start somewhere.
The end of October is when the launch of AI on your iPhone appears set to begin.
Last week, an image gave us our first clear look at all of the planned iPhone 16 color options. Now, a new video from Aaron Zollo on YouTube gives us an even more detailed look at dummy units showing the five different colors for the iPhone 16 and iPhone 16 Plus.
Hands-on with iPhone 16 colors
The iPhone 16 and iPhone 16 Plus are expected to be available in these colors. Compared to the iPhone 15 lineup, Apple is ditching yellow in favor of white.
Blue
Pink
White
Black
Green
The video also gives us yet another look at the new vertically aligned camera layout, which is expected to enable spatial video capture for the iPhone 16 models.
Verdict
The bar is very low, but these new iPhone 16 colors look significantly better than pastel-style iPhone 15 colors. It’s like Apple refilled the ink in their printer and decided to give us bolder, more saturated colors for the first time in several years.
Of these five colors, I think the green looks especially nice. The blue is a close second. I have an iPhone 15 Plus that is allegedly blue, but the color is so faint it’s hard to even tell it’s blue in most lighting environments.
Here’s hoping Apple has plans to give at least some of the iPhone 16 Pro colors a similar treatment this year.
After missing its initially expected release date, Samsung’s Android 15 update seems to be looking at a much later launch, as sources claim it has been delayed “indefinitely.”
Samsung has been working on its Android 15 update, with One UI 7, behind the scenes for a while now, and the update was expected to be unveiled publicly late last month. But that initial date came and went without a launch, despite many leaks revealing what Samsung’s updated skin would bring to the table.
Some sources suggested that Samsung was holding back One UI 7 for the sake of the One UI 6.1.1 rollout, which has also yet to begin. However, it seems like it may be more than that.
Reliable sources Ice Universe and Chun Bhai say that Samsung has delayed the launch of One UI 7 and in turn, the company’s Android 15 update more than previously thought. Ice says Samsung has no plans to launch the beta “in the near future,” while Chun Bhai says it was “delayed indefinitely” by Samsung, adding that there is “low confidence” it could even launch in August.
The latest situation of One UI 7 Beta: There are still no plans to launch it in the near future.
Why the delay? There have been passing mentions of bugs and issues with the update, but it does seem like a considerable portion of the holdup is simply due to the delayed rollout of One UI 6.1.1. Whatever the case, it also comes as Google seems to be slightly delayed on the launch of Android 15 as well. The company’s upcoming Pixel 9 lineup will reportedly launch with Android 14, while the August patch just went out based on Android 14 as well, implying it won’t arrive until at least September.
Apple released iOS 18 beta 5 for developers last August 5, 2024. The update is headlined by a new Safari feature and updates to the Photos app. There are also a few smaller changes throughout, which you can read more about below.
iOS 18 beta 5 is currently available for developer beta testers and is expected to roll out to public beta users sometime within the next week. Early beta versions can be unpredictable, meaning that features working in iOS 18 beta 5 may not function in iOS 18 beta 3. As always, proceed with caution.
iOS 18 beta 5 features and changes
Apple has made several tweaks to the Photos app in response to user feedback. These include removing the Carousel interface, making it easier to access albums, and increasing the visibility of the “All Photos” grid.
iOS 18 beta 5 includes a new Distraction Control feature in Safari, which allows users to selectively block certain elements on web pages, such as sign-in popups and other content overlays.
There are new dark mode icons for Find My and Maps.
Multiple Control Center icons have been redesigned, including Screen Mirroring and Cellular Data.
In the Settings app, Stolen Device Protection can now be managed via the Privacy & Security menu. It’s also still available via the Face ID & Passcode screen.
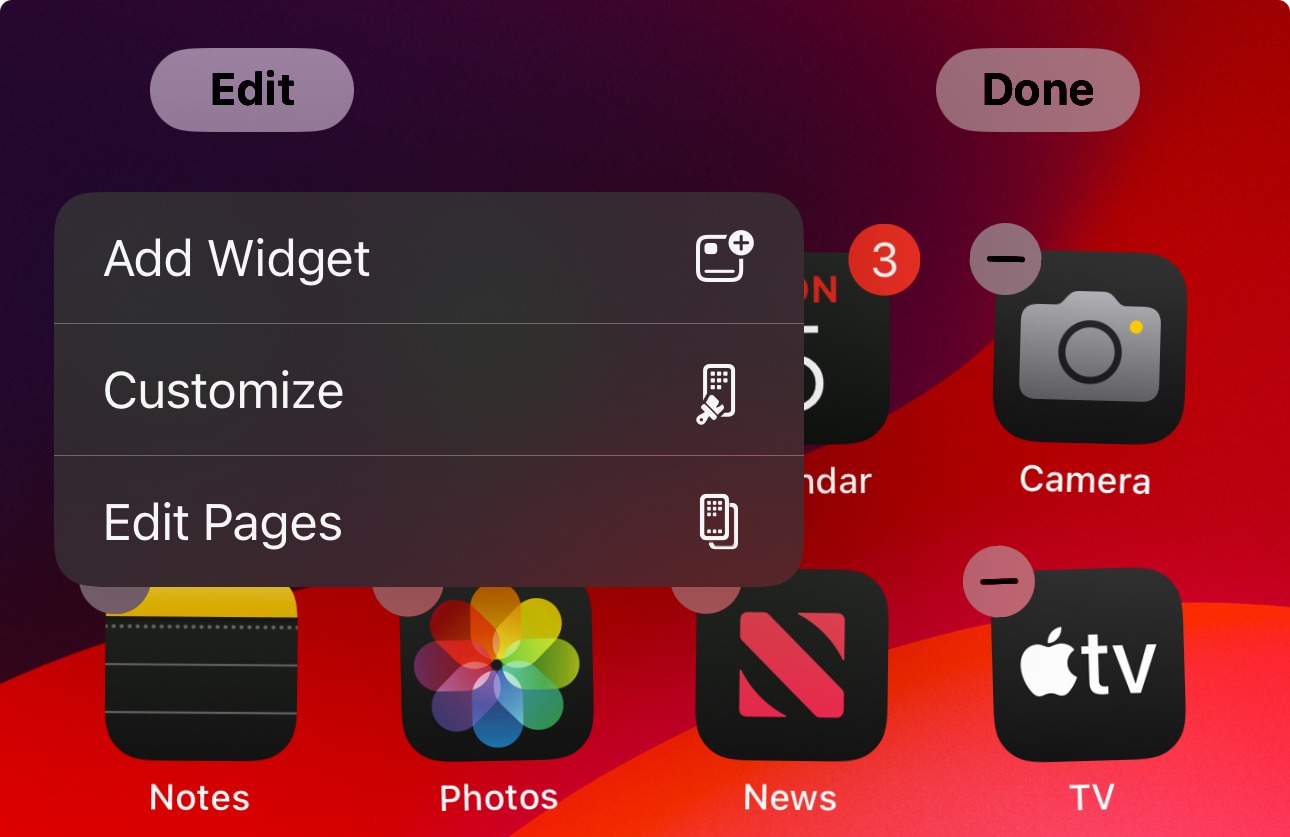
When you long-press on your iPhone’s Home Screen and tap “Edit,” there’s a new “Edit Pages” button. This takes you straight to the multi-page view where you can select and hide select Home Screen pages.
As you can see, the changes in iOS 18 beta 5 are relatively minor outside of the Photos app and Safari.
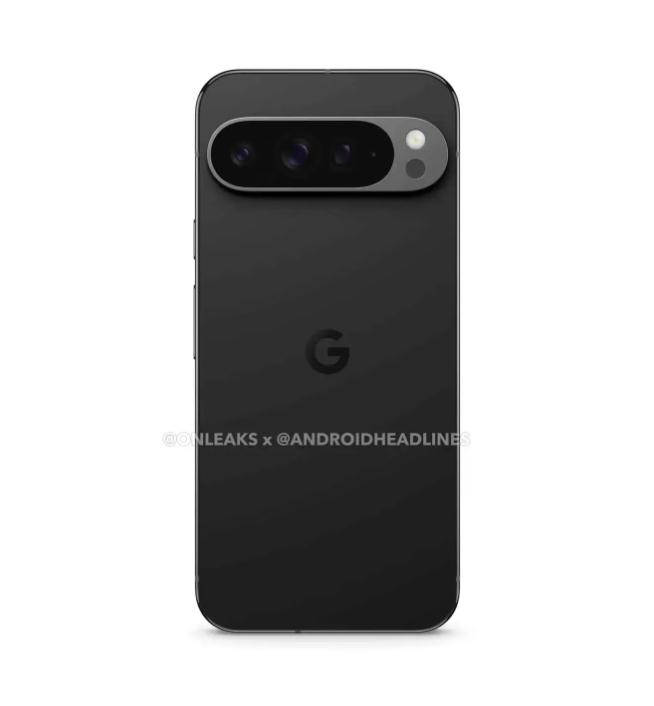
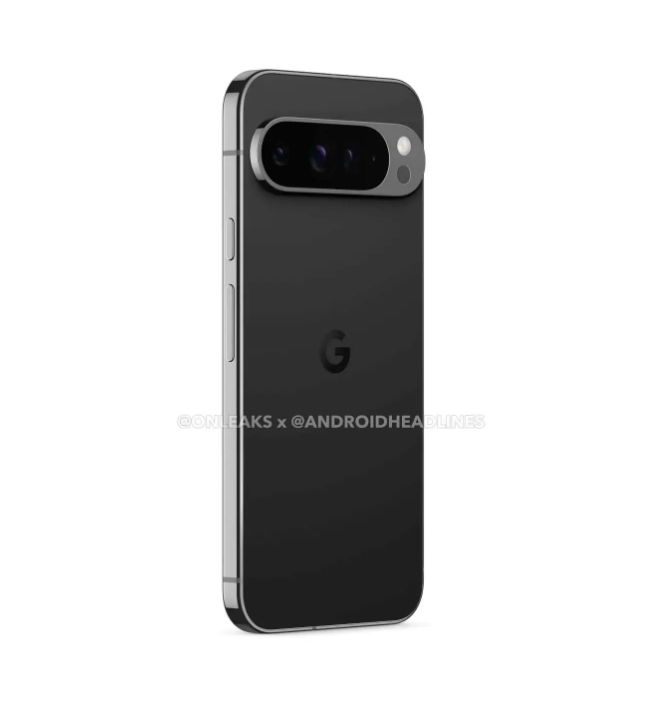
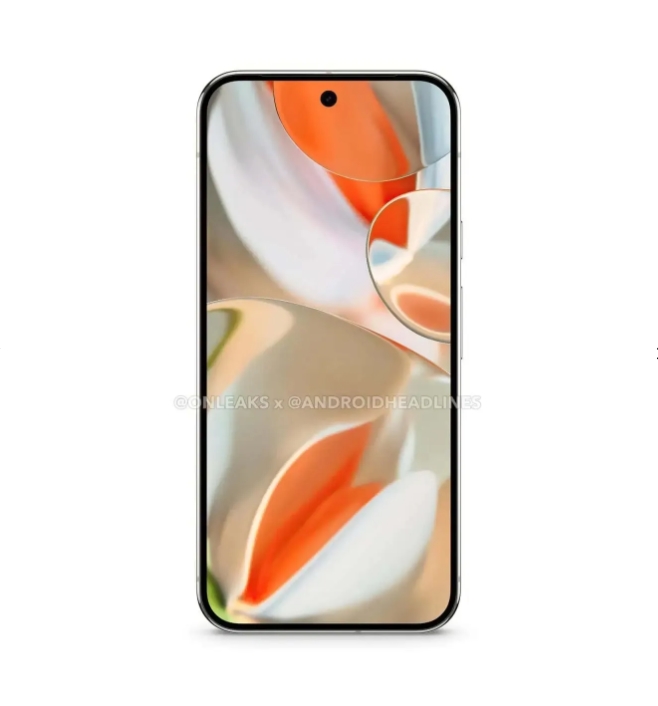
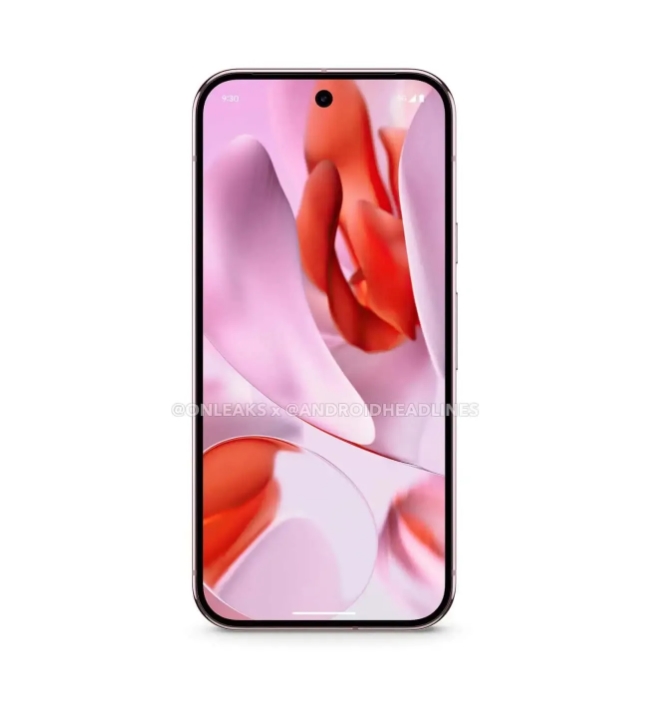
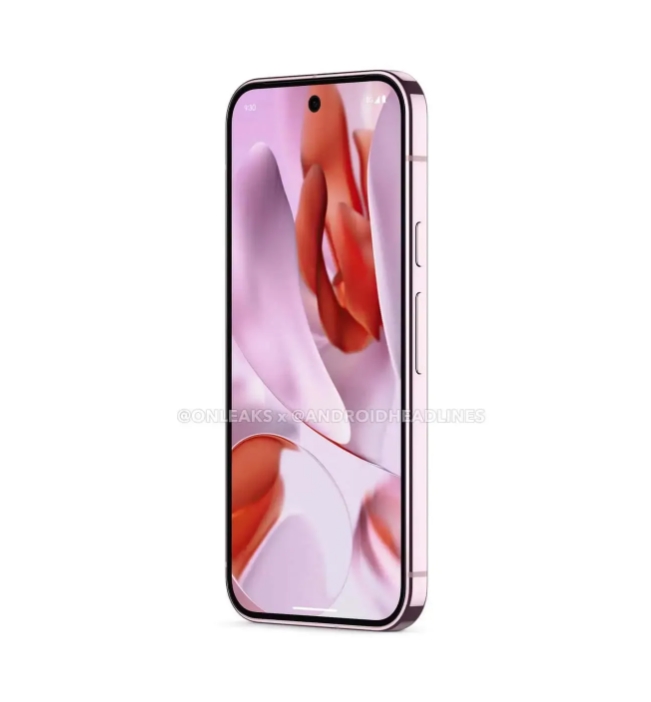
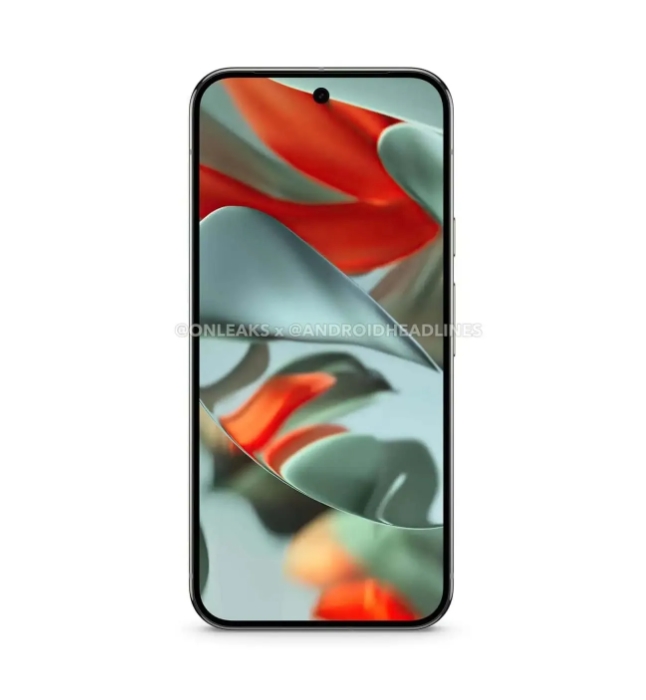
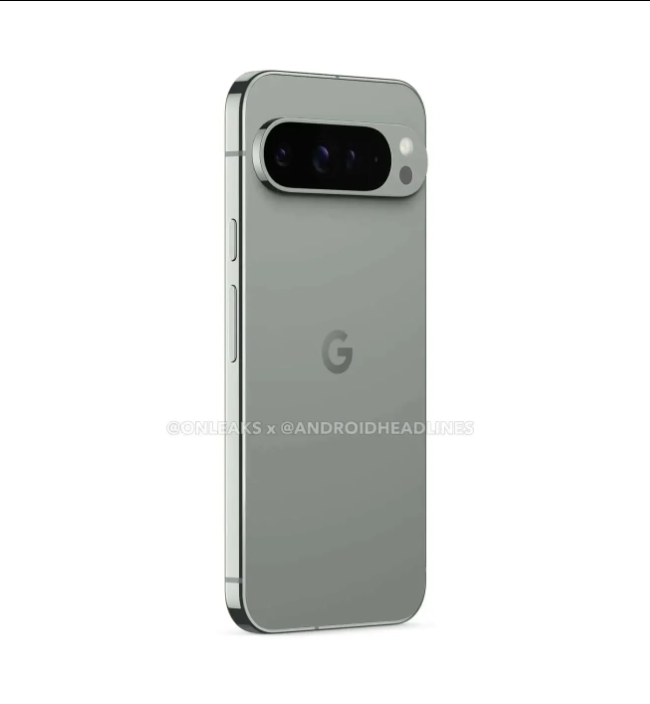
Google Pixel 9 leaks are coming en masse lately, and now we’ve got a good look at the Pixel 9 Pro XL in all four of its color variants.
Generally, Google has launched its Pixel phones with three color variants, last year adding “Mint” a few months later to the original launch lineup of the Pixel 8 series which consisted of “Obsidian,” “Porcelain,” and “Bay.” The Pixel A-Series has, since the Pixel 7a, offered four colors (one of which being a Google Store exclusive, like Pixel 8’s “Mint”), but the flagships have stuck with a lineup of three thus far.
That’s probably set to change with the Pixel 9 Pro series, though, as a new leak shows.
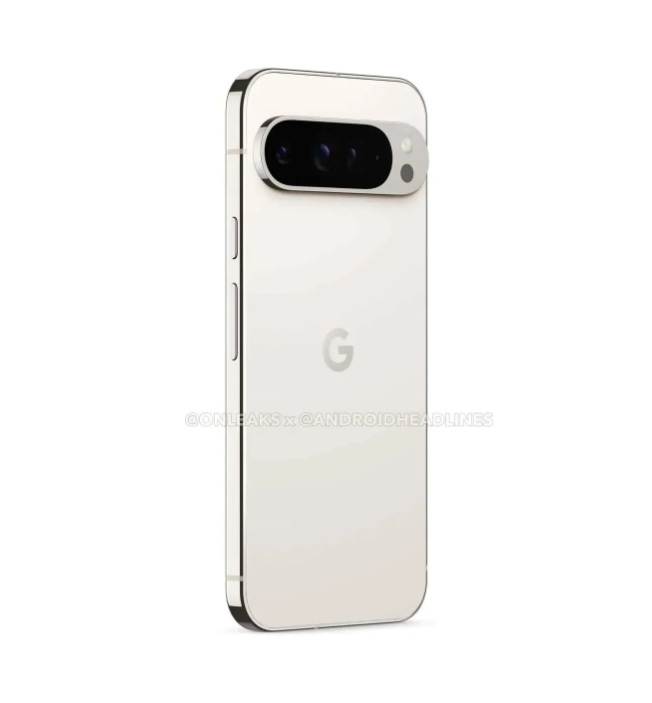
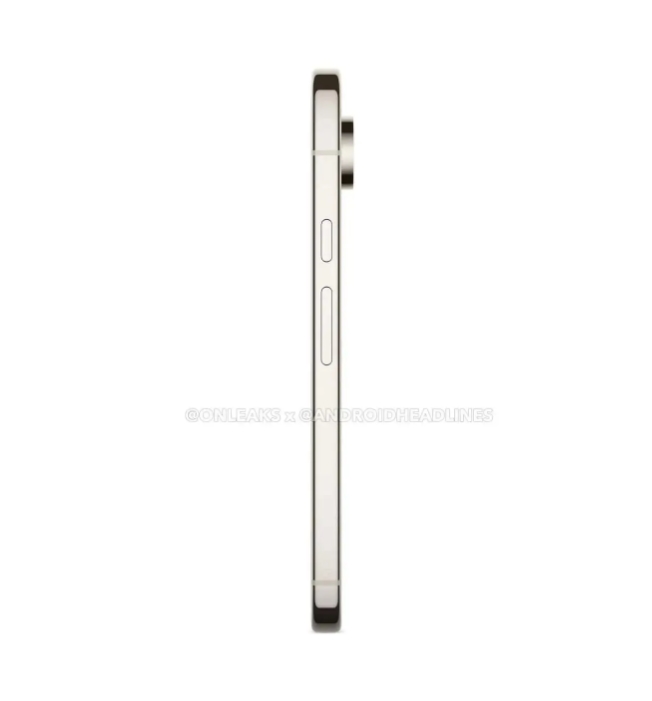
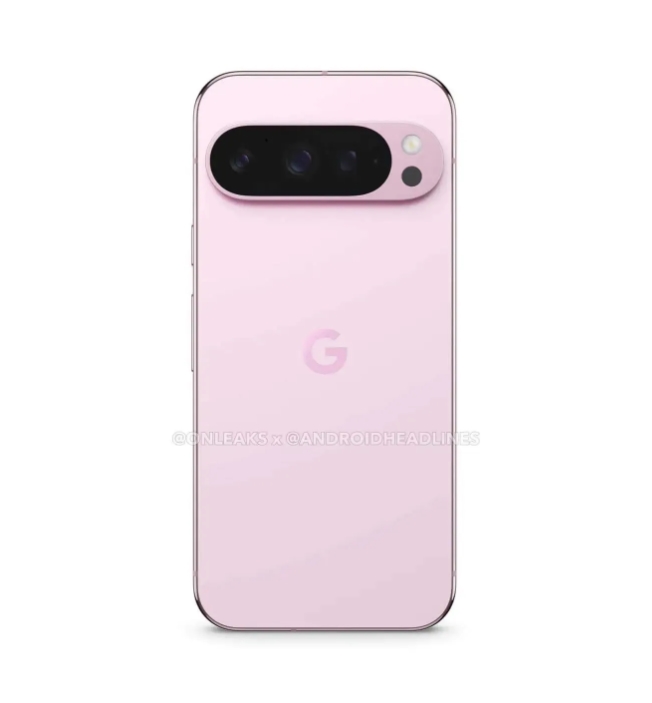
Images published by Android Headlines offer a look at the Pixel 9 Pro XL in “Obsidian,” “Porcelain,” “Rose,” and “Hazel.” All four colors have relatively muted tones to both the back glass and the polished metal frame.
Pixel 9 Pro XL in “Obsidian” color
Pixel 9 Pro XL in “Porcelain” color
“Obsidian” and “Porcelain” are mostly unchanged from last year, besides the striking colors added to the frames. Last year’s variants didn’t feature quite the same look to the frame. It’s also noteworthy that Google has done away with the glossy camera bar finish in place of a matte finish which should mostly eliminate scratching problems that have been ongoing on the “Pro” series since 2021’s Pixel 7 Pro.
Meanwhile, “Rose” and “Hazel” are new additions to the “Pro” lineup. Both names were used on last year’s base Pixel 8, but the new versions are a bit more saturated in their colors.
Pixel 9 Pro XL in “Rose” color
Pixel 9 Pro XL in “Hazel” color
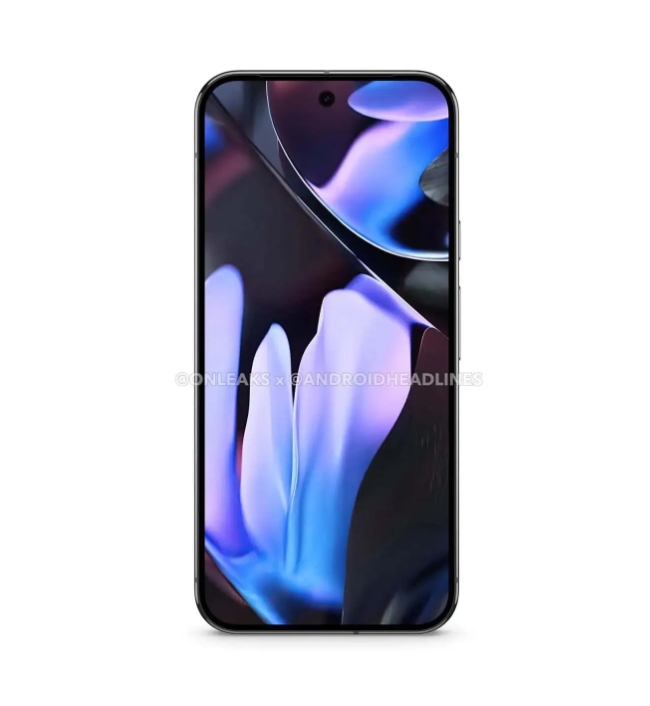
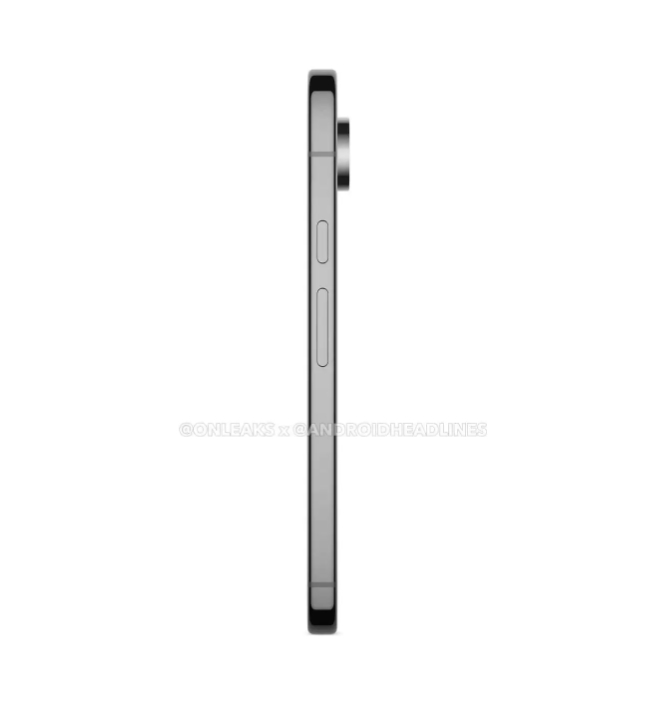
Alongside the colors, we can also better see the display bezels, as we first highlighted in a leak yesterday. The Pixel 9 Pro XL’s bezels, unsurprisingly, look a lot like those on the Pixel 8 Pro.
The base Pixel 9 is expected to possibly come in other colors, including a more vibrant pink. Pixel 9 Pro Fold, meanwhile, is likely only going to be available in “Obsidian” and “Porcelain” as hinted at in the past.