Live Photos are the fun animated images captured by modern iPhone and iPad cameras. Essentially each Live Photo is a still image attached to a short movie clip, and much like movie clips there is a key image that can be set to represent the picture as a thumbnail. Changing that key photo can be desirable if the Live Photo thumbnail preview doesn’t really capture the image well, and you can instead scrub around in the Live Photo for a thumbnail that better represents the image.
This tutorial will show you how to change and set a Live Photo key photo in iOS.
You will need a device that supports Live Photo and an actual Live Photo to do this, you can take a Live Photo with the iPhone or iPad camera if you haven’t done so before, and then use that for testing this out yourself if desired. Of course you’d need to enable Live Photos first before such an image is captured.
How to Set Key Photo in Live Photos for iOS
Open the “Photos” app and choose any Live Photo
Tap the “Edit” button in the corner
Scrub on the timeline with your finger to find the key photo you want to set
Tap and hold on the thumbnail then choose “Make Key Photo”
Choose “Done” to set the changed key photo in iOS
Now anytime you’re browsing the thumbnail view of Live Photos in the Photos app, or if you share the Live Photos, the newly set Key Photo will be the default.
Live Photo is a neat feature with a lot of tricks up its sleeve. One of the more interesting capabilities recently added is the ability to use Live Photos to take long exposure images on iPhone or iPad. And don’t forget you can always convert a Live Photo to still image in iOS if you later decide the animated picture isn’t what you’re looking for after all.
The Accessibility Shortcut in iOS allows users to quickly enable and use various accessibility features on an iPhone or iPad, giving near instant access from just about anywhere to features like AssistiveTouch, Invert Colors, Color Filters, the Magnifier, Reduce White Point, Smart Invert, VoiceOver, and Zoom.
For example, a great usage for the Accessibility Shortcut is to quickly access the Magnifier feature of iOS, or to toggle Smart Invert on, or to temporarily turn the screen greyscale, or zoom the display to read some text or element that is too small to distinguish without that extra zoom level.
There are nine possible Accessibility Shortcut options to choose from in the latest iOS releases, we will show you how to set the Accessibility Shortcut to customize it for your own use, and of course we’ll show you how to use the Accessibility Shortcut on an iPhone and iPad as well.
How to Set the Accessibility Shortcut in iOS
The Accessibility Shortcut can be customized to initiate a single Accessibility feature, or bring up a menu with multiple Accessibility choices. Here is how you can set and customize this capability on an iPhone or iPad :
Open the “Settings” app in iOS
Go to “General” and then to “Accessibility”
At the bottom of the Accessibility section, tap on “Accessibility Shortcut”
Choose the Accessibility item you want to activate when the shortcut is accessed:
AssistiveTouch
Classic Invert Colors
Color Filters
Magnifier
Reduce White Point
Smart Invert Colors
Switch Control
VoiceOver
Zoom
OPTIONAL: select more than one to have the Accessibility Shortcut show a short menu with each selected option
When satisfied exit out of Settings
Go ahead and summon the Accessibility Shortcut* to confirm your changes are working as expected.
Note that whether you select multiple Accessibility Shortcut options or just a single option, summoning the feature is the same.
What is the Accessibility Shortcut for iPhone and iPad? How do I use it?
* Accessing the Accessibility Shortcut differs per iOS device, and whether or not the iPhone or iPad has a Home button or not.
For all devices with a Home button, including nearly all iPad and iPhone devices, you triple-click the Home button in rapid succession to access the Accessibility Shortcut.
For devices without a Home button, like iPhone X, you triple-click the side Lock / Power button to access the Accessibility shortcut instead.
If you have just a single option chosen as the Accessibility Shortcut, then triple-clicking the button will enable that particular Accessibility feature. If you have multiple Accessibility Shortcut options enabled, then triple-clicking the button will trigger a menu:
It may be helpful to know that you can also change the click speed of the side button on iPhone X, as well as change the click speed of the Home button on other iOS devicesif you find that the default click speed required isn’t working well for you.
The Accessibility Shortcut isn’t the only way to quickly get to various Accessibility features, and if you find yourself using some with some regularity but not often enough to include it in the Accessibility Shortcut, then you can customize the Control Center of iOS to have access to those, or also to have access to some other helpful Accessibility features as well, like the ability to increase text size.
Apple just unveiled a 9.7-inch iPad that will cost schools just $299. The debut came at today’s education-oriented event in Chicago because this tablet is designed for students, with Apple Pencil support and a faster processor.
Tim Cook and crew did not unveil this tablet at a high school by accident. Apple is aiming the new iPad straight at classrooms and budget-conscious school districts. Support for Apple’s pressure-sensitive stylus is a big part of that.
Apple Pencil works with new iPad
Apple Pencil supports means young children will be able to practice writing on the screen, as well as drawing and sketching. The company said this morning that three of the most popular iPad apps in education are Pages, Keynote and Numbers. The company promised that those apps will get updated with Apple Pencil support soon.
That’s good news for teachers, as they’ll be able to use the new Smart Annotation feature to grade students’ work directly in Pages. Or kids can virtually dissect a frog on the new iPad, using the Apple Pencil as a stand-in scalpel.
Apple Pencil is good for more than just drawing. You can dissect a virtual frog with it!
This stylus works only with screens designed specifically for it, which so far have been only high-end iPad Pro models. That makes today’s announcement a significant change in strategy.
Unfortunately, the Apple Pencil does not come bundled with the new iPad. It’s a $99 optional add-on. This will make it harder for the iPad to compete with the first tablet running Chrome OS, which was announced yesterday and does come with an active pen.
Still, schools that prefer iPads can opt for the new Logitech Crayon, a less-expensive stylus also shown off during Apple’s event today.
iPad 2018 emphasizes value
For many years, all 9.7-inch iPads cost $499. Then Apple surprised everyone with last year’s $329 model. This helped the company turn around years of slowing tablet sales. Now, Cupertino set the entry-level bar even lower than that — while improving specs. That said, the $299 price is only available to schools. The general public still will pay $329. But buyers will get a vastly improved Apple tablet.
“The new 9.7-inch iPad takes everything people love about our most popular iPad and make it even better,” said Greg Joswiak, Apple’s vice president of worldwide iPod, iPhone and iOS product marketing, at today’s event.
The new model includes a speedy Apple A10 Fusion processor, introduced in the iPhone 7 and 7 Plus. A lesser A9 chip powered last year’s iPad.
The 2018 iPad’s display uses the 2048-by-1536 pixel resolution that Apple has built into all its 9.7-inch tablets for many years. This gives the screen a 261 PPI pixel density, leading to very crisp-looking text.
Apple promises 10 hours of batttery life — long enough for this computer to run continuously for an entire school day.
Other features of the new model include a front-facing HD camera and a rear-facing 8-megapixel camera. There’s Touch ID (Apple’s fingerprint scanner), plus GPS, a compass and a gyroscope.
For an additional $130, shoppers can add 4G LTE support for ubiquitous access to the internet. Of course, there’s Wi-Fi for the classroom or living room.
The 9.7-inch iPad 2018 starts shipping later this week. (You can pre-order one now.) The $299/$329 version comes with 32GB of storage. Taking it up to 128GB increases the price to $429.
Apple VP Greg Joswiak gets ready to take the lid off the new iPad at Apple’s education event in Chicago on May 27, 2018.
Apple’s school sprit
Apple once dominated K-12 education, but now finds itself struggling to remain relevant. During the first quarter of this school year, 60 percent of all computers installed in classrooms ran Chrome OS, Google’s cut-rate operating system for PCs. Apple did not even come in second: That honor goes to Microsoft, with 22 percent of the market. Apple came in third at 17 percent, according to Futuresource Consulting.
A low-cost iPad is just part of Apple’s drive to regain its role in the classroom. The company made several other announcements at its education-themed event in Chicago, including a Schoolwork app for teachers, iWork upgrades and more.
Did you know the Mail app for iOS has a Search feature? Indeed the iPhone and iPad Mail apps have a search capability, but it’s not visible by default and instead the functionality is hidden behind a gesture, and thus many users don’t even know a find feature exists for emails on their iOS devices.
If you ever need to search for an email on an iPhone or iPad, the hidden Search feature in Mail for iOS is going to make your task much easier. You can use it to search by any word, name, or term, and it’ll search all inboxes or a specific inbox to quickly find any email by the provided search terms.
How to Search Emails in iOS Mail App
Want to find an email on an iPad or iPhone? No sweat, here’s how to access the hidden Search functionality:
Open the Mail app on the iPhone or iPad
From the primary inbox view, swipe or pull down on a message, this will reveal the hidden “Search” box
Tap into the “Search” field
Type in the Search box a name, email address, term, phrase, word, date, to search emails for matches
Any emails that match the term you searched for will show up in the list below. In the example above we searched an inbox for the word “turkey” and found a handful of emails that showed to match that word.
The Mail search feature in iOS is fast and should turn up emails that match your search terms quickly, though the speed may depend on your iOS devices age as well as the internet connection, and possibly even the email accounts being used.
By default the Mail search feature on iPhone and iPad will search all inboxes that are in the email account, but if you have multiple email account configured or add another email account to iOS Mail app, you can go to those email inboxes first within iOS Mail and narrow down the search by inbox as well.
It’s worth noting that accessing the search feature in Mail app for iOS is also the same gesture as summoning Spotlight and web search from iOS Home Screen, searching Messages in iOS, searching in Reminders for iOS, searching in iOS Settings and it’s also the same gesture necessary to reveal the hidden search capability in Notes for iOS too.
But before declaring that a downward drag gesture is the universal search feature in iOS, recall that not all search functions in iOS are hidden and tucked behind a pull-down gesture, for example, searching on a webpage in Safari for iOS uses the Sharing button as a starting point instead, and searching Photos on the iPhone and iPad is accessed by tapping on a magnifying glass icon. There is not always consistency with how to access a search function in the iOS world, which can also explain why some users aren’t aware of the search features existing in many apps at all.
You may discover a “Verification Required” error message when attempting to install or update free apps from the iOS App Store on an iPhone or iPad, thereby preventing the user from downloading apps or updating any apps.
The complete message is either “Verification Required – Before you can make purchases, you must tap Continue to verify your payment info.” or “Verification Required. Tap Continue and sign in to view billing information.” if you see this message on an iPhone or iPad when trying to download, install, or update free apps you might be annoyed and want to stop the error and fix it. The verbiage varies slightly depending on the iOS release.
This tutorial will show you who to stop the “Verification Required” message on iOS, either when downloading free apps or app updates on an iPhone or iPad.
Why do I see a “Verification Required” message in the App Store for iOS?
It turns out the “Verification Required” message on iOS is a result of the payment method used on the Apple ID associated with the device. Accordingly, you will see that Verification Required billing message if the payment method failed, if there’s an unpaid balance on the account, or if the device has never purchased or downloaded anything or any free app before, or if the payment method has not been updated as needed. Thus, to stop the Verification Required message, in iOS, you will need to change the payment method, either to a valid payment method, or to ‘none’ which allows no payment details to be associated with an Apple ID and App Store. Below we will detail the exact steps to accomplish this task.
Before beginning: note that if you simply add a valid credit card to an Apple ID, the “Verification Required” message will not appear at all, and you can avoid verification for updates and installs as long as you disable “Require Password” for free downloads on the iPhone or iPad App Store settings.
How to Fix “Verification Required” When Installing Free Apps on iPhone and iPad
If you don’t want to add or verify a credit card with the Apple ID, or if the payment method expired, or you don’t want to use one at all, then you must change a setting on your Apple ID to stop the “Verification Required” message. Here’s how to do that:
Open the “Settings” app on the iPhone or iPad
Choose “iTunes & App Store” settings, then tap on the “Apple ID: your@email.com” button at the top of the settings
Tap on “View Apple ID” and sign in to the Apple ID as usual
In the Account Settings section, tap on “Payment Information”
Under ‘Payment Method’, choose “None” – or, alternatively, update the payment method *
Tap on “Done” when finished adjusting your settings
Exit Settings, and return to the App Store of iOS where you are now able to freely download, install, and update apps without seeing any “Verification Required” message
This should completely resolved the “Verification Required” message when performing App Store actions in iOS, whether updating apps, downloading new apps, or installing any apps, onto an iPhone or iPad.
* Whether or not you choose to update payment information associated with an Apple ID is entirely up to you. If you’re using the App Store without a credit card then you’d want to choose the “None” option, which allows updating and downloading free apps without ever needing any sort of verification of payment or even a payment method at all. Or if the payment method has expired, you can choose “None” too and bypass the ‘Verification Required’ message that way as well, and then later go back and update the payment details if need be. Keep in mind if you havre an unpaid balance on the Apple ID for a purchase, subscription, etc, you must pay that balance before you can choose the “None” option or before you can stop the Verification Required billing message.
Separately but related, if you also don’t want to authenticate with an Apple ID password upon each instance of downloading and installing iOS apps on the iPhone or iPad, you can disable password requirements for free downloads from App Store in iOS (and for Mac users, there is a similar setting to enable free downloads without passwords for Mac App Store too).
The latest versions of iOS offer a very nice feature that lets you easily share wi-fi passwords from an iPhone or iPad so that other people can quickly join a wireless network that you’re already connected to. While there is still no way to see the wi-fi router password in iOS, the ability to share a wi-fi password and assist another device to join a wireless network is a great feature and a step in the right direction.
This trick should help to avoid those annoying situations where you’re trying to relay or receive a confusing wi-fi password, a fairly routine situation when a new guest comes to your office or home, and you’re then going through the process of relaying a complicated wireless password which can be a hassle. Even worse is if you’re visiting someones home who is not tech savvy and they have a wild wi-fi password assigned by their ISP that is some mishmash of 20 randomized characters which most humans will never remember, and you go on a little goose chase to track down the password. So, this iOS feature attempts to help that situation by making it easy to share a wi-fi password from a device that is actively connected to the network.
Before beginning, you must meet some simple requirements:
Requirements for Sharing Wi-Fi Passwords in iOS
All iPhone and iPad devices involved must have iOS 11 or newer installed
All iOS devices must have wi-fi and Bluetooth enabled
The device sharing the password must be actively connected to the same wi-fi network the other device wants to join
All devices involved must be in close physical proximity to one another
You must have one another in each others Contacts list
The requirements sound more complicated than they are, but basically any two updated devices that are in the same room will likely be sufficient. You can also share wi-fi passwords from an iOS device to a Mac if the computer is running macOS 10.13 or newer, but we’re focusing on the iPhone and iPad here, since Macs have other ways of revealing wi-fi passwords if need be, a task that is currently impossible in iOS.
How to Share a Wi-Fi Password from iOS with Other iPhone and iPad
Assuming the devices involved meet the aforementioned requirements for sharing network passwords, here’s how to share a wi-fi password from one iPhone or iPad with another iPad or iPhone:
Position both iOS devices physically close to one another
On the device needing the wi-fi password, open the “Settings” app and go to “Wi-Fi” and then attempt to join the network, then stop at the “Enter Password” screen
Unlock the iOS device that is currently connected to the wi-fi network, and wait a moment until a large “Wi-Fi Password” screen shows up, then tap the “Share Password” button
Wait a moment and the receiving iOS device password entry screen should auto-fill in with the wi-fi password and join the wireless network
When finished, the sharing iPhone or iPad will flash a “Complete” screen, so tap “Done”
Simple, easy, and a great new feature for anyone who has visitors coming over that want to use a wi-fi network, or even if you’re setting up a new device for yourself and you want to easily join a wireless network without having to type out a password to the wi-fi router.
Typically the process works flawlessly, just be sure you meet all of the requirements outlined above to be able to share wi-fi passwords this way. Usually the most important aspect of sharing wi-fi passwords this way is that both devices are running iOS 11.0 or later and the devices are physically near one another with each other stored in the Contacts list, but you’ll want to be sure all requirements are met.
And yes you can share a wi-fi password with yourself using another device this way since your own contact information is stored within Contacts.
Does this work sharing wi-fi passwords from hidden SSID networks?
Yes, as long as the requirements are met. But from the device receiving the wi-fi password, you’ll have to manually join a wi-fi network that isn’t broadcasting an SSID to initiate the process.
Can you see the wi-fi password of a router from an iPhone or iPad?
While you can share the wi-fi password of connected routers in new versions of iOS, you still can not see, reveal, or otherwise view a wireless network password from an iPhone or iPad.
Perhaps a future version of iOS will allow users to directly reveal a wi-fi network password through some authentication method, but for now this is not possible.
What if I forget a wi-fi password, can I still share it?
You can continue to share wi-fi network passwords this way from iOS devices whether you remember the wi-fi network password or not. As long as a device is connected to the network to be shared, the password to that wi-fi network can be shared.
However, if you completely forget the password of a router, you’ll either need to uncover the wireless password another way like from a Mac, or reset the router, or contact the ISP or manufacture of the wi-fi router.
How else can you see a wi-fi password?
If you forgot a wifi password and you have a Mac that was once connected to the network, you can retrieve the forgotten wifi password with a Mac Keychain trick detailed here.
Note that many ISP provided wi-fi routers also will have the default wi-fi password printed physically on the router or wi-fi access point itself, so often you can just look at the physical wireless router to get the password again. If all else fails, you’ll need to reach out to your ISP or manufacturer of the router if you can’t figure what to do.
Can I manually bring up the wi-fi sharing password screen in iOS?
Aside from the method detailed above involving opening the Settings app and having the devices near one another, no. It’s always possible a future version of iOS will offer a more direct way to share a wi-fi password, perhaps through a standard iOS Sharing function from the Wi-Fi Settings screen, but currently this is not available.
The wi-fi password sharing feature of iOS isn’t working, help!
First go back to the requirements at the top of this article and be sure all devices involved meet those requirements. The procedure should work exactly as described with the requirements met.
If all else fails, reboot the two iOS devices involved. If the recipient device was once connected to the wi-fi network but it is no longer connected due to disconnection or a password change, you may need to forget the wi-fi network in iOS Settings and then try to join again.
There continues to be a market for Lighting external storage adapters despite the ever-increasing capacity of iPhones and iPads, which serve not only for adding more storage for photos and videos but also as a means to transfer data between devices. While we’re not seeing as many new external storage devices as we did a couple fo years ago, new ones do appear on the scene once a while, and Naztech’s Xtra Drive Mini is the latest of these. It’s a small aluminum flash drive with a USB connector on one end and a Lighting connector on the other that takes Micro SD memory cards rather than relying on internal storage.
Xtra Drive Mini comes with a 16 GB Micro SD card in the package to get you started, but it supports card capacities of up to 256 GB if you’re willing to supply your own. These cards are also easily swappable so that you can use one Xtra Drive Mini with multiple cards. A key ring is attached with a very short chain, and a clear plastic cap covers the Lighting port which is also attached to the chain to keep it from getting lost. It’s an attractive and minimalist design that reminds us of Kingston’s DataTraveller Bolt Duo that we looked at last year, although Naztech’s flash drive has the keychain and cover directly attached rather than including a separate case. A blue LED at the base of the Lightning port flashes when data access is occurring over either the Lighting or USB ports.
Sadly, as with all iOS external flash drives, you’ll need to use Naztech’s own Xtra Drive Mini app to communicate with the device — Apple’s own Files app is only good for cloud storage providers, although we’re still crossing our fingers that maybe iOS 12 will finally bring unified flash drive support to the mix. Naztech’s app provides the usual mix of functionality, presenting you with a view of the app’s on-device storage and the storage of the connected Xtra Drive Mini. You can tap on the main circle to browser your iOS photo library and selectively copy photos to the flash drive, or drag-and-drop the upper circle to the lower one to backup all of your iOS photos. Folder icons for both internal and external storage allow you to browse by media type — photos, videos, music, or documents — or simply display a standard file browser view of all content on the device.
The app also provides the ability to “lock” files with a password, which appears to employ some kind of rudimentary encryption. You’ll be prompted for the password when attempting to view the files through the Xtra Drive Mini app, however you’ll lose the ability to access it from the USB port on your Mac or PC. The Xtra Drive Mini app also shows up on the standard iOS share sheet, allowing you to transfer files into the app from just about any other app, although this will save the file to the app’s internal storage, requiring you to then open the app and transfer it to the flash drive as a separate step — a cumbersome workaround that’s sadly common to just about every external flash drive we’ve looked at. Like most third-party flash drive apps, Naztech’s app is far from elegant and isn’t as intuitive as we’d like, but it does get the job done, and we were especially pleased by how versatile it is — you can back up photos and videos, create folders and organize files into them, create text files, view supported file types directly in the app, and open unsupported file types in any other apps that support the share sheet’s “Open in” functionality.
In terms of performance for transferring files, Xtra Drive Mini is about average. Unlike Kingston’s Bolt, Xtra Drive Mini isn’t USB 3.0, which will result in slower data transfer speeds on your Mac or PC. Performance over Lightning doesn’t suffer as dramatically — it’s not like we’ve ever seen USB 3.0 speeds over a Lightning connection anyway — but it does come in at only a little over half the speed of Kingston’s flash drive, with a transfer rate of about 4 MB per second. For example, a single 650 MB video file took just under two minutes to transfer, while 49 photos totalling 63 MB took about 17 seconds. Note that we only tested Xtra Drive Mini with the bundled 16 GB Micro SD card; it’s possible a higher-speed card might improve transfer performance. Further, with each flash drive requiring its own app, it’s also impossible to know for certain whether transfer performance is a function of the hardware or processing overhead in each individual app. It’s also worth noting that the Xtra Drive Mini app transfers photos and videos in their original formats, so if you’re using iOS 11 you’re going to end up with HEIC and HEVC files on their flash drive.
While we still believe the demand for external flash drives for iOS devices is diminishing, Naztech’s Xtra Drive Mini is a good solution for users of lower-capacity iPhones who want to be able to carry a lot of photos or videos with them, as well as those who have a regular need to move data between their iOS devices and a PC or Mac. The hardware is well designed, however the app, although very capable, could use a great deal more polish. The price also gives us a bit of a pause, since for $60 you’re only getting 16 GB of storage — half that offered by Kingston’s Bolt or Leef’s iBridge at the same price; however the pricing becomes much more competitive if you’re looking to increase the storage, since you can easily pick up 128 GB and 256 GB Micro SD cards on Amazon for quite a bit less than higher capacity Lightning flash drives with built-in storage. It’s also worth keeping in mind that Bolt is still strictly a solution for backing up photos and videos while Naztech’s app offers a great deal more versatility.
Harmonix’s connected music system is built for party play, but it’s best when you’re just messing around.
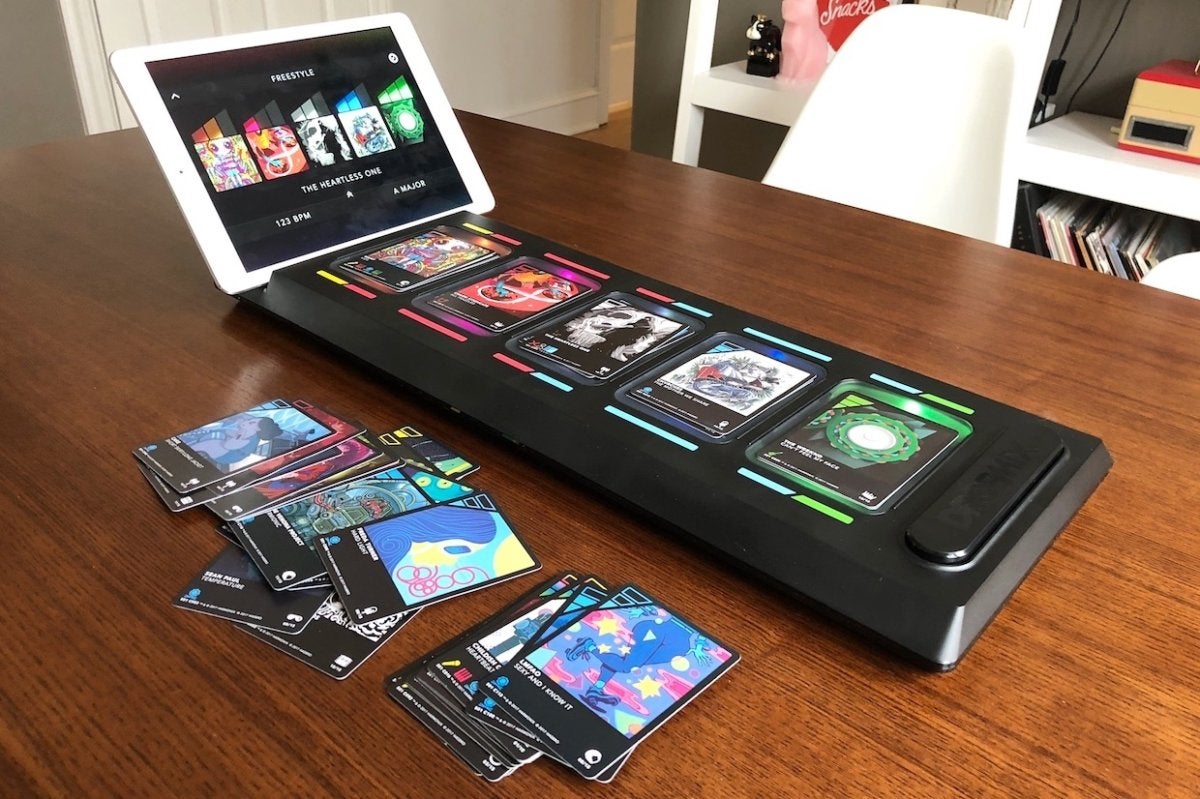
Connected toys and games leverage the power of your iPhone or iPad to empower new kinds of physical-meets-digital experiences—but even so, the concept behind DropMix sounds a bit absurd. It’s a game that finds you placing cardboard playing cards onto a Bluetooth-connected board, and by doing so, you’ll mix and match the beats, harmonies, and vocals from various popular songs into one surprisingly cohesive track.
Playing cards and remixes? DropMix might seem convoluted, sure, but it totally works. And that is Harmonix’s specialty. This is the same studio that created the plastic instrument craze with Guitar Hero and Rock Band, and reinvented dance games with the Kinect motion-sensing Dance Central on Xbox. They are the masters of exciting, music-driven play experiences, and that’s seen yet again with DropMix.
DropMix brings in bits and pieces from some very different source songs.
Described as a “music gaming system,” the DropMix package includes a battery-powered, light-up plastic board along with 60 cards, each of which packs in an NFC chip to interact with the board. You’ll download the free DropMix app on iPhone or iPad, pair it with the board, and then stick your device into the little upright slot at the end of the board. Now you’re ready to make music.
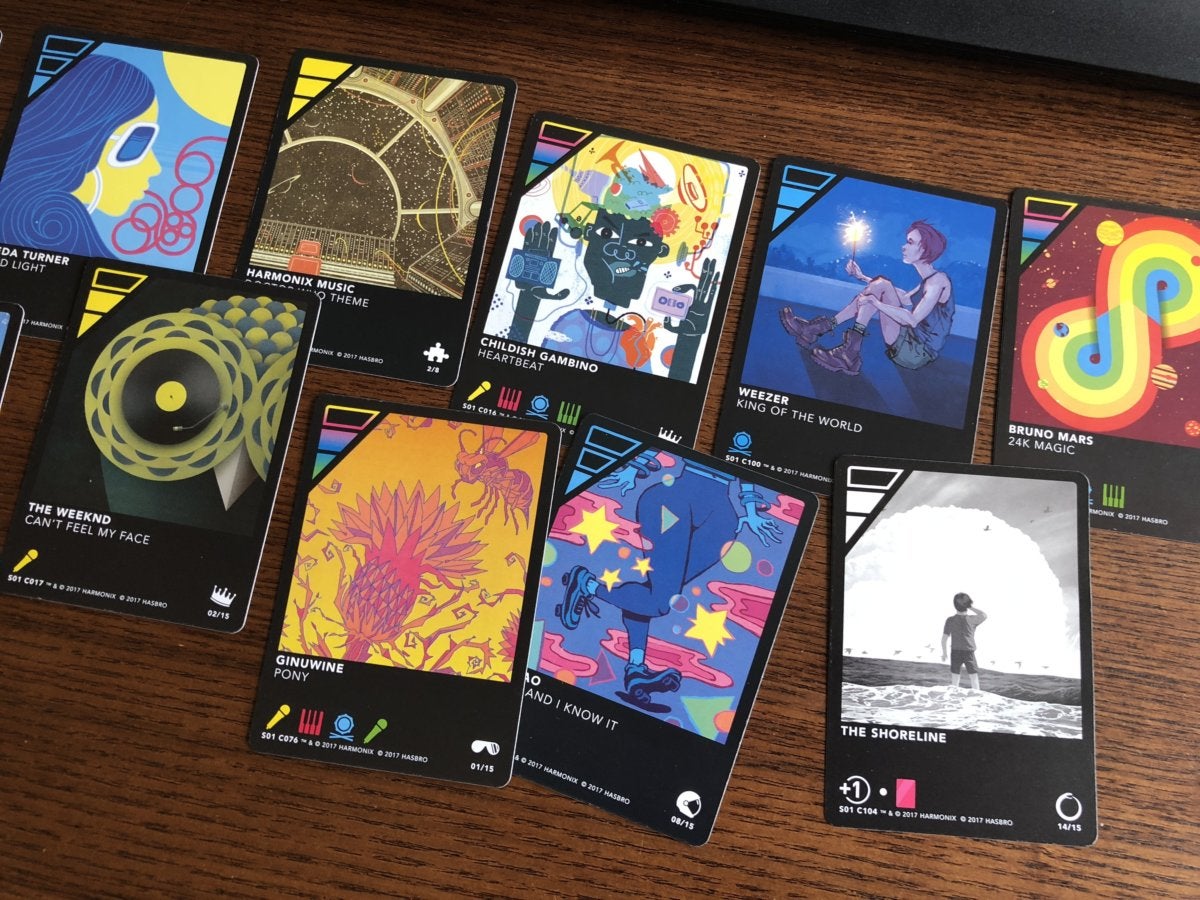
Each color-coded card includes a portion of a real-life song: a guitar riff, vocals, or a beat, for example. When you place a card onto one of the five NFC reader pads, that element of the song is automatically added to your ongoing mix, which plays from the iOS device. You can even drop a new card on top of a pile to switch things up, or use FX cards to tweak the output. DropMix also shifts the tempo and key of elements to ensure that everything matches up perfectly into a compelling aural brew, although you can also manually tweak both on the fly.
Fling a bunch of song chunks at DropMix and it’ll (somehow) find a harmonious result.
It’s effortless, and even an out-there pairing of very different songs from seemingly opposing genres can sound pretty great. Songs from the likes of Bruno Mars, Ed Sheeran, The Weeknd, Sia, and Imagine Dragons are included in the starter pack, and Harmonix and Hasbro sell additional themed sets that bring in artists like Outkast, MGMT, and The Chainsmokers.
DropMix is at its best when you’re just noodling around with cards in the Freestyle mode. It’s less a game than a breezy production studio, letting you add and subtract cards to your heart’s content to create amazing or audacious results. This is where I spent most of my time, taking the 100-or-so cards I had between the starter kit and expansions and just playing around until I made something great… or wonderfully weird, at least. You can even save your mix and share it as a video.
The game modes are fine, but DropMix’s real joy is found in freewheeling experimentation.
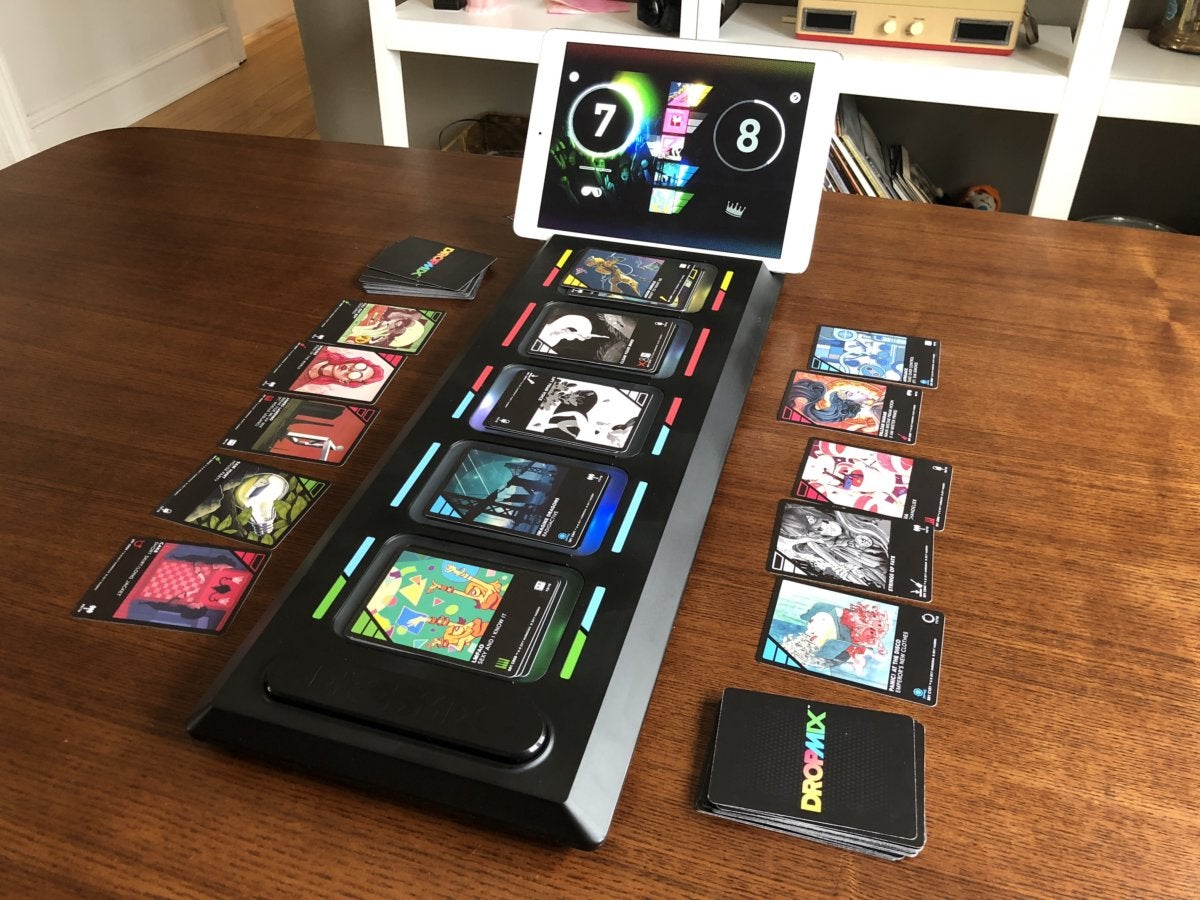
By contrast, the two game modes—the head-to-head Clash and collaborative Party—aren’t nearly as compelling. In Clash, you’ll take turns playing cards to build up a score tally, with each card’s power rating and other modifiers coming into play. Meanwhile, Party mode finds players quickly trying to satisfy requests for certain cards. In both cases, the joy of creation takes a backseat, since you’re more focused on game rules that have little to do with making cool-sounding tunes. They’re solid enough diversions, but I had a lot more fun freestyling. Hopefully we’ll see more modes added in the future.
Bottom line
The starter kit’s original $100 price is a bit daunting, which might explain DropMix’s seemingly muted launch last fall. But with post-holiday season price drops putting it as low as $50, there’s been more buzz building around DropMix—and rightly so. It’s an incredibly cool concept that makes you feel like you’re creating music just by laying down cards, even if it is more fun to mess around than play the structured game modes.
iPhone and iPad users can now customize Control Center to better suit their needs. For example, if you frequently use Voice Memos, Notes app, Stopwatch, Magnifier, or the Alarm feature, you can add those to Control Center for ultra-fast access from anywhere in iOS. Or if you never use the Flashlight feature or Camera via Control Center, you could remove those from Control Center too.
Customizing Control Center is a great way to personalize the quick-access controls which are available from anywhere in iOS, here’s how it works.
This feature is available on iPhone and iPad and it works the same on both device, but you will need a modern iOS version to have the capability to customize Control Center, anything beyond iOS 11.0 or newer will have the functionality.
How to Customize Control Center in iOS
Customizing Control Center is demonstrated on iPhonehere, but it works exactly the same on iPad too. Here’s what to do:
Open the “Settings” app on the iPhone or iPad
Tap on “Control Center”
Now tap on “Customize Controls” where you will be able to add or remove options from Control Center :
To add new control options to Control Center, scroll down and tap on the green (+) plus button next to a control feature name. After the green button is pressed the item will pop to the top of the Customize section and be included in Control Center’
To remove control features from Control Center, tap the red (-) minus button next to control center features at the top of the settings screen. If an item is removed from Control Center it will appear on the bottom of the Customize list
Access Control Center in iOS to see the changes to control center you made *
When satisfied, exit out of Settings as usual
That’s it, you have now customized Control Center in iOS. You can do this at anytime, so if you enabled or disabled a setting you wish you hadn’t, just go back to the Control Center Settings panel and adjust again as needed.
* For the unfamiliar, accessing Control Center on iPhone and iPad is accomplished by swiping up from the bottom of the screen, unless you have an iPhone X in which case accessing Control Center is then accomplished by swiping down from the top-right of the screen.
You’ll find that some features can’t be removed from Control Center, for example the extra large “Screen Mirroring” button can not be removed despite the fact that many users don’t have an Apple TV and will never use it, and the large “Music” control can’t be removed either. The classic controls for options like Wi-Fi, Flashlight, networking, Bluetooth, AirDrop, Cellular, Volume, Screen Orientation Rotate Lock, and Brightness, are also all permanently in place in Control Center.
Currently only Apple-provided options are available for Control Center, and as already mentioned there are some features that are not able to be disabled or removed from Control Center, or added to Control Center either. But it’s always possible that this will change down the road with a future iOS release, as Apple often adds and changes features for iPhone and iPad.
If you ever find yourself wanting to disable Touch ID or Face ID authentication methods on an iPhone or iPad, you can easily temporarily disable the biometric authentication in iOS by using a simple Siri command.
With Touch ID or Face ID temporarily disabled, the iPhone or iPad must then be unlocked with a passcode instead of either a fingerprint or face scan.
How to Disable Touch ID or Face ID Temporarily on iPhone and iPad with Siri
The trick is quite simple, simply ask Siri whose iPhone it is. If that sounds familiar to you, it’s because it’s the same method used to determine the owner of a found iPhone or iPad, and coincidentally it will also lock down the biometric authentication features of the device.
Summon Siri as usual, either via Hey Siri, Home button, or Side button, depending on the iPhone or iPad
Say “Whose iPhone is this?” to disable Touch ID and Face ID temporarily
You can verify this yourself by triggering Siri and asking “Whose iPhone is this”, and then testing out Face ID or Touch ID authentication. The biometric authentication will not work and instead it will say that “Your passcode is required to enable Touch ID” or “Your passcode is require dot enable Face ID” and bring up the typical passcode entry screen of iOS.
Important: You must disable Touch ID and Face ID with “Whose iPhone is this?” and NOT “Whose iPad is this?”
Yes, I know it sounds weird, but you must ask “Whose iPhone is this” even if the device is an iPad.
If you ask “Whose iPad is this” then Siri tells you to go to apple.com for some reason instead.
Maybe this Siri quirk will be resolved some time, but for now be sure to refer to your iPad as an iPhone instead to lock it down from biometric access.
Note that when asking a device “whose iPhone is this”, Siri will nearly always transcribe the request as “Who’s iPhone is this”, which it has been doing for a long time probably because ‘whose’ and ‘who is’ sound similar. Regardless of Siri transcribing the wrong word or not, the feature still works, just remember to ask “Whose iPhone is this” on iPhone and iPad, because Siri currently does not know how to find ownership of an iPad unless you call it an iPhone.
A potential significant advantage to the Siri approach is that it can enacted and used entirely hands-free with ‘Hey Siri’, meaning you can disable Touch ID and Face ID with a device that you don’t have directly on your person. So for example if the iPhone or iPad is sitting on a coffee table face up, you could say “Hey Siri, whose iPhone is this” and it would lock down biometric authentication attempts.
There are other ways to disable Touch ID and Face ID temporarily, for example you can temporarily disable Face ID by pressing the side Power button and then canceling the shutdown request, or by pressing it five times repeatedly, or you can disable Touch ID with repeated attempts with the improper fingerprint. And of course you can always completely turn off Touch ID in iOS, disable Face ID, or use iPhone X without Face ID enabled at all too, and by disabling biometric authentication the passcode must always be used to unlock an iPhone or iPad instead.