In case that you are experiencing iPhone 6 Plus multi-touch problems, Apple is ready to fix that for you. That is, if you are on Apple Care.
Apple has determined that some iPhone 6 Plus devices may exhibit display flickering or Multi-Touch issues after being dropped multiple times on a hard surface and then incurring further stress on the device.
If your iPhone 6 Plus is exhibiting the symptoms noted above, is in working order, and the screen is not cracked or broken, Apple will repair your device for a service price of $149.
Apple will contact customers who may have paid for a service repair related to this issue either through Apple or an Apple Authorized Service Provider to arrange reimbursement. If you have not been contacted but paid for a repair that you believe was related to this issue, please contact Apple.
The reimbursement amount will equal the difference between the price you paid for the original service to your iPhone 6 Plus and the $149 service price.
Apple Watches have noticeably smaller battery so it is important to maximize its power by saving power when it’s not needed and using it when it is.
Update to the latest software
Always make sure your Apple Watch is using the latest version of watchOS.
To see if you need an update, open the Apple Watch app on your iPhone and go to My Watch > General > Software Update.
If an update is available, connect your iPhone to Wi-Fi, attach the charger to your Apple Watch (make sure it has at least 50% charge), and update wirelessly.
Adjust your settings
There are a few ways you can preserve battery life on your Apple Watch:
During running and walking workouts, turn on Power Saving Mode to disable the heart rate sensor. To do this, open the Apple Watch app on iPhone, go to My Watch > Workout, and turn on Power Saving Mode. Note that when the heart rate sensor is off, calorie burn calculations may not be as accurate.
For longer workouts, you can choose to use a Bluetooth chest strap instead of the built-in heart rate sensor. To pair the Bluetooth chest strap with your watch, make sure the strap is in pairing mode, then open Settings on Apple Watch, select Bluetooth, and choose from the list of Health Devices.
If you’re very active with your hands and your watch display turns on more than you think it should, you can prevent the display from turning on every time you raise your wrist. Open Settings on Apple Watch, select General, select Wake Screen, and turn Wake Screen on Wrist Raise off. When you want to turn on the display, just tap it or press the Digital Crown.
Disabling Bluetooth on your iPhone increases the battery drain on your Apple Watch. For more power-efficient communication between the devices, keep Bluetooth enabled on iPhone.
View Battery Usage information
To view your usage and standby information, open the Apple Watch app on iPhone and go to My Watch > General > Usage.
Plug in and power on your computer to charge your Apple Watch
If you want to charge from your computer, make sure it is plugged in and powered on when you’re using it to charge your Apple Watch via USB. If your Apple Watch is connected to a computer that’s turned off or is in sleep or standby mode, the Apple Watch battery may drain.
If your Apple Watch battery needs service, use Apple or an authorized service provider.
iPad Battery and Power Services Costs in Australia
If your battery needs replacement, we can repair or replace your iPad for a battery service fee. There’s no fee if your battery is defective and your iPad is covered by warranty, consumer law, or AppleCare+. Our warranty doesn’t cover wear from normal use.
If you have AppleCare+ for iPad, it offers replacement coverage if your iPad battery can hold only 80 percent or less of its original capacity.
Battery service for all eligible iPad models:
AppleCare+: FREE
Out-of-warranty: AUS$ 165 (updated: 14/09/2021)
All prices are in Australian dollars and include GST. If your iPad is out of warranty and requires shipping, we’ll add an additional A$ 19.95 shipping fee to the listed service price.
Other battery and power issues
Your iPad battery’s performance depends on how you use apps and settings. These tips show you how to maximize the life of your iPad battery.
If your iPad won’t turn on or if the screen turns black, follow these steps and see if the issue gets resolved. Your iPad might not require service.
How long will it take?
Depending on the type of service, your repair might take from 5-12 business days. If your iPad was engraved by Apple, it could take up to 15 business days.
iPhone 6s Battery Replacement: Get it done for FREE
Spoiler Alert: This is just for qualified units that Apple thinks are eligible for free battery replacements. So if you’re iPhone 6s is out of warranty, then tough luck for you.
Apple has determined that a very small number of iPhone 6s devices may unexpectedly shut down. This is not a safety issue and only affects devices within a limited serial number range that were manufactured between September and October 2015.
What’s the Replacement Process
Choose one of the service options below to have your battery replaced. Your iPhone will be examined prior to any service to verify that it is eligible for this program and in working order.
Please call your service provider to confirm that battery replacement service is available on the day you visit them.
Apple Authorized Service Provider
Apple Retail Store
Apple Technical Support
Note: Wireless carrier partners are not participating in this program.
How to prepare your iPhone 6s for the battery replacement process:
Back up your data to iTunes or iCloud
Turn off Find my iPhone
Erase data and settings in Settings > General > Reset > Erase all Content and Settings
Note: If your iPhone 6s has any damage such as a cracked screen which impairs the replacement of the battery, that issue will need to be resolved prior to the battery replacement. In some cases, there may be a cost associated with the repair.
iPhone SIM Card: How to properly convert to Nano SIM
Do you still own that standard SIM Card size or the smaller micro-SIM? It won’t work with a modern iPhone because of the slot size. Here’s how to cut it down.
Warning! Cut your SIM card down at your own risk
We’ve cut down SIM cards a few times, and it’s worked in all but two instances. Those aren’t actually great odds. And one instance was a bit of a headache because the SIM card could no longer be used at all (not even in the original phone).
Please remember that there are always risks involved with home modifications and don’t cut up your SIM card unless you’re happy for it not to work (in this case you’ll need to get a replacement from your carrier or buy a new one). Proceed at your own risk.
What you need
To cut your SIM card down to nano-SIM size you need the following equipment:
Standard or micro-SIM card
Nano-SIM card (for measurement)
Pencil
SIM ejector tool (or Paperclip)
Small pair of straight scissors
Nail file
Once you have all these to hand it’s time to get started.
Removing the nano-SIM
Use the SIM card ejector tool (or a straightened paper clip) to open the SIM card slot on your iPhone or iPad. Inside you might find a stock nano-SIM. You’ll need this. If you do not have a nano-SIM inside your iPhone, you should borrow one from a friend to help you size up your SIM.
Spotting SIM card guidelines
You may see some reports online that suggest you measure the SIM card with a ruler. This used to work with the old-style Micro-SIM cards, but it doesn’t work when creating a new Nano-SIM. For this you need to place a Nano-SIM over the metal of the old SIM and line it up by eye.
Some SIM cards, handily, have guide marks on the metal of the sim. These help you line up the Nano SIM on the regular SIM card and provide you with an area to cut out.
How to measure up your SIM card
Place the Nano-SIM on top of the regular SIM with the cut-corner on both SIM cards in the top-right (as shown in the picture). Use the guide lines to line up the metal of the SIM card in the same central position on your SIM card. Make sure you line up the central metal part of the SIM card and not the surrounding plastic. Different SIM cards have different metal vs card dimensions, so be sure to measure aging just the metal area. You should be looking to line up the central part of the metal on your full sized SIM card.
With the Nano-SIM lined up against the regular SIM draw around the Nano-SIM (and on to the regular SIM) with a sharp pencil. This create a guideline for you to cut around. Do not worry about marking the corner, pay attention to marking the sides of the Nano-SIM accurately.
Cutting your SIM
Softly, softly catchy monkey is the phrase you want to use here. It is better to trim back your SIM card a little bit at a time and not too much. Then use a file to file down the edges. We usually start with the top piece of card and the sides before carefully clipping the bottom (you can also just file down the bottom).
We are using a pair of small nail scissors to cut through the SIM card. It is typically as easy to cut through the metal of the SIM card as it is the plastic card surrounding it. You can also use regular scissors but the smaller pair offer more accuracy. If you are using nail scissors be sure to use a pair that is straight and not with a slight curve.
It’s better to trim it slightly large and squeeze it in, rather than cut off too much and it be wiggling around inside the SIM card slot. Trim off the corner manually.
Measure into the nano-SIM tray
Now place the cut up SIM card on top of the nano-SIM tray from the iPhone or iPad. It should be too large to fit into the nano-SIM tray. This is a good thing. Now you need to trim the SIM card down bit by bit until it fits snugly into the tray. Now slide the nano-SIM card into the device.
That should be it. Turn the iPhone or iPad on and iOS should say ‘Searching’ in the top-left, followed by the name of your service provider.
iPhone Screen Protectors: How to properly install them
Plastic or glass, screen protectors have one job: keep your iPhone screen intact after an impact. Once they took the fall and broke, it’s time to replace them.
If you have a crack in your tempered glass screen protector, then it’s done its job. It’s taken the lumps so that your iPhone or iPad’s screen didn’t have to. Once a tempered glass screen protector has a crack in it, it’s exponentially less effective – you should replace it.
Removing your old tempered glass screen protector
There are a few ways to remove your busted tempered glass screen protector and the one you use will depend on just how well-attached the protector is to your screen.
Before you start, use a hair dryer on low on your screen for about 15 seconds. This should slightly heat up and loosen the adhesive on the screen protector. Do not overdo this part.
Method 1
Before getting out your toolkit and working on your iPhone or iPad like it’s one of Frankenstein’s creations, try removing the screen protector with your fingernail.
Start by trying to lift the screen protector up from each corner. One of them’s gotta give!
Once it starts coming up, stop pulling from just the corner and move further along the protector as it starts to peel off. This will help prevent it from falling to pieces before you can get it all the way off.
Pull slowly and evenly; otherwise, you’ll have a jigsaw puzzle of tempered glass pieces to clean up.
Method 2
Try using a toothpick to pry up one of the corners. Make sure you point the sharp end up toward the screen protector as you do this and not down toward the screen.
Once you can get a corner up, pull with your fingers, once again pulling slowly and evenly.
If you can, slide a credit card into the gap and slowly push it along so as to lift the screen protector.
Method 3
Try some duct tape!
Roll a piece of duct tape around two of your fingers with the sticky side out. Start in a corner and press the duct tape onto it, rolling away from corner slowly. Hopefully, the duct tape will adhere to the screen protector and you’ll be able to pull it up and off.
Installing your new tempered glass screen protector screen protector
It’s hopefully been a long time since you’ve had to install a tempered glass screen protector, so we’ll forgive you forgetting. Just like removal, there are a couple installation methods, which will differ based on brand and style.
Either way, make sure you hands are clean so as not to leave residue, dust, or dirt on your iPhone or iPad’s screen. This can cause bubbles under your screen protector.
Dry mounting
This method is for tempered glass screen protectors that did not come with a bottle of solution.
Clean your phone’s screen with an alcohol pad if the protector came with one. Otherwise, use a lint-free microfiber cloth.
Hold the screen protector and peel off the film on its sticky side.
Very carefully align the screen protector with your iPhone or iPad’s screen, making sure you line up the Home button, earpiece, and camera holes.
Slowly place the screen protector onto your screen, starting from one end and carefully working your way to the other.
Use a credit card or any application tools that were included with your protector to ensure that it goes on evenly and without bubbles.
Smooth out any bubbles with a credit card or the installation card that came with your screen protector.
Starting in the center, push bubbles out toward the edges of your screen with short movements. If you try long pushes, you’ll just spread the bubble out under the screen protector. You can also use a microfiber cloth to do this.
Remove the film from on top of your screen protector. This should reveal a completely clean screen protector.
Wet mounting
This method is for tempered glass screen protectors that come with a bottle of spray solution (usually alcohol) to aid in installation. Some folks prefer applying screen protectors this way, since it cuts down on static and helps prevent dust and hair from sneaking under your screen protector.
Clean your iPhone or iPad’s screen using the spray and a soft cleaning cloth.
Spray both the front and back of the screen protector, being generous with the spray. This will prevent it from drying up during installation.
Carefully place the screen protector onto your iPhone or iPad’s screen.
Balance one end on the screen and slowly apply it from one end to the other, using a credit card or the flat of your hand.
Use the squeegee that comes with wet-mounted tempered glass screen protectors to squeeze the excess solution out from under the screen protector.
Start in the center and gently push it out toward the edges, making sure to hold onto the protector so it doesn’t shift around.
Leave it to dry for at least half an hour. If you’re putting a case on your iPhone or iPad, wait at least a couple hours. This will prevent the screen protector from shifting around and will allow it to fully adhere to your screen.
Keep in mind that during installation, you may have to remoisten the screen protector. It can be rather tedious to line everything up properly and you may have to reapply the spray a few times. Just be patient and careful.
Always remember that if there’s any pits or cracks in your tempered glass screen protector, you should replace it, even if they’re minor. Glass has a habit of turning minor cracks and pits into major defects.
Yes, you’ve seen some iPhones with screens almost popping out of the casing. It’s due to a swollen batteries. Batteries that are either defective or needs replacements.
Suddenly, your battery can’t fit in your phone anymore or can barely fit. You can’t afford for that to happen right now. The question is: why is it swollen in the first place? By the way, it’s unfortunate, but when your battery gets swollen, it cannot be fixed – you have to get a new one. That’s why it’s a good idea to figure that out so that you can take measures that will prevent your battery from swelling the next time.
The following are three main reasons that may cause your smartphone or cellphone battery to swell:
Overcharging This usually isn’t an issue when you use the charger that came with your phone. However, there are times when that charger can malfunction and cause your battery to be overcharged. As a matter of fact, your phone should not be left on the charger for very long after the battery has been fully charged. This can definitely add to the extent of the problem. You should also know that Lithium Ion batteries don’t react well to overcharging at all, so be very careful with those.
Heat Extremely high temperatures in the battery as a result of charging or rapid discharging from using the device, could have an effect on the chemistry of the battery. This negative chemical effect could cause your battery to get swollen.
Faulty Manufacturing This is a case of the manufacturer’s issue. It’s not your fault; it’s a problem which occurred within the manufacturing process, that’s why your poorly-made battery has swollen.
If at any point, you realize that your battery has swollen, you need to get rid of it immediately. Your swollen battery can leak and damage your phone or it can even explode and start a fire. Don’t take the chance. Try to replace the battery with an original one just like it, because it will be safer and it will also perform more effectively within your phone.
Replacing iPhone Battery: When is the right time to do it
The right time to replace your iPhone’s battery is one year after you bought it. That is if you bought it brand new. If you’re not sure, here’s a quick tip on how to tell if your iPhone battery needs to go.
Have a quick check on the settings
Head into the Settings app.
Then go into Battery.
There will be a warning at the top of the page suggesting that your battery needs to be serviced. This indicated that your battery has either reached, or is close to 500 completed charges.
If you do have this message, don’t worry too much. You can continue to use your phone, but you may experience reduced charge capacity and some slight stability issues while your battery is on lower charge. Having your battery seen to by an official service technician is the best way to proceed, which may result in getting a new battery or having your current one fixed if there are any issues.
Here are some indicators that your iPhone might require a new battery: dimmer backlight than normal; lower speaker volume; stuttering screen when scrolling; frame-rate reduction in some game apps; and longer app-launch times.
If you’re covered under AppleCare then you can have your battery replaced at no additional cost, assuming it currently only holds 80% or less of its original charge.
How to maximise battery life on an iPhone
If you want to make sure your battery lasts as long as possible until you have a chance to get it replaced, then try the following suggestions:
Turn off Location Services.
Disable Background App Refresh.
Make sure Auto-Brightness is enabled.
Use Airplane Mode when you don’t need to be connected to the internet.
There’s an app for that
Battery Life is a simple, free app that tells you how much capacity your battery still has, as well as its current level. It can also tell you how long that charge will last depending on what you’re doing, from checking email to streaming video.
Your battery might be making your older iPhone slow. This is because, apparently, iOS system software sometimes slows down older iPhones when the internal battery has degraded to the point where it can no longer sufficiently power the device at the expected performance level.
According to Apple, the throttling of device speed is intended to prevent the iPhone from crashing or shutting down unexpectedly due to a worn batteries diminished capabilities.
Unfortunately, that device speed throttling could have an annoying side effect of making the older iPhone noticeably slower to the end user. This is often noted after new iOS system software releases, though it should be pointed out that sometimes any observed performance degradation irons itself out over time, or can be successfully resolved with various iOS troubleshooting steps and settings adjustments on the impacted device. But, sometimes an older iPhone or iPad just feels persistently slow, and that could very well be due to having an old degraded battery.
This battery and device speed issue has gained considerable attention lately, after a series of iPhone users discovered that system benchmarks were notably underperforming on older iPhone models. For example, a widely tweeted set of screenshots and report from Twitter user @sam_siruomu showed performance benchmarks where an iPhone 6 was under clocking itself down to 600mhz, but after replacing the battery with a new one the speed corrected back to the proper 1400mhz. That anecdotal twitter report has been captured in a screenshot below:
The device benchmarking company Geekbench also seemed to confirm an occasionally observable underperformance of older iPhone models based on referencing their own benchmarking data.
With considerable hubbub generated online, and plenty of related rumors and conspiracies, Apple released a statement to TechCrunch and Buzzfeed that said the following:
“Our goal is to deliver the best experience for customers, which includes overall performance and prolonging the life of their devices. Lithium-ion batteries become less capable of supplying peak current demands when in cold conditions, have a low battery charge or as they age over time, which can result in the device unexpectedly shutting down to protect its electronic components.
Last year we released a feature for iPhone 6, iPhone 6s and iPhone SE to smooth out the instantaneous peaks only when needed to prevent the device from unexpectedly shutting down during these conditions. We’ve now extended that feature to iPhone 7 with iOS 11.2, and plan to add support for other products in the future.”
That statement and admission from Apple is interesting, because there has long been speculation and conspiracy theory that Apple intentionally slows down older iPhone (and iPad) devices with iOS system software updates, but until now most users didn’t know why, they just anecdotally observed it on their devices. That notable performance degradation led to countless theories about why it might happen, along with other theories denying it happens at all and insisting it was imaginary. Well, it turns out that some observed performance decline may directly relate to the older devices battery age and quality.
How this all shakes out remains to be seen, as there are already lawsuits against Appleabout the battery issue, and the topic has also reinvigorated Right-to-Repair advocateswho argue that it’s consumer friendly to be able to easily and reasonably repair your own stuff.
This may all sound bad, but there’s actually good news here. If indeed an iPhone (or iPad) device slowdown is entirely due to an old battery, then replacing the battery should theoretically boost performance back to expectations, much as it did for the Twitter user we cited above, and that has been anecdotally reported as successful elsewhere around the web too.
Of course a notable difficulty here is that iPhone does not typically report that its internal battery is old enough to have degraded device performance, nor does the iPhone have an easily replaceable battery. The former situation is something that could be theoretically addressed in a future iOS software update, with a notification along the lines of “battery has degraded and can no longer support optimal device performance” or something similar, perhaps with a link to battery replacement options. The latter difficulty of not having an easily replaceable battery means you’d either need to get an old worn battery replaced by a competent repair center, or take it upon yourself as a DIY project.
If you do have an older iPhone (say an iPhone 6 or iPhone 6s) that feels unreasonably slow, and you want to see if a battery replacement will restore performance, you’ll need to either contact Apple or an Apple authorized repair center and pay $80 for a battery replacement, or you can get a Do-It-Yourself iPhone battery replacement kit on Amazon for around $40 or so. There’s no guarantee that replacing a battery is going to speed things up and make an older device as snappy as it used to be, but it just might boost performance for some devices under the right set of circumstances.
With all the fuss about old, depleted batteries slowing down your iPhones, it might be a good idea to at least check the health of your iPhone’s battery. To do this, you can use a free tool called coconutBattery, an app that digs into your iOS and Mac devices to tell you how old they are, and how strong your battery is compared to when it was new.
CoconutBattery
CoconutBattery is an Mac app that performs a single task — it checks the status of the battery in your Mac, or the battery of any iDevices connected to that Mac. To use it, you just plug your iPhone or iPad into your Mac, and make sure that it trusts the host computer (if you regularly sync your iPhone with your Mac, you can skip the “trust” step. If you don’t, then just follow along with the instructions that will appear on your Mac and iPhone’s screens).
Once connected, you’ll see a window something like this:
All you need to know about your iPhone battery in one place.
That’s the iOS page of the coconutBattery window, and it shows you several pieces of useful info. The top section is basic data about the connected iPhone (or iPad): dater of manufacture, OS version, device model, and the storage space currently used. For more details –serial number, ages in days, and the current kind of charger connected — click on the Device details… button.
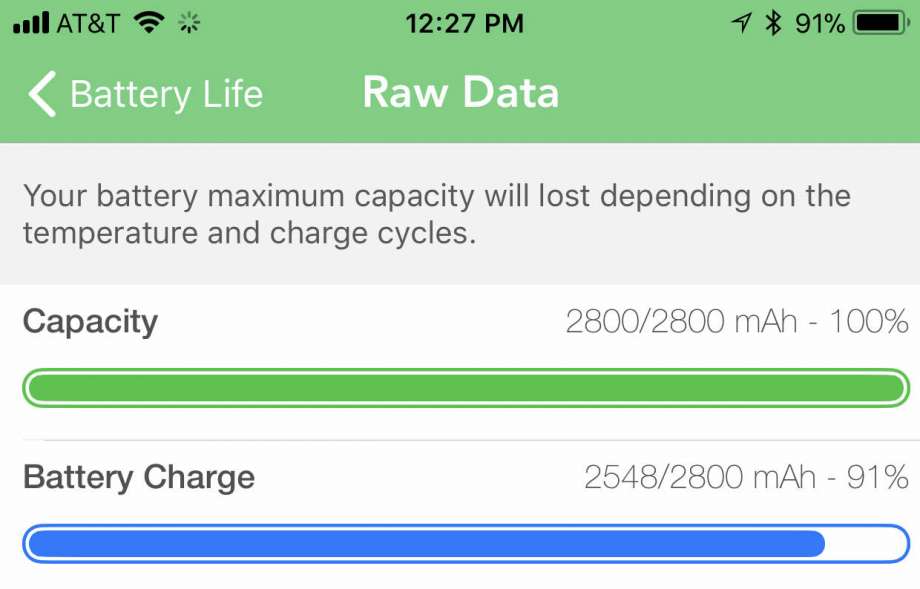
Below that is the section we’re interested in: the battery details. Here you will see two bars, hopefully both green. The upper bar shows you the current charge level of the battery (similar to the percentage readout on the iPhone itself), along with the current charge, and the full possible charge capacity in milliAmp hours (mAh).
New vs. old
Below that is a bar showing the “design capacity” vs the current capacity. That is, it shows you how much charge your iPhone’s battery can hold today, vs how much it could hold when it left the factory (the “design capacity” is the official spec for you device — the actual capacity when new could be slightly over or under that number, but it is a good guide).
Thus, you can see just how weak your battery has become over the years. You can also see how many charge cycles the battery has been through.
Works on Mac batteries too
CoconutBattery also works on the Mac.
How to maximize your battery’s lifespan
There are several tips yo can follow to keep you battery healthy for as long as possible. Apple has a support page dedicated to just that, and it’s a great read if you want the truth about batteries from the source. After all, who would know better about battery life and health than Apple, a company obsessed with optimizing battery performance so it can make its devices ever smaller?
Check it out, and maybe you’ll be able to make your current iPhone last a little longer.
If you are running coconutBattery on a Mac with a battery i.e. a MacBook, then you can see this info for your Mac’s battery too. And you can also save the current data in order to keep a record of your batteries’ depletion over time. And finally, there’s a coconutBattery Plus upgrade to let you check iOS batteries wirelessly, and to unlock battery charge notifications, plus advanced viewers for Mac and iOS.