


Step By Step iPhone 13 Pro Screen Replacement Using Professional Level Repair Techniques
![]()
Step By Step iPhone 13 Pro Screen Replacement Using Professional Level Repair Techniques – 15 Expert Methods for a Flawless Repair
Introduction
The process of a Step By Step iPhone 13 Pro Screen Replacement can look intimidating at first. However, with the right tools, proper preparation, and professional repair techniques, replacing a damaged display becomes much more manageable. Whether your screen is cracked, unresponsive, flickering, or showing black spots, understanding the repair process helps you restore your device safely and efficiently.
The Apple iPhone 13 Pro features a premium Super Retina XDR OLED display that delivers exceptional image quality. Unfortunately, even a minor drop can damage the screen assembly. As a result, many users search for reliable repair solutions that balance quality and affordability.
In this comprehensive guide, you’ll learn every stage of the repair process using industry-standard methods. We’ll also cover important technician tips, waterproofing restoration, display testing, and quality control procedures. By the end, you’ll understand exactly how professional technicians perform an iPhone 13 Pro screen replacement with precision.
For official device specifications, visit Apple Official Website
Understanding the iPhone 13 Pro Display Assembly
Before beginning a Step By Step iPhone 13 Pro Screen Replacement, it’s important to understand how the display assembly works.
The iPhone 13 Pro display consists of several integrated components:
- OLED display panel
- Touch digitizer
- Front sensor assembly
- Earpiece speaker
- Ambient light sensor
- Face ID components
Unlike older smartphones, modern iPhones combine multiple systems into one compact assembly. Consequently, technicians must work carefully to avoid damaging delicate flex cables and sensors.
The OLED technology used in the iPhone 13 Pro offers:
| Feature | Benefit |
|---|---|
| Super Retina XDR | Sharp visuals |
| High brightness | Better outdoor visibility |
| ProMotion 120Hz | Smooth scrolling |
| HDR support | Improved video quality |
| Deep blacks | Enhanced contrast |
Because these displays are expensive, professional handling is crucial during an iPhone 13 Pro screen replacement.
Signs You Need an iPhone 13 Pro Screen Replacement
Many users continue using their phone despite visible damage. However, delaying repairs may worsen internal issues.
Here are the most common signs that indicate you need a new display:
Cracked Glass
Visible fractures weaken the structural integrity of the screen and may lead to touch failure.
Dead Pixels
Small black or colored spots usually indicate OLED damage.
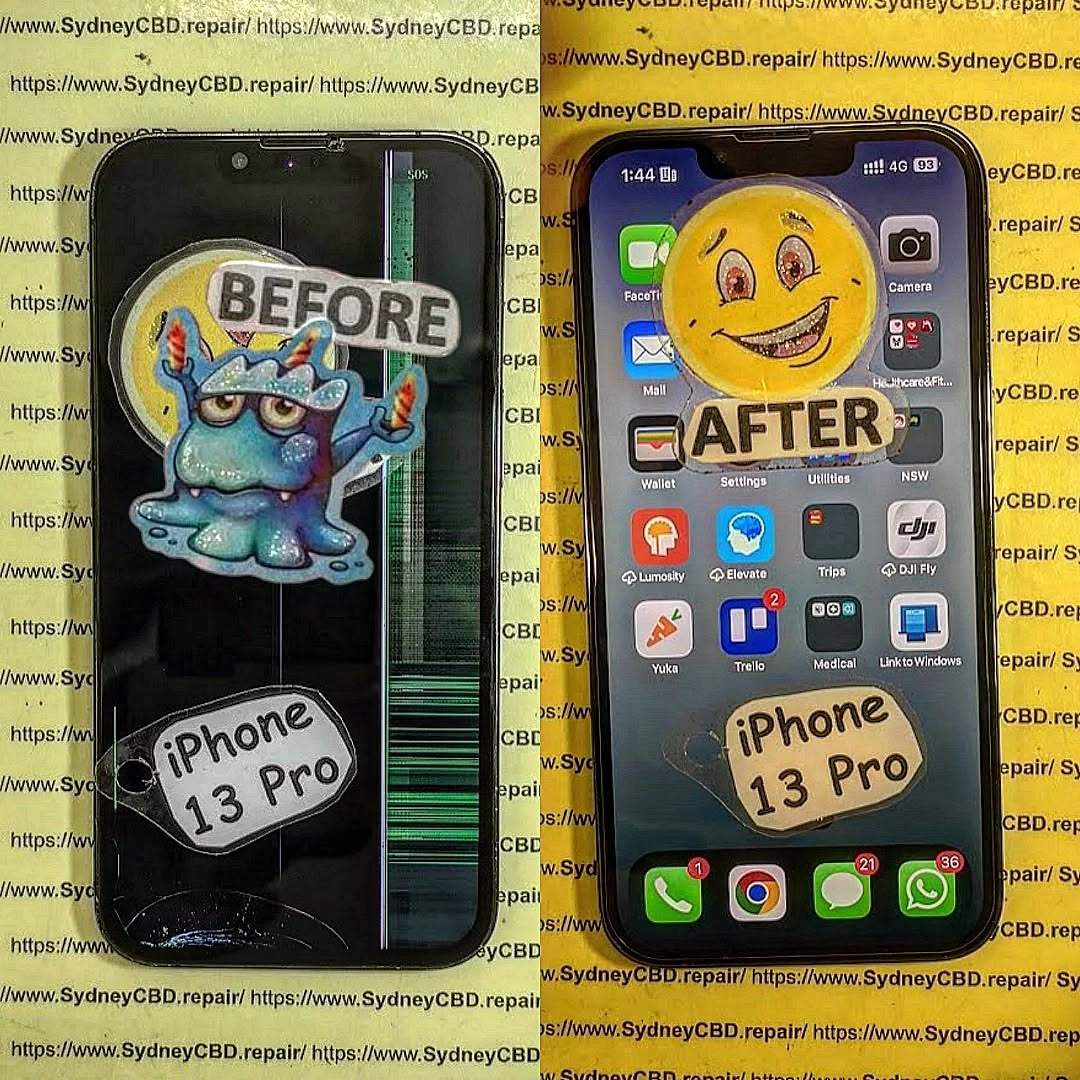
Green or White Lines
Vertical lines often appear after impact damage.
Ghost Touch Issues
The screen may register false touches without user input.
Unresponsive Touch
Certain screen areas may stop responding entirely.
Flickering Display
Brightness instability usually points to OLED panel failure.
If you notice any of these symptoms, performing a Step By Step iPhone 13 Pro Screen Replacement quickly can prevent further complications.
Essential Tools for Professional Repair

Professional-level repairs require specialized tools. Using improper equipment increases the risk of damage.
Below is a list of recommended tools:
| Tool | Purpose |
|---|---|
| Pentalobe screwdriver | Removes bottom screws |
| Y000 screwdriver | Removes internal brackets |
| Plastic pry tools | Safe screen separation |
| Suction cup | Lifts display assembly |
| Heat pad or heat gun | Softens adhesive |
| Tweezers | Handles small parts |
| Isopropyl alcohol | Cleans adhesive residue |
| Magnetic mat | Organizes screws |
| Waterproof adhesive | Restores sealing |
Professional technicians also use anti-static equipment to prevent electrical damage during an iPhone 13 Pro screen replacement.
For premium repair tools, visit Sydney CBD Repair Centre
Safety Precautions Before Opening the Device
Safety should always come first.
Before starting the repair:
- Power off the phone completely
- Remove the SIM tray
- Discharge the battery below 25%
- Work in a clean environment
- Avoid metal pry tools near flex cables
Lithium-ion batteries can become dangerous if punctured. Therefore, never force components during the repair process.
Professional repair centers also wear:
- Safety glasses
- Anti-static wrist straps
- Heat-resistant gloves
These precautions reduce the risk of injury and device damage.
Preparing Your Workspace Like a Technician
A professional workspace dramatically improves repair success.
Ideal Workspace Setup
Lighting
Bright LED lighting helps identify tiny connectors and screws.
Organization
Use a magnetic project mat to separate screws by location.
Dust Control
Dust particles trapped under the display can ruin the final result.
Temperature Control
Moderate room temperatures improve adhesive handling.
Professional technicians understand that preparation matters just as much as technical skill during a Step By Step iPhone 13 Pro Screen Replacement.
Step By Step iPhone 13 Pro Screen Replacement Process
This section covers the complete repair workflow.
Step 1: Remove Bottom Screws
The two pentalobe screws are located beside the charging port.
Use a proper pentalobe screwdriver to avoid stripping them.
Step 2: Apply Controlled Heat
Heat softens the waterproof adhesive securing the display.
Apply moderate heat around the screen edges for 1–2 minutes.
Avoid overheating the OLED panel.
Step 3: Lift the Display Carefully
Attach a suction cup near the bottom edge.
Gently create a small gap and insert a plastic opening pick.
Slowly slide around the edges.
Do not insert the tool too deeply.
Step 4: Open the Screen Sideways
The iPhone 13 Pro opens like a book from the left side.
Be cautious of flex cables attached internally.
Step 5: Disconnect the Battery
Remove the battery connector bracket first.
Disconnecting the battery prevents accidental short circuits.
Step 6: Disconnect Display Cables
Carefully disconnect:
- OLED connector
- Touch connector
- Sensor assembly connector
Use a plastic spudger only.
At this stage, the damaged display can now be removed safely during the iPhone 13 Pro screen replacement.
Removing the Bottom Screws Correctly
Many beginners accidentally strip screws during repairs.
To avoid this:
- Use the correct screwdriver size
- Apply downward pressure
- Turn slowly
- Avoid cheap toolkits
Stripped screws can significantly delay repairs.
Professional technicians often use precision screwdrivers with magnetic tips for better control.
Heating and Lifting the Display Safely
Heat application is one of the most critical repair stages.
Too little heat makes removal difficult.
Too much heat can damage:
- OLED layers
- Flex cables
- Internal seals
- Battery
Recommended Heating Methods
| Method | Safety Level |
|---|---|
| Heat pad | Excellent |
| Controlled heat gun | Good |
| Hair dryer | Acceptable |
| Open flame | Dangerous |
The goal is to soften adhesive—not melt components.
During a professional Step By Step iPhone 13 Pro Screen Replacement, technicians maintain consistent heat movement to prevent hot spots.
Disconnecting the Battery and Screen Cables
Battery disconnection is mandatory before touching display connectors.
Modern iPhones are highly sensitive to power surges.
Important Tips
- Never use metal tools
- Lift connectors vertically
- Avoid flex cable bending
- Keep screws organized
Damaging a connector can result in:
- No display output
- Touch malfunction
- Face ID failure
- Boot loops
This stage requires patience and precision.
Transferring Components to the New Display
The replacement display often arrives without small components installed.
You’ll typically need to transfer:
- Earpiece speaker
- Sensor flex
- Brackets
- Mesh grills
Face ID components are especially delicate.
Damaging the sensor assembly may permanently disable biometric authentication.
Professional Transfer Tips
Use Gentle Heat
This softens adhesive securing sensors.
Avoid Excessive Flexing
Sensor cables tear easily.
Maintain Screw Positions
Incorrect screw placement can damage the motherboard.
During a high-quality iPhone 13 Pro screen replacement, technicians inspect transferred parts under magnification.
Installing the Replacement Screen
Now it’s time to install the new display assembly.
Installation Steps
- Connect display flex cables
- Reconnect battery connector
- Test the display before sealing
- Power on the device
- Verify touch responsiveness
Testing before final assembly prevents unnecessary reopening.
Screen Testing Checklist
| Function | Test |
|---|---|
| OLED display | Brightness and color |
| Touchscreen | Full responsiveness |
| Face ID | Authentication |
| Front camera | Clarity |
| Earpiece | Audio quality |
| Proximity sensor | Screen dimming |
Once testing passes, apply fresh waterproof adhesive around the frame.
Testing Face ID and Touch Functionality
Face ID issues are common after improper repairs.
The front sensor assembly is paired to the motherboard, meaning replacement isn’t simple.
Face ID Testing Procedure
- Open Settings
- Navigate to Face ID
- Attempt setup
- Test unlock functionality
Touch Testing
Drag an app icon around the screen to identify dead zones.
Professional technicians also run diagnostic software during an iPhone 13 Pro screen replacement to verify:
- Multi-touch response
- Display brightness
- Sensor calibration
Common Mistakes During Screen Repair
Even experienced repair technicians occasionally make errors.
Here are the most common repair mistakes:
Using Excessive Force
Forcing the display open can tear flex cables.
Mixing Screws
Incorrect screws may puncture internal layers.
Skipping Battery Disconnection
This can short circuit components.
Cheap Replacement Screens
Low-quality displays often suffer from:
- Poor brightness
- Weak touch sensitivity
- Battery drain
- Color inaccuracies
Ignoring Waterproof Adhesive
Without sealing adhesive, water resistance is compromised.
Avoiding these mistakes greatly improves repair success rates.
OEM vs Aftermarket iPhone 13 Pro Screens
Choosing the right replacement screen matters.
OEM Displays
Original equipment manufacturer screens offer:
- Superior brightness
- Accurate colors
- Better durability
- Reliable touch response
However, they’re more expensive.
Aftermarket Screens
Aftermarket options vary widely in quality.
| Screen Type | Quality |
|---|---|
| Hard OLED | Mid-range |
| Soft OLED | Excellent |
| LCD conversion | Low |
| Refurbished OEM | Premium |
Professional repair shops usually recommend Soft OLED or OEM displays for the best user experience during an iPhone 13 Pro screen replacement.
Waterproofing and Adhesive Restoration
The iPhone 13 Pro includes factory water resistance.
Opening the phone breaks the original seal.
Therefore, technicians must install new waterproof adhesive after repair.
Adhesive Installation Tips
- Clean old adhesive completely
- Use precision-cut seals
- Align carefully
- Apply even pressure
Although resealing improves protection, repaired devices should still avoid heavy water exposure.
Post-Repair Quality Inspection
Professional repairs always conclude with quality testing.
Final Inspection Checklist
Visual Inspection
- No screen gaps
- No dust under display
- Proper alignment
Functional Testing
- Charging
- Audio
- Cameras
- Sensors
- Face ID
Pressure Test
Some repair centers perform seal pressure testing to evaluate waterproofing integrity.
A professional Step By Step iPhone 13 Pro Screen Replacement always includes comprehensive final checks.
When to Seek Professional Repair Services
DIY repairs can save money, but they aren’t ideal for everyone.
You should consider professional repair if:
- Face ID is involved
- The frame is bent
- The phone suffered water damage
- You lack proper tools
- You’ve never repaired smartphones before
Experienced repair technicians reduce the risk of costly secondary damage.
Professional repair shops also provide:
- Warranty coverage
- Genuine parts
- Fast turnaround
- Diagnostic testing
Frequently Asked Questions
How long does an iPhone 13 Pro screen replacement take?
Professional technicians usually complete the repair within 1–2 hours.
Will Face ID still work after screen replacement?
Yes, provided the original sensor assembly remains undamaged.
Is the iPhone 13 Pro waterproof after repair?
Water resistance can be improved using replacement adhesive, but factory waterproofing may not be fully restored.
Can I replace only the glass?
Glass-only repairs are possible but require advanced equipment and expertise.
Are aftermarket screens worth buying?
High-quality Soft OLED screens can perform very well, but cheap screens often cause problems.
Does replacing the screen affect True Tone?
True Tone functionality may require programming tools during an iPhone 13 Pro screen replacement.
Is DIY repair cheaper?
DIY repairs can reduce costs, but mistakes may become expensive.
Conclusion

Performing a Step By Step iPhone 13 Pro Screen Replacement requires patience, technical precision, and proper tools. From careful adhesive heating to delicate flex cable handling, every stage influences the final repair quality.
Although many users successfully complete DIY repairs, professional-level results depend heavily on experience and attention to detail. Choosing quality replacement parts, maintaining organized work habits, and testing all functions thoroughly are essential for long-lasting performance.
Whether you’re a beginner learning smartphone repair or an experienced technician refining your process, following professional repair techniques ensures safer and more reliable outcomes.
By understanding the full repair workflow, you can confidently restore the stunning display performance of your Apple iPhone 13 Pro while minimizing repair risks.
David from Sydney CBD Repair Centre – The Best place to fix mobile phones as 7 Years In A Row! Top Mobile Phone Repair In Sydney. More than 2000 Positive Reviews on Google and Same Day Repairs.
We take pride in delivering exceptional repair services for all major phone brands including Apple, Samsung, Google, and more. Our expert technicians use only genuine parts and offer 90days warranty on repairs. Located in the heart of Sydney CBD, we’re your one-stop solution for all mobile device repairs.
Our commitment to excellence has earned us the trust of thousands of satisfied customers. Whether it’s a cracked screen, battery replacement, or water damage repair, we handle it all with professional care and expertise. Walk in today and experience why we’re Sydney’s #1 choice for mobile phone repairs.
Visit us for:
✓ Same Day Express Repairs
✓ Genuine Parts Guarantee
✓ Professional Technicians
✓ Competitive Pricing
✓ 2000+ 5-Star Google Reviews
✓ 7-Time Award Winner for Best Phone Repairs
Sydney CBD Repair Centre – Where Quality Meets Reliability.
Call : +61280114119
Website: Sydney CBD Repair Centre