If you just got an iPhone XS or iPhone XS Max, you almost certainly will want to migrate everything from your old iPhone to your new one, so that your all of your data, contacts, photos, messages, notes, apps, and all other personalized data and stuff is transferred over to use on your new iPhone XS / Max.
This walkthrough will show you the fastest way to get all of your data from an older iPhone to a new iPhone XS Max or iPhone XS with iTunes.
Our focus here will be on using iTunes and a computer to transfer data from one iPhone to another because for many people using a USB cable and iTunes will be the fastest method of backing up and transferring data. You could use iCloud if you want to and happen to have an incredibly fast and reliable internet connection, but for most people iTunes will offer the quickest setup with getting all data over to their new iPhone XS or iPhone xS Max.
To get started, you’ll need the latest version of iTunes (12.8 or 12.6.5) on a computer (Mac or Windows PC), a USB Lightning cable to connect the iPhones to the computer, an active internet connection, and enough free hard disk space on the computer to store the iPhone backup on the computer.
How to Transfer All Data to iPhone XS / iPhone XS Max from Old iPhone
In the examples here we will demonstrate transferring data from an iPhone Plus to a new iPhone XS using iTunes.
Start by connecting the old iPhone model to the computer with a USB cable
Launch iTunes on the computer, then choose the connected old iPhone by clicking on the tiny iPhone button near the top of the iTunes window to select the device
Under the Summary section of the device in iTunes, look for the backup section and choose “This Computer” and be sure to check “Encrypt iPhone Backup”
Now choose “Back Up Now” to create a fresh backup of the old iPhone connected to the computer – let this backup process complete
Next, on your brand new iPhone XS or iPhone XS Max, start going through the onscreen setup steps as usual on the device, eventually you’ll get to the “Apps & Data” screen
Select the “Restore from iTunes Backup” option at this screen, then connect the iPhone XS Max or iPhone XS to the computer running iTunes with a USB cable *
In iTunes you will see a “Welcome to Your New iPhone” screen, choose the “Restore from this backup:” option and then choose the backup previously made of the old iPhone to iTunes, click “Continue” when the proper backup is selected
The backup restoration process will begin, this can take a while depending on the size of the device size, expect somewhere around an hour per 100GB backup
When the iTunes restore process has completed, complete the setup steps on the iPhone XS Max or iPhone XS, you’ll be using your new device with all data transferred over in no time
All of your data, messages, notes, photos, movies, videos, contacts, health data, settings, and everything else will have been successfully transferred to your new iPhone XS or iPhone XS Max.
One thing to note is that apps will re-download as part of this process, since apps are no longer backed up to iTunes by default on the main iTunes release track (iTunes 12.8) though you can use the alternate release track (iTunes 12.6.5) if you’d like.
Remember to use the “Encrypt iPhone backup” setting, as this preserves your Health data as well as passwords, logins, and other important details in the iTunes backup. If you fail to encrypt the backup, you will need to enter all passwords again, and your health data will be lost.
iCloud vs iTunes Restoring from Backups
* To be clear, while we’re using iTunes here, you can also use iCloud backups or the optional Quick Start setup process to complete the entire migration and data transfer from an old iPhone to a new iPhone XS Max / iPhone XS. But using iCloud has a potential disadvantage in that how long it takes to complete is entirely dependent on your internet connection speed. For example if you have a 100 GB iPhone backup stored in iCloud, then downloading and restoring that 100 GB from iCloud to an iPhone can take half a day or even several days to complete on many typical home-based US internet connections, and most people won’t want to wait nearly that long before they can use their new iPhone (a 3 mbit/s DSL internet connection will take roughly 80 hours to download 100 GB!). But if you happen to have some modern world internet connection because you’re in a region of the world that has decent internet infrastructure with 100 mbit/s internet speeds, then using iCloud is easy and suitable, the entire process is basically the same except you’ll choose an iCloud backup to restore from rather than iTunes. Nonetheless, due to the huge variability in internet speeds, iTunes is often faster for most iPhone users since it uses a wired USB connection to complete the data transfer process.
iOS 12 is a performance focused software update, aiming to boost the usability of older iPhone and iPad models. But that doesn’t mean iOS 12 is without new fancy features too, so while the iOS 12 update may not be as outwardly flashy as some other past releases, there are still some interesting new additions and changes to the mobile operating system for iPhone and iPad users.
We’re going to review a handful of great iOS 12 features that you’re likely to actually use. Let’s get to it!
1: The Virtual Trackpad & Text Selection Cursor
Selecting text has long been a challenge on the iPhone or iPad, and if you spend a lot of time writing emails, messages, notes, Pages, or in any other text editor you’ll appreciate the new virtual cursor tool that makes text selection and navigation much easier.
From any app where a block of text is on screen, like in Mail, Pages, Notes, Messages, tap and hold on the Spacebar of the keyboard
Keep holding down until the keys all turn blank, continue to hold down while you swipe around on the digital trackpad to move the text selection cursor around on screen
You can also then place a second finger on the trackpad to enter text selection mode with the cursor, which then allows you to drag the cursor and select text while in this virtual trackpad mode.
This is a great feature that you really should try out for yourself, as it’s much better experienced directly. For anyone who spends much time typing or writing in iOS this is particularly fantastic, since it’s much easier to direct the little cursor around with a virtual trackpad compared to pecking on screen between letters or words with a finger or stylus.
It should be noted this is not a new feature, it’s just how you access it that is new, and the number of devices it’s available on is new. Now you can simply tap and hold the Spacebar on any iPad or iPhone with iOS 12, whereas perviously accessing the virtual trackpad for text selection was available on iPhone with 3D Touch support only.
2: Screen Time & App Time Limits
Screen Time is arguably the best new feature of iOS 12. Screen Time gives you insight into how an iPhone or iPad is being used, allowing you to see exactly how much time is spent in particular apps. More importantly, you can take action based on that information and set time limits for app usage, and place other restrictions on app usage if desired. This makes Screen Time a fantastic tool particularly for parents or anyone providing child care or education, but also for anyone who wants to reduce their time wasted in any unproductive apps or detrimental device usage. Want to set a 15 minute time limit for a particular game? You can do that with Screen Time. Want to limit yourself to only 20 minutes of social media use? Screen Time lets you do that too.
Open the “Settings” app and choose “Screen Time”
Tap on the device usage graph near the top to see Screen Time usage data on that particular device
Once in Screen Time you can set time limits with App Limits, or even outright block an app from being used entirely, or set aside times of the day where the device itself isn’t usable through Downtime. There are also Content & Privacy Restriction settings available if you want to block adult content or otherwise limit device usage. It’s sort of like a broad self-control / parental controls feature built right into iOS, and it’s pretty great.
Don’t be surprised if you look at Screen Time and discover some uncomfortable data… maybe you’re spending a few hours every day lost in the misery generating abyss of social media, maybe you discover that your kids iPad is being used to spend hours every night in a video game rather than doing homework, or maybe you find that you’re not committing enough time every day to learning a new foreign language with an app like DuoLingo and you decide you want to change that. These are examples of the type of data you can get out of Screen Time on any iPhone or iPad.
By the way, for best results with Screen Time, it’s good to check it after a few days or so of device usage so that it has more data to work with. Even after you set some limits or restrictions, you should periodically check into Screen Time to see if it’s making any difference in behavior or device usage.
3: Disable Notifications Faster Than Ever
Let’s go ahead and state the obvious; Notifications are often annoying, distracting, and rarely important.
And by default just about every app on the iPhone and iPad wants to fill your device up with constant alerts and a barrage of notifications about every inconsequential event, happenstance, and useless tidbit under the sun. Do you really need to be notified instantaneously when some celebrity is on their 23rd marriage?
Do you need a giant banner splashing onto your screen to inform you about creamy salad dressing in the News app?
Is any of this stuff important enough to disrupt you and what you were doing with a giant notification message? Probably not.
But what if the breaking news notification delivered instantly to your iPhone or iPad is about the flavor of creamy salad dressing!?!??!? Stop everything that you are doing and read this notification about creamy salad dressing!! It’s breaking news, according to the News app!
But it’s kind of hard to focus when you have constant notifications bothering you, right? Did that point get across as you tried to read this section that is interspersed with that image of a useless notification?
If you feel the vast majority of notifications are simply annoying distractions, noise, and clutter, then fortunately the latest version of iOS makes it easier than ever to manage them as they come in to pester you. In fact, you can completely disable notifications faster than ever and right from the lock screen of your device:
From the lock screen or Notification Center of iOS 12, swipe left on any notification
Choose “Manage” from the list of options
Select “Turn Off” from the menu to permanently disable notifications from that app
You can also choose “Deliver Silently” if you still want to see the annoyifications err notifications in Annoyification Center errr Notification Center for some reason, but choosing Turn Off is the simplest way to never see them again. And of course you can return to the Settings app Notifications section if you later change your mind.
My personal opinion is that only actual communication with actual humans should be sending you notifications, things like messages and phone calls, as everything else is likely nothing more than distraction. Make your own decisions here, but focus on what is important and think critically about the kind of stuff that is splashing onto your screen to get your attention and disrupting your device use.
4: Automatic iOS Software Updates
Do you want to make sure you’re always on the latest version of iOS? Do you frequently forget to update your iOS system software? Are you tired of wandering into the Settings app to check if a software update is available? iOS 12 has a great feature that solves all of this, it will automatically install iOS updates when they’re available onto an iPhone or iPad.
You can turn this feature on easily:
Open the “Settings” app then go to “Software Update”
Choose “Automatic Update” and turn the feature on
Just be sure that you have iCloud backups enabled so that your device is always backing up when it’s plugged in to charge.
The auto-update iOS feature pairs well with automatic app updates in iOS too, allowing you a very hands-off approach to device management.
5: Siri Shortcuts & Shortcuts App
The Shortcuts app (once called Workflow) allows you to create simple automation of tasks in iOS, and you can now tie those actions directly into Siri. There’s a plethora of options available with Shortcuts, you can use the feature to create animated GIFs out of Animojior a series of images, you can use your current location to find any nearby gas stations, you can create custom replies to messages that will send someone your most recent photo taken, and so much more. If it’s a task in iOS, you might just be able to automate the entire thing with Shortcuts.
Curiously, the Shortcuts app is not included by default in iOS 12, so you have to download it separately from the iOS App Store. Not to worry though, it’s free from Apple:
Get Shortcuts app from the App Store
Launch the Shortcuts app and explore the default and example options, and create your own. Tie them to Siri so that you can simply ask Siri to perform that task for you. There’s a lot of potential here, so if you’re a fan of automation and macros, you’ll almost certainly be thrilled with Shortcuts for iOS.
Do you feel like your battery life has worsened since updating to iOS 12? With every new iOS release comes complaints about battery life, particularly in the early days of the software update being available, and the iOS 12 update is no different with some users reporting rapid battery draining. While reduced battery life on iPhone or iPad can be annoying, there may be valid reasons why device battery is draining quicker than usual after updating system software, so before you throw in the towel read on for a handful of helpful tips and tricks to help improve battery life issues after updating to iOS 12 on an iPhone or iPad.
Fixing iOS 12 Battery Life Draining on iPhone and iPad
We’ll cover 12 tips aimed at addressing battery life issues with iOS 12 on iPhone or iPad. The first few tips are general advice pertaining to updating to a new iOS release, and from there more specific battery advice is offered for improving performance by adjusting various settings, and checking on the health of the device battery itself.
1: Are you using the iPhone or iPad more than usual?
You just updated to iOS 12, and you’re probably digging around and exploring what has changed, or maybe spending a few hours setting up the perfectly customized Memoji. Well, the more you us a battery powered device, the more the battery power depletes, so if you’re simply toying around with your iPhone or iPad a bit more than usual after the software update, this can give the perception that battery life is suddenly worse. Whether or not this applies to your particular case, keep this in mind as you sort out what’s causing battery to drain faster than expected.
2: Did you just update to iOS 12? Great, then wait a while!
If you just recently updated to iOS 12 and now you feel your iPhone or iPad has reduced battery life, you might be onto something… sometimes battery life is reduced right after a system software update because when you update the system software, iOS will undergo various routine maintenance tasks and background activities to be up and running again. This includes background activity like indexing your Photos, indexing Spotlight, facial recognition, iCloud activity, and many other background system tasks that can occur after a software update has completed. Operating systems are complex, but fortunately iOS takes care just about all of that in the background.
The solution to this is as simple as it gets: wait. Just leave your iPhone or iPad alone and plugged in to a power source, typically overnight is a great time for leaving a device plugged in and unattended. During this time iOS will be able to complete all necessary background tasks, and in a day or two usually everything will be working as expected again, with battery life resuming it’s expected longevity.
3: Check for Software Updates
Sure iOS 12 just came out, but Apple often issues small bug fix software updates quickly after a major software release (iOS 12.1 went into beta testing almost immediately).
Accordingly, it’s a good idea to check for and install available software updates on any device that has installed iOS 12, both for core iOS system software and for third party apps.
Checking for iOS updates is easy from the Settings app > General > Software Update
Checking for app updates is easy from the App Store > Updates tab
It’s always possible some bug or issue in an app you are using often is leading to a reduction in battery life, so keep everything up to date.
4: Find Apps Using Battery Life
iOS offers excellent battery monitoring tools right in the system software, letting you see which apps are using battery power, and if something is particularly egregious then you can take action as needed. iOS 12 improves the battery monitoring functionality even further, so you can quickly find what apps (if any) are draining battery on an iPhone or iPad.
Open the Settings app, then go to “Battery”
Toggle between the “Last 24 hours” and “Last 10 days” switches and locate the app(s) using heavy battery
Typically you will find that anything using location data will be a heavy battery drain, as will social media apps, most GPU intensive games, and many media and movie watching apps. Streaming multimedia can also waste battery life, so service like Apple Music, Pandora, and Spotify if they are left open and playing in the background can lead to battery draining faster than you might expect. The Messages app can also turn into a battery hog if you spend tons of time in the app sending and receiving a trillion stickers, animated gifs, videos, audio messages, Animoji, and other processor intensive toys.
If you see any particularly aggressive apps draining battery, try and see if there’s an app update available for that app. Or if you don’t even use the app much or don’t care for it, just delete the app to uninstall it from iOS.
5: Disable Background App Refresh
Background App Refresh enables apps that are in the background to stay updated. A side effect of allowing apps to update in the background is they will use more power and drain battery in the background too.
Open the “Settings” app, then go to “General” > Background App Refresh > and turn this switch to the OFF position
Often just disabling Background App Refresh will notably boost battery performance of an iPhone or iPad.
This is a feature that some advanced users really like, particularly hardcore iPad users who setup they iPad with a Bluetooth keyboard and use it like a laptop or desktop computer, but for most users disabling it goes completely unnoticed.
6: Force Reboot
Forcibly rebooting an iPhone or iPad can sometimes lead to a resolution of battery issues if the battery draining is caused by some unusual background app behavior or rogue app going wild. This is a fairly simple troubleshooting trick so there’s not much to it beyond just forcibly restarting the device:
• For iPad and iPhone models with a clickable Home button: Hold down the Power Button and Home button together until you see the apple logo on the display. This is how to force reboot any iPhone or iPad with a clickable Home button.
• For iPhone 7, iPhone 8, iPhone 7 Plus, and iPhone 8 Plus: Hold down the Power Button and Volume Down button until you see the Apple logo on screen. This action will restart the device.
• For iPhone X (and iPhone XS Max and iPhone XS, though those come preinstalled with iOS 12): Click the Volume Up button then let go, click the Volume Down button then let it go, now press and hold down the Power button and continue to hold the Power button until the Apple logo appears on the screen. This is how to force restart iPhone X, iPhone XS, iPhone XS Max.
7: Turn Off Raise to Wake
Raise to wake is a feature on iPhone that detects when the iPhone has been lifted or raised which then awakens the screen automatically without having to press any button.
Open “Settings” app then go to > Display & Brightness > Raise to Wake > turn the switch to OFF
It’s a nice feature, but it can lead to the screen turning on sometimes when you aren’t expecting it to, for example if you’re walking around with the iPhone in your hand, or if iPhone is in your hand during an activity like jogging, dancing, cartwheeling, backflipping, or anything else that causes the iPhone to raise up quickly. Because displaying the screen uses power, turning off Raise to Wake can help save some battery life.
Once Raise to Wake is disabled you will find the iPhone no longer turns the screen on from an upward motion alone, and instead you’ll need to interact with it by pressing a button or summoning Siri.
A similar feature causes the screen to wake up when the display is tapped on, which is quite useful for newer iPhone models without the Home button but it may lead to some inadvertent screen awakening scenarios. If you’re concerned about that, you can also disable Tap To Wake though the difference will likely be less.
8: Lower Display Brightness Levels
The display of your iPhone or iPad is perhaps uses power to light up, and while brightness at 100% can look brilliant it will also reduce battery life just due to the amount of power needed to keep the screen that bright. Thus, reducing screen brightness can help the battery last longer.
Open the “Settings” app then go to > Display & Brightness > Brightness > adjust the brightness slider
You’ll have to adjust this to what you feel is appropriate for your particular needs, but it’s also convenient to access Control Center in iOS 12 and adjust display brightness quickly from there as needed on any iPhone or iPad.
9: Disable All Unnecessary Location Services
Location Services and GPS on iPhone and iPad are undeniably useful for apps like Maps and getting directions, but tons of other apps try to get and use your location for other purposes that are ultimately irrelevant or unnecessary (i.e. nearly all social networking apps). Using location data also uses battery power, so reducing the number of apps that can and do use your location data should improve your battery life of an iPhone or iPad.
Open the Settings app > go to Privacy > choose Location Services
Disable location features for apps that do not require location data for core functionality
You can also go all out and disable location services completely in iOS but that’s not a good idea for most users since apps like Maps and Weather will need location data to function properly. But does a music app, or drawing app, or social network need your location? Probably not, so you can turn off location access for most.
An added bonus to turning off unnecssary location service features is more privacy, so that’s an incentive to some users too.
10: Utilize Low Power Mode on iPhone
Using Low Power Mode is an excellent way to dramatically improve battery life of an iPhone, though it comes at a cost of reducing performance slightly, and some other features like email fetching are disabled while the feature is on.
Open the Settings app on iPhone then choose “Battery” and toggle “Low Power Mode” to the ON position
Personally I use Low Power Mode on iPhone constantly and I find it to be incredibly effective at boosting battery performance in general, it’s a really great feature.
Unfortunately, iPad does not have Low Power Mode available yet.
11: Check Battery Health & Replace Battery if Needed
New versions of iOS allow you to check battery health on iPhone, and if you feel that battery life is particularly awful, and perhaps performance is sluggish too, then it could be due to a battery going bad in the iPhone.
Go to “Settings” app then to “Battery” and check Battery Health
If the “Maximum Capacity” is lower than you’d prefer, or if Peak Performance is disabled, you should replace the battery
You can initiate a repair and replace the battery of iPhone through Apple Support here
The best way to replace a device battery is through Apple, and it’s also reasonably affordable too (particularly until the end of this year while the price is discounted). There are many reports of users replacing a battery of an older iPhone and then suddenly performance and speed is excellent again, and of course a brand new battery will have the best possible battery life too. This is a great option if you are concerned about some hardware issue. Check the Apple Support battery repair page here on apple.com for more info.
12: Downgrade iOS 12
Another option is to downgrade from iOS 12 back to iOS 11.4.1 as discussed here, but the opportunity to do so is limited, and there’s no guarantee that it will improve battery life. In fact, if you downgrade iOS 12 you will still need to go through the normal ‘waiting’ process that is recommended at the very beginning of this article.
Downgrading iOS 12 should only be considered an absolute last resort, and really only if other problems are impacting the iPhone or iPad too, like some app incompatibility. Don’t take the downgrade process lightly, a failure of downgrading properly can result in permanent data loss of all data on the device itself.
Where did Control Center go in iOS 12? And how do you access it? If you have these questions about Control Center on your iPad or iPhone after updating to iOS 12 you’re not alone, as the ability to access Control Center in iOS 12 has changed. But fear not, Control Center still exists on iPad and iPhone, it’s just the gesture that you use to summon the feature that has changed.
No longer do you swipe from the bottom of the screen to access Control Center on the iPad and some iPhone models, instead, all new devices will swipe down from the top right corner of the screen instead to summon Control Center. Everything else is the same, including the ability to customize Control Center and all the options are still there, it’s just that initial access which has changed.
How to Access Control Center in iOS 12 on iPad and iPhone
This change applies to all iPad models, and all iPhone models without a Home button:
From the Home Screen or Lock Screen of iPhone or iPad, look at the top right corner of the screen to where the wi-fi and battery indicator are located
Swipe down from the top-right corner of the screen to access Control Center in iOS 12 on iPhone or iPad
Control Center will appear as normal, except it comes from the top right corner of the display
Swipe back up to dismiss Control Center again
The key thing to remember is that you now swipe down from the top-right corner of the display to access Control Center in iOS 12, regardless of whether the device is an iPad or an iPhone. All devices now access Control Center this way.
The animated GIF below demonstrates Control Center being accessed in iOS 12 by using the swipe down gesture from the top-right corner of an iPad, it works the exact same on all other iPad models and some iPhone models as well, like iPhone X, iPhone XS, iPhone XR, and iPhone XS Max :
In fact, this change brings the method of accessing Control Center on iPhone X to all other new iPhone models and all iPad devices, it’s the exact same gesture and same move.
This adjustment can lead to a little bit of confusion since many users are long accustomed to swiping up from the bottom of their screen to get to Control Center on an iPad or iPhone, but as iOS evolves and changes so will the gestures and how to access certain features. It may be a little confusing at first, but once you get used to it it’s quite simple, and you’ll soon commit the new gesture location and direction to memory.
If you are swiping down from the top right corner of the display and continue to not be able to access Control Center you might want to check your settings. This is particularly valid if Control Center is inaccessible on the Lock Screen, that’s almost always due to a settings issue in iOS that can be easily resolved, usually because it has been disabled there. Regardless, you’ll still be using the swipe-down from the right-corner to access Control Center, whether it’s from inside an app, on the lock screen, or on the home screen of a device.
Update: iPhone models with Touch ID apparently still use the swipe-up from the bottom gesture to access Control Center, thanks to our readers who noted that change in the comments below. Only new iPhone models with no Home button will use this new gesture for accessing Control Center. However, all new iPad models even those with Touch ID use this new gesture for Control Center access.
New features available with iOS 12. iOS 12 is designed to make your iPhone and iPad experience even faster, more responsive, and more delightful.
Performance
Faster and more responsive
The things you do every day are faster than ever — across more devices. iOS has been overhauled for improved performance on devices as far back as iPhone 5s and iPad Air.
Smoother animations
Animations are smoother across the system. So when you do things like bring up Control Center, swipe while multitasking, or scroll in apps, it’s more fluid and responsive.
Up to 40% faster app launch
Apps launch faster in day-to-day use. And when you’re pushing your iOS device to the limit, multitasking between lots of apps, they launch up to 2x faster.
Up to 50% faster keyboard display
The keyboard appears faster and typing is more responsive.
Up to 70% faster swipe to Camera
Swiping to Camera from the Lock screen happens faster so you never miss a moment.
Up to 2x faster Share sheet display under load
The Share sheet appears faster than ever, especially if you have a lot of sharing extensions installed.
FaceTime
Group FaceTime
Make FaceTime calls with up to 32 participants simultaneously.
FaceTime audio and video
Answer incoming Group FaceTime calls with video or audio on iPhone, iPad, and Mac, or join with audio on Apple Watch.
Join anytime
Join or add people to Group FaceTime at any time.
Focus View in Group FaceTime
During Group FaceTime, the speaker will automatically be front and center. Or with Focus View, you can double-tap the person you’d like to see.
Ringless notification
Group FaceTime uses a silent notification that participants can tap to join.
Messages integration
Start Group FaceTime right from a group Messages conversation. See and join active calls from the conversation list or in the conversation itself.
Animoji
Use FaceTime with your friends and family as your favorite Animoji or Memoji.
Filters
Transform your look using built-in filters, like classic black and white, comic book, and watercolor.
Text effects
Add text effects like speech bubbles and emoji to your photos or videos.
Shapes
Jazz up your photos and videos with shapes like stars, hearts, and arrows.
iMessage sticker packs
Download sticker packs from the App Store for iMessage to enhance your photos and videos. Stickers track the movement of your face and move with you.
Private end-to-end encryption
FaceTime is encrypted end to end for both one-to-one and group calls, so your conversations remain private and viewable only by the participants.
Messages
Memoji
Create an all-new kind of Animoji that fits your personality and mood.
Memoji Maker
A new tool for you to select and adjust nearly endless customization options to make your Memoji.
New Animoji
Try four new Animoji: T. rex, ghost, koala, and tiger.
Tongue and wink detection
Improved face tracking now recognizes when you stick out your tongue or wink.
Longer Animoji
Now you can record clips of up to 30 seconds.
Camera effects
Use the camera in Messages to capture photos and enhance them in new ways using built-in effects and third-party sticker packs.
Filters
Transform your look using built-in filters, like classic black and white, comic book, and watercolor.
Text effects
Add text effects like speech bubbles and emoji to your photos or videos.
Shapes
Jazz up your photos and videos with shapes like stars, hearts, and arrows.
iMessage sticker packs
Download sticker packs from the App Store for iMessage to enhance your photos and videos inside Messages. Stickers track the movement of your face and move with you.
Photos iMessage app
Get photo suggestions based on who you’re messaging with, what you’re talking about, and where you’ve taken photos together.
Redesigned App Strip
The redesigned App Strip now takes up less space when you type. So you can see more of your content and always get to your favorite iMessage apps.
Screen Time
Screen Time
New tools empower you to understand and make choices about how much time you spend using apps and websites.
Activity reports
Get reports weekly or check Today View anytime to see app usage, notifications, and device pickups.
For kids
Use your family’s Apple IDs to set up Screen Time for your kids to keep an eye on how much time they spend on apps and websites. They can request more time for you to approve.
App limits
Set the amount of time you and your kids can spend each day on specific apps and websites.
Downtime
Set a specific time, like bedtime, when apps and notifications are blocked. You can choose which apps are on and off limits.
Always allowed
Create exceptions for apps you’d like your kids to have access to even during Downtime, such as Messages or education apps.
Notifications
Grouped notifications
Message threads and notification topics are grouped together, so it’s easier to see what’s important with just a glance at your iPhone or iPad.
Instant Tuning
Control your notification settings the moment you receive an alert, without having to leave what you’re doing.
Deliver quietly
Within Instant Tuning, you can choose to have notifications delivered silently to Notification Center by default so you’re not interrupted by alerts.
Siri notification suggestions
Get suggestions based on how you interact with your notifications, such as which app notifications to deliver prominently and which ones to send to Notification Center.
Critical alerts
A new type of opt-in alert for important information, like reports from a healthcare provider, which you’ll receive even during Do Not Disturb.
Tapback to messages
Quickly reply to messages with an expression, like a heart or a thumbs-up, by touching and holding the notification.
Do Not Disturb
Do Not Disturb During Bedtime
Dim your display and silence overnight notifications until you unlock your iPhone in the morning.
New Do Not Disturb options
Set Do Not Disturb to end automatically in an hour, at the end of the day, when you leave a certain location, or at the end of a meeting on your calendar.
Augmented Reality
Persistent and multiuser experiences
AR experiences can now be shared across time and fixed to real-world locations, so you can create a piece of AR art that can be viewed later in the same place by someone else.
3D object recognition
ARKit 2 recognizes objects and how your device is oriented to them, and can use that information to trigger AR experiences.
Face tracking
Face tracking now sees where you’re looking and can detect whether you’re sticking out your tongue or winking.
Scene reflection
AR is even more lifelike, enabling virtual objects to reflect the real-world scene in your camera.
USDZ file format
A new format that helps 3D creators to create rich content and animations optimized for mobile devices.
AR Quick Look
View AR experiences in the apps you use every day, including Files, Mail, Messages, and Safari.
Measure app
Draw straight lines to measure objects and surfaces both vertically and horizontally using your iPhone or iPad camera, and automatically detect dimensions of rectangular objects.
Photos
For You tab
A single destination for your Memories, Shared Album activity, and the best moments in your library. Featured Photos and Effect Suggestions intelligently show you your best photos and propose effects to make them even better.
Sharing suggestions
Photos understands when you’ve done something meaningful, like taking a trip or attending an event, and will suggest sharing the photos with the people who are in them. And if you receive photos from someone else, your device will look for photos in your library from the same event and suggest sharing photos back.
Intelligent search suggestions
Smart suggestions help you find photos even before you finish typing by suggesting events, people, places, and relative dates.
Places search
Search for photos based on the places or businesses where you were when you took them, whether it’s a general category, like “Japanese restaurant,” or a specific place, like “Jacques Torres Chocolate.”
Event search
Search for photos from events you’ve attended, like the Aspen Ideas Festival.
Multiple keyword search
Now you can combine keywords in searches, like “surfing” and “vacation,” for even better results.
Improved import
It’s easier than ever to import photos and videos from your professional camera on the go.
RAW editing support
You can now edit your RAW images in Photos on iPhone and iPad models with an A9 chip or later.
Redesigned Albums tab
Find existing and shared albums more quickly and efficiently.
Camera
Improved Portrait Lighting
Portrait mode photos are better than ever. Camera now generates a mask when it detects a person and intelligently and elegantly separates the person from the scene.
Portrait Segmentation API
A new API for third-party developers allows for the separation of layers in a photo, such as separating the background from the foreground.
Improved QR code reader
Camera now highlights QR codes in the frame, making them easier to scan.
Siri
Siri suggestions
A quicker way to do the things you do most often. As Siri learns your routines, you’ll get suggested shortcuts for just what you need, at just the right time, on the Lock screen or in search.
New Shortcuts app
Create or customize your own shortcuts to run multiple steps at once. Get started with examples from the gallery and personalize with steps from across your apps.
Shortcuts API
App developers can work with Siri to run shortcuts via a new SiriKit API.
Photos Memories search
Use Siri to quickly pull up photos and memories based on people, places, events, time, and keywords of objects and scenes in the photos.
Privacy and Security
Enhanced tracking prevention
Improvements prevent Share buttons and comment widgets on web pages from tracking you without your permission in Safari. Safari also prevents advertisers from collecting your device’s unique settings, so they can’t retarget ads to you across the web.
Automatic strong passwords
Automatically create, autofill, and store strong passwords in Safari and iOS apps. Passwords are stored in iCloud Keychain and are available on all your Apple devices.
Password reuse auditing
Passwords that have been reused will be flagged in the passwords list, so you can quickly navigate to the app or website and replace it with an automatically generated strong password.
Security code AutoFill
SMS one-time passcodes will appear automatically as AutoFill suggestions, so you never have to worry about quickly memorizing them or typing them again.
Password sharing
Easily share and receive passwords from nearby iOS devices, from an iOS device to a Mac, and from an iOS device to Apple TV.
Password Manager API
Access passwords stored in third-party password managers directly from the QuickType bar in apps and in Safari (requires third-party adoption).
App Updates
Apple Books
The Apple Books app has been completely redesigned to make it easier for you to discover and read your favorite books. Access your current book or start a new one in the Reading Now tab, visit the new bookstore, and organize your library with more flexible collections.
Stocks
The redesigned Stocks app keeps you more informed about the market. View prices at a glance in the customizable watch list. Tap any ticker to see key details and an interactive chart. And for the first time ever, Stocks is available on iPad as well as iPhone.
Voice Memos
Voice Memos has been redesigned and is available on iPad. It’s even easier to capture your personal reminders, edit class lectures, or share family moments. And with iCloud, you can record on your iPhone or iPad and harness the power of your Mac to do even more.
Even More
More battery information
The battery usage chart in Settings now shows your usage for the last 24 hours or 10 days. Tap a bar to see your app use for that period of time.
iPad gestures
iOS 12 for iPad includes updated gestures that make it easier to navigate. You can now go to the Home screen by quickly swiping up from the bottom of the screen. Get to Control Center more conveniently with a swipe from the top-right corner.
Keyboard
Turn the QuickType keyboard into a trackpad on devices without 3D Touch by touching and holding the space bar.
New dictionaries
Enjoy three new language dictionaries: an Arabic and English bilingual dictionary, a Hindi and English bilingual dictionary, and a Hebrew dictionary.
English Thesaurus
Get synonyms and related concepts for words with English Thesaurus.
New markup tools
When you mark up a screenshot or PDF or draw in Notes, you can now choose from more colors, line weights, and opacities for each tool.
Favicons in Safari on iPad
View website favicons on tabs in Safari to identify your open tabs at a glance.
Automatic software update
A new option allows iOS software updates to be installed automatically, so you always have the latest. When you enable this setting, software updates will be installed overnight.
Are you ready to install iOS 12 on your iPhone or iPad? The iOS 12 release date is September 17, and if you intend on updating right away you might want to take a few moments ahead of time to prepare for the iOS 12 software update.
We’ll walkthrough a few helpful tips to get your iOS device ready for the latest mobile operating system from Apple. From confirming device compatibility to performing some basic cleanup and maintenance, you’ll be ready for updating to iOS 12 in no time.
1: Check iOS 12 Compatibility: Can the iPhone or iPad run iOS 12?
The first thing you’ll want to do is review the iOS 12 compatible devices list to make sure your particular iPhone, iPad, or iPod touch supports the new operating system. The good news is that iOS 12 has generous support for a wide variety of devices, and if your iPhone is newer than a 5s or iPad is newer than an Air, it will be able to run the iOS 12 update. The full list is as follows:
iPads with iOS 12 support: iPad Pro 12.9″ 1st and 2nd generations, iPad Pro 10.5″, iPad Pro 9.7″, iPad Air 2, iPad Air 1, iPad 5th gen, iPad 2018 model (not pro), iPad 2017 model (not pro), iPad Mini 4, iPad Mini 3, iPad Mini 2
iPods with iOS 12 support: iPod Touch 6th Generation
Note the iPhone XS, iPhone XS Max, and iPhone XR will come with iOS 12 preinstalled, so there is no need to update those devices unless a smaller point release is available for them (like iOS 12.0.1 or iOS 12.1, etc).
The good news is that iOS 12 aims to boost performance of older iPhone and iPad hardware, so if you have a device currently running iOS 11 or iOS 10 that feels sluggish, updating to iOS 12 may improve the performance on that device.
2: Tidy Up & Free up Storage Space
Before you update to a major new iOS release, it’s often a good idea to tidy up your device, delete some long unused apps, and update your remaining apps.
You’ll also need to have a few free GB of storage available to install iOS 12 in the first place, so aside from tidying up and ridding yourself of dusty apps, if you’re tight on storage space now is a good time to take care of that.
You can check your devices available storage capacity by going to Settings > General > iPhone Storage / iPad Storage
If you are low on storage space, some simple ways to free up storage in iOS include:
You will want to have at least a few GB or so of space available to update iOS 12, partially because the iOS 12 download is several GB in and of itself, and then it needs temporary space to further complete the update.
3: Update Your Apps
After you have deleted unused apps and cleared up storage space (if needed) and made sure you have sufficient storage available for the iOS 12 update, it’s a good idea to update all iOS apps on the device so that they are new and more likely to be compatible with the latest iOS release.
Simply open the App Store, then go to the Updates tab, and choose “Update All”
An added bonus tip: be sure to again go through and update all your apps in the weeks following installing the iOS 12 software update, as more apps will be updated as time goes on.
4: Back up the iPhone or iPad
This is the most important step! You must backup an iOS device before installing iOS 12, or any other software update for that matter. Having fresh backups allow you to recover quickly if something goes wrong, and being able to restore an iPhone or iPad from a fresh backup helps guard against permanent data loss. Do not skip backing up!
For performing an iCloud backup of the iPhone or iPad, open the Settings app in iOS, then tap on your name to access iCloud settings, next go to “iCloud” and choose “iCloud Backup”, finally you want to select to “Back Up Now”.
Make and complete the iCloud backup right before installing iOS 12, so that your data is freshly saved and backed up. This includes all your contacts, photos, notes, movies, apps, all personal data, and customizations to the device.
You can also backup to iTunes on a Mac or PC. Connect the iPhone or iPad to a computer and open iTunes, and then choose to backup. Be sure to encrypt the backup in iTunes so that passwords and health data are preserved as well.
To be thorough, you can backup to both iCloud and iTunes, there’s nothing wrong with backup redundancy and many would consider that prudent.
5: Time to Install iOS 12!
Once you have completed the above tasks, you’re easy to install iOS 12. iOS 12 is a free software update for any compatible iPhone, iPad, and iPod touch.
The simplest way to install the iOS 12 update is through the Settings app on the iPhone or iPad. Just open Settings, go to General, then choose Software Update. When iOS 12 is available, click to Download and Install.
iPhone XS and iPhone XS Max come packing a brand new A12 Bionic chip with greatly improved performance and sound, as well as Apple’s best displays and even better designs. They can also juggle two SIM cards simultaneously.
Meanwhile, the new iPhone XR delivers the flagship iPhone look and some of the best features from iPhone XS at a more-affordable price.
iPhone X marked “the future of the smartphone,” Apple told us last September. It sacrificed beloved features like Touch ID in favor of an all-new design with a stunning Super Retina display and Face ID. It was a gamble that paid off for Apple.
Despite its $1,000 price tag and controversial “notch,” iPhone X consistently outsold every other iPhone in Apple’s lineup since it went on sale last November. It also earned praise from fans and critics, and scored a 98 percent customer satisfaction rating last quarter.
One year on, it’s hard to imagine going back to big bezels and buttons.
It’s no surprise, then, that this year’s iPhones follow suit. The iPhone X has been retired. And in its place, Apple unveiled today the iPhone XS, iPhone XS Max and iPhone XR. They all look like last year’s flagship at first glance, with edge-to-edge displays and smooth glass fronts and backs — but they’re bigger, better and more powerful in every way.
iPhone XS Max and iPhone XS.
Meet Apple’s new iPhone lineup
iPhone XS is “by far the most advanced iPhone we have ever created,” said Apple CEO Tim Cook during today’s Gather Round keynote. It’s available in two sizes: A 5.8-inch model that replaces iPhone X, and a 6.5-inch model that shows Apple hasn’t forgotten about iPhone Plus lovers.
Both feature OLED screens with support for Dolby Vision and HDR10, with a 1-million-to-1 contrast ratio, 120Hz touch-sensing, True Tone and 3D Touch. They also offer a wider and richer stereo sound experience, Apple says.
They’re the first iPhones to offer dual-SIM functionality, allowing users to juggle two numbers simultaneously. That’s thanks to a traditional SIM card slot and a built-in eSIM that can be connected to a whole bunch of supported carriers.
In China, where the eSIM can’t be supported yet, iPhone XS and iPhone XS Max will ship with two SIM card slots.
A12 Bionic will blow you away
iPhone XS and iPhone XS Max are powered by an A12 Bionic chip — the industry’s first 7-nanometer processor. It’s packed with 6.9 billion transistors, with a 6-core CPU and a 4-core GPU that’s up to 50 percent faster.
Apple has also introduced a new 8-core Neural Engine that’s dedicated to machine learning. Last year’s A11 Bionic was capable of processing 600 billion operations per second, but the A12 can process a staggering 5 trillion in the same time.
This new Neural Engine allows for improved Portrait mode in the Camera app, even better Animoji, and more immersive augmented reality experiences. Face ID also works faster than ever before, thanks to faster algorithms and a snappier secure enclave.
Apple’s best cameras
The iPhone is the world’s most popular camera. Apple helped its handset secure this crown by delivering the best smartphone shooters every year. The cameras packed into iPhone XS and iPhone XS Max are its best yet — and they deliver jaw-dropping results.
Apple’s new iPhone XS cameras.
There are two sensors on the back of each device: one 12-megapixel sensor with a wide-angle lens and an f/1.8 aperture, and one 12-megapixel sensor with a telephoto lens and an f/2.4 aperture. There’s also an improved True Tone flash, and twice as many Focus Pixels.
Thanks to an improved image signal processor, which works alongside the Neural Engine for the first time, the new iPhones can identify faces and bodies when you’re taking a photo and automatically apply adjustments like red-eye reduction.
By far the most impressive feature of Apple’s new cameras is called Smart HDR. It works by capturing numerous frames every time you take a photo to get the best white balance, highlights, shadows, different exposures, and more.
It then analyzes those images, picks out the best bits, and merges them to produce that “one perfect photo.” All of this happens at lightning speed, and it’s incredibly impressive.
Even better designs
Both the iPhone XS and iPhone XS Max are protected by the most durable glass ever installed on a smartphone, and they have an improved IP68 rating for dust- and water-resistance. They also last longer than their predecessors in between charges.
iPhone XS and iPhone XS Max will be available in gold, silver and space gray with up to 512GB of storage. Prices start at $999 for the smaller model, and $1,099 for the larger model. You’ll be able to order them this Friday, and they’ll start shipping September 21.
iPhone XR brings the color
iPhone XR delivers the “iPhone X experience” at a more affordable price. It’s powered by the new A12 Bionic chip and sports a gorgeous edge-to-edge display just like its siblings, only this time, it’s an LCD screen.
iPhone XR is a beauty.
It’s the most advanced LCD ever packed into a smartphone, Apple says, and it’s called the Liquid Retina display. The screen measures 6.1 inches diagonally, making it bigger than an iPhone 8 Plus display, but the device itself is smaller.
iPhone XR has just one camera, but it’s the same 12-megapixel camera found in iPhone XS and iPhone XS Max. That means you get the same great performance, optical image stabilization, and the improved True Tone flash.
Apple even managed to deliver Portrait mode for iPhone XR, despite just one sensor.
iPhone XR is made from 7000 Series aerospace-grade aluminum that’s finished in either white, black, blue, coral, red or yellow. It also boasts an IP67 rating for dust- and water-resistance.
Prices start at $749 with 64GB of storage, but 128GB and 256GB models will be available. You’ll be able to order iPhone XR next month, and it will start shipping October 26.
The Messages app in newer releases of iOS and MacOS will attempt to render a small preview of any webpage URL or link that is shared within the Messages app. Usually the link preview will pull the title of the article or webpage, an image, and the domain of the URL being shared, all in a little compact thumbnail preview seen in the Messages thread on an iPhone, iPad, or Mac. The Message link previews are useful to many people, but some users may not like the URL previews, and some more cautious users may prefer to see the full URL of a link at all times, especially before clicking on it.
We’ll show you a few tricks to disable the link previews of URLs sent and received in the Messages app of iOS and MacOS.
First, if you’re looking for a switch or setting for this, you won’t find one because it does not exist. So be aware that the approaches covered here are effectively workarounds, as there is no method of disabling the URL link previews in Messages app completely, either on the Mac, iPhone, or iPad. But with that said, you can effectively disable URL link previews in Messages on a per-message basis by using a few text tricks.
How to Prevent URL Link Previews in Messages for iOS and Mac OS
This comes down to a simple text trick. Essentially, you need to wrap the URL in text. You can do that in several different ways:
Option 1: Put the link in a sentence, or between words
Put a URL in the middle of a sentence like this http://osxdaily.com and then share it as usual
Simply placing the link being sent through Messages in between words or in a sentence will remove the message preview on an iPhone, iPad, or Mac.
Just note that the words or text must appear on both sides of the URL to work as intended. Basically anything like “words URL words” will do the job and disable the Message URL preview, and instead show the full URL.
Option 2: Place periods on both sides of the link being shared
Place periods on the beginning and end of a URL being shared, like this: “.http://osxdaily.com/.”
Just wrap the URL in periods and send the link as usual. This is just a variation of the above trick but rather than placing the URL in a sentence or between words, you’re placing the URL between periods.
Interestingly, if you use periods on both sides of the URL, then Messages in both iOS and MacOS will strip the periods out, as long as they surround a complete URL like so:
.http://osxdaily.com/.
This means that, once the message with the URL is sent, it will appear as so:
http://osxdaily.com/
And yes, without the iMessage preview.
While the above screenshots focus on the iPhone and iPad by demonstrating the iOS Messages app, the tricks work identically on the Messages app for Mac, where the same techniques will disable the URL preview on the Mac side of things too (for both sending and receiving). The screenshot below demonstrates this with a link preview, as well as a link without the URL preview on the Mac:
Apple has released the final version of iOS 11.4.1 to all iPhone and iPad users. The release comes after a period of beta testing, and while a concurrent beta testing program continues for iOS 12.
Separately, Apple has released MacOS High Sierra 10.13.6 and Security Update 2018-004 for Sierra and El Capitan along with software updates for Apple TV, HomePod, and Apple Watch users as well.
How to Update to iOS 11.4.1
The simplest way to update to iOS 11.4.1 is through the Software Update function on the iPhone or iPad.
Choose “Download & Install” when iOS 11.4.1 update shows as available
Optionally, users can also update to iOS 11.4.1 by using a computer with iTunes on a Mac or Windows PC.
If you are currently running the iOS 12 public beta or developer beta than you will not be able to find or download iOS 11.4.1 unless you downgrade first.
iOS 11.4.1 IPSW Firmware Direct Download Links
Advanced users can also choose to update iOS by using IPSW files, which are firmware files downloaded from Apple servers, by using the links below:
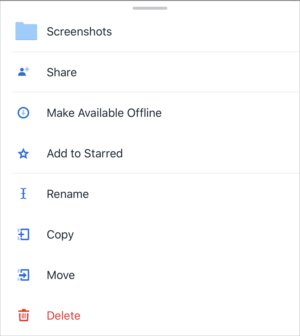
iCloud Photo Library isn’t flexible about file storage. But the solution may lie with Dropbox.
With iCloud Photo Library you can take endless photos on an iPhone or iPad, or upload endless images on a Mac or via iCloud.com, as long as you’re paying for the right quantity of iCloud storage. And Apple simply manages it for you.
This trick comes through optimized storage, which is enabled by default in iOS when you turn on iCloud Photo Library. On the Mac, you have to turn it on: In the Photos app, go to Preferences > iCloud, check the iCloud Photo Library option, and then pick either to Download Originals to the Mac or Optimize Mac Storage. (I use full-resolution downloads on one of my Macs, a desktop machine, so I have a local copy that I can also backup elsewhere.)
Macworld reader John has a common request. While he’s using optimized storage on his iPad, he wants to always have some media locked at full resolution to show other people. The images he wants to show seem to be dumped routinely by iOS. Retrieving them is tedious—not to mention redundant—unless he has a high-speed internet connection.
It’s completely reasonable and totally unavailable. For some reason, even years into iCloud Photo Library as a service, Apple doesn’t recognize this as something people might want.
Dropbox lets you force offline (on device) storage.
There’s one reliable option: Dropbox. You can export the images you want to always have available, store them in Dropbox, and use the Dropbox app. Dropbox has a Make Available Offline option for each folder and file. With that option, the file or folder is downloaded to iOS and retained.
In macOS, by the way, if you put images or videos in a shared album, those images are always cached locally at full resolution on the startup volume. This is known because it bites some users with a lot of shared media and tight storage on the startup volume.