For years, people have wondered if Google would merge its Android and Chrome operating systems, and the company has steadfastly held to them important but distinct pieces of its strategy. That might be changing: The Wall Street Journal is reporting that Google has been working for two years to merge Chrome OS and Android. The results of that unified operating system is expected to be officially released to the public in 2017, but we may see an early version as soon as next year.
Update: While some have reported Google might “kill” ChromeOS, the company seems to still have some kind of dual-strategy in mind and has disputed that interpretation. As the Senior VP of Chrome OS, Chromecast and Android Hiroshi Lockheimer probably knows the the most about each project’s potential fate, and he tweeted tonight that “we are very committed to Chrome OS.”
The WSJ says that this new version of Android will also run on PCs, though it’s not clear if the company is talking about Windows and Mac computers or just a rebranded extension of the current Chromebook lineup. The former seems likely, as the Chrome browser contains most of the functionality of Chrome OS itself. Given that Google wants to get its Google Play store on as many devices as possible, it would make sense to see a version that works with the vast number of Windows and Mac machines out there. Chromebooks will end up being rebranded to an as-yet undetermined name.
Ever since current Google CEO Sundar Pichai became both the director of Android as well as Chrome OS in March of 2013, there’s been a lot of speculation about if the two operating systems would merge. While Pichai initially said they would stay separate, he appointed Hiroshi Lockheimer to manage both operating systems late last year — so there’s been a fairly long history of Google’s two operating systems having one clear lead for some time now.
When we might see this new, combined operating system is far from certain — but it seems like the next Google I/O event would be as natural a time as any for the company to show off such a major shift.
If there are words and phrases you type out over and over again on your phone—from your email address to “I’ll be five minutes late”—then both Android and iOS include built-in tools to help you communicate faster. Here’s how to get the shortcuts set up and burn through emails and texts messages on your smartphone.
Android
Head into the Settings app, then tap Language & input and choose the Personal dictionary entry from the menu that appears. A list of all the words you’ve added to your personal dictionary appears on screen. Tap the plus icon (top right) to enter your word or phrase, then give it a unique shortcut code in the field underneath.
That’s just about all there is to it. Next time you’re tapping out a message, enter the shortcut code and the word or phrase appears as a suggestion on screen. If you prefer, you can make use of a third-party app to do the same job—Texpand seems to be the most useful and most recently updated option out there at the moment.
iOS
On recent versions of iOS, you can find the keyboard shortcuts feature by going to the Settings app, then tapping General and Keyboard. Select Text Replacement and you can start working on your shortcuts. As on Android, a tap on the plus icon in the top-right corner lets you create a new one.
The process is almost exactly the same as it is on Google’s mobile OS—input your word or phrase, specify a shortcut, tap Save and you’re good to go. The next time the iOS keyboard pops up on screen, you can type out your shortcut and then choose your specified word or phrase from the suggestions that appear above the keys.
Marshmallow further bolsters Android’s existing notification muting features thanks to an enhanced Do Not Disturb feature.
n Android 5.0 Lollipop, Google added some new features that made it easier to silence unwanted notifications while you’re asleep or at work, for example. Android 6.0 Marshmallow builds on Lollipop’s Priority Notifications and Downtime features, and gives these notification management tools a new umbrella name: Do Not Disturb. Let’s take a look at what these expanded notification-silencing features can do.
Turn on Do Not Disturb at any time
Android Marshmallow lets you mute notifications at any time with just a tap. Pull down the Notifications drawer, then swipe down again to get to the Quick Settings tray (or swipe down with two fingers at once). Tap Do not disturb, then choose the sorts of alerts you want to receive while do not disturb is active. You can choose to continue receiving notifications for alarms or priority notifications, or you can opt for total silence. (We’ll discuss priority notifications in-depth here in a moment.)
Do Not Disturb is a swipe and a tap away in Android Marshmallow.
Finally, choose whether you want to have Do Not Disturb stay on until you say otherwise (“Until you turn this off”) or for a set period of time (“For one hour,” by default). If you choose the latter option, use the “+” and “-“ buttons to set how long you want Do Not Disturb to be active.
Priority interruptions
Android Lollipop introduced the concept of “priority notifications”: These notifications rise to the top of the notifications screen, and you can choose to continue receiving auditory or vibration alerts for these notifications even when you have all other notifications muted.
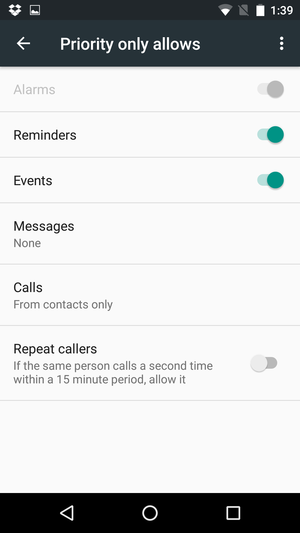
To choose which notifications you’d like to treat as priority notifications, head on over to your phone’s Settings app, then tap Sound & notification—a one-stop shop of sorts for all things related to notifications and alert sounds. Next, tap Do not disturb, then tap Priority only allows. From this screen, you can choose to limit the sorts of notifications you’ll be alerted to.
First, choose whether you want to give priority to notifications for reminders and calendar events. (The option to silence alarms is grayed out for whatever reason.)
Next, review the priority notifications options for Messages and Phone calls. set your priority preferences by tapping either “Messages” or “Calls.” when you do, a menu pops open with four options:
From anyone: This option allows all notifications through, regardless of who is trying to reach you.
From contacts only: Notifications alerting you to calls or messages from people listed in your Contacts app will get priority status.
From starred contacts only: This setting gives priority to notifications that pertain only to those marked as favorites in the Contacts app. To mark someone as a favorite, go to the Contacts app, tap that person’s name, then tap the star icon in the upper right corner.
None : No call or message notifications will receive priority status.
Once you choose your desired settings for calls and messages, choose whether you want notifications from repeat callers to gain priority by toggling the “Repeat callers” slider to the On position. When this setting is switched on, you’ll receive a notification if someone calls you a second time within a 15-minute period, regardless of whether notifications from that person receive priority status.
Downtime
If you want to allow all notification alerts through most of the time, but want to limit alerts during certain hours (like when you’re sleeping or at the office), Downtime is for you. During Downtime hours, you’ll only be alerted to priority interruptions; your phone will receive all other notifications silently. They’ll be there, waiting for you when you wake up, but your phone will not light up the screen, make a noise, or vibrate.
If you want to use Downtime, you first need to choose the days of the week and times you want to set as notification quiet hours. Go to Settings > Sound & notification > Do not disturb > Automatic rules. Android Marshmallow provides presets you can use for weekends and weeknights, and a preset option for managing notifications during calendar events.
Start by tapping any of these three options—for the sake of this tutorial, I’ll tap Weekend. Next, toggle the on/off switch to the “on” position. Select theDays you want the preset to apply to, then set a Start time and End time.
Finally, select the kinds of alerts you’d like to allow through. You can choose between Alarms only (allows alarms to sound but silences all other notifications), Priority only (allows only priority notifications), or Total silence(which mutes all notifications).
Take a peek at the Event preset as well, and choose whether you want to silence notifications from going off during events listed on your calendar—useful for preventing your phone from going off in the middle of a staff meetings. Switch the rule on, select the calendar and reply status you want it to use, then choose what kind of notifications—if any—you want to receive during calendar events.
You can create additional rules for notifications as well: For example, you can set one to allow only priority notifications while you’re at the office. TapAdd rule, enter a name, choose whether you want a Time rule (you enter specific times and dates) or an Event rule (one based on calendar events), then tap OK. At this point, you can set up your new rule: Doing so is pretty straightforward—it works just like the presets mentioned above.
You can delete a rule at any time by tapping its name, then tapping the trash can icon in the upper right corner. You can also choose to temporarily stop observing a rule by toggling the on/off switch to the “off” position.
App notifications
Android Marshmallow, like Lollipop before it, also lets you choose to block apps from sending notifications entirely, or to mark notifications from certain apps as priority notifications.
First, head back to Settings > Sound & notification. Next, scroll to the bottom and tap App notifications, then tap on the app for which you want to adjust notification settings. Toggle the Block all slider to the “on” position to stop receiving notifications from that app. Toggle the Treat as Priority slider to “on” if you want notifications from that app to be considered Priority notifications.
While you’re here, you can toggle whether you want to view the larger “heads-up” notifications for the app in question using the Allow peeking setting.
You can also get to this screen any time an app’s notification appears by pressing and holding on the notification until you see the little info button (it looks like a lowercase “i” in a circle) appear. Tap on that, and you’ll go straight to the notification settings for that app.
Once you’re done, exit the Settings app and enjoy your newfound mastery of Android Marshmallow’s notification system.
Earlier this week, iOS and Mac users rejoiced at the arrival of the taco emoji, just one of a number of new emoji that were added to the operating systems via a software update. Unfortunately, Android users don’t yet have access to these emoji, something that’s an undeniable bummer. The good news is that the senior VP of Android says more emoji will be coming soon, the bad news is we don’t know when. Last night, Hiroshi Lockheimer tweeted that he’s heard the feedback and that Google is working on it — but when that change might happen is up in the air. Still, it’s good news — every day that goes by without a taco emoji is a day that isn’t lived quite to its fullest.
If you’ve ever tapped on a search result on your phone only to see a giant ad imploring you to install the site’s app, you know how annoying that can be. Google realizes that too, thanks to its own internal study that showed users often don’t click through when they encounter these ads. Now Google wants to change that by downranking sites that pull such a stunt. Starting November 1st, any site that uses large app install interstitials will no longer be deemed “mobile-friendly” by Google, which could spell disaster for the site’s SEO. Other interstitials will still be okay, however, and Google is encouraging the use of less obtrusive app install banners instead. While ads aren’t going away entirely — this is Google, after all — at least it looks like they’ll be less aggravating in the future.
Thank you for using
Themify Popup
This is a sample pop up. Themify Builder or Builder Lite (free) plugin is recommended to design the pop up layouts.