Introducing the 13-inch MacBook Pro updated with the new Magic Keyboard, double the storage, and faster graphics performance.
Cupertino, California — Apple today updated the 13-inch MacBook Pro with the new Magic Keyboard for the best typing experience ever on a Mac notebook and doubled the storage across all standard configurations, delivering even more value to the most popular MacBook Pro. The new lineup also offers 10th-generation processors for up to 80 percent faster graphics performance1 and makes 16GB of faster 3733MHz memory standard on select configurations. With powerful quad-core processors, the brilliant 13-inch Retina display, Touch Bar and Touch ID, immersive stereo speakers, all-day battery life, and the power of macOS, all in an incredibly portable design, the new 13-inch MacBook Pro is available to order today, starting at $1,299, and $1,199 for education.
With a sleek aluminum unibody design in space gray or silver and weighing just 3 pounds, the 13-inch MacBook Pro is highly portable and packed with performance and advanced technologies.
“Whether you’re a college student, a developer, or a creative pro, the 13-inch MacBook Pro delivers powerful performance, a stunning Retina display, and all-day battery life in our most portable pro notebook. Today we’re adding the new Magic Keyboard, doubling the standard storage, and boosting performance, making the 13-inch MacBook Pro an even better value for our customers,” said Tom Boger, Apple’s senior director of Mac and iPad Product Marketing. “With these updates, our entire notebook lineup features the Magic Keyboard for the best typing experience ever on a Mac notebook, offers twice the standard storage than before, and delivers even more performance.”
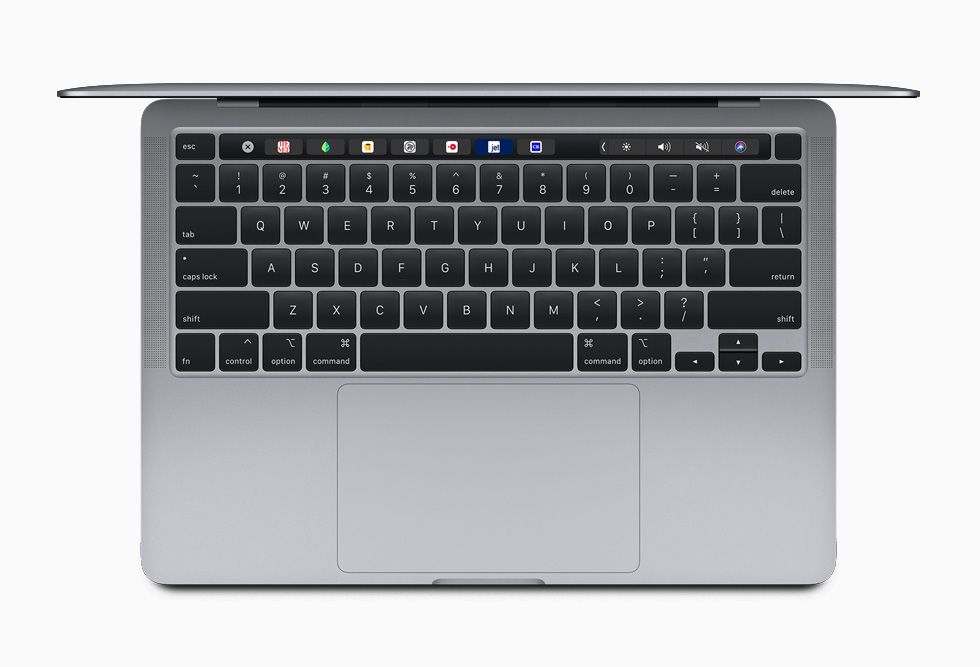
The new Magic Keyboard comes to the 13-inch MacBook Pro, delivering the best typing experience ever on a Mac notebook.
New Magic Keyboard
The updated 13-inch MacBook Pro now features the new Magic Keyboard, first introduced on the 16-inch MacBook Pro and added to MacBook Air in March. Magic Keyboard features a redesigned scissor mechanism with 1mm of key travel for a comfortable and stable key feel, while the new inverted-“T” arrangement for the arrow keys makes them easier to find, whether users are navigating through spreadsheets or playing games. Magic Keyboard also features a physical Escape key, along with Touch Bar and Touch ID, for a keyboard that delivers the best typing experience ever on a Mac notebook.
Magic Keyboard on the 13-inch MacBook Pro features a physical Escape key, Touch ID for easy login and secure online purchases, and Touch Bar with dynamic and contextual controls.
Double the Storage
Customers love the superfast SSDs on MacBook Pro, with sequential read speeds of up to 3.0GB/s. The 13-inch MacBook Pro now comes with double the storage of the previous generation, with standard storage starting at 256GB all the way up to 1TB, so customers can store even more photos, videos, and files. And for pro users who need even more storage capacity for large photo libraries and video projects, the 13-inch MacBook Pro now offers up to a 4TB SSD.
With standard storage starting at 256GB all the way up to 1TB, 13-inch MacBook Pro users can store even more photos, videos, and files.
Better Performance
The 13-inch MacBook Pro lineup now offers up to 10th-generation quad-core Intel Core processors with Turbo Boost speeds of up to 4.1GHz. Customers who are upgrading from a 13-inch MacBook Pro with a dual-core processor will see up to 2.8 times faster performance. The integrated Intel Iris Plus Graphics deliver up to 80 percent faster performance over the previous generation 13-inch MacBook Pro for 4K video editing, faster rendering, and smoother gameplay. The new graphics also enable users to connect to Pro Display XDR at full 6K resolution.
With the latest 10th-generation processors, the 13-inch MacBook Pro delivers up to 80 percent faster graphics performance for 4K video editing, faster rendering, and smoother gameplay.
Faster Memory and More Memory
16GB of faster 3733MHz memory is now offered as a standard configuration on select models, and for the first time on a 13-inch Mac notebook, customers can choose a 32GB memory option. With 32GB of memory, users will experience better performance while running multiple virtual machines and up to 50 percent faster performance when editing gigapixel images in Photoshop.
Portable Design with a Stunning Retina Display
With a sleek aluminum unibody design in space gray or silver and weighing just 3 pounds, the 13-inch MacBook Pro is both highly portable and packed with performance and advanced technologies. Its stunning and brilliant 13-inch Retina display delivers more than 4 million pixels and millions of colors, along with 500 nits of brightness and support for the P3 wide color gamut. And with True Tone technology, the display offers a more natural viewing experience for design and editing workflows, as well as for everyday tasks such as browsing the web and writing email. The 13-inch MacBook Pro also comes with speakers that provide incredibly immersive wide-stereo sound, Touch ID for easy login and secure online purchases, Touch Bar with dynamic and contextual controls, and the industry-best Force Touch trackpad for precise cursor control and Multi-Touch navigation.
The 13-inch MacBook Pro features a brilliant Retina display with more than 4 million pixels and millions of colors, 500 nits of brightness, and support for the P3 wide color gamut.
Built-in Security and Privacy
The 13-inch MacBook Pro comes with the Apple T2 Security Chip, Apple’s own custom-designed second-generation silicon, which checks that software loaded during the boot process has not been tampered with and provides on-the-fly data encryption for everything stored on the SSD. This allows MacBook Pro and any Mac with the T2 chip to deliver the most secure boot process and storage of any computer. The T2 also protects Touch ID information, so whether customers are unlocking their Mac, entering an online password, or making online purchases, their information stays safe.
Touch ID on the 13-inch MacBook Pro keeps information safe whether customers are unlocking their Mac, entering an online password, or making online purchases.
macOS Catalina
Every new MacBook Pro comes with macOS Catalina, the latest version of the world’s most advanced desktop operating system. macOS has always been at the core of the Mac experience, and with apps such as Safari, Mail, Photos, Pages, Numbers, and Keynote, customers have powerful tools to do amazing things. macOS also makes MacBook Pro the perfect companion device to iPhone, iPad, and Apple Watch with built-in Continuity features that allow users to make and receive phone calls without picking up their iPhone; automatically unlock their Mac with Apple Watch; copy and paste images, video, and text straight from iPhone or iPad to a nearby Mac; and in macOS Catalina, extend the workspace of their Mac using an iPad and Sidecar. Security features keep users better protected, and Voice Control lets users control their Mac entirely with their voice.
In macOS Catalina, users can extend their workspace and use iPad and Sidecar alongside their new 13-inch MacBook Pro.
Apple Services
Customers can also enjoy Apple services right on their MacBook Pro, including Mac versions of the Apple Music, Apple Podcasts, and Apple TV apps, as well as Apple News. Apple Arcade is available through the Mac App Store, bringing more than 100 new and exclusive games to Mac customers. And for a limited time, customers who purchase a new MacBook Pro can enjoy one year of Apple TV+ on the Apple TV app for free.3
Pricing and Availability
Starting at $1,299 (US), and $1,199 (US) for education, the new 13-inch MacBook Pro is available to order today on apple.com and in the Apple Store app. It will begin arriving to customers and will be in select Apple Stores and Apple Authorized Resellers later this week. Additional technical specifications, configure-to-order options, and accessories are available online at apple.com/mac.
In the past, we’ve told Apple World Today readers about PDFelement, a powerful tool for creating, editing and annotating PDF documents. The app is developed and supported by Wondershare, which has recently released PDFelement 7, the latest generation of this popular software. Download a copy today to see why PDFelement is the most popular PDF editor on the Mac App Store.
The free trial evaluation copy of PDFelement adds a watermark, but otherwise functions identically to the paid version.
Why PDFelement?
The fact that PDFelement is the best-selling PDF editor in the world is one reason why you should consider this app for your PDF needs, but there are more reasons than that. It’s also less expensive than its competitors, with volume licensing and educational discounts available. The app is easy to install and set up — using the power of the Mac App Store — in minutes.
Activation of the Pro features of PDFelement 7 is done through registration and a simple in-app purchase. Flexible licensing with either perpetual license ownership or yearly plan leasing is available.
What’s New In PDFelement 7
PDFelement 7 builds on the power and success of PDFelement 6, and now is even easier to use with an all-new user interface. Securing, modifying and sharing documents is now much more simple to accomplish.
Launch PDFelement 7 for Mac and you’ll see a clean interface with a list of your most recent documents. All those documents are one click away from editing, annotating, and sharing.
During testing of PDFelement 7 for this article, we found the page menu display (see image above) to greatly speed up the process of reordering pages in a PDF file. The pages of a document are presented in a grid format, and the user can then drag and drop images to reorder them or rotate them to change orientation.
Behind the clean, intuitive user interface of PDFelement 7 is a set of features that is ready for any size business, whether a one-person operation or large enterprise. Adding or changing headings and footers, editing text, and other document modifications are done much faster than in the previous version. Customized annotations and Bates numbering are now part of the new PDFelement.
Now that we’ve looked at the new features of PDFelement 7, let’s take a look at what it can do for you.
PDF Creation
For many people, it all starts with creating new PDF files for distribution to customers, readers or friends. You can actually create new PDFs from a scanner. Take an existing paper form, scan it, and then perform optical character recognition (OCR – a feature of PDFelement Pro) to either generate editable text or make a searchable text image.
Want to archive old documents by scanning them into PDF files? PDFelement can save PDF files in the PDF/A format that is designed especially for archiving and long-term preservation of electronic documents. It does this by embedding all of the information required to display the document in its original form into the PDF file.
Whether you’re using PDFelement on Mac or Windows, you get the same functionalities and experience, making it easy to support users in cross-platform environments. It also supports ten separate languages — English, French, German, Spanish, Russian, Portuguese, Italian, Japanese, Dutch and Chinese. This feature alone makes PDFelement indispensable in global enterprises.
PDF Editing
PDFelement 7 for Mac makes editing PDF documents simple. Whether the text inside a PDF requires editing, or it’s the images, pages, links, backgrounds, watermarks, headers or footers that need a fix, PDFelement has the tools you need to make a PDF perfect.
For text, PDFelement has both paragraph and single-line editing modes, with font type, size and style being easily adjustable. Images are just as easy to edit. Need to add, copy and paste an image? Consider it done! How about extracting an image from an existing PDF to be used in another document? It’s easy with PDFelement. Cropping and rotating images takes no time and effort at all.
PDF Annotation And Sharing
When you’re working on a group project, PDF annotation tools are a must. PDFelement’s toolset gives editors the ability to add fills, highlight text, draw on images and text, create and use stamps, and leave comments for future reference or rework.
Sharing sensitive PDF content can expose data to others and create privacy issues. That’s why PDFelement has the ability to lock down PDF content with passwords and permissions. Your documents can be shared immediately to Dropbox or Google Drive, or sent to others through email and messaging.
Should you need to pull data from PDF forms into a spreadsheet for analysis, PDFelement is there to turn a slow manual process into a speedy and automated batch process.
Try PDFelement 7 For Mac Today
Remember, PDFelement 7 for Mac is free to try. Just download a copy from the Mac App Store, and within minutes you’ll be trying out the world’s most popular PDF editor.
Wondershare also makes PDFelement versions for iPhone and iPad, the perfect mobile companion to the Mac version. You’ll be able to create, edit, annotate and share PDFs from anywhere.
The Image Capture app comes pre-installed with every Mac, allowing users to easily import photos and videos from other devices.
How Apple is filling your hard drive with empty data.
Apples Image Capture.app is a very nice and simple tool to transfer photos from attached cameras to your Mac without the need to use heavy and slow launching apps like Apples “Fotos.app”.
Most unfortunately, in every single release since Mac OS X 10.10, Apple has added a lot of very embarrassing bugs to Image Capture.
Some of them got quickly fixed after we told Apple about them, but at the same time, Apple was very busy adding new bugs.
By pure chance, we have discovered a very disturbing bug recently that is able to quickly fill your macOS volumes with empty data.
Here is what happens.
If you connect an iPhone or iPad to your Mac, and use Image Capture to transfer the photos you took with the device to the Mac, you have the option to convert the HEIC photos taken by iOS to more standard JPG files. This requires you to uncheck the “Keep Originals” option in the settings for that iOS device, as shown here.
More specifically, the issue only affects users who import photos from an iPhone or iPad using Image Capture. Let’s say you want to manually transfer photos from your iPhone to a Mac via USB, and your photos are saved with the High Efficiency option (which is basically the HEIF format).
By unchecking the “Keep originals” option, macOS converts all HEIF image files to JPG automatically as you might expect.
The problem discovered by the NeoFinder team is that the Mac adds 1.5MB of empty data to each converted photo, making the imported files larger for no reason. By looking inside these photos through a Hex-Editor, you can find a section full of zeroes, which results in unnecessarily larger files.
With that said, if you import 1,000 images from your iPhone or iPad to your Mac using the Image Capture app, the bug will take up an additional 1.5GB of storage — which can be a lot for someone who owns a MacBook with 128GB of storage.
Apples Image Capture will then happily convert the HEIF files to JPG format for you, when they are copied to your Mac.
But what is also does is to add 1.5 MB of totally empty data to every single photo file it creates!
We found that massive bug by pure chance when working on further improving the metadata editing capabilities in NeoFinder, using a so-called Hex-Editor “Hex Fiend“.
Here is how the end of every single JPG file created by Apples buggy Image Capture.app looks like:
Apple has already been notified about the problem, but we don’t know when the company plans to release a macOS update to fix that bug. Until then, users can try the latest beta version of the Graphic Converter app, which removes the unwanted empty data from the JPG files. Of course, this is a colossal waste of space, especially considering that Apple is seriously still selling new Macs with a ridiculously tiny 128 GB internal SSD. Such a small disk is quickly filled with totally wasted empty data.
With just 1000 photos, for example, this bug eats 1.5 GB off your precious and very expensive SSD disk space.
We have notified Apple of this new bug that was already present in macOS 10.14.6, and maybe they will fix it this time without adding yet additional new bugs in the process.
Changing the refresh rate of a display can be needed by some Mac users, particularly if they work with movie files and video editing. Generally speaking, most users should keep their displays set to the default refresh rate for their particular screen, but if you need to adjust refresh rate you’ll find it’s simple to do so with displays used on the Mac.
It’s important to note that not all Mac displays can change their fresh rate, though many third party external screens offer different refresh rate options. In fact, most Mac internal screens can not change refresh rates for those built-in displays, though that is changing with some of the Pro models.
How to Change the Refresh Rate on MacBook Pro Display
For the latest MacBook Pro 16″ and newer models, and the Apple Pro XDR display, you can adjust the Mac refresh rate as follows :
Pull down the Apple menu and choose ‘System Preferences’
Go to “Displays”
Under the ‘Display’ tab, hold down the OPTION key and click on the “Scaled” button to reveal the “Refresh Rate” options
The default option is 60 hertz for most displays, which is recommended to maintain.
For example, the 16″ MacBook Pro has multiple refresh rates available on the built-in display, including 47.95 hertz, 48 hertz, 50 hertz, 59.94 hertz, and 60 hertz.
You can also change the screen resolution of Retina Macs in the same settings menu if you choose to, whether to increase text size and size of stuff on the screen or to get more screen real estate. Much like refresh rate, it’s generally recommended to use the native screen resolution on a display for best results.
How to Change Refresh Rate on External Mac Displays
Some external displays can also change their refresh rate easily, here’s how you can do that :
Connect the external display to the Mac if it’s not connected already
Pull down the Apple menu, and choose ‘System Preferences’
Go to “Displays”
Under the ‘Display’ tab, hold down the OPTION key and click on the “Scaled” button to reveal the “Refresh Rate” options for that display
Some displays may even show the refresh rate drop-down menu options without having to hold down the OPTION key, but that partially depends on the version of MacOS and the display itself too.
Why don’t I see an option to change refresh rate on Mac display?
If you don’t see the option to change refresh rate on the Mac display, it’s either because your display does not support changing refresh rate, or you forgot to hold down the OPTION / ALT key while you were choosing the Scaled resolution button.
If your Mac does not support different refresh rates on the internal display, you’ll see the standard settings screen for Display preferences :
If you know the display should have the option but you are encountering issues, you may try disconnecting it, reconnecting it, and using the Detect Displays trick, which sometimes can resolve curious issues with display resolution, refresh rate, and other unusual display behavior.
As mentioned before, if you do change the refresh rate of a display you’ll likely want to switch it back to the default once you’re finished using the different setting while editing video or for whatever other purpose you adjusted the setting for.
Need to clear up some disk space or get rid of some old iPhone or iPad backups on a Mac? With the latest versions of MacOS, managing iOS and iPadOS device backups is done entirely in Finder, including deleting and removing device backups.
Arguably the safest and most thorough way of backing up an iPhone or iPad is to do an encrypted backup via Mac Finder. When the backup is complete you’ll have a copy of all of your data on your computer, complete with encrypted keychain contents. But it all takes up space that you might want to reclaim. As you can imagine, doing a full backup of your iPhone or iPad can take a lot of space. That’s fine if you’re lucky enough to be using a Mac with a multi-terabyte SSD. But most of us aren’t, so we need a way to trip the amount of data used by backups. We need to delete old ones. And in macOS Catalina, that’s a whole new process compared to deleting backups with iTunes. As you’ll see, removing backups this way is similar, but since iTunes is no more in modern macOS versions, it’s obviously a bit different and using a different process.
Here’s how to go about deleting old iPhone or iPad backups in macOS Catalina.
How to Delete iOS & iPadOS Device Backups from MacOS Finder in Catalina
This assumes you have made a backup of iPhone or iPad to macOS before, if not there will not be any backup to remove.
Plug your iPhone or iPad into your Mac using a USB cable.
Open a Finder window by clicking its icon in the Dock and click your iPhone or iPad in the sidebar.
Make sure that the “General” tab is selected and then click “Manage Backups.” You’ll find it at the very bottom of the window.
Click to select the backup that you want to delete and then click “Delete Backup.”
You’ll need to confirm that you want to delete the selected backup before the action is carried out.
The selected backups will be deleted.
Depending on the size of the device backups you removed, you can possibly get a ton more space on your Mac drive, whether it’s a hard disk or SSD, just by removing backups this way. This is particularly nice to do with old device backups that are no longer needed.
Of course you don’t want to delete the only copy of a device backup you have, so be sure you have a backup of the iPhone or iPad somewhere before deleting one from the Mac.
As a bonus, you’ll still have these backups safe and sound if you’re using Time Machine, assuming you use that feature to backup the entire Mac anyway. You can then go about restoring the backup if you still need it, depending on how much time has passed and how long Time Machine keeps files around. Another handy trick for redundant backups is to manually copy a copy of the backed up devices to other external storage mediums, like an SD card, USB flash drive, or external hard drive, which you can then refer to if needed.
Using a Mac is just one way of backing up your iPhone or iPad. You can also use a Windows PC with iTunes if you want to. If you’d rather not have to plug them into a computer at all, you can use iCloud for backups instead as well. With iCloud, your device will back itself up overnight and you won’t need to connect to a computer to restore anything, either. And just like the Mac and iTunes approaches, you can also delete backups from iCloud too.
Finder in MacOS handles all device management now that iTunes used to, and that includes not only device backups but also syncing music to iPhone or iPad in MacOS with the Finder too, along with other device management options. Basically all that used to be device management in iTunes is now in Finder.
Interested in disabling Launchpad on Mac? If you want to turn off the Launchpad for whatever reason or to stop accidentally opening Launchpad in MacOS, you can turn the feature off completely.
For some quick background, Launchpad is a feature in MacOS that reveals a screen of app icons, sort of reminiscent to the appearance of an iPad or iPhone. Launchpad can be accessed by gesture, F button, or by opening the Launchpad app from the Dock or Applications folder. Some users may find this feature to be really helpful, whereas others may find it to be less useful particularly if they’re accessing Launchpad through an accidental pinch gesture on trackpad, or tapping on the F4 key, or clicking the app Dock icon.
This article will show how to disable the Launchpad gesture, remove the Launchpad Dock icon, and disable remove the Launchpad F button trigger on Mac to turn Launchpad off.
How to Disable Launchpad Gesture on Mac
This applies to turning off the Launchpad gesture on all Macs using a Trackpad :
Pull down the Apple menu and go to “System Preferences”
Choose “Trackpad” then choose “More Gestures”
Locate “Launchpad” in the list of gestures and uncheck the box next to “Launchpad” to disable the Launchpad pinch gesture on Mac
Close System Preferences
That will disable the Launchpad pinch gesture.
You may also want to remove the Launchpad app icon from the Mac Dock.
How to Remove Launchpad from Mac Dock
Click and hold on the Launchpad icon, then drag it out of the dock and wait a moment for the ‘Remove’ label to appear, then drop the Launchpad icon
That will remove Launchpad from the Dock on the Mac.
Finally, you may be interested in changing or removing the keyboard shortcut for Launchpad on the Mac.
How to Change or Remove Launchpad Keyboard Shortcut on Mac
Pull down the Apple menu and go to “System Preferences”
Go to “Keyboards” and then to “Shortcuts” and choose “Launchpad & Dock”
Uncheck the box for “Show Launchpad” to disable it, otherwise click the keyboard shortcut to set it to something else
This process should be familiar to anyone who has set a custom keyboard shortcut on Mac except that rather than creating a new one you’re either disabling or changing an existing keystroke combination.
Obviously this is geared towards disabling Launchpad, but if you don’t want to turn off the feature and you instead enjoy it, then there are plenty of Launchpad tips we’ve discussed before to browse through.
Want to remove an application from the Dock on Mac? You can easily remove app icons from the Mac Dock. This can offer a simple way to reduce clutter of the Mac Dock, but also to remove unwanted or unused apps from the Dock, or even just to customize the Dock for your personal preferences.
Removing app icons from the Mac Dock is simple and aside from removing it from the Dock it has no impact on the application. This will not uninstall the app or remove it from the Macintosh otherwise, it simply removes the app icon from the Dock.
How to Remove Applications from Mac Dock
Here’s how you can remove any app icon from the Dock in MacOS:
Locate the app you want to remove the Mac Dock
Click and hold on the app icon
Now drag the app icon out of the Dock while holding the click, continue holding as you drag until you see the “Remove” text appear on the icon
Let go of the click to remove that app icon from the Mac Dock
Repeat with other app icons to remove them from the Mac Dock too
You can remove just about every app icon from the Mac Dock if you’d like to, though Finder, active apps, and Trash will always remain the Dock.
Remember, you can not remove an app icon from the Dock that is currently running. You can tell an app is running as signified by the app status icons, which are little dots underneath the Dock icon; if you see a dot under the app icon, it’s running and active, if you do not, then it’s not open or active. There is an exception to this however, and that’s if you disabled the app icon status icons in System Preferences.
This applies to all versions of MacOS and Mac OS X, but there are some minor changes depending on the precise system version you’re running. For example, on some earlier versions of Mac OS X, you had to click and drag an app icon out of the Dock and then wait a bit longer for a cloud icon to appear on the icon but the ‘Remove’ label did not appear, instead you’d simply release the app icon and it would disappear into a poof with a little sound effect. That whimsical touch was removed in modern MacOS releases, however.
Adding app icons back into the Mac Dock is just as easy, just drag and drop them into the Mac Dock and position them wherever you’d like them to be. Easy as always.
If you remove (or add) too many things from the Mac Dock and regret your changes, remember that you can always reset the Mac Dock to the default icon set if you’d like to start over from scratch.
The Mac Dock has other customizations available for it too, and don’t forget that you can relocate the Mac Dock screen position with ease to any side of the screen, and you can also set the Mac Dock to automatically hide or show itself with the cursor.
If you enjoyed this tip, we’ve got tons of other Dock tips available for Mac, iPhone, and iPad, so check those out too.
If you’re going to attempt to install MacOS Catalina on an unsupported Mac, do so at your own risk.
Then you may be interested in a third party tool that allows advanced uses to patch the MacOS Catalina installer so that it works on otherwise unsupported Macs.
Whether or not you should install MacOS Catalina onto an unsupported Mac is another question entirely, as performance may not be up to par, and some things may not work as expected (or at all, since features like Sidecar are compatible with specific Macs only), but if you’re an advanced user who is interested in running macOS 10.15 on unsupported hardware this patcher utility makes it easy to do so.
If this sounds interesting to you, check out the link below to learn more about the DosDude Catalina Patcher utility, and you can view a video tutorial further below showing how it works.
If you’re going to attempt to run this patcher and install MacOS Catalina on an unsupported Mac, be sure you have full complete backups of the computer and understand that running unsupported system software on an unsupported Mac has obvious risks.
DosDude has been tweaking with the MacOS system installers for a while, and you may recall a past article discussing running macOS Mojave on unsupported Macs too using a similar patch.
Which Unsupported Macs Can Install MacOS Catalina with the DosDude Tool?
According to DosDude, the MacOS Catalina Patcher will work to install MacOS Catalina on the following list of otherwise unsupported Macs:
Early-2008 or newer Mac Pro, iMac, or MacBook Pro:
MacPro3,1
MacPro4,1
MacPro5,1
iMac8,1
iMac9,1
iMac10,x
iMac11,x (systems with AMD Radeon HD 5xxx and 6xxx series GPUs will be almost unusable when running Catalina.)
iMac12,x (systems with AMD Radeon HD 5xxx and 6xxx series GPUs will be almost unusable when running Catalina.)
MacBookPro4,1
MacBookPro5,x
MacBookPro6,x
MacBookPro7,x
MacBookPro8,x
Late-2008 or newer MacBook Air or Aluminum Unibody MacBook:
MacBookAir2,1
MacBookAir3,x
MacBookAir4,x
MacBook5,1
Early-2009 or newer Mac Mini or white MacBook:
Macmini3,1
Macmini4,1
Macmini5,x (systems with AMD Radeon HD 6xxx series GPUs will be almost unusable when running Catalina.)
MacBook5,2
MacBook6,1
MacBook7,1
Early-2008 or newer Xserve:
Xserve2,1
Xserve3,1
As you can see, that list is significantly broader than what is on the list of MacOS Catalina compatible Macs.
It goes without saying that just because you can do something doesn’t mean you should, and some Macs may not perform well, and not all features may work as expected if trying to run MacOS Catalina on unsupported hardware. This is very much a third party tweak, and is of course not supported by Apple in any way.
The video below demonstrates a tutorial walking through the process of using the DosDude Catalina patcher tool to install the macOS 10.15 system software on an unsupported Mac.
If you have attempted to use a MacOS installer application recently, you may discover an error message stating something like “This copy of the Install macOS Mojave.app application is damaged, and can’t be used to install macOS.” This prevents the installer of macOS from working and running, and essentially makes the installer applications useless.
The cause of this error is an expired certificate, and because the certificate is expired the “Install macOS” app for Mojave, Sierra, and High Sierra will not run. Fortunately, there is a fairly simple solution to the “damaged” installer problem.
Resolving “Install MacOS Application is Damaged, Can’t be Used to Install MacOS” Error Messages with Mac OS System Installers
The easiest way to resolve the “This copy of the Install macOS .app application is damaged, and can’t be used to install macOS.” is to re-download the installer again from Apple, which contains a new fresh certificate that is not expired. The links below point to Apple resources where you can find or download the updated macOS installers for Mojave, High Sierra, and Sierra :
You may need to reboot the Mac after you have downloaded the new (and valid certificate) installer application, particularly if you had already launched a version that showed the application damaged error message.
If you do not download new versions of these macOS installer applications, you are likely to encounter the error messages for each release if you attempt to open or use the MacOS installer, or even a USB boot drive created with one of the expired installers:
“This copy of the Install macOS Mojave.app application is damaged, and can’t be used to install macOS.”
“This copy of the Install macOS High Sierra.app application is damaged, and can’t be used to install macOS.”
“This copy of the Install macOS Sierra.app application is damaged, and can’t be used to install macOS.”
If you want to see specifics and the expired certificate itself, you can investigate .pkg components of the MacOS Installer with tools like Suspicious Package and pkgutil, which can show the expired certificate that causes the error message :
Similar issues have happened with various Mac OS installers in the past. Aside from re-downloading the installer, another option that some users have reported to work that gets around these sort of error messages for installers (and sometimes apps too) is setting the Macs clock back in time (in this case, before October 2019 when the certificate expired rendering the installer application unusable), but that apparently doesn’t work all the time with the Install MacOS Mojave app. It’s also not always a practical solution to adjust clocks particularly if you plan on widely deploying, using, and archiving the installer apps for various MacOS releases and on different hardware. Instead, just re-download the new versions of “Install macOS.app” that you require, and keep those around instead.
Many Mac users like to maintain a repository of MacOS installer packages for older versions of system software. For example, I have a collection of MacOS installers including for Mac OS X Snow Leopard, Mac OS X Mavericks, MacOS High Sierra, macOS Sierra, macOS Mojave, and MacOS Catalina. These can be used to build USB boot installers, restore systems, troubleshoot, perform clean installations of the various system software versions, perform upgrades to specific system software releases, and serve many other purposes. If you have a similar installer archive, it’s probably a good time to replace those installers with the new versions that won’t be expired.
Want to stop MacOS Catalina showing up in Software Updates on a Mac? Don’t plan on updating to MacOS Catalina anytime soon? Still up in the air about whether or not to update to MacOS Catalina 10.15?
If you don’t want the “MacOS Catalina” update to show as available to download in the Software Update section of macOS, you can use a terminal command to block and hide the software update from showing as available. This can be helpful if you’re avoiding installing MacOS Catalina for whatever, whether to avoid potential problems, or if you just don’t want to deal with updating to it anytime soon.
How to Stop MacOS Catalina Showing in Software Update on Mac
Quit out of System Preferences
Launch the Terminal application on the Mac, found in /Applications/Utilities/ folder
Enter the following command at the Terminal command line:
sudo softwareupdate --ignore "macOS Catalina"
Hit return then enter the admin password * and hit return again to execute the command with super user privileges
Re-open System Preferences, the “MacOS Catalina” update will no longer show as available
Now MacOS Catalina update will remain hidden from Software Update on the Mac until this setting has been changed, which we’ll discuss further below.
With MacOS Catalina no longer taking up the primary “Software Update” screen, you’ll continue to be informed of incoming software updates for Security Updates, Safari Updates, iTunes updates, and any other software releases for the currently running MacOS version.
If you have ignored the MacOS Catalina upgrade you can also continue to selectively install specific software updates via Mac Software Update.
Any future software updates that are not Catalina will continue to be available, or install automatically if you have that feature enabled.
Note you may wish to download MacOS Catalina installer before ignoring the software update, for convenience, if you plan on installing it down the road, or onto another computer, or making a USB boot drive, or whatever else. Of course you can also make the upgrade show as available in Software Update again if you’d like to, as we’ll cover next.
How to Make MacOS Catalina Upgrade Available in Software Update Again
To unhide MacOS Catalina and make the MacOS 10.15 update available again, you can do one of two things. One is to start the process of downloading MacOS Catalina from the Mac App Store, but since we used the command line to ignore the update the best approach is to return to the Terminal.
To make MacOS Catalina upgrade show up in Software Update again, return to the command line and clear and reset the ignored software updates list with the following command line syntax:
sudo softwareupdate --reset-ignored
Again authenticate with the admin password and hit return.
Relaunching System Preferences and returning to Software Update will make MacOS Catalina show as available again, just like any other system software update in modern MacOS versions like Mojave (or Catalina).