Microsoft is working to make your and your family’s online experience safer. Today the company is launching its new Defender security dashboard for 365 subscribers. Users on iPhone, Mac, Windows, and Android devices have access to the Microsoft Defender security app that utilizes existing antivirus software or other protections.
Microsoft Defender is simplified online security that meets you and your family where you are by bringing multiple protections together into a single dashboard. It provides online protection across the devices you and your family use. It offers tips and recommendations to strengthen your protection further. And, as you grow your digital footprint by adding family members and devices, Defender grows with you and keeps your defenses up-to-date using trusted technology.
According to The Verge, Microsoft Defender’s features will vary by which platform. For instance, on iPhone and iPad, Microsoft Defender users won’t have antivirus protection. However, they’ll have some phishing protections alongside their dashboard that features alerts for their other devices.
Additionally, the new app includes security alerts for your devices to ensure maximum protection. While not on iPhone, you can also view Microsoft Defender’s cybersecurity tips on your Mac or Windows computer.
This is just the start. As we look forward, we will continue to bring more protections together under a single dashboard, including features like identity theft protection and secure online connection. Microsoft Defender is simplified online security that grows with you and your family to help keep you safe.
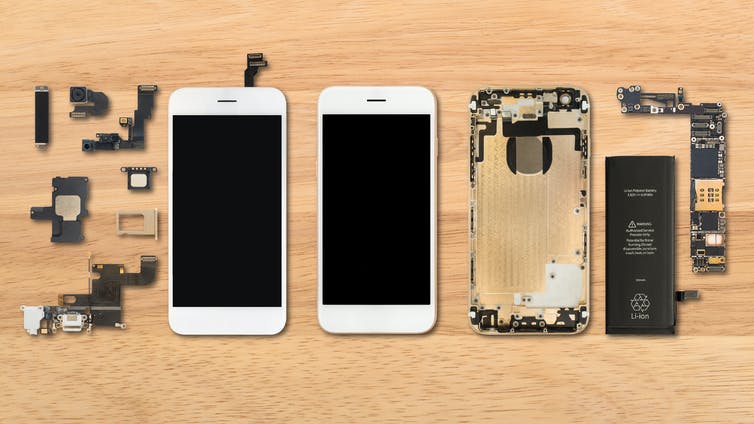
Why go to a repair shop or a manufacturer or the smartphone shop you bought the phone from? When you can do it yourself?
So you have to know if you are an enthusiast or a tech oriented individual. If you own a shop and you fix smartphones for a living, then this video is not for you. However, if you only do screen replacement once or twice a year, then watch out for the risk of DIYing a screen replacement.
Risk #1: You buy the wrong replacement part.
Think about it, the only places where you can buy these replacement parts is online shops or an actual repair shop that is willing to sell you one.
There will be a risk that you can buy the wrong part from a slightly different model. Whether it’s an iPhone or Android smartphone, you might end up with a half open smartphone that you fixed up in your kitchen counter because you can’t finish it because of a wrong part.
Risk #2: You don’t have the right tools or the knowledge to use them.
If you’ve seen some of our videos, we have a lot of special tools specifically designed to perform an operation. Oftentimes, we create our own tools based on experience.
If you don’t have the right tools to do the job, then you can jeopardise the whole repair by giving your already damaged device more damage. It’s a risk that you have to think about. Remember that a smartphone screen is made up of glass. You still have to be very gentle with it and use non-metallic tools to pry your smartphone open.
Risk #3: You can have complications while disassembling or reassembling the device.
You’ve watched videos on ifixit. you have the tools. You have the right part. But what if somewhere down your screen replacement operation, something came up that was not discussed in the repair video that you watched? What if your smartphone didn’t boot up when you tested it? What will you do?
Complications like these can happen if you don’t know the nuance of fixing a specific smartphone model. What is your smartphone chassis is bent? What will you do? What if you punctured your battery? These complications do happen, folks, so watch out.
Risk #4: You can spend more if you damage other components.
Speaking of complications, one other risk is damage to other components. So you thought that you just have to remove the broken screen and you’re good to go? One wrong move and you can bend your smartphone’s housing. Hashtag, bendgate. You can puncture your battery if you’re not careful too. That’s why no metallic objects should be used when you interact with electrical or glass components of a smartphone. You can also leave scratches on the smartphone’s aluminum body.
Damaging other parts of the smartphone if you’re not careful is a risk.
Risk #5: You don’t know advanced troubleshooting techniques if the smartphone won’t boot up after your screen replacement.
We already discussed this. What if your smartphone required more troubleshooting after you successfully replaced the screen? Do you know how to deal with it? If you’re not sure, just let the pros do it.
Sometimes, when you drop your smartphone and whacked the front display, you can also dislodge some parts inside the smartphone. Or your smartphone just won’t accept the replacement screen. It’s like next level skills that you can only get from years of experience fixing smartphones.
Call us at 8011 4119 if you have smartphone problems, Sydney CBD Repair Centre will fix it for you.
We know very well of the dangers of a battery exploding or instantly dying on you. One is a fire hazard and a health hazard. The other one can let you down on critical situations. So how can you tell that your battery needs to retire and you need to get a new one?
Reason #1: Reduced Battery Life
One of the main reason is when your battery isn’t as lively as it used to be a year ago. It needed a recharge after lunch? It needed one again just after six o’clock. What is going on? Aging. That’s what’s going on. Some lithium ion batteries just lost their capabilities to hold charge after a year. Some batteries are extreme so you might end up with a bad one. Get a new battery installed if you still want to use your old device.
Reason #2: Unexpected Shutdowns
This is worse. You are still at 80 percent and then out goes your smartphone to sleep. What’s going on? Well, your battery is not even registering the accurate charge through it’s controller. This means that it can go from hero to zero in a second. Battery replacement? Sure.
Reason #3: Bootloops
Smartphones are smart. That’s why when they detect that your battery is not supplying enough voltage to start up the device, they immediately retry. And then retry again. And again. You’re in a loop. A boot loop. Some factors can also cause this like corrupted OS or a bad motherboard. However, if you can fix it with a battery replacement, then go for it.
Reason #4: Physical Damage
Need I say more? Your smartphone is literally trying to rip itself apart because the battery pack is bloating. This is dangerous so don’t even attempt to open up your device if you don’t know what you’re doing. It can explode. Go to a repair centre immediately and have this sorted out.
Call us at 8011 4119 if you have smartphone problems, Sydney CBD Repair Centre will fix it for you.
If you’re going to attempt to install MacOS Catalina on an unsupported Mac, do so at your own risk.
Then you may be interested in a third party tool that allows advanced uses to patch the MacOS Catalina installer so that it works on otherwise unsupported Macs.
Whether or not you should install MacOS Catalina onto an unsupported Mac is another question entirely, as performance may not be up to par, and some things may not work as expected (or at all, since features like Sidecar are compatible with specific Macs only), but if you’re an advanced user who is interested in running macOS 10.15 on unsupported hardware this patcher utility makes it easy to do so.
If this sounds interesting to you, check out the link below to learn more about the DosDude Catalina Patcher utility, and you can view a video tutorial further below showing how it works.
If you’re going to attempt to run this patcher and install MacOS Catalina on an unsupported Mac, be sure you have full complete backups of the computer and understand that running unsupported system software on an unsupported Mac has obvious risks.
DosDude has been tweaking with the MacOS system installers for a while, and you may recall a past article discussing running macOS Mojave on unsupported Macs too using a similar patch.
Which Unsupported Macs Can Install MacOS Catalina with the DosDude Tool?
According to DosDude, the MacOS Catalina Patcher will work to install MacOS Catalina on the following list of otherwise unsupported Macs:
Early-2008 or newer Mac Pro, iMac, or MacBook Pro:
MacPro3,1
MacPro4,1
MacPro5,1
iMac8,1
iMac9,1
iMac10,x
iMac11,x (systems with AMD Radeon HD 5xxx and 6xxx series GPUs will be almost unusable when running Catalina.)
iMac12,x (systems with AMD Radeon HD 5xxx and 6xxx series GPUs will be almost unusable when running Catalina.)
MacBookPro4,1
MacBookPro5,x
MacBookPro6,x
MacBookPro7,x
MacBookPro8,x
Late-2008 or newer MacBook Air or Aluminum Unibody MacBook:
MacBookAir2,1
MacBookAir3,x
MacBookAir4,x
MacBook5,1
Early-2009 or newer Mac Mini or white MacBook:
Macmini3,1
Macmini4,1
Macmini5,x (systems with AMD Radeon HD 6xxx series GPUs will be almost unusable when running Catalina.)
MacBook5,2
MacBook6,1
MacBook7,1
Early-2008 or newer Xserve:
Xserve2,1
Xserve3,1
As you can see, that list is significantly broader than what is on the list of MacOS Catalina compatible Macs.
It goes without saying that just because you can do something doesn’t mean you should, and some Macs may not perform well, and not all features may work as expected if trying to run MacOS Catalina on unsupported hardware. This is very much a third party tweak, and is of course not supported by Apple in any way.
The video below demonstrates a tutorial walking through the process of using the DosDude Catalina patcher tool to install the macOS 10.15 system software on an unsupported Mac.
If you have attempted to use a MacOS installer application recently, you may discover an error message stating something like “This copy of the Install macOS Mojave.app application is damaged, and can’t be used to install macOS.” This prevents the installer of macOS from working and running, and essentially makes the installer applications useless.
The cause of this error is an expired certificate, and because the certificate is expired the “Install macOS” app for Mojave, Sierra, and High Sierra will not run. Fortunately, there is a fairly simple solution to the “damaged” installer problem.
Resolving “Install MacOS Application is Damaged, Can’t be Used to Install MacOS” Error Messages with Mac OS System Installers
The easiest way to resolve the “This copy of the Install macOS .app application is damaged, and can’t be used to install macOS.” is to re-download the installer again from Apple, which contains a new fresh certificate that is not expired. The links below point to Apple resources where you can find or download the updated macOS installers for Mojave, High Sierra, and Sierra :
You may need to reboot the Mac after you have downloaded the new (and valid certificate) installer application, particularly if you had already launched a version that showed the application damaged error message.
If you do not download new versions of these macOS installer applications, you are likely to encounter the error messages for each release if you attempt to open or use the MacOS installer, or even a USB boot drive created with one of the expired installers:
“This copy of the Install macOS Mojave.app application is damaged, and can’t be used to install macOS.”
“This copy of the Install macOS High Sierra.app application is damaged, and can’t be used to install macOS.”
“This copy of the Install macOS Sierra.app application is damaged, and can’t be used to install macOS.”
If you want to see specifics and the expired certificate itself, you can investigate .pkg components of the MacOS Installer with tools like Suspicious Package and pkgutil, which can show the expired certificate that causes the error message :
Similar issues have happened with various Mac OS installers in the past. Aside from re-downloading the installer, another option that some users have reported to work that gets around these sort of error messages for installers (and sometimes apps too) is setting the Macs clock back in time (in this case, before October 2019 when the certificate expired rendering the installer application unusable), but that apparently doesn’t work all the time with the Install MacOS Mojave app. It’s also not always a practical solution to adjust clocks particularly if you plan on widely deploying, using, and archiving the installer apps for various MacOS releases and on different hardware. Instead, just re-download the new versions of “Install macOS.app” that you require, and keep those around instead.
Many Mac users like to maintain a repository of MacOS installer packages for older versions of system software. For example, I have a collection of MacOS installers including for Mac OS X Snow Leopard, Mac OS X Mavericks, MacOS High Sierra, macOS Sierra, macOS Mojave, and MacOS Catalina. These can be used to build USB boot installers, restore systems, troubleshoot, perform clean installations of the various system software versions, perform upgrades to specific system software releases, and serve many other purposes. If you have a similar installer archive, it’s probably a good time to replace those installers with the new versions that won’t be expired.
Want to stop MacOS Catalina showing up in Software Updates on a Mac? Don’t plan on updating to MacOS Catalina anytime soon? Still up in the air about whether or not to update to MacOS Catalina 10.15?
If you don’t want the “MacOS Catalina” update to show as available to download in the Software Update section of macOS, you can use a terminal command to block and hide the software update from showing as available. This can be helpful if you’re avoiding installing MacOS Catalina for whatever, whether to avoid potential problems, or if you just don’t want to deal with updating to it anytime soon.
How to Stop MacOS Catalina Showing in Software Update on Mac
Quit out of System Preferences
Launch the Terminal application on the Mac, found in /Applications/Utilities/ folder
Enter the following command at the Terminal command line:
sudo softwareupdate --ignore "macOS Catalina"
Hit return then enter the admin password * and hit return again to execute the command with super user privileges
Re-open System Preferences, the “MacOS Catalina” update will no longer show as available
Now MacOS Catalina update will remain hidden from Software Update on the Mac until this setting has been changed, which we’ll discuss further below.
With MacOS Catalina no longer taking up the primary “Software Update” screen, you’ll continue to be informed of incoming software updates for Security Updates, Safari Updates, iTunes updates, and any other software releases for the currently running MacOS version.
If you have ignored the MacOS Catalina upgrade you can also continue to selectively install specific software updates via Mac Software Update.
Any future software updates that are not Catalina will continue to be available, or install automatically if you have that feature enabled.
Note you may wish to download MacOS Catalina installer before ignoring the software update, for convenience, if you plan on installing it down the road, or onto another computer, or making a USB boot drive, or whatever else. Of course you can also make the upgrade show as available in Software Update again if you’d like to, as we’ll cover next.
How to Make MacOS Catalina Upgrade Available in Software Update Again
To unhide MacOS Catalina and make the MacOS 10.15 update available again, you can do one of two things. One is to start the process of downloading MacOS Catalina from the Mac App Store, but since we used the command line to ignore the update the best approach is to return to the Terminal.
To make MacOS Catalina upgrade show up in Software Update again, return to the command line and clear and reset the ignored software updates list with the following command line syntax:
sudo softwareupdate --reset-ignored
Again authenticate with the admin password and hit return.
Relaunching System Preferences and returning to Software Update will make MacOS Catalina show as available again, just like any other system software update in modern MacOS versions like Mojave (or Catalina).
Wondering which Mac and iPad models support Sidecar? If you’re curious as to whether or not a Mac and iPad is compatible with Sidecar, you’ll find the list of supported devices below to be helpful. Not all Mac and iPad models support the feature, but most new models do.
Sidecar is the helpful new feature introduced in MacOS Catalina 10.15 and iPadOS 13 that allows an iPad to function as an external display for a Mac, with full touch screen support on the iPad as well as the ability you use Apple Pencil. Some MacOS Catalina users have attempted to use Sidecar but found it’s not working on their Mac and iPad combination, perhaps thinking it’s a problem with MacOS Catalinawhen in fact it’s just a matter of system compatibility. So let’s review which devices Sidecar works for.
Sidecar System Requirements for Mac & iPad
Sidecar is only compatible with some of the latest models of iPad and Mac hardware.
iPad Models with Sidecar Support
iPad must be running iPadOS 13 or later, and must be one of the following devices:
iPad Pro (all models, including 9.7″ iPad Pro, 10.5″ iPad Pro, 11″ iPad Pro, 12.9″ iPad Pro, all generations)
iPad Air (3rd generation and newer)
iPad (7th generation and newer)
iPad (6th generation and newer)
iPad mini 5 (and newer)
You might notice that only the iPad models with Apple Pencil support will also support Sidecar (and yes, you can use Sidecar without having an Apple Pencil, just use touch interaction instead).
Macs with Sidecar Compatibility
The Mac must be running MacOS Catalina 10.15 or later, and must be one of the following computers:
MacBook Pro (2016) or newer
MacBook Air (2018) or newer
MacBook (Early 2016) or newer
Mac Mini (2018) or newer
Mac Pro (2019)
iMac Pro (2017) or newer
iMac 27″ (Late 2015) or newer
For Mac, you can confirm that Sidecar is enabled and available on the Mac by going to the System Preferences and checking the Sidecar preferences.
Assuming you meet the system requirements for using Sidecar on Mac and iPad, you must have the two devices with Handoff enabled and within range of one another, and the feature should work and be available.
As you can see, there are various other iPad and Mac models that do not support Sidecar, even if they otherwise compatible with MacOS Catalina and compatible with iPadOS 13. So if you have recently updated your devices to the latest operating systems but find the feature is not available or is not working, perhaps it’s because of a compatibility issue with the hardware not being supported, rather than a problem with the Sidecar feature itself.
Some Mac users have reported a variety of problems with MacOS Catalina, ranging from installations getting stuck or taking abnormally long, to problems with some apps not working, to issues with certain printers or accessories no longer working, App Store difficulties, iCloud and Apple ID issues, amongst other nuisances.
While installing and using MacOS Catalina goes fine for most users, that is no solace if you are experiencing problems with a particular Mac and the new MacOS 10.15 release. Below we will discuss a variety of reported issues and problems with MacOS Catalina, and offer various troubleshooting methods to attempt to resolve those difficulties.
Before perusing this guide or attempting any troubleshooting method, be sure to back up your Mac and all data first. Failure to backup data can result in permanent data loss.
MacOS Catalina Won’t Download or Shows “An error occurred while running scripts from the package “RecoveryHDMetaDmg.pkg”
If you are attempting to download MacOS Catalina and it fails with a “An error occurred while running scripts from the package “RecoveryHDMetaDmg.pkg” error message, it may be related to third party firewall, anti-virus, or anti-malware software running on the Mac.
Temporarily disable the third party software that is a firewall, anti-virus, or anti-malware protection, and then relaunch System Preferences to check for the download again and MacOS Catalina should arrive as expected.
Note that some Macs may need to be restarted after third party protection software is disabled, depending on the software and how it works. In that case, after rebooting the Mac return to System Preferences in the Software Update section to download MacOS Catalina as expected.
MacOS Catalina won’t install because “There is not enough free space on Macintosh HD to install”
If you do not have sufficient free disk space available on the Mac hard drive, you will not be able to install MacOS Catalina.
Aim to have at least 15GB freely available to complete the installation of MacOS Catalina.
MacOS Catalina Installation Stalls on “Estimating time remaining…”
A fair number of people have reported that MacOS Catalina installation takes longer to install than they were expecting, or longer to install than prior MacOS installations. A common symptom of this is the Mac is apparently stuck on “Estimating time remaining…” when trying to install MacOS Catalina.
If you see the “Estimating time remaining…” screen when trying to install MacOS Catalina, be patient. It’s unlikely the installer is actually stuck, so just let it sit, and if it’s a MacBook Pro or Air make sure it is connected to a power source.
Let the Mac sit for however long it takes to complete the installation of Catalina, it may take several hours. The Mac will automatically boot into MacOS Catalina when finished installing.
There are mixed reports that the MacOS Catalina installation has taken anywhere from 45 minutes to over 12 hours to complete, how long it takes on a particular machine likely depends on many factors, including computer speed, internet connection speed, the Mac OS version being updated from, and more, thus it’s best to initiate the installation when there is plenty of time available to allow the Mac to complete installation.
MacOS Catalina Installation Stuck on “Less than one minute remaining”
Some users report that installing MacOS Catalina gets stuck on a black screen with an Apple logo and progress bar, stating there is less than a minute remaining to complete the installation.
If you see this screen, let the Mac sit and wait for a substantial amount of time before attempting to intervene.
If the Mac is still stuck on “Less than one minute remaining” after many hours (let it sit overnight if you can), and you have a full backup of your data, try powering down the Mac and then turning it back on again. It may boot directly into the MacOS Catalina setup screen. It also may fail to boot entirely, in which case you’ll need to reinstall MacOS system software with Internet Recovery (you can also try to reinstall MacOS Mojave through regular recovery too), or restore the Mac from a previously made Time Machine backup.
MacOS Catalina Installation Stuck or Fails with “The operation couldn’t be completed. (PKDownloadError error 8.)”
This error has been reported to occur during installation of MacOS Catalina if the internet connection is disrupted or disconnected.
Insure that the Mac has an active wi-fi or ethernet connection and that the internet works as expected, and then try installing MacOS Catalina again.
MacOS Catalina Stuck on “Setting Up Your Mac” Screen After Install
Let it sit for at least several hours, it may resolve itself.
If a after hours pass, force reboot the Mac by turning the computer off, then turning it back on again
Mac Running MacOS Catalina Randomly Crashes & Restarts
Some Mac users are reporting their Mac is crashing and restarting itself, particular when the Mac is left unattended for a period of time.
This random crash/freezing/restarting issue appears to happen more often on newer Macs with T2 security chips, or with Macs with a Radeon Pro Vega GPU, but it has been reported on other Mac models as well.
There are various discussion threads on Apple Support Forums here about this, but there is not yet any clear explanation or solution to this problem.
Reinstalling MacOS Catalina may help.
If any updates come available to MacOS Catalina, be sure to install those right way (ie: MacOS Catalina 10.15.1, 10.15.2, etc), as they may resolve the problem.
Downgrading to MacOS Mojave may also be a workaround to some users, though that is obviously not desirable or practical for many users.
Frequent “Update Apple ID Settings” Requests
Some users have reported a frequent “Update Apple ID Settings” pop-up message, informing them that some services will not be available until they sign-in again. Then after signing in again, the popup returns.
If you encounter frequent “Update Apple ID Settings” alerts, first try restarting the Mac.
If the “Update Apple ID Settings” alert message continues still, back up the Mac (if you haven’t done so already), then go to System Preferences and logging out of the Apple ID, rebooting the Mac, then logging back in again.
Be aware that signing out of an Apple ID may cause issues with synced data over iCloud, including iCloud Documents, iCloud Files, iCloud Photos, and other iCloud syncing.
Persistent iCloud Password Requests
Some users have reported issues with persistent Apple ID and iCloud password requests.
Open System Preferences > go to iCloud settings > and login to iCloud directly.
You may also need to log out and then log back into iCloud via System Preferences, but be aware that doing so can cause issues with iCloud Documents, iCloud Files, and other iCloud syncing.
Some Mac Apps Don’t Work, “App Needs to be Updated” Error Message
Any 32-bit app that has not been updated to 64-bit will not work in MacOS Catalina.
When attempting to launch an app that does not work in MacOS Catalina, you will see an error message stating “(Name) needs to be updated”
This includes many older versions of popular apps like Microsoft Office (Word, Excel, Powerpoint, etc), Adobe Photoshop, Lightroom, and many smaller third party tools and utilities.
Additionally, many popular older Mac games are 32-bit and thus will not work on MacOS Catalina (unless they are updated for 64-bit support, which some developers have already stated will not happen with older software).
The only solution to this is to update the apps to 64-bit versions, or to find alternative applications. Or, more extreme, would be to downgrade from MacOS Catalina, but that’s a sizable hassle.
Printers, Scanners, Accessories Incompatible or Don’t Work with MacOS Catalina
Some users have found that printers, scanners, and other hardware accessories are no longer working after updating to MacOS Catalina.
This may be related to the loss of 32-bit application support, as some older printers and drivers are not updated to 64-bit.
Numerous reports exist of various Brother, Epson, HP, and other printers and accessories are incompatible with MacOS Catalina currently.
A good first step would be to reach out to the manufacturer of the printer, scanner, or hardware accessory and see if new drivers or related software are available with MacOS Catalina compatibility.
If new Catalina compatible drivers are available, install them to regain access to the printer, scanner, or hardware accessory.
Loss of iTunes Causing Issues with Music Playlists
Some users have reported that music playlists created from iTunes are not being imported or included in the new Music app of MacOS Catalina.
This may be a bug, or it could be an issue with the Music app not finding the playlist files from iTunes.
Some users have reported that simply quitting Music app and restarting the Mac has allowed their old iTunes playlists to surface in Music app as expected.
iTunes Removal Causing Issues with XML File Support & Third Party Music Apps
Some users of various music apps have reported that MacOS Catalina does not work with various music production and DJ apps.
This is apparently due to an issue with XML file support being removed from the new Music app.
If you rely on an application which requires iTunes or iTunes XML file support, consider avoiding MacOS Catalina for the time being, or until the apps you rely on are updated to support MacOS Catalina.
You can read more about this specific issue at The Verge if interested.
Mac App Store Showing “No Purchases”
Some Mac users are discovering that MacOS Catalina is not showing their purchased app history.
Sometimes simply rebooting the Mac can resolve this problem.
Otherwise, try logging out of the Mac App Store, quitting the App Store application, relaunching the App Store, then logging back into the Mac App Store again, to regain access to purchases.
Mac App Store Showing “No Updates”
Some users have reported that the Mac App Store is erroneously showing a “No Updates” available message, despite having older versions of apps like iMovie installed that are not working without an update for full 64-bit compatibility.
Quitting the Mac App Store, then rebooting the Mac and relaunching the Mac App Store appears to resolve this problem.
Mac is Hot and Running Slow After Installing MacOS Catalina
This is likely due to the system reindexing files on the drive, and the system toll it takes to perform maintenance tasks that are necessary after reinstalling or updating MacOS system software.
Let this process complete, it may take a while, but the Mac should perform as expected when that background activity has finished.
Safari Can’t Connect to Websites, But Internet Works
Some third party firewall software and anti-virus apps may be causing issues with Safari and other apps accessing websites and the internet in general.
Try disabling those third party firewall and virus tools, then rebooting the Mac to see if the issue is resolved.
Additional MacOS Catalina Troubleshooting Ideas
Depending on the issue, you may want to try a few additional troubleshooting steps like:
Try re-installing MacOS Catalina by rebooting the Mac and holding down Command+R and choosing to “Reinstall MacOS” – this will reinstall the core operating system without changing user files. Be sure to have a full backup fo your Mac before attempting this.
Try resetting SMC
Reset the PRAM on the Mac
MacOS Catalina is Unusable for Me, Help!
If you find MacOS Catalina totally unusable for whatever reason, you have a few options:
Restore the Mac from a previously made Time Machine backup, which is perhaps the easiest and best method of reverting from MacOS Catalina
Reinstalling MacOS via Internet Recovery, which will attempt to reinstall the version of MacOS that came with the Mac
Erase the Mac and restore from Time Machine or a prior backup method to effectively downgrade from MacOS Catalina to the prior version of MacOS you had backed up
Contact official Apple Support for further assistance – Apple support techs and engineers may be able to resolve a problem for you that unaffiliated third party fan sites like this are not able to address
Are all of these problems common?
No, these are not commonly encountered issues with MacOS Catalina.
Perhaps the most common issue that may be experienced by users with MacOS Catalina is that some older apps will not work, because of the loss of 32-bit app support. The other issues discussed here are fairly rare.
If you’re on the fence about whether or not to install MacOS Catalina then don’t assume you will experience any of the issues or problems discussed here. This is intended as a troubleshooting guide for problems that a small number of users are encountering, and by no means is representative of the wider MacOS Catalina user base or experience. You can use this guide to get ready and prepare for MacOS Catalina and download MacOS Catalina as soon as you’re ready for the software update. Or you can skip it for the time being, that’s OK too!
Want to clear and disable Significant Locations data stored on your Mac? For some quick background, your Mac will attempt to determine what locations are significant to you in order to provide you with location related information for Maps, Photos, Calendars, and with other apps too. These stored places are referred to as “Significant Locations” and can be very helpful for traffic and directions predictions, along with other location related assistance.
Some Mac users may prefer to disable the Significant Locations feature and clear any existing Significant Locations data from the Mac, and this tutorial will show you how to do that.
How to Clear & Disable Significant Locations on Mac
Go to the Apple menu and go to “System Preferences” and then go to the “Security & Privacy” preference panel
Choose the “Privacy” tab and then choose “Location Services”, then click the lock icon in the corner to authenticate and unlock the ability to make changes
Scroll down to find ‘System Services’ and click on “Details”
Locate the ‘Significant Locations’ settings and click on “Details” to see a list of any and all stored significant location data on the Mac
To clear all Significant Locations history, click on the “Clear History” button
Confirm that you want to clear significant locations from the Mac as well as from all other devices signed into the same Apple ID (for example, any other Macs, iPhones, iPads, etc)
Uncheck the box for “Significant Locations” then click on “Done” and exit out of System Preferences as usual
While you’re in the Location Services section of Mac system preferences, you might also decide to manage and control which apps can use location data on Mac. It can also be helpful to show the Location Usage icon in the Mac menu bar to be able to easily determine what an app or service is using your computers location data. If you never use any location specific data or services from the computer whatsoever, you can also completely disable all Location Services on Mac, but that is not recommended for most people.
It’s important to note that Apple says that Significant Locations are encrypted and cannot be read by Apple, so if you’re worried about the feature for any reason related to that, you probably shouldn’t be. Nonetheless there are many privacy and security conscious users out there who would rather minimize their location usage footprint, or even not have any type of location data kept or stored at all, regardless of its purpose.
As with all settings on the Mac, you can always reverse this decision and re-enable Significant Locations on the Mac again. Note that re-enabling significant locations will not bring back any cleared prior significant location data, however.
At some point in time you may have installed the popular Malwarebytes tool on a Mac to scan for malware, spyware, ransomware, junkware, and other garbage threats on a Mac, but at some point you may decide you want to uninstall Malwarebytes from the Mac and remove the utility from a computer.
Whether you’re using the free or paid version of Malwarebytes you’ll find that uninstalling it is fairly easy. We’ll cover two methods to remove Malwarebytes from a Mac.
How to Uninstall Malwarebytes from Mac OS the Easy Way
The simplest way to uninstall Malwarebytes from a Mac is to use the apps built-in uninstaller:
Open the Malwarebytes app on the Mac, found in the /Applications folder
Pull down the “Help” menu and choose “Uninstall Malwarebytes”
Choose “Yes” when asked if you want to completely remove Malwarebytes from the Mac
Authenticate with the admin password to uninstall Malwarebytes
How to Remove & Uninstall Malwarebytes by Script (if the Application is Missing, Doesn’t Work, etc)
If for some reason the above easy approach to uninstalling Malwarebytes does not work, or perhaps you already deleted the primary Malwarebytes application and so you no longer have the capability to use the built-in uninstaller function, another is available using a free removal script from Malwarebytes. Here’s how that works:
Launch the “Uninstall MWB” tool from the Downloads folder
Choose “Yes” when asked if you wish to remove all components of Malwarebytes from the Mac
This is the preferred method to remove Malwarebytes from a Mac. It’s easy and it’s relatively fast, and it should remove every component of Malwarebytes from the computer without having to do anything else.
Nonetheless there are other options which may be necessary if the primary application has already been removed, but other Malwarebytes components remain on the system.
When finished, Malwarebytes will have been deleted and all components uninstalled from the Mac.
Many of the components of the app remained which is often the case when simply dragging an app to the Trash does not uninstall everything related to the application. If you’re aiming to remove Malwarebytes from a Mac you can use either approach, but if the application is missing with the built-in uninstall tool then using the uninstaller script will still remove remaining Malwarebytes components from the Mac.
These uninstall methods should work on any semi-modern Mac running any modern version of Mac OS or Mac OS X, though the uninstaller script is valid for 10.10 and later only.
Technically speaking you could also manually remove Malwarebytes but that process is much more cumbersome than simply using the uninstaller tool offered in the application itself, or the uninstaller script available as a download from Malwarebytes. If you do want to manually remove the Malwarebytes app, you’ll be digging around in various user and system folders and searching system files for a variety of plists, extensions, and other components of the app, and other stuff. That’s really only appropriate for very advanced users, and there is little purpose to do so when there are easier uninstall methods.
To be clear, this is not a suggestion, this is simply a tutorial demonstrating how to uninstall Malwarebytes from MacOS. If you use Malwarebytes and find it useful, there’s no reason to stop using it or to remove it from a Mac. And remember that if you remove it because you’re finished using it for now, you can always install Malwarebytes again later if you want to.
As we mentioned before, Malwarebytes is a popular Mac utility and even the free download version will work for scanning and removing malware and junkware from a Mac, but whether or not you use it, or want to remove it, is entirely up to you. It’s generally well regarded and doesn’t carry some of the baggage (and bad headlines) that some other scanning and cleaning utilities out there, so if you’re interested in an malware scanner and removal tool on the Mac it’s a good choice even at the free level. If you are going to install a malware removal tool on the Mac, it’s best to pick just one and don’t overlap them to avoid any issues.