If you have an iPhone or iPad with Face ID you may want to toggle the devices Attention Aware Features setting to be enabled or disabled. The Attention Aware Features uses the iPhone or iPad camera to check if you are looking at the device before dimming the display, or lowering the volume of alerts on the device.
For example, if you have Attention Aware Features enabled, then you may notice that the iPhone XS, XR, X ringer volume is low when you pick up the phone or look at it, and that happens automatically. If you don’t want that to happen, you can disable the feature. And likewise, if you had previously turned this off, you can re-enable Attention Aware Features of Face ID to turn those features back on again.
How to Turn Attention Aware Features OFF or ON on iPhone & iPad
Open the Settings app in iOS
GO to “General” and then go to “Accessibility”
Tap on “Face ID and Attention”
Toggle the setting for “Attention Aware Features” to the ON position to enable this feature, or the OFF position to disable it
The description under this particular Face ID attention setting is as follows:
“IPhone / iPad will check for attention before dimming the display and lowering the volume of alerts”
As mentioned before, one of the more common examples of users noticing this feature is if they have an iPhone with Face ID and they notice the ringer volume is lowering itself seemingly out of nowhere. Likewise, many iPad users may notice the feature if they discover their screen is not dimming or turning off automatically as expected, because they are looking at the device.
You can choose whichever setting you want for this feature, so if you like it, leave it enabled, and if you don’t, turn it off. It’s easy to change again at anytime.
The default setting on Face ID equipped iPhone and iPad models is to have Attention Aware Features enabled, and the features work even if you are not using Face ID on the device for unlocking and authentication of the iPhone or iPad.
Want to transfer photos from a digital camera to iPhone? You can easily import photos and video from a digital camera or SD card to an iPhone with the help of an appropriate adapter and the super simple iOS Photos import procedure. This tutorial will walk through the steps to copy images and media from an SD card or camera to an iOS device.
To be able to successfully transfer and import photos from a digital camera or SD card to the iPhone, you will need the following:
The digital camera and/or SD card to copy the photos from
Assuming you have those prerequisites met, you’ll be able to copy images from the digital camera or SD card to the iPhone. And in case you were wondering, yes all of this is the same on iPhone as it is on iPod touch and iPad, so long as the iOS device has a Lightning port.
How to Import All Photos from Camera / SD Card to iPhone
Ready to import and copy photos from the SD card / camera to iPhone? Here’s what you’ll want to do:
Connect the Apple Lightning to SD Card Camera Reader adapter to the iPhone lightning port at the bottom of the phone
Insert the SD Card into the Apple Lightning to SD Card Camera Reader
Wait a moment and Photos app will launch automatically on the iPhone *
Tap on “Import All” in the corner of the Import screen of Photos app **
When the “Import Complete” screen appears, choose to “Keep” the photos on the SD card / camera, otherwise choose Delete if you want to permanently remove them from the attached SD card
All photos that were copied and imported from the SD card will now appear in the Photos app on the iPhone. You can find them in the general Camera Roll section or in the Photos section, though do note that the default Photos sorting view is by date and so if the images are from different dates they may not appear at the very bottom of the Photos app screen.
You can also choose to browse the imported photos by going to the Photos app “Albums” view and then selecting the “Imports” album.
Sometimes the Photos app does not automatically open when the SD card or digital camera is connected to the iPhone, if that happens manually open the Photos app and choose the “Import” tab.
** Optionally, you can manually select specific photos to import by tapping on them individually at the Import screen so that they a green checkmark appears overplayed on them, but for most users they’ll probably want to import all photos from the SD card to the iPhone.
If you have a digital camera that uses a different sort of memory card rather than an SD card, you’ll want to either use an adapter, or use the USB adapter for the iPhone instead. Fortunately most digital cameras have standardized around the SD card and so that will apply for most users who want to import pictures from a camera or SD card to their iPhone.
This walkthrough is obviously focused on the iPhone, but everything is basically the same on iPod touch and iPad, assuming they have a Lightning port anyway. If you’re a Mac computer use than you can also transfer images from iPhone, camera, or memory card to the Photos app on Mac too.
If you’re an iPad owner who uses Google Chrome web browser with an external keyboard connected to the iPad, you might appreciate learning a variety of handy keyboard shortcuts to help using Chrome and navigating within the app for iPad.
This collection of keyboard shortcuts for Chrome on iPad works with basically any iPad, iPad Pro, iPad Air, or iPad Mini, and with basically any keyboard connected to the iPad, whether it’s an Apple Smart Keyboard, Bluetooth keyboard, or a keyboard case.
22 iPad Keyboard Shortcuts for Chrome
New Tab – Command + T
New Incognito Tab – Command + Shift + N
Close Tab – Command + W
Reopen Closed Tab – Command + Shift + T
Bookmark This Page – Command + D
Find In Page – Command + F
Open URL / Location / Website – Command + L
Go to Location / Search Bar to Google Search – Command + L, search terms, then hit Return key
Reload Current Page – Command + R
Open History – Command + Y
Voice Search – Shift + Command + .
Navigate Down – Down Arrow
Navigate Up – Up Arrow
Full Page Down – Control + Down Arrow
Full Page Up – Control + Up Arrow
Scroll to Bottom of Page – Command + Down Arrow
Scroll to Top of Page – Command + Up Arrow
Go Back a Tab – Command + Option + Back Arrow
Go Forward a Tab – Command + Option + Forward Arrow
Go Back to Previous Page – Control + [
Go Forward a Page – Control + ]
Leave Chrome – ESC (if your keyboard has an Escape key) or Command + H
You can also use the traditional copy, cut, and paste keyboard shortcuts for iPad(Command + C, Command + X, Command + V) within Chrome on iPad, whether that’s while using the URL / Location / Search bar, or a form on a web page, or anywhere else you can select or enter text in the browser.
Notably missing from the keystroke actions in Chrome for iPad is going back a page or forward a page by using the back and forward arrow keys, which instead either requires using the same keystroke for back as you use to type the Escape key on many iPad apps, or requires tapping the screen Back and Forward buttons to perform that action. That may be an oversight or perhaps something that depends on the version of Chrome for iPad, or perhaps even the keyboard in use with the iPad, iPad Air, iPad Mini, or iPad Pro. If you have any additional insight into that behavior, share it below in the comments.
Google Chrome is a very popular web browser for many computing users on virtually every platform. Other than being a great general web browser, one of the main perks is that it easily syncs across platforms, meaning if you use Google Chrome on iPad, you can easily sync all of your browsing tabs and windows to just about anything else, including a Windows PC, Android, Mac, Chromebook, iPhone, or even a Linux machine. That contrasts to Safari, which is a fantastic web browser with iCloud tab syncing functionality too, but is only available for Apple platforms including iOS and MacOS (well, technically there is a version of Safari for Windows but it is quite outdated and doesn’t support the cloud syncing features so it wouldn’t apply in that regard anyway).
Want to know what the air quality index is at a particular destination? The Apple Maps app on iPhone and iPad can give you this information.
Those who are concerned about air quality will find it useful to know that the Maps app on iPhone and iPad has an optional feature that allows you to see the Air Quality Index (AQI) and accompanying color code directly in the Maps app, but first you must enable the feature, and have a compatible version of iOS system software on the device. This is obviously helpful for planning trips and maps routes for groups who impacted by air quality, and offers another way to see air quality information on an iOS device.
Finding the optional Air Quality Index information in the Maps app of iOS requires iOS 12.2 or later to be installed on the iPhone or iPad, as earlier versions do not support AQI index (though they do support weather). iPhone users with earlier iOS versions can get air quality information in the Weather app on iPhone, and both iPhone and iPad users can find AQI index info from Siri, whereas iPad users with earlier iOS versions will want to use either a website or dedicated weather app for this same information. Assuming you’re on iOS 12.2or later though, here’s how you can enable and see AQI details in Apple Maps.
How to View Air Quality Index in Maps on iPhone or iPad
Open the “Settings” app on the iPhone or iPad
Go to “Maps”
Find the setting for ‘Air Quality Index’ and toggle that switch to the ON position
Exit Settings
Launch the Maps application in iOS
Search for a location or destination in Maps as usual
Note the ‘AQI’ score in the corner of Maps app as you search and use the Maps app on iPhone or iPad
You’ll also notice the weather is shown in Maps directly above the AQI index, offering further information about the destinations and locations you’re viewing in the Maps app of iOS. If you don’t see the weather in Apple Maps, then you may have it turned off in the Maps Settings, directly above the Air Quality Index information.
Any Air Quality Index rating between 0-50 is considered to be ‘Good’, while anything over 50 is of declining quality, over 100 to be considered ‘unhealthy for sensitive groups’, with increasing severity of air quality health concerns from numbers beyond that. You can refer to the below chart from AirNow.gov for reference of air quality index, color codes, and the health concerns associated with them:
While AQI information may be irrelevant to some iPhone and iPad users, others will find it to be a very helpful feature, especially if you or someone else has trouble with particulate matter, air pollutants, or even allergies, asthma, COPD, or the myriad other conditions where the quality of air matters tremendously.
Have you ever wanted to know if someone blocked your number from calling them or sending them messages? You may be familiar with the process of blocking calls, messages, and contacts on the iPhone, but have you ever wondered if YOUR number or messages have been blocked? While Apple makes the blocking feature for texts and calls fairly subtle, and blocked calls can even still leave voicemails, there are a few ways you can try to determine if someone has blocked your number on iPhone. Read on to learn more!
How to Know if Someone Blocked Your Number on iPhone
There are a few ways you can potentially determine if your phone number has been blocked by an iPhone user. We’ll show you a few ways to help figure it out.
Note that you have been blocked by the recipient iPhone, that recipient iPhone will not ring or make any notification or sound that you have called, nor sent them a message, nor left a voicemail. From the end that is doing the blocking, their iPhone stays silent and undisturbed by an inbound blocked call.
Method 1: Check for Call Block by Calling the iPhone
If you have been blocked by someone with an iPhone, then calling the iPhone results in one ring, or no ring at all, before hearing a generic message stating that the person is not available.
If the recipients iPhone has voicemail setup, the call is then directed to voicemail. (And yes, blocked callers can still leave voicemails, and you can check voicemails from blocked callers on iPhone too with these instructions).
If you hear multiple rings and eventually get to voicemail, most likely your call and number has not been blocked.
Important: getting sent to voicemail does not always mean you’re blocked!
Note that quickly getting sent to voicemail when you call someone does not necessarily mean your number or iPhone has been blocked, it can also mean a number of other things, including:
The recipient is actively on another phone call that is connecting or the line is otherwise busy
The recipient is in an area with low cell service coverage, or no cell service coverage
The recipients phone is powered off, or in the process of rebooting
The recipients iPhone does not have cellular service, or there is some other issue with the network
There is a cellular network outage or something similar
They may have their iPhone on Do Not Disturb mode (calling twice in a row sometimes gets through Do Not Disturb so you can try that too, especially if Emergency Bypass is enabled)
They may have limited inbound calls to Favorites or just Contacts or a contacts group, which is sometimes used to prevent junk calls and unknown calls
Your call was sent to voicemail manually on their iPhone
There are other reasons you may get sent to voicemail quickly too. Don’t assume getting someones voicemail is because you have been blocked by the person.
Method 2: Sending Text or iMessage to the iPhone Number to Check for Block
You can also try to check if your number has been blocked by sending the person a message.
If the iMessage never shows a “Delivered” or “Read” message, and it’s still blue, then you may have been blocked – but not always.
If the iMessage goes through and shows a “Read” receipt, then you have definitely not been blocked. Remember that Read Receipts can be disabled completely, or enabled broadly, or enabled on a per contact basis, but there is no way to determine which is the case unless you have specifically discussed it with the recipient or checked the settings on their iPhone (or iPad).
If the iMessage goes through and shows a “Delivered” message, then you have probably not been blocked.
If the iMessage fails to send and after repeated attempts at sending the message, and if the message turns green rather than blue, the person may have no cellular service, has no data connection, has a problem with their cell service, has a problem with their iPhone, has iMessage turned off, uses an Android phone (or other platform), or possibly has their iPhone turned off or is in the process of rebooting. There are many reasons why someones iMessages may not be working, and it’s no indicator of being blocked by the person.
Remember, when messages are being sent as green instead of blue, that means the phone is attempting to send a traditional SMS text message instead of an iMessage.
How can I find out exactly what happens if someone blocks my number on an iPhone?
There is no perfect solution or guaranteed way to find out if someone has blocked your iPhone without actually seeing their blocked contact list, but the next best thing is to setup a test for yourself.
A quick test is pretty easy as long as you have a friend or family member with another iPhone. Simply block the number of your iPhone from their device, then call it and send it a text message or iMessage. You’ll discover that you’re either sent to voicemail, or the messages just appear to go nowhere. Just be sure you unblock the number when you’re finished with the test so that you can actually get through to the person you tested this out with later.
Want to turn off iPhone for whatever reason? Newer iPhone models have a different method of shutting down the device to turn off the iPhone compared to earlier model devices. This article will show you how to turn off iPhone XS Max, iPhone XS, iPhone XR, and iPhone X.
Note that turning off the iPhone literally turns it off completely by shutting it down. When the device is powered off it will not be able usable in any way until it is turned back on again.
How to Turn Off iPhone XS, XS Max, XR, X
Turning off a newer model iPhone without a Home button is accomplished by holding down a button sequence to access the power off option. Here is how to turn off iPhone XS Max, XS, XR, and iPhone X:
Hold down both Volume Up button and Power / Lock button until you see “Slide to Power Off” at the top of the iPhone display
Swipe the slider right on the “Slide to Power Off” option to turn off the iPhone
The iPhone will power down and turn off completely. It will stay turned off until it is turned back on again.
Another Option for Turning Off iPhone: Shut Down via Settings
Another option is to shut down the iPhone or iPad through Settings, which does not require pressing any hardware buttons, but does still require using a slide to power off gesture:
Open the “Settings” app then go to “General”
Scroll down to the bottom of General settings and tap on “Shut Down”
Swipe on “Slide to Power Off” to shut down the iPhone
How to Turn On iPhone XS, XS Max, XR, X Again
If the iPhone is turned off, you can turn it back on again using either of the following methods:
Pressing the Power / Lock button on the side of the iPhone
Plugging it into a power source
These methods of turning the shut down iPhone back ON apply to all iPhone models, including iPhone XS, XS Max, XR, X, and even other iPhone models like iPhone 8, 8 Plus, 7, 7 Plus, 6s, 6s Plus, 6, 6 Plus, SE, 5S, and prior iPhones too.
If the iPhone won’t turn on, then read these troubleshooting steps to fix that. Note that hardware damage can prevent an iPhone from turning back on again, so if the iPhone is damaged or destroyed then it may need repair first.
Turning off the iPhone and turning it back on again can also be used as a method to perform a soft reboot of the iPhone. Hard reboots are immediate and less graceful and are a different process, though performing a hard reboot differs per iPhone (and iPad) model. If necessary you can read how to force reboot iPhone XS, iPhone XS Max, and iPhone XR, iPhone X, iPhone 8 and 8 plus, 7 and 7 plus, force restarting iPad Pro, and how to force reboot all iPhone or iPad with clickable Home buttons which includes basically all older model devices and all modern devices where the Home button can physically be pressed down.
Do you like using Safari Reader View on the iPhone or iPad when reading a particular webpages articles or stories? Reader View in Safari can make webpages easier to read in some situations, and if you use the feature for some websites, or all of the web, you might appreciate enabling Automatic Reader View in Safari for iOS.
With this Automatic Reader View enabled in Safari for iOS, Safari will automatically enter into Reader Mode, either for specific website URLs as chosen, or for all web sites.
How to Enable Automatic Reader View in Safari for iPhone or iPad
Want to enable Reader View automatically, either on a particular website or for all websites? Here’s how to do that in iOS:
Open Safari in iOS, then visit the website URL you want to use Automatic Reader View for
Tap and hold on the Reader button in the URL bar at the top of the Safari screen
When the ‘Automatic Reader View’ option shows up, choose one of the following: “Use on (current domain)” or “Use on All Websites”
Browse the web as usual with the settings in place
If you choose “Use on (current domain)” then anytime you load that particular website in Safari for iOS, Reader View in Safari will enable itself automatically, but only for that website domain.
If you choose “Use on All Websites” then every web site will load into Reader View automatically in Safari for iOS.
Most users will probably want to limit this feature to specific websites and domains that are either not optimized for their device or screen, or otherwise difficult to read for some other reason. That way every time such a website is visited, the Reader mode feature will trigger and legibility and readability should improve (remember you can customize the appearance of Safari Reader).
Automatic Reader View will use the last settings that were defined for the appearance of Safari Reader Mode, so if you want to change the text size, color theme, font face, or other aspects of the Safari Reader experience you can do so as described here and have those customizations carry over to the Automatic Reader mode too.
This is a particularly helpful feature for viewing webpages on the iPhone that are not mobile optimized or that don’t have a mobile website, since Safari Reader View tends to improve legibility in those situations by boosting font size and focusing on the webpages content.
How to Disable Automatic Reader View in Safari for iOS
If you had previously turned on Automatic Reader View and would now like to change that setting in iOS, here’s how to do so:
Open Safari in iOS, then visit the specific website URL that you want to disable Automatic Reader View for
Tap and hold the Reader button at the top of the Safari screen
When the ‘Automatic Reader View’ options appear, choose one of the following: “Stop Using on (current domain)” or “All Websites”
Use Safari with the previously set Reader settings disabled
These settings obviously pertain to iOS Safari for the iPhone and iPad, but the feature exists on the Mac version of Safari as well, where it can also be set to activate on individual websites or all websites, and the Reader appearance customized as needed on the Mac too.
Safari Reader Mode has been around for a while and is really quite useful, even if you don’t use it for reading certain webpages it can be useful for other purposes like printing out webpage articles without ads and other extraneous page content.
Don’t want the Emoji button on the iOS keyboard and wish it were gone? You can remove the Emoji button from the keyboard on iPhone and iPad, and by doing so you are effectively turning off Emoji in iOS so that it can’t be typed, nor can the Emoji keyboard be accessed. Disabling the Emoji button from the iOS keyboard can be desirable for many reasons, particularly if you accidentally hit the Emoji button and find that annoying, or if you simply never use Emoji and want to get rid of the smiley face button on the keyboard of iPhone or iPad.
We’ll show you how to remove the Emoji button from the iPhone and iPad keyboard, and also how to return the Emoji functionality back to the iOS Keyboard if you decide you want the Emoji button back again.
Note that if you remove the Emoji button from iOS keyboard then you will not be able to type Emoji on the iPhone or iPad because there is no longer any way to access the Emoji keyboard, unless you reverse this settings change.
How to Turn Off Emoji & Disable Emoji Button on iOS Keyboard
To remove the Emoji button from the keyboard, you must disable and remove the Emoji keyboard from iOS in general. Here’s how this is done:
Open the “Settings” app on iPhone or iPad
Go to “General” and then to “Keyboard”
Choose “Keyboard”
Tap the “Edit” button in the corner of Keyboard settings
Now tap the (-) red minus button next to “Emoji”
Tap on the “Delete” button next to Emoji
Tap “Done” or exit Settings
Now if you open any app on iPhone, iPad, or iPod touch that allows you to type and shows a keyboard, like the Messages app, Notes, Pages, or anywhere else where typing in iOS is possible, you will find the Emoji button has been removed.
By removing the Emoji keyboard, you no longer have the Emoji button on the iOS keyboard, which means you can’t type Emoji on the device. Currently there is no way to remove the Emoji button from the keyboard without also removing the entire Emoji keyboard itself, which basically disables Emoji completely on the iPhone or iPad (though anyone can continue to send you Emoji, and your iOS device will continue to render and show Emoji).
If you’re turning off the Emoji button on iOS keyboard because you are accidentally hitting it, or because you never use it, or because you find the keyboard too cluttered, you might also appreciate removing the microphone button from the iPhone and iPad keyboard too. If you remove both the Emoji button and microphone button from the iOS keyboard, the space bar takes up the available space, and for some users they may find that easier to type with.
How do I get Emoji button back on the iPhone or iPad Keyboard?
If you disabled the Emoji button and Emoji keyboard but decide you want that smiling face button back so you can type your favorite Emoji again, you can enable the Emoji keyboard on iPhone or iPad again easily with these instructions or by doing the following:
Open the “Settings” app then go to “General” and “Keyboard”
Choose “Keyboards” then “Add New Keyboard” and select “Emoji” to add, this will return the Emoji button to the iOS keyboard
You must re-add the Emoji keyboard to the iOS Keyboard settings in order to regain access to the Emoji button on the keyboard of an iPhone or iPad, as well as to regain access to the Emoji keyboard in iOS and the smiley face button.
Like basically all settings in iOS, these changes are easily reversed and adjusted at anytime.
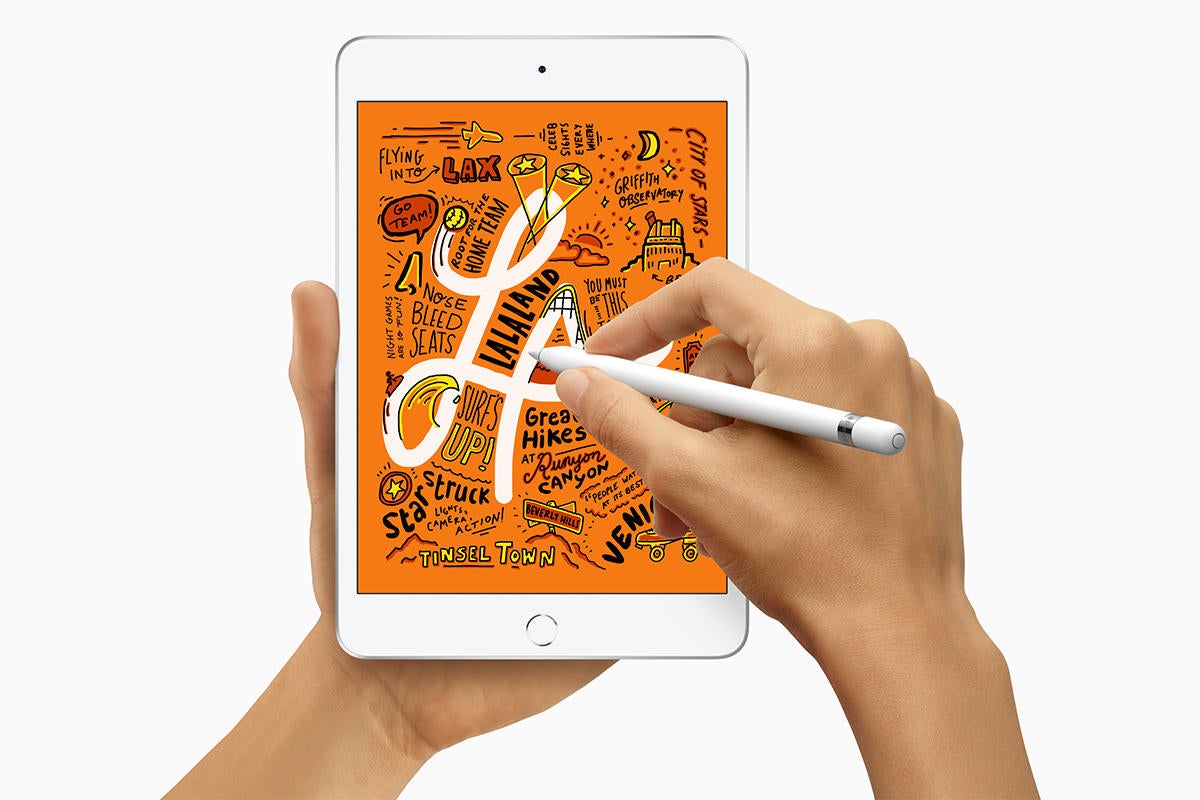
Apple has released two new hardware updates to the iPad lineup; a new iPad Air 10.5″ model, and an updated iPad mini 7.9″ model.
The new iPad models will be appealing to many users for differing reasons, as the iPad Air 10.5″ is a step closer to an iPad Pro in many ways, while the iPad mini 7.9″ is the smallest and most portable iPad.
Both the new iPad Air 10.5″ and iPad mini 7.9″ feature an A12 CPU, Touch ID, support for the 1st generation Apple Pencil (but not the new 2nd generation Apple Pencil), a laminated display, and start at 64GB storage capacities with a maximum of 256GB storage available for each. Each model can also be purchased with optional LTE cellular connectivity for an added cost.
With the addition of the new iPad Air (3rd generation) and iPad mini (5th generation), this means that Apple is now selling five different screen size iPads, including the iPad Pro 12.9″ model, iPad Pro 11″ model, the iPad Air10.5″ model, the iPad 9.7″ model, and the iPad mini 7.9″ model, with each iPad size also coming in three different color options, possible LTE cellular connectivity, multiple storage capacity configurations, and at different price points. For consumers looking to differentiate one model from another, the official iPad comparison tool on apple.comcan help.
Regardless of what iPad you go for, if you want an Apple Pencil to go along with it then be sure you get the proper Apple Pencil for the specific iPad model. This is important, because the older1st generation Apple Pencil works with the new iPad Air, iPad mini, iPad, and older iPad Pro, but does not work on the new iPad Pro (2018), whereas the new 2nd generation Apple Pencildoes not work on the new iPad Air, iPad, iPad mini, or older iPad Pro models, while it does work on the new iPad Pro (2018). Basically you want the older Apple Pencil for the new iPad models unless the iPad is a new iPad Pro, in which case you want the new Apple Pencil for the new iPad Pro only.
iPad Air: What’s new
Let’s kick off with what’s new with the iPad Air, which we thought was effectively replaced with the 10.5-inch iPad Pro in 2017. In essence, this is the iPad Air 3, but much as with the iPad mini, Apple’s dropping the numerals. It’s now just the iPad Air.
The price sees a welcome change, as Apple now sells it for a starting price of $499 instead of the $649 we saw with the iPad Air 2. There’s also a change in storage options, as Apple only sells the new iPad Air in 64GB and 256GB configurations. Before, you could buy the iPad Air 2 with 16, 32, 64, and 128GB options. It’s a smart move for a more data-hungry age.
The tablet is also bigger—insomuch it has the same 9.8 by 6.8-inch frame as the 2017 10.5-inch iPad Pro. For comparison, the iPad Air 2 measured 9.4 by 6.67 inches. And much like the old iPad Pro, the new iPad Air supports the first-generation Apple Pencil. That could be a big deal if you don’t want to pay iPad Pro prices but don’t like the smaller screen of the 9.7-inch iPad—or the new 7.9-inch iPad mini.
The iPad Air essentially looks like an older iPad Pro now.
I especially like that the new iPad Air sports the A12 Bionic processor found in the iPhone XS and XR, which marks a massive jump from the A8X chip in the iPad Air 2. Keep in mind, though, that it’s not quite as fast as the A12X chips that we find in the 2018 iPad Pros.
The display has changed, too, as the resolution is now 2224 by 1668, up from 2048 by 1536. It’s also packed with Apple’s TrueTone technology that adapts to ambient light in order to deliver a more natural viewing experience. That display is also laminated, which effectively means the glass sits on top of the display. When you use an Apple Pencil, it makes for an experience that feels slightly more like writing on paper than what you’ll get with an unlaminated display. Unfortunately, the iPad Air didn’t inherit the iPad Pro’s ProMotion 120Hz refresh rate, which makes everything from Apple Pencil strokes to scrolling through webpages a bit smoother.
The iPad Air is also brighter, as it delivers 500 nits of brightness versus the 415 in the older model. That’s great if you often have to use your iPad in the sunlight. And last but certainly not least, the front-facing FaceTime camera got a big boost from 1MP to 7MP.
iPad Air: What isn’t new
That’s a lot of good stuff, especially when you compare it to the iPad Air 2. When you compare to the 10.5-inch iPad Pro, though, the truth is that we’re basically looking at an iPad Pro from 2017 with a better chip. In other words, if you got a 10.5-inch iPad Pro two years ago, you may not need to upgrade.
The A12 Bionic chips allow the new iPads to take better advantage of augmented reality apps.
The new model still has a home button with Touch ID, and I think that’s a bit of a bummer as the latest iPad Pros have taught me that Face ID is even better suited for iPads than iPhones. It’s still LED backlit, so don’t expect the super cool OLED displays you find in the new iPhones. Even the new iPad Pro doesn’t have that. While the FaceTime camera got a boost, the rear camera hasn’t changed much, as it still has an 8MP rear camera like the iPad Air 2. It’s still got a 3.5mm headphone jack, it’s still available in space gray, silver, and gold, and it still gives you a battery life of around 10 hours. And it still supports Lightning cables instead of USB-C.
iPad mini: What’s new
Let’s move on to the new iPad mini. A lot of you have been waiting for this one for a long time, and as you might expect after a four-year wait, it’s a massive improvement over the iPad mini 4. What’s new?
First off, much as with the iPad Air, this is now simply called iPad mini—even though it’s essentially the iPad mini 5. It also sports the A12 Bionic processor, and that’s enough of an upgrade from the A8 chip to give you around three times the graphics processing power of the iPad mini 4.
It’s also got a laminated display and first-generation Apple Pencil support like the iPad Air, along with support for Apple’s TrueTone technology. It even has a wider P3 color gamut, and Apple says its pixel density of 3 million is the highest of any iPad. The display itself is 25 percent brighter at 500 nits, up from the 450 in the iPad mini 4.
At this point, you’re almost using a digital Moleskine notebook.
The camera remains at 8MP, but the newer model reportedly offers better low-light performance and HD video recording. And here again we see the boost to 7MP from 1MP in the front-facing camera.
The iPad mini 4 only sold in a 128GB configuration, but the new iPad mini comes with both 64GB and 256GB storage options. For that matter, it now supports the same Wi-Fi and gigabit-class LTE speeds you’ll find in new iPads.
iPad mini: What isn’t new
What hasn’t changed? For one, there’s the starting price, which remains the same as the iPad mini 4 at $399. I’d be annoyed with that considering that the 9.7-inch iPad supports the Apple Pencil and gives you more screen space for $329. Nonetheless, this delivers a lot of upgrades for people who want a smaller iPad.
As for the display, it may have that TrueTone tech and the wider P3 color gamut, but the 7.9-inch display itself still has a resolution of 2046 by 1536. Like the iPad Air, it also doesn’t support ProMotion.
In fact, I’ll probably have a hard time telling the iPad mini 4 apart from the NEW iPad mini when we get ours. It still has the same 8 by 5.3-inch frame, a home button that supports Touch ID, and support for Lightning cables instead of USB-C. And yes, it still comes in space gray, silver, and gold, and it still delivers around 10 hours of battery life.
As you may have noticed, a prominent microphone button is visible on the iOS keyboard for iPhone and iPad, which when tapped will use voice-to-text to dictate spoken text to the iOS device in lieu of typing. Some users may never use the microphone button, while others may accidentally tap on the mic button, in which case it can be desirable to remove the microphone button from the keyboard on iPhone and iPad completely.
Note that you can not simply hide and show the microphone button from the keyboard on iOS as needed, but you can remove the microphone button completely by disabling a separate feature. Essentially this means you’ll be removing the microphone button by turning off a text-to-speech capability in iOS, and that’s what we’re going to show you how to do here as a way to hide the mic / dictate button from the onscreen keyboard.
How to Remove Microphone Button from Keyboard on iPhone or iPad
Open the Settings app in iOS
Go to “General”
Now go to “Keyboard”
Scroll down and locate “Enable Dictation” and toggle that button to the OFF position
Confirm that you want to disable Dictation by choosing ‘Turn Off Dictation’, this will remove the microphone from the iOS keyboard
Exit out of Settings as usual
Now anytime you access the keyboard on iPhone or iPad, the prominent microphone / dictation button will no longer be visible, or available.
If you decide you want the microphone and dictation button back again on the keyboard of iPhone or iPad, simply toggle the Dictation feature back on again.
Note this settings change will not impact the microphone in the Messages app that is within the text-entry field, a separate feature which allows for sending voice audio messages in iOS. That can be a little confusing to have two microphones on the same keyboard, but they have different functionality.
Most iOS users will likely want to leave Dictation enabled and keep the microphone on the keyboard of iPhone or iPad because it’s useful, but if you don’t find the feature to be helpful or you hit it accidentally, disabling it can be reasonable too.
Why is the microphone button missing from my iPhone / iPad keyboard?
If you do not have a microphone button on the keyboard of iPhone or iPad, it likely means the device does not have dictation enabled to begin with. Another possibility is that the iOS device or iOS version does not support dictation, though that’s less likely given the feature has been around for quite some time.
If you don’t have the microphone button on iPhone keyboard but you want to have it for dictating text, simply reversing the above settings change and enabling Dictation will regain the microphone button the iOS keyboard.
Like nearly all iOS settings changes, these adjustments can be made at anytime, as disabling or enabling Dictation in iOS is just a matter of adjusting the appropriate toggle in the Settings app.