Apple this year made some significant changes to Safari with iOS 15, which has been repaginated with a new unified address bar at the bottom of the screen. While this change upset a number of iOS users, Samsung is now following Apple with a new option to move the address bar of its mobile web browser to the bottom — just like Safari.
The new layout was added with an update to the Samsung Internet beta app, which is now available for the company’s Android smartphones.
By going to the Layout and Menu settings in the browser preferences, there’s now an “Address bar position” option. There, users can choose between the classic web browser layout and the new one with the unified address bar at the bottom of the screen.
With the “Bottom” option enabled, the Samsung Internet app looks quite similar to Safari in iOS 15. The address bar is displayed on top of the navigation controls and buttons for managing tabs, sharing, and other app settings.
well gee samsung, I wonder why you suddenly decided to add this option now to your browser, I just can't fathom a guess pic.twitter.com/WTTI98OwQv
It’s worth noting that Apple wasn’t the first company to try out a similar layout for a mobile web browser, as other companies such as Google have tried this years ago. However, Samsung seems to have decided to change the layout of its web browser soon after Apple did so.
After several complaints, Apple let users revert Safari to the old design in iOS 15, although the new layout still comes enabled by default. The company has also released updates to the iPadOS and macOS versions of Safari that reverts the controversial design changes.
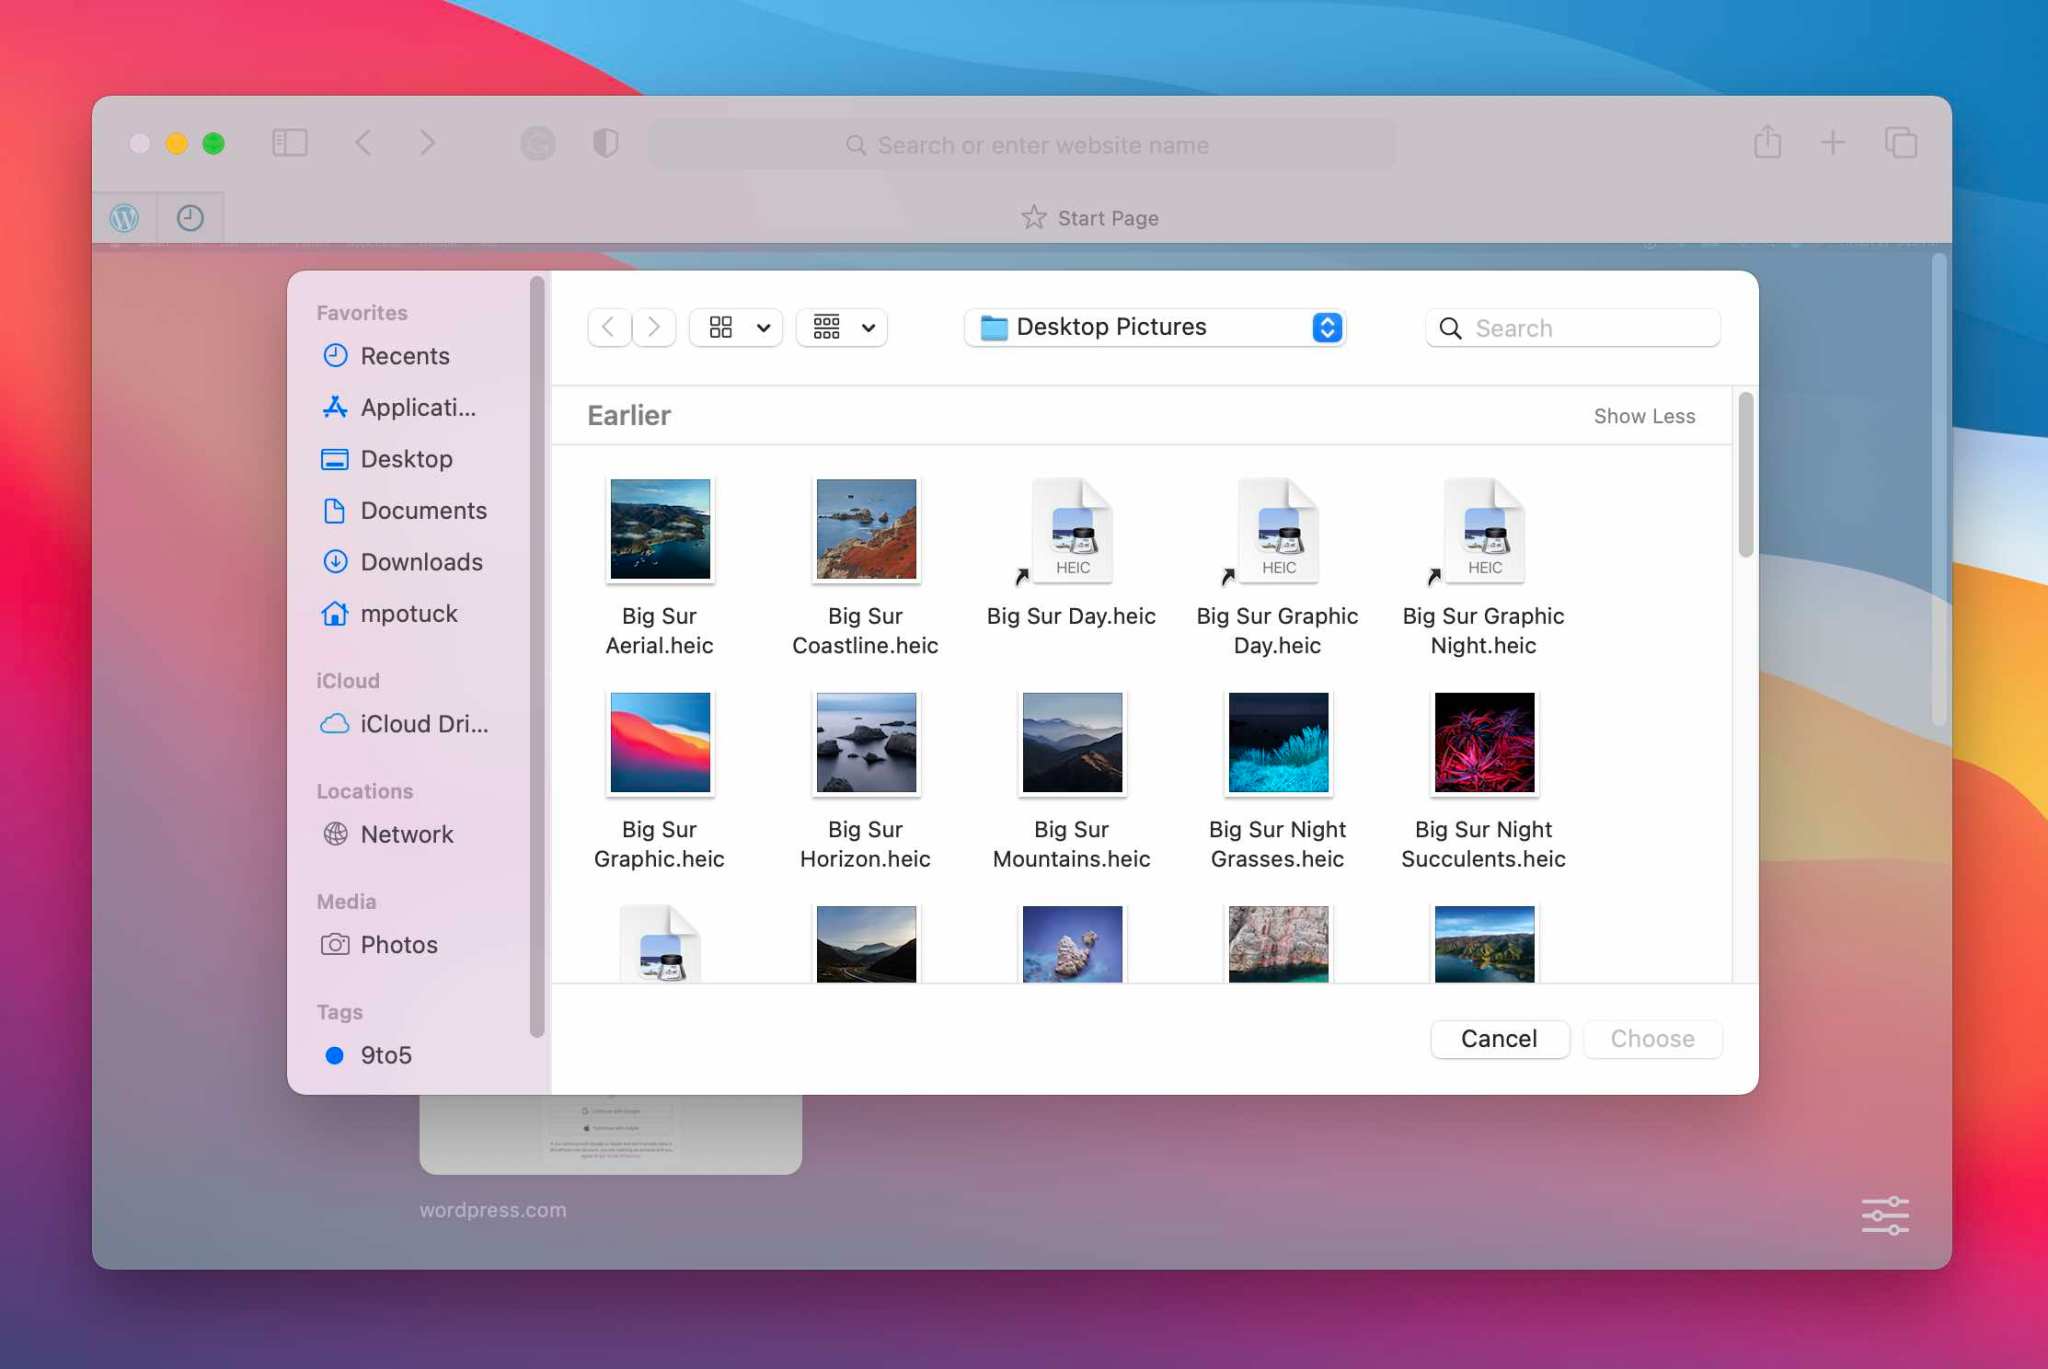
macOS Big Sur comes with some major changes and Safari 14 includes a number of enhancements. One of the simple but nice aesthetic changes is the option to set your own image for Apple’s browser. Read on for how to set custom Safari backgrounds.
Safari 14 comes with macOS Big Sur (released for Catalina too) and brings a lot of great features like 4K support for YouTube, Apple’s new translation integration, performance improvements, and a new start page. The start page is where you can set a custom Safari background.
Let’s look at two ways to do this…
How to set custom Safari backgrounds with macOS Big Sur
The fastest option if you already have the image you want to use is to drag and drop it on the Safari start page
Alternatively, you can right-click on the start page in a blank area and click “Choose Background…”
Now you can search Finder to select an image
If you want to clear you custom Safari background, right-click on the start page background and choose “Clear Background”
Here’s how the process looks:
Drag and drop an image to set a custom Safari background
And here’s the right-click option to set custom Safari backgrounds:
Wondering how to download and save PDF files from Safari to a Mac? If you frequently encounter and work with PDF documents on the web, you might be interested in saving them locally to your Mac from time to time. With Safari, it’s easy to open, save, and download PDF files to the Mac.
The process is quite simple as this tutorial will demonstrate through several different ways to download PDF files to save them to the Mac from Safari.
You may have noticed that default Safari will automatically open PDF files that are clicked into in-browser windows. That can confuse some users at first, but it ends up being OK because if we’re looking to save a PDF file that makes it very easy to do as you’ll see.
How to Download & Save PDF Files from Safari to Mac
Opening PDF files in Safari on the Mac allows them to be easily downloaded and saved to the computer, here’s how the process works :
Open Safari on the Mac if you haven’t done so yet
Go to the PDF file in Safari that you want to save to the Mac
With the PDF file open in Safari, pull down the “File” menu and choose “Save As”
Name the PDF file and select the destination to download the PDF file to and then click “Save” to download and save the PDF file locally to the Mac at that destination
In the example image here, we’re downloading a PDF document of a study
If you want to download a linked PDF file in Safari to the Mac, that works the same as downloading any other linked item in Safari on the Mac :
Right-click on the PDF file link and choose “Download Linked File As”
Save the PDF file to the Mac destination as desired
You can use either method to download and save PDF files to the Mac.
How to Download & Save Linked PDF Files in Safari with Option Key
Another neat download trick for Safari that is lesser known is to hold down the OPTION key and then click the link to the PDF, or refresh the current URL if the PDF page is already open in Safari.
That will also download the PDF document directly into the Downloads folder as configured by Safari.
Note that saving a PDF file from Safari is completely different from saving a webpage as a PDF in Safari on Mac, the latter of which actually preserves the webpage as a PDF file and also saves it locally. It’s a bit redundant, but you can technically use that same save-as-pdf approach to an existing PDF too, which may be helpful in some situations if the PDF file you are trying to save is stuck in an iFrame or something similar that prevents easy access to opening, downloading, and saving the file directly.
And yet another neat trick; if you happen to forget where you got a particular PDF from but you want to know the source URL, you can retrieve a files original direct download URL using this Safari trick.
Remember that Safari defaults to using the User Downloads folder on the Mac, but you can change the Safari download location if needed to suit your preferences.
These methods work on practically all versions of Safari for basically all versions of MacOS and Mac OS X, so it shouldn’t matter what software release you are on you will be able to open, download, and save PDF files to the Mac locally if needed.
Have you deleted or lost Safari bookmarks from iPhone, iPad, or Mac somehow? If so you can use a procedure we’ll outline here to restore and recover lost Safari bookmarks back to your device.
Most iPhone and iPad owners make use of Safari to browse the web, and creating bookmarks of favorite sites (like SydneyCBD.repair of course) is a common procedure. Since it’s the web browser that comes pre-installed on iOS and iPadOS, Safari works seamlessly with other devices in the Apple ecosystem, and iCloud can help sync your bookmarks too.
Bookmarks, History, and other data are synced automatically across your devices as long as iCloud is enabled, so regardless of whether you’re browsing on your iPhone, iPad, or a MacBook, all your Safari data is readily available. However, it’s always possible to to accidentally delete a bookmark, or have some other action occur where you lose your Safari bookmarks.
Did you lose your bookmarks in Safari for whatever reason? Perhaps after an accident, a corrupted iOS update, some other error on the device? If so, look no further. Thanks to Apple’s iCloud service, it’s fairly easy to restore your lost Safari bookmarks data. In this article, we’ll be discussing how you can recover all your lost Safari bookmarks using iCloud using a process similar to restoring lost contacts with iCloud, restoring lost Calendars and Reminders with iCloud, and recovering lost iCloud Drive documents and files.
How to Recover Lost Safari Bookmarks with iCloud
By default, iCloud backup is enabled on all Apple devices, so restoring your bookmarks shouldn’t be a tedious process. However, if you ever manually disabled backups at some point for whatever reason, this procedure will not help you recover your lost Safari bookmarks data.
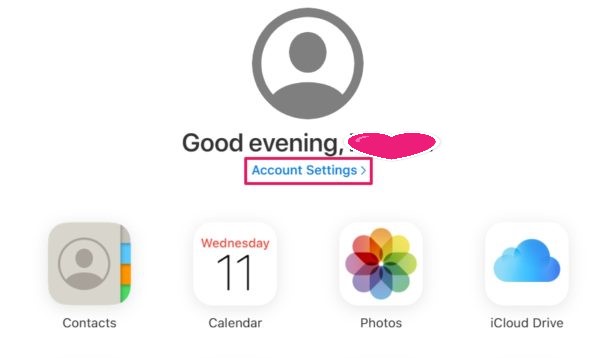
Open any web browser like Chrome, Safari, Firefox, etc. from your PC, Mac, or iPad and head over to iCloud.com. Sign in to iCloud by clicking on the “arrow icon” once you’ve typed in your Apple ID and password.
Click on “Account Settings” once you’re in the iCloud homepage.
Here, just click on “Restore Bookmarks” under the Advanced section located at the bottom of the page, as shown in the screenshot below.
You’ll get a new pop-up window where iCloud will start searching for the Safari bookmarks that are stored on the cloud. Wait for a few seconds. Once the search is complete, you’ll get a list of all the bookmarks that can be restored. Simply select the bookmarks which you want to recover by checking the boxes and click on “Restore” as shown in the screenshot below.
The restoration process will take a few seconds to finish. Once it’s done, the window will display how many bookmarks were restored in the process. Click “Done” to close this window and end the procedure.
Those are the steps required to recover and restore your lost Safari bookmarks.
This recovered data will be accessible immediately across all your supported Apple devices, as long as they’re logged into the same iCloud account, which is one of the many reasons you must use the same Apple ID on all of your own personal devices.
To use the data recovery features available on iCloud.com, you need to use the iCloud.com desktop site, meaning you can use an iPad or computer that features a desktop-class web browser. You can also use this trick to access and login to iCloud.com from iPhone with full access by requesting the desktop site. If you’re trying to perform this restoration process on your iPhone’s mobile browser without requesting the desktop site, you’re out of luck. It’d be reasonable to expect Apple to add this functionality to mobile devices at some point down the line however, so that limitation may change in the future..
By default, Apple provides 5 GB of free cloud storage with every iCloud account. As long as you’re not backing up tons of files and photos, this should be adequate to store most of basic stuff like bookmarks, documents, files, contacts, calendars, and other data on Apple’s cloud servers. If you do need to update to a larger iCloud storage capacity, they’re available at monthly costs of $0.99, $2.99 and $9.99 for 50 GB, 200 GB and 2 TB storage space respectively.
For the majority of users, you’ll want to have iCloud backups enabled, so unless you have serious privacy concerns or some other compelling reason it may be a good idea to shell out for an iCloud paid plan if needed to backup your devices.
The convenience that iCloud brings to the table and how it works seamlessly across iOS and macOS devices is simply unmatched. Users don’t have to heavily rely on physical storage anymore, as valuable information like contacts, photos, files, etc. are automatically backed up to the cloud when their devices are turned on and connected to power. You can always manage your iCloud backups too from the devices, if you need to delete an iCloud backup from iPhone or iPad for example to make space for a fresh backup.
Wondering how to switch back to a mobile site after requesting a desktop site in Safari for iPhone? You may have noticed there’s not a “Request Mobile Site” option in Safari on iPhone and iPod touch, but changing back to the mobile version of a desktop site is quite simple on iPhone with Safari as we’ll show you in this tutorial.
As you likely know, many websites serve a mobile-specific version to smaller screened devices like the iPhone or iPod touch. But sometimes users will use the “Request Desktop Site” feature in Safari for iPhone to view the full version of a website rather than a mobile site. But how do you switch back to the mobile site again? That’s easy, here is all you need to do :
How to Switch from Desktop Site Back to Mobile Site with Safari for iPhone
Returning to the mobile version of a website in Safari on iPhone is simply a matter of closing the tab and opening the website again :
From Safari on iPhone, go to the desktop webpage that you want to view the Mobile Site for
Tap on the Tabs button in Safari and then close that webpages tab while it’s still in Desktop Site view (optionally, you may want to copy the URL first for easy retrieval)
Now open a new Safari tab and go back to the website URL you just closed, it will load automatically in Mobile Site view
Simply closing the Safari tab on iPhone and re-opening the webpage will switch it back to the Mobile Site default view.
Alternatively, you can also delete the specific sites website data in Safari Settings on iPhone and then refresh the website to accomplish the same thing. Doing that will also refresh the webpage into Mobile Site from Desktop Site, as the default user agent on iPhone is for a mobile device.
While we’re obviously focusing on iPhone here, this process is the same on iPod touch and iPad too, though most websites will show an iPad the full desktop version of a website rather than the mobile site anyway.
Currently this is how you switch from the desktop site back to a mobile site, and while it would make a lot of sense for the iOS “Request Desktop Site” option to switch to a “Request Mobile Site” option in the Sharing action menu, for now that feature does not exist. Instead, you’ll want to just close the tab and then open it again to achieve the same result.
This is probably mostly relevant for web workers, but sometimes regular users find themselves having to switch between desktop sites and mobile sites too.
Safari on the Mac can resume stopped downloads and restart failed downloads rather easily. For example, if you were downloading Xcode from Apple but your internet connection was interrupted and the download stopped, you can resume the download where it left off rather than restart the entire download over again. This is a great way to restart and resume incomplete downloads, regardless of the reason the file download failed, was interrupted or otherwise halted, and it’s available in the Safari download manager on Mac OS.
How to Resume Incomplete Downloads in Safari on Mac
From Safari on the Mac, click the Downloads button in the Safari toolbar, it looks like an arrow pointing downwards
Locate the stopped, stalled, or failed download, then click the orange circular arrow button to attempt to restart the download
The file should resume downloading where it was otherwise interrupted
Once the file, archive, image, or whatever else has completed downloading, it will appear in the Downloads folder on the Mac.
Note that Safari defaults to downloading things into the user Downloads folder, but you change the Safari download location on Mac if desired. Thus if you had previously changed the download location, you’d need to find the item there instead.
If you do need to start the download over from scratch, often an easy way to do that is to copy the downloaded files original direct download URL from Safari and simply paste that address back into the URL bar. Note that approach doesn’t always work with randomly generated CDN address downloads however. Similarly, you can find out where a file was downloaded from on the Mac by using Get Info in the Finder on the file, even if the file is only partially downloaded and incomplete.
Some other web browsers also support file download resuming as well, including Chrome, though how you go about resuming downloads in Chrome is different than what is discussed here in Safari.
Do you like using Safari Reader View on the iPhone or iPad when reading a particular webpages articles or stories? Reader View in Safari can make webpages easier to read in some situations, and if you use the feature for some websites, or all of the web, you might appreciate enabling Automatic Reader View in Safari for iOS.
With this Automatic Reader View enabled in Safari for iOS, Safari will automatically enter into Reader Mode, either for specific website URLs as chosen, or for all web sites.
How to Enable Automatic Reader View in Safari for iPhone or iPad
Want to enable Reader View automatically, either on a particular website or for all websites? Here’s how to do that in iOS:
Open Safari in iOS, then visit the website URL you want to use Automatic Reader View for
Tap and hold on the Reader button in the URL bar at the top of the Safari screen
When the ‘Automatic Reader View’ option shows up, choose one of the following: “Use on (current domain)” or “Use on All Websites”
Browse the web as usual with the settings in place
If you choose “Use on (current domain)” then anytime you load that particular website in Safari for iOS, Reader View in Safari will enable itself automatically, but only for that website domain.
If you choose “Use on All Websites” then every web site will load into Reader View automatically in Safari for iOS.
Most users will probably want to limit this feature to specific websites and domains that are either not optimized for their device or screen, or otherwise difficult to read for some other reason. That way every time such a website is visited, the Reader mode feature will trigger and legibility and readability should improve (remember you can customize the appearance of Safari Reader).
Automatic Reader View will use the last settings that were defined for the appearance of Safari Reader Mode, so if you want to change the text size, color theme, font face, or other aspects of the Safari Reader experience you can do so as described here and have those customizations carry over to the Automatic Reader mode too.
This is a particularly helpful feature for viewing webpages on the iPhone that are not mobile optimized or that don’t have a mobile website, since Safari Reader View tends to improve legibility in those situations by boosting font size and focusing on the webpages content.
How to Disable Automatic Reader View in Safari for iOS
If you had previously turned on Automatic Reader View and would now like to change that setting in iOS, here’s how to do so:
Open Safari in iOS, then visit the specific website URL that you want to disable Automatic Reader View for
Tap and hold the Reader button at the top of the Safari screen
When the ‘Automatic Reader View’ options appear, choose one of the following: “Stop Using on (current domain)” or “All Websites”
Use Safari with the previously set Reader settings disabled
These settings obviously pertain to iOS Safari for the iPhone and iPad, but the feature exists on the Mac version of Safari as well, where it can also be set to activate on individual websites or all websites, and the Reader appearance customized as needed on the Mac too.
Safari Reader Mode has been around for a while and is really quite useful, even if you don’t use it for reading certain webpages it can be useful for other purposes like printing out webpage articles without ads and other extraneous page content.
Modern versions of Safari for Mac include favicon (favorite icon) support, offering a visual indicator of webpages in the titlebar and tab bar of the Safari browser. Nearly every other web browser on the Mac (and other operating systems) has had favicon support for quite some time, but this is a relatively new addition to Safari and to show the website icons in Safari for Mac you must first enable favicon support in preferences as the feature is not enabled by default.
For some quick background, most websites have favicons that help to differentiate a website URL when a site is active in a browser, bookmarked, or favorited. The small favicon is next to the webpages name when shown in a tab or window of a web browser.
How to Enable Website Icons / favicons in Safari for Mac
Open the Safari app on the Mac if you haven’t done so already
Pull down the Safari menu and choose “Preferences”
Choose “Tabs”
Toggle the switch for “Show website icons in tabs” so that it’s checked and enabled
Close out of Safari preferences
The website icons are immediately visible in any tabbed window in Safari or bookmark bar of Safari. Just look at the top of the tabs section of a Safari browser window to see the favicons.
Of course if you decide you don’t like favicons in Safari, you can hide them again just as easily as you enabled them.
How to Hide / Disable Website Icons / favicons in Safari for Mac
Open the Safari app on the Mac
Pull down the Safari menu and select “Preferences”
Select “Tabs”
Toggle the switch for “Show website icons in tabs” so that it is not checked, thereby disabling favicons in Safari
Close out of Safari preferences and use the browser as usual
Hiding Favicons is the default setting in Safari, so this is just returning to that.
If you don’t find this feature available in your version of Safari it’s likely because it does not support favicons, as only modern releases of Safari support the display of website favorite icons. You can either update Safari to the newest version, or you can also download Safari Technology Preview which has the latest beta features available to it, including favicon support and other features that may appear in future releases (the tech preview is sort of like a public beta of Safari).
For anyone wondering, this works the same on the Safari final versions, as well as Safari Technology Preview and Safari Developer Preview builds as well.
Thank you for using
Themify Popup
This is a sample pop up. Themify Builder or Builder Lite (free) plugin is recommended to design the pop up layouts.