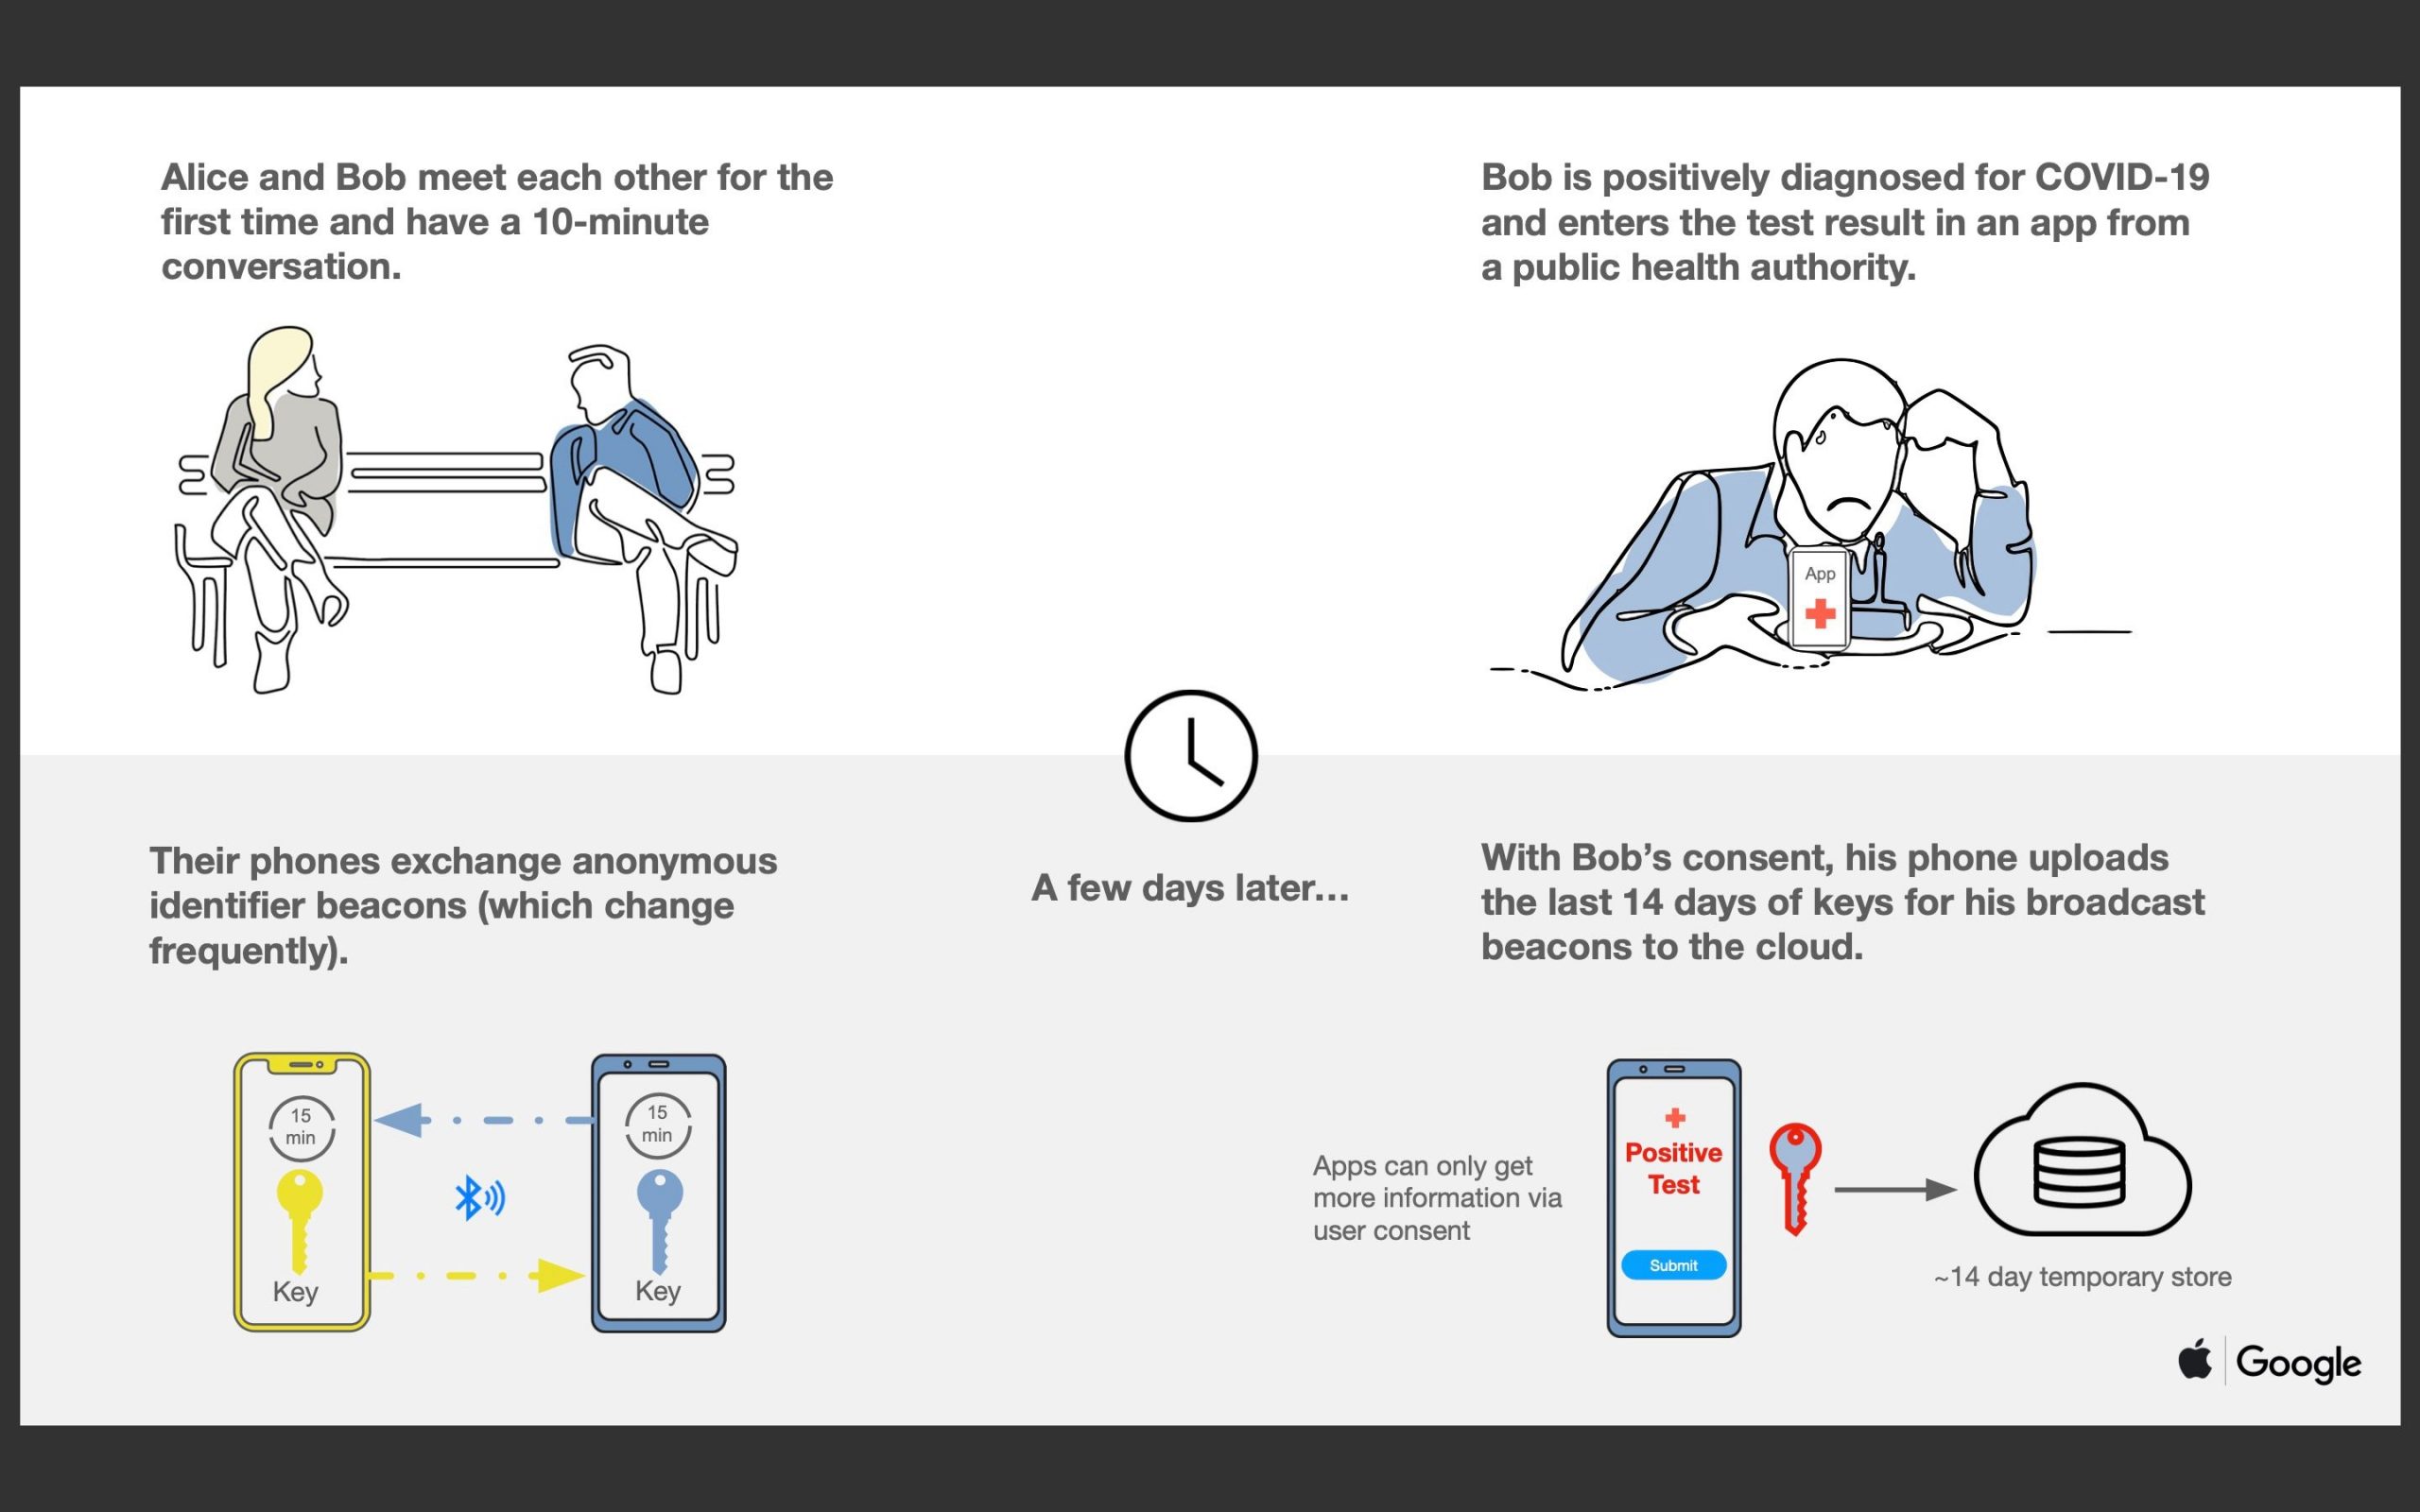
One way to track the spread of COVID-19 across a population is through contact tracing. Apple and Google today announced a “joint effort” that leverages Bluetooth on Android and iOS phones to “help governments and health agencies reduce the spread of the virus.”
The two companies are launching a “comprehensive solution” for contract tracing that encompasses “application programming interfaces (APIs) and operating system-level technology to assist in enabling contact tracing.”
This is an alternative to relying on location data approaches from carriers and other telecom companies that some countries have already implemented.
Based on these upcoming tools, governments will be able to build COVID-19 contact tracing apps that work across Apple and Google devices. When two people are in close-range, their phones will exchange anonymous identifiers. If an individual gets diagnosed with COVID-19, they can have their device transmit a list of everybody they’ve been in contact with to the cloud.
Meanwhile, the second person’s phone will periodically download a list of everyone that has tested positive in their area. If a match occurs, they will be notified and prompted to contact health authorities.
These APIs will be available by May, and those “official apps” from public health agencies can be downloaded through Google Play and the App Store.
A second joint effort is focused on creating a “broader Bluetooth-based contact tracing platform by building this functionality into the underlying platforms.” Third-party apps will no longer be required, with contact tracing built into Android and iOS directly. While still requiring manual opt-in, this should increase adoption.
This is a more robust solution than an API and would allow more individuals to participate, if they choose to opt in, as well as enable interaction with a broader ecosystem of apps and government health authorities
Both companies in their joint press release this morning are heavily focused on the privacy angle. Key points include :
Explicit user consent required
Doesn’t collect personally identifiable information or user location data
List of people you’ve been in contact with never leaves your phone
People who test positive are not identified to other users, Google, or Apple
Will only be used for contact tracing by public health authorities for COVID-19 pandemic management
All of us at Apple and Google believe there has never been a more important moment to work together to solve one of the world’s most pressing problems. Through close cooperation and collaboration with developers, governments and public health providers, we hope to harness the power of technology to help countries around the world slow the spread of COVID-19 and accelerate the return of everyday life.
Across the world, governments and health authorities are working together to find solutions to the COVID-19 pandemic, to protect people and get society back up and running. Software developers are contributing by crafting technical tools to help combat the virus and save lives. In this spirit of collaboration, Google and Apple are announcing a joint effort to enable the use of Bluetooth technology to help governments and health agencies reduce the spread of the virus, with user privacy and security central to the design.
Since COVID-19 can be transmitted through close proximity to affected individuals, public health officials have identified contact tracing as a valuable tool to help contain its spread. A number of leading public health authorities, universities, and NGOs around the world have been doing important work to develop opt-in contact tracing technology. To further this cause, Apple and Google will be launching a comprehensive solution that includes application programming interfaces (APIs) and operating system-level technology to assist in enabling contact tracing. Given the urgent need, the plan is to implement this solution in two steps while maintaining strong protections around user privacy.
First, in May, both companies will release APIs that enable interoperability between Android and iOS devices using apps from public health authorities. These official apps will be available for users to download via their respective app stores.
Second, in the coming months, Apple and Google will work to enable a broader Bluetooth-based contact tracing platform by building this functionality into the underlying platforms. This is a more robust solution than an API and would allow more individuals to participate, if they choose to opt in, as well as enable interaction with a broader ecosystem of apps and government health authorities. Privacy, transparency, and consent are of utmost importance in this effort, and we look forward to building this functionality in consultation with interested stakeholders. We will openly publish information about our work for others to analyze.
All of us at Apple and Google believe there has never been a more important moment to work together to solve one of the world’s most pressing problems. Through close cooperation and collaboration with developers, governments and public health providers, we hope to harness the power of technology to help countries around the world slow the spread of COVID-19 and accelerate the return of everyday life.
Apple quietly added a new privacy feature to the latest iPad Pro, borrowing a MacBook security feature to help prevent eavesdropping on its 2020 tablets. With the launch of the 2018 MacBook range and the introduction of the Apple T2 security chip, closing the lid of the notebooks automatically disconnects the hardware microphones.
That way, in addition to the webcam obviously being covered, it means extra reassurance that apps and services aren’t secretly listening in through the microphones. Turns out, Apple has decided to so the same thing for its most expensive tablets, too.
An updated version of the Apple Platform Security document details the change. “iPad models beginning in 2020 also feature the hardware microphone disconnect,” it explains. “When an MFI compliant case (including those sold by Apple) is attached to the iPad and closed, the microphone is disconnected in hardware, preventing microphone audio data being made available to any software—even with root or kernel privileges in iPadOS or in case the firmware is compromised.”
As the document makes clear, you’ll need a specific type of case in order for this to work: one with MFI certification. That obviously means Apple’s own cases, like the Smart Keyboard Folio currently available and, come May, the new Magic Keyboard for iPad. However there are plenty of third-party cases that are also MFI compliant.
Logitech, for instance, has several keyboard cases that work with the iPad Pro if you want easier text entry than the iPadOS on-screen keyboard. Alternately, if you don’t need the physical keyboard – and the thickness that brings – there are cases from Otterbox, for example, that will lock and unlock the iPad Pro when closed and opened. They’ll also trigger the new hardware microphone disconnect in the process.
Digital eavesdropping has been long been a concern, but attention has ramped up in recent weeks as more people rely on devices like iPads to work from home. Video calling apps like Zoom have found themselves suddenly popular outside of their traditional enterprise audience, but that surge in users has also helped highlight security shortcomings. While Apple does have its approvals process to try to ensure software which makes it to the App Store isn’t also quietly tapping into hardware it shouldn’t, hardware disconnect for the microphone on the iPad Pro is another step for those particularly concerned about privacy.
During these days of working from home and possibly having some extra spare time, we have some useful tutorials for you that can help build your skills. One of these skills makes use of the Forms feature in Apple’s free Numbers spreadsheet app to capture data wherever you may be. Grab your iPhone or iPad and join in as we create a sample form in Numbers.
Make A Spreadsheet For The Data You Wish To Analyze
You’ll need to know what data you want or need to capture. We’ll create a spreadsheet in Numbers that has the data fields in individual columns, with each row being a separate record. For example, we’ll make a spreadsheet for tracking credit card expenses. Our fields, or data points, are:
Date and Time we made a credit card purchase
Card Used (this assumes that we have more than one credit card)
Vendor (where we made the purchase)
Amount of purchase
Category (if we want to see how much we’re spending on certain items)
Notes (general comments on a purchase)
Launch Numbers, then tap the + button in the upper right corner of the screen to make a new spreadsheet (or table, as it’s referred to by Numbers), and select “Blank” from the list of templates provided by the app.
Starting at the top of the spreadsheet in row 1, we’ll enter the field names. Tap on cell A1 (the upper left corner of the table) and type the field name. To start with, we’ll enter Date and Time, then Card Used, Vendor, Amount, Category and Notes. The basic spreadsheet table looks something like this :
We now need to add the correct format for each column. Formatting allows us to enter data in the proper way – a date and time will have a specific format, the amount will have a dollar sign and two numbers to the right of the decimal point, etc…
Column A is our Date and Time column, so tap the A at the top of the column to highlight it, then tap the Format button — it looks like a paintbrush. Select Date & Time as the format to be applied to the column, tap the info button ( a circled “i”) to select a date format (I selected M/D/YY, like 4/3/20) and a time format (H:MM, like 4:32).
Other formats are easier. The Vendor and Notes columns are just Text, and the Amount column is formatted as Currency. To make entering information fast and easy, I selected “Pop-Up Menu” as the format for the Card Used and Category columns. This lets me create a pop-up menu containing a set of common entries. For Card Used, I entered Visa, Amex, and Apple Card. By doing this, when I go to the Card Used field on my form, a pop-up menu lets me select one of those three credit cards with a tap. I did the same for Category, adding pop-up menu items for Automobile, Groceries, Entertainment, Restaurant, Taxes, and so on.
THE POP-UP MENU FOR CARD USED, CONTAINING VISA, AMEX AND APPLE CARD AS MY CHOICES
Once formats have been set for all of the columns on the spreadsheet, it’s time to create the entry form. Note that if your spreadsheet shows more columns that you have fields, you should delete those extra columns by tapping the column letter, then tapping “Delete”.
Creating The Form
Numbers for iPhone and iPad is smart — it is designed to automatically create a form for easily entering information into our fields. By tapping the gray + button on the top left of the spreadsheet, we’re asked if we want to create a new sheet or a new form. Select New Form, and Numbers immediately creates the entry form.
A SAMPLE DATA ENTRY FORM FOR OUR CREDIT CARD CHARGE DATABASE EXAMPLE, WITH THE DATE AND TIME ENTRY KEYPAD SHOWN AT THE BOTTOM.
What you see is a simple form that’s easier to enter data info — particularly without a keyboard — than typing into a spreadsheet table. The 3 of 19 indicates that this is record 3 of 19, and there’s a field at the top of the unfilled form that says “Tap to add title”. That’s actually our Date and Time field (Column A), and since it was formatted as date and time, tapping it brings up a time and date entry keyboard (see image above). Tapping “now” automatically enters the date and time of the entry.
Now tapping on Card Used reveals the pop-up menu created earlier, from which I selected Visa. Tap on Vendor, and here I can use the keyboard to type the name of the store. Tap Amount, and a numeric keypad appears for entering the dollar amount for my charge. Category displays another pop-up menu with my different categories listed, and Note shows a text field that I can type a short note into (like “bought ground beef”).
Tap Done at the top of the screen, and the entries made on the form are added to a new row on the spreadsheet. Each entry I make is added as a separate row to the spreadsheet.
You might notice that the spreadsheet is listed as Sheet 1 and the form as Table 1. To make this look a bit nicer, I tapped and held those default titles to change them to “Charges” and “Enter Charges”.
USE THESE BUTTONS TO NAVIGATE TO A PREVIOUS ENTRY, ADD A NEW ENTRY, DELETE AN ENTRY OR MOVE TO THE NEXT ENTRY IN A FORM.
Our form is useful both for making new entries and for editing existing entries (see image above). Using the left (<) and right (>) arrows on the bottom of the form, you can navigate to earlier or later entries. To delete an entry, tap the Trash Can button, or tap the + button to add a new entry.
Analyzing The Data
With a real database like this, there’s a lot you can do once you’ve entered information. Now, my wife and I use the same credit cards and accounts, to I want to share this database with her. To do that, I tap the “Add People” button on top of the spreadsheet. Now we can both make entries into the database, even at the same time. Perhaps I need to share the database with my accountant. Tapping the More button (…) on the top of the sheet, I select Share, and have the option of sending the spreadsheet via AirDrop, Mail, or Messages. To save the Numbers sheet as an Excel .xlsx spreadsheet file or a PDF, I tap the More button and select Export.
This post isn’t meant to be a full tutorial on Numbers, but there are a few handy things I’ll tell you about. You can use Filters to further organize your data. Tapping the Filters button gives me the options of sorting my data, filtering it (in other words, only showing rows that match rules I specify), or group rows into categories.
If I want to see my data grouped by the type of credit card I used, I can tap Filters, Categories, Add a Category, and select Card Used. Sorting the Date and Time column, looking at my Charges spreadsheet shows the entries grouped by card (see image below) :
VIEWING THE CHARGES SPREADSHEET BY CREDIT CARD, SORTED BY DATE.
Now, can you use this spreadsheet on the Mac or iCloud versions of Numbers? You can, but you won’t see the form! Only the charges spreadsheet will be visible. With any luck, Apple will rectify this issue in the future!
Want to set a time limit for app usage on iPhone or iPad? Screen Time lets you do just that.
At a time where we all perhaps use our iPhones a little too much, knowing exactly how long we spend with it in our hand can be useful. Knowing which apps we use most can inform our decisions around usage habits, too. But if all that fails simply setting a time limit might be the only way to go. Apple makes it easy to do exactly that by setting time limits on specific apps and how long they can be used for on iPhone, iPad, and iPod touch.
Setting an app time limit is a great way of preventing yourself from spending all day watching Netflix, YouTube, playing games, using too much social networking like browsing Twitter or checking out what your friends are doing in Instagram. It can also be really useful to enable on a family device or a kids device if you want to limit their usage of particular apps to a specific time. And if you’d rather avoid the news, that’s an option as well. You can limit any apps you want with Screen Time as you’ll see.
How to Add a Time Limit to an App on iPhone & iPad
Setting up Screen Time limits for apps on iPhone and iPad is easy :
Open the Settings app and then tap “Screen Time” to get started.
Tap “App Limits.”
If you have any limits already set, you’ll see them here. Tap “Add Limit” to set a new one.
Tap the circle beside an app category to set a limit for all apps that fall under that category. You can see which apps those are by tapping the category itself. You can do that If you’d rather set a time limit for a specific app, too.
Press “Next” when all of the apps you want to set time limits for have been selected.
Now it’s time to set the limit. Use the time picker to select the hours and minutes that you’d like to limit the app to. You can also customize which days the limit takes affect by tapping “Customize Days,” too. Tap “Add” when ready.
Once the Screen Time limit is in effect for that app, say for an hour, when the time limit is over a message on the screen will appear notifying the user of the screen time limit being reached. You can override it at any time if you know the passcode.
By the way, if you are adding time limits to apps and need to change the Screen Time passcode on iPhone or iPad to one that someone else using the device doesn’t know, you can do that too.
How to Add a Time Limit to a Child’s iPhone or iPad via Family Sharing
You can set a time limit for an app on any child’s device that is part of your family, too. This is possible with the Family Sharing iCloud feature available for iPhone and iPad.
The process is the same as above, except you should tap the person’s name at step 2 above. The steps are identical from there on out.
Open the Settings app, then tap on Screen Time
Tap on the persons name
Now tap on “App Limits.”
Tap “Add Limit” to create a new limit for an app
Tap the circle beside an app category to set limits for app categories, recall you can see which apps are included by tapping the category directly. If you wish to set a specific Screen Time Limit for a particular app it’s done there too.
Tap “Next” once you have select the app(s) or category to set screen time limits for
Next, set the limit itself by using the time picker choose hours and minutes to limit the app usage to, for example 30 minutes, 1 hour, 2 hours, etc, you can optionally choose what days to set the limits for by selecting “Customize Days”
Tap “Add” when finished configuring to set the screen time limit
Alternatively, if you don’t use iCloud Family Sharing then you can set the time limit on their device directly instead, using the same instructions as shown earlier.
Using Family Sharing to set screen time limits is particularly useful for parents and caregivers though, because if you set them from your iPad or iPhone, you can do it without them knowing, which is even more fun!
What Happens Next with Screen Time App Limits?
Whenever an assigned time limit has been reached your iPhone will tell you.
At that point it’s up to you whether you want to continue using the app, or not.
If you do, tap “Ignore Limit” and select how long you want the limit to be out of action for.
Ultimately a lot of this comes down to your own willpower. If you really want to use the app you’ll just override the timer.
You can also remove the Screen Time limits on iPhone or iPad if you wish.
At least if you set a timer for a child they’ll need to know the Screen Time PIN to override it, though. Speaking of Screen Time PINs, remember that you can change the Screen Time password on iPhone and iPad at any time.
Of course if you disable Screen Time at any time too if you decide you don’t want to use the feature.
Apple has released iOS 12.4.6 for older model iPhone and iPad devices that are not able to run iOS 13.4 and iPadOS 13.4.
The iOS 12.4.6 is said to include important security updates and thus is recommended for eligible users to download and install onto their devices. No new features are expected to be included with iOS 12.4.6.
Devices eligible for the iOS 12.4.6 update include iPhone 6 Plus, iPhone 6, iPhone 5s, iPod touch 6th generation, iPad Air 1, iPad Mini 2, and iPad Mini 3. Newer iPhone and iPad models are able to download iOS 13.4 and iPadOS 13.4 instead.
How to Update to iOS 12.4.6
Before anything else, backup the iPhone or iPad to iCloud, iTunes, or to MacOS before beginning any system software update. Failure to backup could lead to data loss.
The easiest way for most users to download iOS 12.4.6 is through the Software Update mechanism in Settings app on the iPhone, iPad, or iPod touch :
Open the “Settings” app
Go to “General” and then choose “Software Update”
Choose to “Download and Install” iOS 12.4.6
iOS 12.4.6 will download and install automatically, requiring a device reboot to complete. When the installation has finished, the iPhone, iPad, or iPod touch will automatically boot itself back up and be usable again as normal.
Release notes accompanying the iOS 12.4.6 update download are very brief stating that it “provides important security updates” and is therefore recommended for all users who are eligible for the update.
More advanced users can also choose to update iPhone or iPad manually by using IPSW as detailed here.
Separately, Apple has also released macOS Catalina 10.15.4 for Mac, along with Security Update 2020-002 for macOS Mojave and High Sierra, iPadOS 13.4 for newer iPad, iOS 13.4 for newer iPhone, along with updates for tvOS and watchOS.
Would you like to download music directly from Apple Music to iPhone or iPad? Doing so allows for offline listening, which is a really handy capability for many situations.
Like any other streaming service, by default Apple Music requires you to be connected to the internet. It’s all sunshine and rainbows as long as you’re streaming your music over Wi-Fi or cellular, but what if you lose connectivity? Or, what if you’re asked to switch your device to Airplane mode on a flight? The answer is pretty simple. You can’t stream music anymore. However, Apple does offer a solution in the form of Offline Listening, which lets you download music directly from Apple Music to iPhone or iPad.
Are you an Apple Music subscriber looking to download your favorite songs for listening offline? If so then you’ve come to the right place. In this article, we’ll be discussing exactly how you can download music from Apple Music to your iPhone or iPad for offline listening.
How to Download Music from Apple Music for Offline Listening on iPhone & iPad
Apple Music only allows you to download songs that are in your library. So, if you’re trying to download a song that you just looked up, make sure you add it to your Apple Music library first. Now, simply follow the steps below to download music to your iPhone or iPad.
Open “Music” app from the home screen of your iPhone or iPad.
Head over to the “Library” section within the app and select any album where you want to download your favorite song from.
Now, tap on the “cloud” icon located right next to the title of the song to start the download. Once complete, this icon will disappear, indicating that the song isn’t stored on the cloud anymore and is available for offline access.
Here’s another way to download a song. While you’re listening to a song in the playback menu, tap on the “triple dot” icon located next to the song title.
A menu will pop up from the bottom of your screen. Here, simply tap “Download” to store the song offline.
As for the last step, in order to access all the songs you’ve downloaded to your iPhone or iPad, head over to the “Library” section and tap on “Downloaded Music”.
That’s all there is to it. You’ll be able to listen to your favorite music even if you aren’t connected online.
It’s always nice to have a few songs downloaded as a backup just in case you lose connection, especially while travelling.
In addition to downloading songs available on the streaming platform, your Apple Music subscription gives access to iCloud Music Library. Thanks to this nifty feature, the songs you’ve added to your iTunes Library on a PC / Mac will be automatically available for download on the rest of your Apple devices.
Most streaming services including Apple’s primary competitor Spotify, allows you to consume media offline, so it’s nothing new. Despite all the advances in technology, it’s still pretty difficult to stay connected at all times. A power outage or loss of cellular coverage is all it takes to stop you from accessing internet.
Offline Listening is actually pretty useful for people living in rural areas with unreliable internet connections, regions with less than stellar internet service, and even developing countries where a majority of the people don’t have access to fast and reliable internet yet. Considering how streaming could get interrupted due to poor connectivity, it’s better to listen offline and avoid all the buffering issues.
Apple Music is a hugely successful music streaming service that was introduced back in 2015 to compete against the likes of Spotify and Pandora, and it’s a great service for many users because it’s baked into the stock Music app that’s available on all iOS devices. Additionally, the service is also accessible on Android devices via a standalone app, and available on Windows PC / Mac through iTunes and the Music app in MacOS Catalina or later.
Need to clear up some disk space or get rid of some old iPhone or iPad backups on a Mac? With the latest versions of MacOS, managing iOS and iPadOS device backups is done entirely in Finder, including deleting and removing device backups.
Arguably the safest and most thorough way of backing up an iPhone or iPad is to do an encrypted backup via Mac Finder. When the backup is complete you’ll have a copy of all of your data on your computer, complete with encrypted keychain contents. But it all takes up space that you might want to reclaim. As you can imagine, doing a full backup of your iPhone or iPad can take a lot of space. That’s fine if you’re lucky enough to be using a Mac with a multi-terabyte SSD. But most of us aren’t, so we need a way to trip the amount of data used by backups. We need to delete old ones. And in macOS Catalina, that’s a whole new process compared to deleting backups with iTunes. As you’ll see, removing backups this way is similar, but since iTunes is no more in modern macOS versions, it’s obviously a bit different and using a different process.
Here’s how to go about deleting old iPhone or iPad backups in macOS Catalina.
How to Delete iOS & iPadOS Device Backups from MacOS Finder in Catalina
This assumes you have made a backup of iPhone or iPad to macOS before, if not there will not be any backup to remove.
Plug your iPhone or iPad into your Mac using a USB cable.
Open a Finder window by clicking its icon in the Dock and click your iPhone or iPad in the sidebar.
Make sure that the “General” tab is selected and then click “Manage Backups.” You’ll find it at the very bottom of the window.
Click to select the backup that you want to delete and then click “Delete Backup.”
You’ll need to confirm that you want to delete the selected backup before the action is carried out.
The selected backups will be deleted.
Depending on the size of the device backups you removed, you can possibly get a ton more space on your Mac drive, whether it’s a hard disk or SSD, just by removing backups this way. This is particularly nice to do with old device backups that are no longer needed.
Of course you don’t want to delete the only copy of a device backup you have, so be sure you have a backup of the iPhone or iPad somewhere before deleting one from the Mac.
As a bonus, you’ll still have these backups safe and sound if you’re using Time Machine, assuming you use that feature to backup the entire Mac anyway. You can then go about restoring the backup if you still need it, depending on how much time has passed and how long Time Machine keeps files around. Another handy trick for redundant backups is to manually copy a copy of the backed up devices to other external storage mediums, like an SD card, USB flash drive, or external hard drive, which you can then refer to if needed.
Using a Mac is just one way of backing up your iPhone or iPad. You can also use a Windows PC with iTunes if you want to. If you’d rather not have to plug them into a computer at all, you can use iCloud for backups instead as well. With iCloud, your device will back itself up overnight and you won’t need to connect to a computer to restore anything, either. And just like the Mac and iTunes approaches, you can also delete backups from iCloud too.
Finder in MacOS handles all device management now that iTunes used to, and that includes not only device backups but also syncing music to iPhone or iPad in MacOS with the Finder too, along with other device management options. Basically all that used to be device management in iTunes is now in Finder.
Would you like to turn off Netflix autoplay of previews and trailers? It’s fairly simple to disable preview autoplaying, and you can always reenable it again should you change your mind.
As you likely have noticed by now, Netflix automatically plays previews and trailers of shows and movies as you browse around. Some users may wish to disable preview autoplaying on Netflix however.
This tutorial will show you how quickly and easily you can turn off autoplaying previews and trailers for Netflix on any device, including iPhone, iPad, Apple TV, Android, Xbox, Switch, Roku, Amazon Fire TV, Netflix on the web on Mac or Windows, or anything else.
How to Disable Netflix Autoplay Previews & Trailers Videos
In order to turn off Netflix autoplaying previews, you must use a web browser on any internet connected device, here’s how it works:
Sign in to the Netflix account you wish to disable autoplay previews and trailers for
Choose “Manage Profiles” from the menu options
Select your user profile that you want to turn off autoplay previews for
Uncheck the option for “Autoplay previews while browsing on all devices”
Choose Save
Optionally, repeat the steps to disable autoplay previews and autoplay trailers on other users for the same Netflix account
Once you disable autoplay previews on Netflix you may have to wait a little bit for the setting to carry over to all of your other devices.
For example, if you use Netflix on a variety of devices like Apple TV, Amazon Fire TV, Xbox, Nintendo Switch, iPhone, iPad, Android, Roku, as well as a computer or tablet web browser, you may find it takes a little bit for the setting to take effect.
If you’re impatient, Netflix says you can switch Netflix profiles and switch back again to forcibly reload the profile with the updated autoplay setting, so give that a try if the autoplay preview setting hasn’t updated yet.
You can always re-enable autoplaying previews and trailers on Netflix again by returning to the Netflix.com profile settings and adjusting the checkbox for “Autoplay previews while browsing on all devices” so that it’s enabled again.
Whether or not you want to turn off autoplaying previews likely depends on your personal preferences, but if you’re trying to conserve bandwidth you may be more inclined to do so as well.
Another way around autoplaying previews is if you download Netflix shows for offline viewing to iPhone or iPad you will find that once the device is not connected to the internet, the random previews will not play since they’re not able to load, but that’s obviously not a settings option.
Are you an Apple TV+ subscriber looking to download your favorite shows and content onto your devices? You can easily download locally Apple TV+ shows to iPhone and iPad so that you can enjoy them offline, this is perfect for long trips, plane flights, train rides, or just posting up on your couch or in bed to binge-watch.
As you perhaps already know, Apple, in a move to compete against the likes of Netflix, Disney+ and other video streaming services, launched Apple TV+ some time ago (and if you recently bought an Apple device you can get a free Apple TV subscription for a year). Sure, it doesn’t (yet) boast a huge content library like Netflix and Prime Video, but they do have some of the biggest names in the film industry producing original content and that’s actually pretty impressive for a service that’s so new.
Although streaming content might be the way to go, not everyone can stay connected to the internet at all times. That’s exactly when offline viewing comes in. Apple TV allows you to download shows onto your iPhone or iPad, so you can watch them while you’re on the move or when your Wi-Fi is down.
In this article, we’ll be discussing exactly how to download Apple TV+ shows on your iPhone or iPad. Let’s see how this process works.
How to Download and Access Apple TV+ Shows on iPhone & iPad
Apple TV+ service is baked into the default TV app on your iPhone and iPad, where content purchased or rented from the iTunes store is normally stored. Simply follow the steps below to start downloading the content you want to watch offline.
Open the default “TV” app from the home screen of your iPhone or iPad.
In the “Watch Now” section, tap on the show or movie that you want to watch offline, as shown in the screenshot below.
Select any episode that you want to download onto your iPhone or iPad and tap on the “Cloud” icon located right next to the name of the episode.
Once downloaded, you’ll notice the iPhone or iPad icon right next to the name of the episode, indicating that it has been saved to your device for offline viewing. In order to view all your downloaded content, tap on “Library”.
Now, tap on “Downloaded”.
Here, you’ll be able to access all of your downloaded content, grouped by the title of the TV shows.
That’s all you need to do in order to download and view your favorite Apple TV+ shows for offline viewing.
From now on, you don’t have to always rely on your internet connectivity to watch your favorite TV shows. If you want to watch a show offline, just run through the process detailed above and you can download some Apple TV+ content to view on your device at any time, regardless of internet connectivity.
The ability to watch content offline is extremely handy for travelers, people living in rural areas with less reliable internet connections, people developing countries where a majority of the people don’t really have access to fast and stable internet, and for myriad other occasions. Considering how streaming could get interrupted due to poor connectivity, it can be better to watch shows offline and avoid the buffering issues that comes with streaming altogether. That being said, Apple doesn’t let you download multiple episodes of a show simultaneously at the moment just like downloading Netflix shows for offline viewing, but that could potentially change at some point down the line.
Apple TV+ might have a comparable shortage of content at the moment, but it offers a free trial and costs just $4.99 a month, which is considerably lower compared to the competition like Netflix and Disney+. However, Apple is betting on top-tier production and casting some of the biggest names in the industry, and over time it’s likely their streaming library will grow as they cut new deals and create new shows unique to the Apple TV+ platform. The company has also suggested they’ll be adding a new show or movie every single month to keep users engaged, so if you’re already hooked on Apple TV+ content you should get a regular stream coming in, so whether you want to watch it live or download it to your iPhone or iPad you’ll be able to enjoy plenty of TV shows and content into the future.
Did you know that Apple Maps has a feature that lets you ‘look around’ as if on the ground in some regions? Indeed it does, available for iPhone and iPad.
Most of us are familiar with Google’s “Street View”, a nifty feature within Google Maps that lets you view panoramic street-level images of various cities across the globe. When Street View was first introduced back in 2007, it was ahead of its time, but today, Google isn’t the only player in this space with plenty of competition to look out for, the latest one being Apple.
The Cupertino-based company recently started rolling out a similar functionality to Apple Maps in the United States, simply called “Look Around”. Quite frankly, Apple has taken their sweet time to add this functionality, considering how it has been seven years since Apple replaced Google Maps across iOS devices with their own web mapping service.
If you’re one of those iOS users interested in trying out this feature and see how it compares to Street View, you’ve come to the right place. In this article, we’ll be discussing exactly how you can use Look Around on Apple Maps for iPhone & iPad.
How to Use Look Around on Maps for iPhone & iPad.
Currently, the new “Look Around” feature is only available for select locations and larger cities, including popular cities like Los Angeles, New York, Las Vegas, and San Francisco, but the feature will grow so it’s worth checking out other locations too. So, if you’re interested in learning how to access this feature, simply follow the steps below.
Open the stock “Maps” app from the home screen of your iPhone or iPad.
Type any of the supported locations in the search bar and tap search on your keyboard.
Maps will now take you to the searched location. Here, simply zoom in slowly until you a “binocular” icon at the top-right edge of the screen.
As you can see in the screenshot below, it’s located right below navigation icon. Tap on the “binocular icon” to proceed to the next step.
Now, you’ll see a preview of the “Look Around” feature right at the top of your screen. The pin on the map will now be indicated by a binocular icon, which can be dragged around to get a street view preview of the pinpointed location. If you want to use Look Around in fullscreen mode, tap on the “stretch” icon at the top-left corner of your screen.
Here, if you want to look around the streets, simply tap anywhere on the screen and pan around for a 360-degree view. When you’re ready to exit Look Around mode, tap “Done” in order switch back to regular maps.
That’s pretty much all there is to it.
If you’re lucky enough to be residing in any of the currently supported locations, you’d be glad to know that the feature works seamlessly. Significant points of interests like businesses, restaurants, landmarks, etc. are all highlighted in Look Around for quick access.
If you live in a city, region, or country where Look Around isn’t available yet, don’t fret. You could take advantage of other handy Apple Maps features like “Look Inside” that lets you access indoor maps of Airports, shopping malls and other notable landmarks while you patiently wait for its roll-out. Or you could just use Google Street View, which is a bit more ubiquitous for all sorts of global locations.
Compared to Google Street View, Apple Maps Look Around is a bit limited with fewer cities and locations supported at the moment, so it may take a while for Apple to catch up to the expectations set by Google Street View.
Apple has promised to roll out this feature to additional countries and areas over time, but we’ll just have to wait and see how fast they can expand the coverage. Look Around has been made possible with the help of Apple’s own mapping vehicles that are equipped with several cameras and lidar sensors that help capture street-level imagery as they traverse through various locations.