A big change that arrived with iOS 14 is an all-new home screen experience. This marks arguably the biggest UI update for iOS since it was first introduced. However, iPad isn’t getting all the same new features and changes as iPhone, but there are new widgets to take advantage of. Follow along for how to use the new iPad widgets in iPadOS 14.
iOS 14 on iPhone includes the ability to use the new widgets anywhere on the home screen as well as other app pages. There’s also the new App Library feature.
iPad sees a different experience in iPadOS 14 with the new widgets arriving for use only in the Today View portion of the home screen (can’t be mixed in with apps) and the new App Library feature is absent. In any case, the new widgets still offer some useful new functionality.
Note: iOS 14 and iPadOS 14 are available as free public betas as well as developer betas for iPhone and iPad.
How to use new iPad widgets in iOS 14
If it’s not turned on permanently, swipe from left to right on your iPad home screen to see the Today View
Long press on a black space of your home screen to enter Edit mode (jiggle mode)
You can tap the Keep on Home Screentoggle at the top to keep widgets available all the time
Tap, hold, and drag the existing widgets around to organize them
You can stack widgets of the same size on top of each other for swipeable widgets
Swipe to the bottom of the widgets and tap Customize to add new ones
Tap the green “+” icon to add available widgets, tap Done when finished
When not in Edit mode, you can long press a widget from your home screen to get the edit or remove option (e.g. removing stacked widgets, modify smart suggestions, etc.)
Here’s how all this looks:
Now you’ll be able to edit your widgets.
Tap the “—” icon to remove widgets or tap-hold-drag them to reorganize the layout. Swipe to the bottom to add more widgets, tap Customize.
You can add new widgets by tapping the green “+” icons and then order them by dragging the three-line icons as shown below.
Don’t forget you can stack widgets of the same size on top of each other to maximize your use of space.
And from the home screen you can long press on a widget to get edit and customization options:
What do you think of the new widgets in iPadOS 14? Are you hoping to see the same implementation as iOS 14 in the future? Share your thoughts in the comments below!
Whether you want to take advantage of the 0% interest offers for iPhone, iPad, Mac, and more or have been wanting to get Apple’s credit card for while for another reason, follow along for how to apply for Apple Card on iPhone and iPad.
Apple Card offers a variety of compelling features like its Daily Cash program, strong focus on security and privacy, no fees, a clean, optional Titanium physical card, and a great software experience to track spending and more on iPhone.
While Apple has offered free iPhone financing to Apple Card users for some time, a new addition is the ability to get 0% interest financing for iPad, Mac, AirPods, and more. The interest-free period ranges from 6-12 months depending on the product you’re buying. There’s also a $50 sign up bonus promotion through 7/31/2020.
Here are some of the requirements for Apple Card eligibility:
Be 18 years or older, depending on where you live
Be a U.S. citizen or a lawful U.S. resident with a valid, physical U.S. address that is not a P.O. Box. You can also use a military address
Have a compatible iPhone with the latest iOS version (iPhone 6 or later)
Using two-factor authentication with your Apple ID and be signed in to iCloud with your Apple ID
Apple works with Goldman Sachs to provide the financial end of Apple Card.
How to apply for Apple Card on iPhone and iPad
On iPhone open the Wallet app (on iPad head to Settings > Wallet & Apple Pay > Add Card)
You might see an offer at the top to apply for Apple Card (if not tap the + icon in the top right corner)
Choose Apply for Apple Card
Read the terms and conditions, tap Continue
Confirm your Apple ID, name, date of birth, and phone number, tap Next
Enter your address (no P.O. boxes)
Enter the last four digits of your social security number
Enter your total annual income (required by Goldman Sachs)
Agree to the terms and conditions
It will just take a few moments and you’ll see if you’re immediately approved or not
In some cases, Apple/Goldman Sachs may ask for you to share a photo of your driver’s license or State ID.
Here’s how the process looks:
Once your application is submitted, you should see a screen that lets you know if you’re approved or not. Check out our previous hands-on coverage of using Apple Card, tracking spending, and more with iPhone, iPad, and Apple Watch.
Apple is rolling out the second developer betas of iOS 13.6 and iPadOS 13.6 today. Included in the updates are additional controls to manage software updates going forward, including having updates automatically download and install.
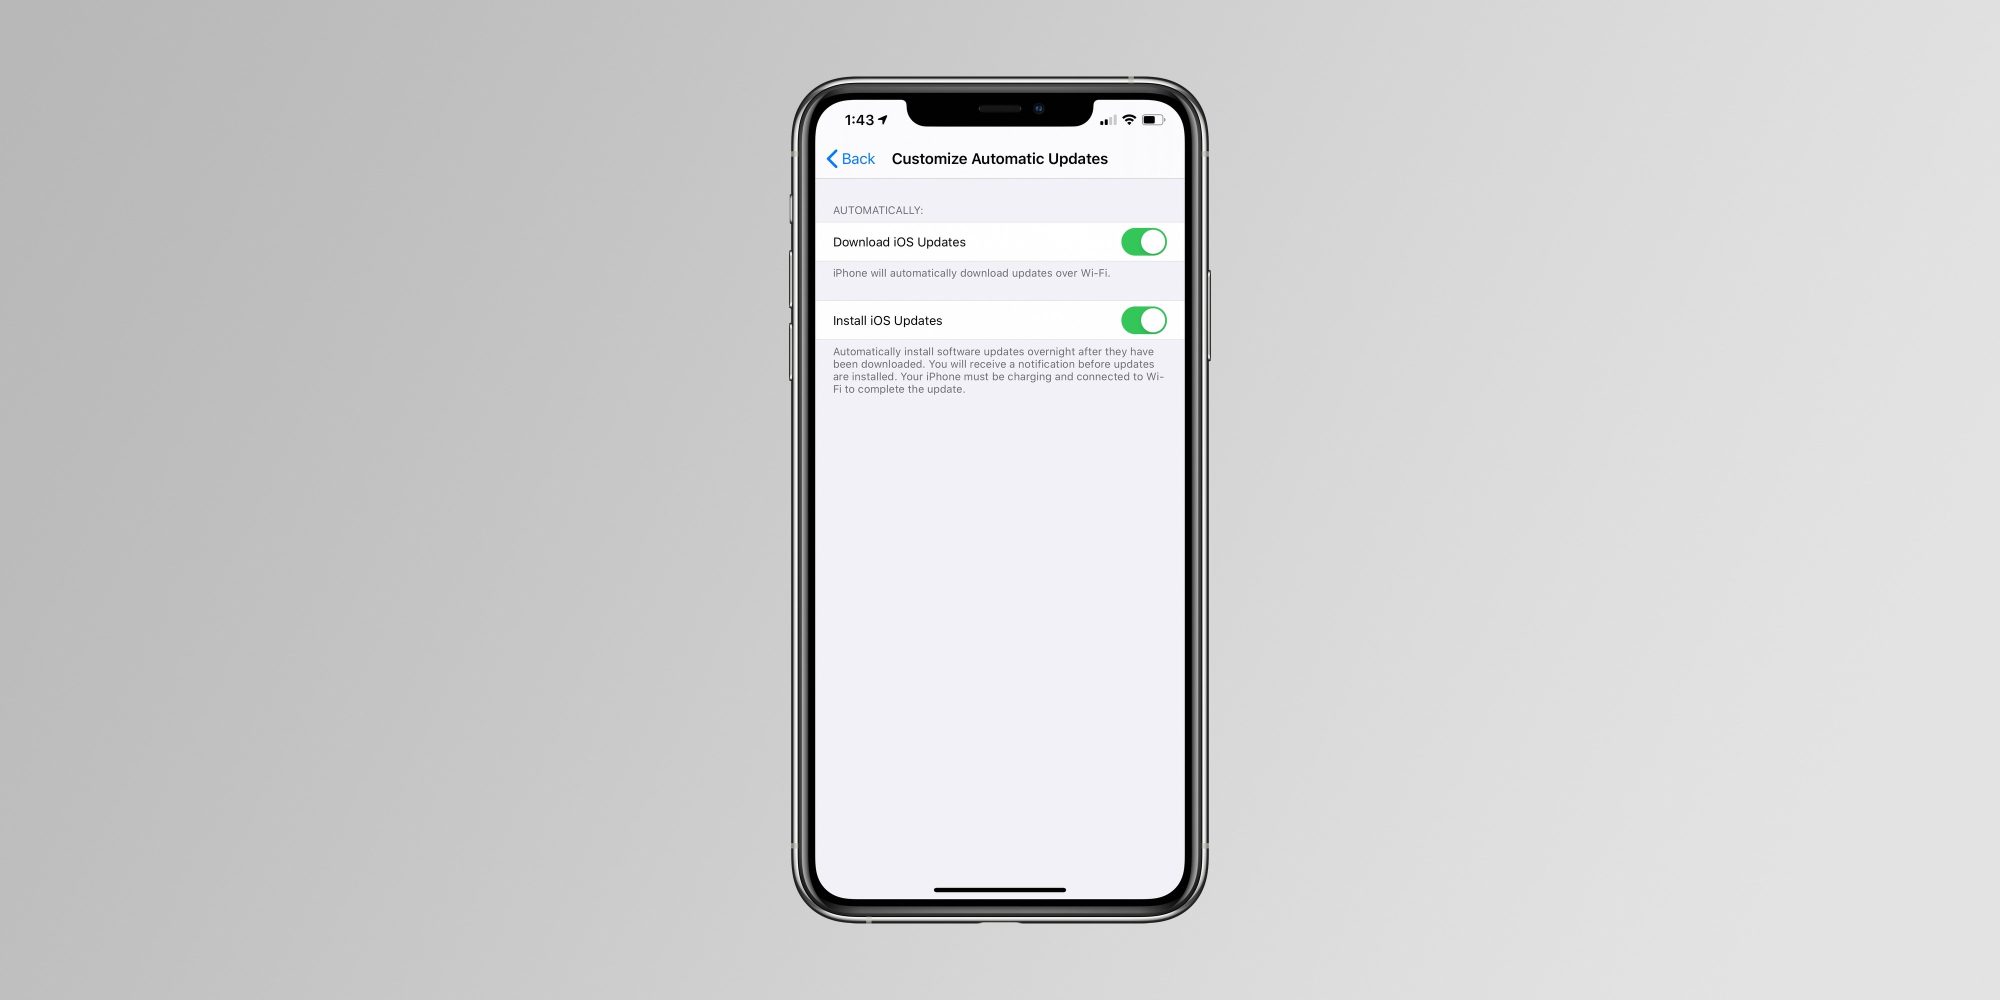
The new Automatic Updates setting allows your iPhone, iPad, or iPod touch to automatically download software updates when you’re connected to Wi-Fi. “iPhone will automatically download updates over Wi-Fi,” is how Apple describes the new toggle.
iOS and iPadOS have long allowed you to automatically install software updates overnight, and today’s new toggle simply builds on that feature. There’s no need to manually download an update, but iOS will still send you a push notification before an update is installed overnight:
Automatically install software updates overnight after they have been downloaded. You will receive a notification before updates are installed. Your iPhone must be charging and connected to Wi-Fi to complete the update.
We’re still digging through iOS 13.6 beta 2 to see if there are any other notable changes.
Apple is also expected to introduce iOS 14 in less than two weeks at WWDC 2020. Whether or not iOS 13.6 is released to the public before iOS 14 beta testing begins remains to be seen.
Also new in iOS 13.6:
Health app adds new “Symptoms” section for tracking symptoms of different illnesses
New data types are available in HealthKit to track symptoms including headaches, chills, sore throat, and more
May 20: iOS 13.5 was released with the new Apple and Google Exposure Notification API
June 1: iOS 13.5.1 released to everyone with a security patch for the unc0ver jailbreak vulnerability.
June 1: iOS 13.5.5 beta 1 released to developers and public beta users with “bug fixes and improvements”
June 9: iOS 13.5.5 renamed to iOS 13.6, beta 2 released to developers
Apple has today released iOS & iPadOS 13.6 Beta 2 to developers along with Xcode 11.6 beta (11N700h). The build number for this update is 17G5045c. There are two new interesting features added to this beta which are:
1. New Toggle for Automatic Updates: With this version of iOS & iPadOS, Apple has added a new toggle which will allow users to enable or disable the option to download updates automatically on your iPhone or iPad when they are connected to WiFi. The option is called “Download iOS updates” and under it, Apple mentions, “iPhone will automatically download updates over Wi-Fi”. To enable or disable this option, go to Settings>General>Software update>Customize Automatic Updates.
2. A new Symptoms Section in the Health App: Apple has added a new Symptoms Section to the the Browse Tab on the Health App. This section will enable users to add their symptoms like pain, coughing, headache, dizziness, etc. This will help users to be aware of their symptoms over time, and will help to discover illnesses developed by the users over time. Apple has described each symptom they have listed under teh new Symptoms category, and has options to add important details like Present/Not Present, Mild, Moderate and Severe.
These are the two interesting changes are present on iOS 13.6 Beta 2. This update is expected to be released after 2-3 betas.
Apple quietly added a new privacy feature to the latest iPad Pro, borrowing a MacBook security feature to help prevent eavesdropping on its 2020 tablets. With the launch of the 2018 MacBook range and the introduction of the Apple T2 security chip, closing the lid of the notebooks automatically disconnects the hardware microphones.
That way, in addition to the webcam obviously being covered, it means extra reassurance that apps and services aren’t secretly listening in through the microphones. Turns out, Apple has decided to so the same thing for its most expensive tablets, too.
An updated version of the Apple Platform Security document details the change. “iPad models beginning in 2020 also feature the hardware microphone disconnect,” it explains. “When an MFI compliant case (including those sold by Apple) is attached to the iPad and closed, the microphone is disconnected in hardware, preventing microphone audio data being made available to any software—even with root or kernel privileges in iPadOS or in case the firmware is compromised.”
As the document makes clear, you’ll need a specific type of case in order for this to work: one with MFI certification. That obviously means Apple’s own cases, like the Smart Keyboard Folio currently available and, come May, the new Magic Keyboard for iPad. However there are plenty of third-party cases that are also MFI compliant.
Logitech, for instance, has several keyboard cases that work with the iPad Pro if you want easier text entry than the iPadOS on-screen keyboard. Alternately, if you don’t need the physical keyboard – and the thickness that brings – there are cases from Otterbox, for example, that will lock and unlock the iPad Pro when closed and opened. They’ll also trigger the new hardware microphone disconnect in the process.
Digital eavesdropping has been long been a concern, but attention has ramped up in recent weeks as more people rely on devices like iPads to work from home. Video calling apps like Zoom have found themselves suddenly popular outside of their traditional enterprise audience, but that surge in users has also helped highlight security shortcomings. While Apple does have its approvals process to try to ensure software which makes it to the App Store isn’t also quietly tapping into hardware it shouldn’t, hardware disconnect for the microphone on the iPad Pro is another step for those particularly concerned about privacy.
During these days of working from home and possibly having some extra spare time, we have some useful tutorials for you that can help build your skills. One of these skills makes use of the Forms feature in Apple’s free Numbers spreadsheet app to capture data wherever you may be. Grab your iPhone or iPad and join in as we create a sample form in Numbers.
Make A Spreadsheet For The Data You Wish To Analyze
You’ll need to know what data you want or need to capture. We’ll create a spreadsheet in Numbers that has the data fields in individual columns, with each row being a separate record. For example, we’ll make a spreadsheet for tracking credit card expenses. Our fields, or data points, are:
Date and Time we made a credit card purchase
Card Used (this assumes that we have more than one credit card)
Vendor (where we made the purchase)
Amount of purchase
Category (if we want to see how much we’re spending on certain items)
Notes (general comments on a purchase)
Launch Numbers, then tap the + button in the upper right corner of the screen to make a new spreadsheet (or table, as it’s referred to by Numbers), and select “Blank” from the list of templates provided by the app.
Starting at the top of the spreadsheet in row 1, we’ll enter the field names. Tap on cell A1 (the upper left corner of the table) and type the field name. To start with, we’ll enter Date and Time, then Card Used, Vendor, Amount, Category and Notes. The basic spreadsheet table looks something like this :
We now need to add the correct format for each column. Formatting allows us to enter data in the proper way – a date and time will have a specific format, the amount will have a dollar sign and two numbers to the right of the decimal point, etc…
Column A is our Date and Time column, so tap the A at the top of the column to highlight it, then tap the Format button — it looks like a paintbrush. Select Date & Time as the format to be applied to the column, tap the info button ( a circled “i”) to select a date format (I selected M/D/YY, like 4/3/20) and a time format (H:MM, like 4:32).
Other formats are easier. The Vendor and Notes columns are just Text, and the Amount column is formatted as Currency. To make entering information fast and easy, I selected “Pop-Up Menu” as the format for the Card Used and Category columns. This lets me create a pop-up menu containing a set of common entries. For Card Used, I entered Visa, Amex, and Apple Card. By doing this, when I go to the Card Used field on my form, a pop-up menu lets me select one of those three credit cards with a tap. I did the same for Category, adding pop-up menu items for Automobile, Groceries, Entertainment, Restaurant, Taxes, and so on.
THE POP-UP MENU FOR CARD USED, CONTAINING VISA, AMEX AND APPLE CARD AS MY CHOICES
Once formats have been set for all of the columns on the spreadsheet, it’s time to create the entry form. Note that if your spreadsheet shows more columns that you have fields, you should delete those extra columns by tapping the column letter, then tapping “Delete”.
Creating The Form
Numbers for iPhone and iPad is smart — it is designed to automatically create a form for easily entering information into our fields. By tapping the gray + button on the top left of the spreadsheet, we’re asked if we want to create a new sheet or a new form. Select New Form, and Numbers immediately creates the entry form.
A SAMPLE DATA ENTRY FORM FOR OUR CREDIT CARD CHARGE DATABASE EXAMPLE, WITH THE DATE AND TIME ENTRY KEYPAD SHOWN AT THE BOTTOM.
What you see is a simple form that’s easier to enter data info — particularly without a keyboard — than typing into a spreadsheet table. The 3 of 19 indicates that this is record 3 of 19, and there’s a field at the top of the unfilled form that says “Tap to add title”. That’s actually our Date and Time field (Column A), and since it was formatted as date and time, tapping it brings up a time and date entry keyboard (see image above). Tapping “now” automatically enters the date and time of the entry.
Now tapping on Card Used reveals the pop-up menu created earlier, from which I selected Visa. Tap on Vendor, and here I can use the keyboard to type the name of the store. Tap Amount, and a numeric keypad appears for entering the dollar amount for my charge. Category displays another pop-up menu with my different categories listed, and Note shows a text field that I can type a short note into (like “bought ground beef”).
Tap Done at the top of the screen, and the entries made on the form are added to a new row on the spreadsheet. Each entry I make is added as a separate row to the spreadsheet.
You might notice that the spreadsheet is listed as Sheet 1 and the form as Table 1. To make this look a bit nicer, I tapped and held those default titles to change them to “Charges” and “Enter Charges”.
USE THESE BUTTONS TO NAVIGATE TO A PREVIOUS ENTRY, ADD A NEW ENTRY, DELETE AN ENTRY OR MOVE TO THE NEXT ENTRY IN A FORM.
Our form is useful both for making new entries and for editing existing entries (see image above). Using the left (<) and right (>) arrows on the bottom of the form, you can navigate to earlier or later entries. To delete an entry, tap the Trash Can button, or tap the + button to add a new entry.
Analyzing The Data
With a real database like this, there’s a lot you can do once you’ve entered information. Now, my wife and I use the same credit cards and accounts, to I want to share this database with her. To do that, I tap the “Add People” button on top of the spreadsheet. Now we can both make entries into the database, even at the same time. Perhaps I need to share the database with my accountant. Tapping the More button (…) on the top of the sheet, I select Share, and have the option of sending the spreadsheet via AirDrop, Mail, or Messages. To save the Numbers sheet as an Excel .xlsx spreadsheet file or a PDF, I tap the More button and select Export.
This post isn’t meant to be a full tutorial on Numbers, but there are a few handy things I’ll tell you about. You can use Filters to further organize your data. Tapping the Filters button gives me the options of sorting my data, filtering it (in other words, only showing rows that match rules I specify), or group rows into categories.
If I want to see my data grouped by the type of credit card I used, I can tap Filters, Categories, Add a Category, and select Card Used. Sorting the Date and Time column, looking at my Charges spreadsheet shows the entries grouped by card (see image below) :
VIEWING THE CHARGES SPREADSHEET BY CREDIT CARD, SORTED BY DATE.
Now, can you use this spreadsheet on the Mac or iCloud versions of Numbers? You can, but you won’t see the form! Only the charges spreadsheet will be visible. With any luck, Apple will rectify this issue in the future!
Want to set a time limit for app usage on iPhone or iPad? Screen Time lets you do just that.
At a time where we all perhaps use our iPhones a little too much, knowing exactly how long we spend with it in our hand can be useful. Knowing which apps we use most can inform our decisions around usage habits, too. But if all that fails simply setting a time limit might be the only way to go. Apple makes it easy to do exactly that by setting time limits on specific apps and how long they can be used for on iPhone, iPad, and iPod touch.
Setting an app time limit is a great way of preventing yourself from spending all day watching Netflix, YouTube, playing games, using too much social networking like browsing Twitter or checking out what your friends are doing in Instagram. It can also be really useful to enable on a family device or a kids device if you want to limit their usage of particular apps to a specific time. And if you’d rather avoid the news, that’s an option as well. You can limit any apps you want with Screen Time as you’ll see.
How to Add a Time Limit to an App on iPhone & iPad
Setting up Screen Time limits for apps on iPhone and iPad is easy :
Open the Settings app and then tap “Screen Time” to get started.
Tap “App Limits.”
If you have any limits already set, you’ll see them here. Tap “Add Limit” to set a new one.
Tap the circle beside an app category to set a limit for all apps that fall under that category. You can see which apps those are by tapping the category itself. You can do that If you’d rather set a time limit for a specific app, too.
Press “Next” when all of the apps you want to set time limits for have been selected.
Now it’s time to set the limit. Use the time picker to select the hours and minutes that you’d like to limit the app to. You can also customize which days the limit takes affect by tapping “Customize Days,” too. Tap “Add” when ready.
Once the Screen Time limit is in effect for that app, say for an hour, when the time limit is over a message on the screen will appear notifying the user of the screen time limit being reached. You can override it at any time if you know the passcode.
By the way, if you are adding time limits to apps and need to change the Screen Time passcode on iPhone or iPad to one that someone else using the device doesn’t know, you can do that too.
How to Add a Time Limit to a Child’s iPhone or iPad via Family Sharing
You can set a time limit for an app on any child’s device that is part of your family, too. This is possible with the Family Sharing iCloud feature available for iPhone and iPad.
The process is the same as above, except you should tap the person’s name at step 2 above. The steps are identical from there on out.
Open the Settings app, then tap on Screen Time
Tap on the persons name
Now tap on “App Limits.”
Tap “Add Limit” to create a new limit for an app
Tap the circle beside an app category to set limits for app categories, recall you can see which apps are included by tapping the category directly. If you wish to set a specific Screen Time Limit for a particular app it’s done there too.
Tap “Next” once you have select the app(s) or category to set screen time limits for
Next, set the limit itself by using the time picker choose hours and minutes to limit the app usage to, for example 30 minutes, 1 hour, 2 hours, etc, you can optionally choose what days to set the limits for by selecting “Customize Days”
Tap “Add” when finished configuring to set the screen time limit
Alternatively, if you don’t use iCloud Family Sharing then you can set the time limit on their device directly instead, using the same instructions as shown earlier.
Using Family Sharing to set screen time limits is particularly useful for parents and caregivers though, because if you set them from your iPad or iPhone, you can do it without them knowing, which is even more fun!
What Happens Next with Screen Time App Limits?
Whenever an assigned time limit has been reached your iPhone will tell you.
At that point it’s up to you whether you want to continue using the app, or not.
If you do, tap “Ignore Limit” and select how long you want the limit to be out of action for.
Ultimately a lot of this comes down to your own willpower. If you really want to use the app you’ll just override the timer.
You can also remove the Screen Time limits on iPhone or iPad if you wish.
At least if you set a timer for a child they’ll need to know the Screen Time PIN to override it, though. Speaking of Screen Time PINs, remember that you can change the Screen Time password on iPhone and iPad at any time.
Of course if you disable Screen Time at any time too if you decide you don’t want to use the feature.
Apple has released iOS 12.4.6 for older model iPhone and iPad devices that are not able to run iOS 13.4 and iPadOS 13.4.
The iOS 12.4.6 is said to include important security updates and thus is recommended for eligible users to download and install onto their devices. No new features are expected to be included with iOS 12.4.6.
Devices eligible for the iOS 12.4.6 update include iPhone 6 Plus, iPhone 6, iPhone 5s, iPod touch 6th generation, iPad Air 1, iPad Mini 2, and iPad Mini 3. Newer iPhone and iPad models are able to download iOS 13.4 and iPadOS 13.4 instead.
How to Update to iOS 12.4.6
Before anything else, backup the iPhone or iPad to iCloud, iTunes, or to MacOS before beginning any system software update. Failure to backup could lead to data loss.
The easiest way for most users to download iOS 12.4.6 is through the Software Update mechanism in Settings app on the iPhone, iPad, or iPod touch :
Open the “Settings” app
Go to “General” and then choose “Software Update”
Choose to “Download and Install” iOS 12.4.6
iOS 12.4.6 will download and install automatically, requiring a device reboot to complete. When the installation has finished, the iPhone, iPad, or iPod touch will automatically boot itself back up and be usable again as normal.
Release notes accompanying the iOS 12.4.6 update download are very brief stating that it “provides important security updates” and is therefore recommended for all users who are eligible for the update.
More advanced users can also choose to update iPhone or iPad manually by using IPSW as detailed here.
Separately, Apple has also released macOS Catalina 10.15.4 for Mac, along with Security Update 2020-002 for macOS Mojave and High Sierra, iPadOS 13.4 for newer iPad, iOS 13.4 for newer iPhone, along with updates for tvOS and watchOS.
Would you like to download music directly from Apple Music to iPhone or iPad? Doing so allows for offline listening, which is a really handy capability for many situations.
Like any other streaming service, by default Apple Music requires you to be connected to the internet. It’s all sunshine and rainbows as long as you’re streaming your music over Wi-Fi or cellular, but what if you lose connectivity? Or, what if you’re asked to switch your device to Airplane mode on a flight? The answer is pretty simple. You can’t stream music anymore. However, Apple does offer a solution in the form of Offline Listening, which lets you download music directly from Apple Music to iPhone or iPad.
Are you an Apple Music subscriber looking to download your favorite songs for listening offline? If so then you’ve come to the right place. In this article, we’ll be discussing exactly how you can download music from Apple Music to your iPhone or iPad for offline listening.
How to Download Music from Apple Music for Offline Listening on iPhone & iPad
Apple Music only allows you to download songs that are in your library. So, if you’re trying to download a song that you just looked up, make sure you add it to your Apple Music library first. Now, simply follow the steps below to download music to your iPhone or iPad.
Open “Music” app from the home screen of your iPhone or iPad.
Head over to the “Library” section within the app and select any album where you want to download your favorite song from.
Now, tap on the “cloud” icon located right next to the title of the song to start the download. Once complete, this icon will disappear, indicating that the song isn’t stored on the cloud anymore and is available for offline access.
Here’s another way to download a song. While you’re listening to a song in the playback menu, tap on the “triple dot” icon located next to the song title.
A menu will pop up from the bottom of your screen. Here, simply tap “Download” to store the song offline.
As for the last step, in order to access all the songs you’ve downloaded to your iPhone or iPad, head over to the “Library” section and tap on “Downloaded Music”.
That’s all there is to it. You’ll be able to listen to your favorite music even if you aren’t connected online.
It’s always nice to have a few songs downloaded as a backup just in case you lose connection, especially while travelling.
In addition to downloading songs available on the streaming platform, your Apple Music subscription gives access to iCloud Music Library. Thanks to this nifty feature, the songs you’ve added to your iTunes Library on a PC / Mac will be automatically available for download on the rest of your Apple devices.
Most streaming services including Apple’s primary competitor Spotify, allows you to consume media offline, so it’s nothing new. Despite all the advances in technology, it’s still pretty difficult to stay connected at all times. A power outage or loss of cellular coverage is all it takes to stop you from accessing internet.
Offline Listening is actually pretty useful for people living in rural areas with unreliable internet connections, regions with less than stellar internet service, and even developing countries where a majority of the people don’t have access to fast and reliable internet yet. Considering how streaming could get interrupted due to poor connectivity, it’s better to listen offline and avoid all the buffering issues.
Apple Music is a hugely successful music streaming service that was introduced back in 2015 to compete against the likes of Spotify and Pandora, and it’s a great service for many users because it’s baked into the stock Music app that’s available on all iOS devices. Additionally, the service is also accessible on Android devices via a standalone app, and available on Windows PC / Mac through iTunes and the Music app in MacOS Catalina or later.
Need to clear up some disk space or get rid of some old iPhone or iPad backups on a Mac? With the latest versions of MacOS, managing iOS and iPadOS device backups is done entirely in Finder, including deleting and removing device backups.
Arguably the safest and most thorough way of backing up an iPhone or iPad is to do an encrypted backup via Mac Finder. When the backup is complete you’ll have a copy of all of your data on your computer, complete with encrypted keychain contents. But it all takes up space that you might want to reclaim. As you can imagine, doing a full backup of your iPhone or iPad can take a lot of space. That’s fine if you’re lucky enough to be using a Mac with a multi-terabyte SSD. But most of us aren’t, so we need a way to trip the amount of data used by backups. We need to delete old ones. And in macOS Catalina, that’s a whole new process compared to deleting backups with iTunes. As you’ll see, removing backups this way is similar, but since iTunes is no more in modern macOS versions, it’s obviously a bit different and using a different process.
Here’s how to go about deleting old iPhone or iPad backups in macOS Catalina.
How to Delete iOS & iPadOS Device Backups from MacOS Finder in Catalina
This assumes you have made a backup of iPhone or iPad to macOS before, if not there will not be any backup to remove.
Plug your iPhone or iPad into your Mac using a USB cable.
Open a Finder window by clicking its icon in the Dock and click your iPhone or iPad in the sidebar.
Make sure that the “General” tab is selected and then click “Manage Backups.” You’ll find it at the very bottom of the window.
Click to select the backup that you want to delete and then click “Delete Backup.”
You’ll need to confirm that you want to delete the selected backup before the action is carried out.
The selected backups will be deleted.
Depending on the size of the device backups you removed, you can possibly get a ton more space on your Mac drive, whether it’s a hard disk or SSD, just by removing backups this way. This is particularly nice to do with old device backups that are no longer needed.
Of course you don’t want to delete the only copy of a device backup you have, so be sure you have a backup of the iPhone or iPad somewhere before deleting one from the Mac.
As a bonus, you’ll still have these backups safe and sound if you’re using Time Machine, assuming you use that feature to backup the entire Mac anyway. You can then go about restoring the backup if you still need it, depending on how much time has passed and how long Time Machine keeps files around. Another handy trick for redundant backups is to manually copy a copy of the backed up devices to other external storage mediums, like an SD card, USB flash drive, or external hard drive, which you can then refer to if needed.
Using a Mac is just one way of backing up your iPhone or iPad. You can also use a Windows PC with iTunes if you want to. If you’d rather not have to plug them into a computer at all, you can use iCloud for backups instead as well. With iCloud, your device will back itself up overnight and you won’t need to connect to a computer to restore anything, either. And just like the Mac and iTunes approaches, you can also delete backups from iCloud too.
Finder in MacOS handles all device management now that iTunes used to, and that includes not only device backups but also syncing music to iPhone or iPad in MacOS with the Finder too, along with other device management options. Basically all that used to be device management in iTunes is now in Finder.
Would you like to turn off Netflix autoplay of previews and trailers? It’s fairly simple to disable preview autoplaying, and you can always reenable it again should you change your mind.
As you likely have noticed by now, Netflix automatically plays previews and trailers of shows and movies as you browse around. Some users may wish to disable preview autoplaying on Netflix however.
This tutorial will show you how quickly and easily you can turn off autoplaying previews and trailers for Netflix on any device, including iPhone, iPad, Apple TV, Android, Xbox, Switch, Roku, Amazon Fire TV, Netflix on the web on Mac or Windows, or anything else.
How to Disable Netflix Autoplay Previews & Trailers Videos
In order to turn off Netflix autoplaying previews, you must use a web browser on any internet connected device, here’s how it works:
Sign in to the Netflix account you wish to disable autoplay previews and trailers for
Choose “Manage Profiles” from the menu options
Select your user profile that you want to turn off autoplay previews for
Uncheck the option for “Autoplay previews while browsing on all devices”
Choose Save
Optionally, repeat the steps to disable autoplay previews and autoplay trailers on other users for the same Netflix account
Once you disable autoplay previews on Netflix you may have to wait a little bit for the setting to carry over to all of your other devices.
For example, if you use Netflix on a variety of devices like Apple TV, Amazon Fire TV, Xbox, Nintendo Switch, iPhone, iPad, Android, Roku, as well as a computer or tablet web browser, you may find it takes a little bit for the setting to take effect.
If you’re impatient, Netflix says you can switch Netflix profiles and switch back again to forcibly reload the profile with the updated autoplay setting, so give that a try if the autoplay preview setting hasn’t updated yet.
You can always re-enable autoplaying previews and trailers on Netflix again by returning to the Netflix.com profile settings and adjusting the checkbox for “Autoplay previews while browsing on all devices” so that it’s enabled again.
Whether or not you want to turn off autoplaying previews likely depends on your personal preferences, but if you’re trying to conserve bandwidth you may be more inclined to do so as well.
Another way around autoplaying previews is if you download Netflix shows for offline viewing to iPhone or iPad you will find that once the device is not connected to the internet, the random previews will not play since they’re not able to load, but that’s obviously not a settings option.