Want to change the name of your AirPods? You can quickly change AirPods name from the Settings app of the synced iPhone or iPad.
Note this is just a simple name change of AirPods, it does not require resetting AirPods nor does it require setting them up again. You simply open the pertinent iOS settings, rename the AirPods, and that’s about it.
How to Rename AirPods
Here is how you can easily rename AirPods, right from iOS:
Open the “Settings” app on the iPhone or iPad that AirPods are connected to
Go to “Bluetooth”
Find the AirPods in the Bluetooth device list then tap on the (i) button next to the AirPods
In AirPods settings, tap on “Name”
Enter the new name you’d like to change AirPods name to, then tap the back “<” button to confirm the AirPods name change
Exit out of Settings as usual
Now AirPods will have whatever name you chose, and that name will be visible anywhere that you can see or access AirPods, including in Bluetooth settings, when you check their battery level, and anywhere else you might see the AirPods from iOS.
You name AirPods whatever you want, whether that’s simply calling them “AirPods” or “Paul’s AirPods” or giving them some other customized name, the choice is yours. You can easily change their name again at any time by simply returning to the settings as covered above.
In a similar manner, you can also easily change the name of iPhone, iPad, or an iPod touchby going to the appropriate Settings in iOS.
This obviously covers iOS, but you can also change the name of AirPods from a Mac, assuming the AirPods are connected to that same Mac anyway, by going to Bluetooth settings in MacOS.
As always, if you have any particularly helpful advice, tips, tricks, suggestions, or general input about renaming AirPods, share with us in the comments below!
Have you ever been typing on a Mac laptop keyboard and noticed that hitting the spacebar sometimes randomly inserts double spaces between words? Or maybe you’re typing some other letter and randomly two of that key is doubled-typed? Some MacBook Pro, MacBook Air, and MacBook users have discovered this happens seemingly at random, where hitting a key or the spacebar actually inserts two spaces or two characters instead of one, which is a nuisance at best and problematic at worst.
Mystery double key presses are a well-documented issue with some MacBook Pro, MacBook Air, and MacBook computers, and while it’s not clear what causes the issue or how widespread the problem is, if you’re encountering the double typing issue yourself, you may find a settings change in Mac OS can help reduce the frequency, or even fix it entirely. We’ll also cover a few other possible troubleshooting options for addressing double typing issues on Mac laptops.
How to Fix Double Typing Key Problems on MacBook Pro & MacBook Air
Note this settings change may not resolve the double typing problem for everyone, but for some Mac laptop users it does appear to completely remedy the double typing key and double spacebar issues. It’s a simple settings change either way and thus is worth a try, here’s what to do:
Pull down the Apple menu and go to “System Preferences”
Go to the “Keyboard” preference panel, and choose the Keyboard tab
Locate the “Key Repeat” slider setting and adjust it to the “Off” position
Exit out of System Preferences
Open any typing application (TextEdit, Word, Pages, etc) and try to replicate the double-typing issue by typing sentences and phrases as usual, the double space and double typing issue should be resolved
If you’re able to successfully type sentences, phrases, spaces, keys, letters, numbers, and anything else without double-typing occurring, then your issue may be resolved entirely by this simple settings change. If the double typing problem is now resolved when this feature iso ff, that could indicate a bug associated with the Key Repeat functionality in MacOS, though that’s purely speculation.
Unfortunately not all MacBook, MacBook Pro, and MacBook Air users will have such luck, and some Mac laptop owners may discover they issue persists despite changing the key repeat settings.
Mac Laptop Still Double Typing? Clean the Keyboard!
If the Mac is still double typing characters and spaces, the next thing you should do is clean the Mac keyboard, which can be made easier with an app called ‘Keyboard Cleaner’ that temporarily blocks the keys on a computer so that they can be pressed down without inserting any characters. Typically wiping down the keys with a very lightly damp cloth or
If you have a 2016 or later MacBook Pro with the newer flat keyboard design, then you can also choose to follow this official instruction set from Apple on cleaning a MacBook / Pro keyboardwhich involves a series of gymnastic movements of the computer with precise angle instructions, rotation suggestions, and directional recommendations on how to blast a keyboard with a third party compressed air canister. It’s a fascinating support guide, and the method described using compressed air might work to resolve key issues for you.
Help, my MacBook Pro / MacBook Air keyboard is still typing double-spaces and double keys!
If you cleaned the keyboard and made the above settings change to Key Repeat and yet you find your Mac laptop keyboard is still randomly repeating keys when pressed once, it is possible the MacBook Pro, MacBook, or MacBook Air keyboard has a physical hardware problem.
The good news is that Apple actually has an extended service program for faulty keyboards on some Mac laptop models, including all 2016 MacBook Pro models, all 2017 MacBook Pro models, all 2015, 2016, and 2017 12″ MacBook models (note the keyboard program does not include any 2015 MacBook Pro or Air model, which had a completely different keyboard design). In fact, the first keyboard issue identified by Apple with the faulty keyboards on some Mac laptops is “Letters or characters repeat unexpectedly”. Thus if your Mac laptop falls in that model release year, you may be able to get a free keyboard repair. If you aren’t sure which model year Mac you have, you can check when a Mac was built and what the Mac model is with these instructions.
The “Keyboard Service Program for MacBook and MacBook Pro” from Apple covers many modern Mac laptops with the new flat key keyboard design. Interestingly, the 2018 model year MacBook Pro and 2018 MacBook Air are not included in the keyboard repair program list, despite those Mac laptops having the same flat keyboard design, and despite some users have issues with double-repeating keys as well (yours truly included with a max-spec 2018 Retina MacBook Air, hence part of the motivation of this article).
Regardless, if you have a 2018 model year Mac laptop that is experiencing the double-key press issue, and cleaning the keys or disabling the aforementioned ‘Key Repeat’ does not work to resolve the double-typing keyboard issue for you, you might want to reach out to Apple Support anyway, because many 2018 Mac laptops will still be covered under the limited warranty.
As you may have noticed, a prominent microphone button is visible on the iOS keyboard for iPhone and iPad, which when tapped will use voice-to-text to dictate spoken text to the iOS device in lieu of typing. Some users may never use the microphone button, while others may accidentally tap on the mic button, in which case it can be desirable to remove the microphone button from the keyboard on iPhone and iPad completely.
Note that you can not simply hide and show the microphone button from the keyboard on iOS as needed, but you can remove the microphone button completely by disabling a separate feature. Essentially this means you’ll be removing the microphone button by turning off a text-to-speech capability in iOS, and that’s what we’re going to show you how to do here as a way to hide the mic / dictate button from the onscreen keyboard.
How to Remove Microphone Button from Keyboard on iPhone or iPad
Open the Settings app in iOS
Go to “General”
Now go to “Keyboard”
Scroll down and locate “Enable Dictation” and toggle that button to the OFF position
Confirm that you want to disable Dictation by choosing ‘Turn Off Dictation’, this will remove the microphone from the iOS keyboard
Exit out of Settings as usual
Now anytime you access the keyboard on iPhone or iPad, the prominent microphone / dictation button will no longer be visible, or available.
If you decide you want the microphone and dictation button back again on the keyboard of iPhone or iPad, simply toggle the Dictation feature back on again.
Note this settings change will not impact the microphone in the Messages app that is within the text-entry field, a separate feature which allows for sending voice audio messages in iOS. That can be a little confusing to have two microphones on the same keyboard, but they have different functionality.
Most iOS users will likely want to leave Dictation enabled and keep the microphone on the keyboard of iPhone or iPad because it’s useful, but if you don’t find the feature to be helpful or you hit it accidentally, disabling it can be reasonable too.
Why is the microphone button missing from my iPhone / iPad keyboard?
If you do not have a microphone button on the keyboard of iPhone or iPad, it likely means the device does not have dictation enabled to begin with. Another possibility is that the iOS device or iOS version does not support dictation, though that’s less likely given the feature has been around for quite some time.
If you don’t have the microphone button on iPhone keyboard but you want to have it for dictating text, simply reversing the above settings change and enabling Dictation will regain the microphone button the iOS keyboard.
Like nearly all iOS settings changes, these adjustments can be made at anytime, as disabling or enabling Dictation in iOS is just a matter of adjusting the appropriate toggle in the Settings app.
Have an older Mac but want Hey Siri voice commands? With a little effort, you can get ‘Hey Siri’ on unsupported Macs by using a creative workaround. While new Mac models can enable Hey Siri on the Mac as easily as checking a setting in system preferences, older Macs do not support the same Hey Siri feature. This tutorial will show you how you can replicate the exact same “Hey Siri” capability on any Mac that does not support Hey Siri by default, as long as it has regular Siri functionality.
This has been tested and confirmed to work on Macs that have Siri and without official Hey Siri support. This includes Macs running macOS Mojave, High Sierra, and Sierra, as long as Siri is enabled on the Mac you will be able to use this workaround approach to mimic Hey Siri functionality. You will need a microphone, and the Mac must have Siri support. The rest is just a matter of configuring the Mac to listen for a special command and then tie that command to Siri to replicate Hey Siri hands-free voice commands on a Mac.
How to Enable “Hey Siri” on Unsupported Macs
This is a multiple-step process to setup Hey Siri on an unsupported Mac, follow the steps carefully:
Go to Apple menu and choose “System Preferences”
Choose “Siri” preference panel and make sure Siri is enabled
Now go to the “Keyboard” preference panel and to the “Dictation” tab and check the box for “Dictation” to ON and then check “Use Enhanced Dictation” as well
Next go to the “Accessibility” system preference panel and choose ‘Dictation’ from the sidebar, and check the box for “Enable dictation keyword phrase” and type in ‘Hey’ * and then click the “Dictation Commands” button
Check the box for “Use advanced commands” then click the + plus button
Configure the advanced Dictation command as follows:
When I say: “Siri”
While using: “Any Application”
Perform: Run Workflow -> Other -> Navigate to /Applications folder and select “Siri.app”
The configuration should look like the following, with the Perform action being “Open Siri.app”, if everything matches choose “Done”
Confirm that the “Hey Siri” trick is working by saying “Hey Siri what’s the weather” or some other Siri command
Assuming you configured things as described above, you will now have a fully functioning “Hey Siri” hands-free voice commanded assistant on a Mac, even if that Mac does not officially support Hey Siri.
Try it out yourself, it works! The response time and accuracy seems about the same as official Hey Siri on the Mac.
Basically anything from the Mac Siri commands list will work when activated through voice this way.
* You can use any other dictation keyword phrase, we’re using “Hey” so that we can mimic the “Hey Siri” feature. But you can use “Open the pod bay doors Hal” or something else if you feel like it.
How to Turn Off the Hey Siri Workaround on Older Macs
If you want to turn this off, you can return to the Accessibility Dictation section and uncheck the various boxes. If you want to disable Enhanced Dictation and disable Siri in general you can do that too. You may have noticed that Enhanced Dictation downloads a 1.2gb package for it to work, but you can remove Enhanced Dictation to reclaim that disk space on the Macif desired.
While this is obviously for the Mac, enabling Hey Siri on iPhone or iPad is easy and supports many devices, and you can enable Hey Siri on Apple Watch too. Whichever device you use Siri on you can use many Siri commands from the list and yes even the funny Siri commands that are just plain goofy.
Intel Power Gadget for Mac is a processor monitoring tool that allows computer users to monitor the performance of an Intel processor in real-time. Intel Power Gadget will show you power and energy information in watts, the clock speed frequency of the CPU in GHz, the temperature of the CPU, and CPU utilization. It’s a handy utility for many reasons, and some Mac users may even use it as an alternative system monitor sort of like Activity Monitor.
Newer versions of MacOS can sometimes have trouble installing Intel Power Gadget, and many MacOS Mojave users have discovered the installation fails or the app doesn’t work. This installation failure is usually due to a default security setting in MacOS, and is easy to resolve.
How to Install Intel Power Gadget on MacOS
Installing Intel Power Gadget on the Mac is easy, though you may run into a Gatekeeper security block that can cause installation trouble. Here’s how to successfully install the tool in modern macOS releases:
Launch the “Install Intel Power Gadget.pkg” from the mounted disk image as usual and start the installation process
If you see a ‘System Extension Blocked’ message, click on “Open Security Preferences”, otherwise go to the Apple menu and choose ‘System Preferences’ followed by ‘Security’
Under the ‘General’ section of the Security preference panel, click the button to “Allow” the ‘system software from developer Intel corporation apps’ which was blocked by Gatekeeper *
The Intel Power Gadget installer should proceed as usual and successfully install, if it fails then just run the “Install Intel Power Gadget.pkg” package installer again
When finished, launch Intel Power Gadget from the /Applications folder as usual
If you run Intel Power Gadget while you’re using the Mac, you may notice that processor performance can change around quite a bit depending on what you’re doing and what sort of apps you’re using.
It is completely normal for the processor charts to be changing constantly, and you’ll find that the processor clock speed may go up or down, as will both CPU temperature and power, typically correlated with processor utilization – this makes sense as more processing utilization requires more power to have a higher clock speed, which raises the temperature of the CPU, and of course the opposite can happen as well with CPU speed lowering along with lower power and lower temperature and utilization when the Mac is less busy. If you’re interested in doing so, you can see this directly and test it yourself by running any CPU intensive task, like the Terminal command ‘yes’, which is often used for stress testing a Mac (or any Linux PC):
As you can see the graphs for power, frequency, temperature, and utilization suddenly shoot way up as the ‘yes’ command runs in the adjacent Terminal window as a stress test, which is normal and expected behavior for the processor.
Uninstalling Intel Power Gadget on Mac
Decide you don’t need Intel Power Gadget? Uninstalling Intel Power Gadget is quite simple. Simply navigate to the /Applications folder and open the Intel Power Gadget directory, then run the included ‘Uninstaller.pkg’ package file. This will remove the Intel Power Gadget application and the associated kernel extension from the Mac.
* If you’re a truly advanced Mac user and you’re bothered by these type of security measures causing installation issues, you can choose to allow apps from anywhere in macOS by disabling Gatekeeper, though that is strongly not recommended for the vast majority of Mac users. There are quite a few apps that can fail to install because of the stricter security standards that are in place in modern macOS releases, and if you’re the type of person running Intel Power Gadget then you may encounter also a similar issue with installing VirtualBox in MacOS where the kernel driver fails to install, thereby preventing that app to work as well. Typically you can bypass Gatekeeper on a one-off basis as discussed here, which is arguably the best approach, but you can also just turn it off completely if needed.
Resetting AirPods returns AirPods to factory default settings, this procedure can be helpful for troubleshooting various problems with AirPods, but it can also be necessary if you plan on giving used AirPods to someone else, or even to sync and connect the AirPods to another compatible device. Essentially this will be resetting AirPods to factory settings, as if they were brand new.
Some common reasons to reset AirPods for troubleshooting reasons are if the airPods are suddenly not showing up as available, if the AirPods case is not charging the AirPods out of the blue, if there are curious battery issues with the AirPods, amongst other issues that could be experienced. Usually a quick reset to factory settings fixes these type of AirPods issues quickly.
How to Reset AirPods
Make sure the AirPods and the charging case all have a battery charge available
Place both AirPods into the charging case if you haven’t done so already, close the lid for 15 seconds
Open the lid of the AirPods case, keeping the AirPods secured in place
Turn the AirPods Case around and look for the small button on the back, press and hold the case button until the light flashes orange a few times, and then flashes white – this indicates the AirPods have been reset
Now that the AirPods have been reset, if you open the AirPods case near an iPhone or iPad, the the setup for AirPods process will begin automatically again.
If you are still experiencing issues with the AirPods, the first thing you should do is charge the AirPods longer in their case, aim for at least 20 minutes or longer of charging. Then you can also try to select them from the iPhone or iPad Settings app and either forget the Bluetooth device or even disconnect the Bluetooth device from iOS and then start the AirPods reset process over again.
It can also be a good idea to check for and update AirPods firmware software if there are updates available.
Resetting devices to factory defaults can be a common troubleshooting approach to figuring out and resolving a variety of software issues, and not just for AirPods. You can also reset iPhone to factory settings, reset and erase iPad and iPad Pro, reset Mac to factory settings, and even reset Windows 10 to factory default settings too. For resetting AirPods to factory settings there is no concern for data loss, whereas for resetting other devices it is important to have a backup available before you reset the device, otherwise you may permanently lose data from an iPhone, iPad, Mac, or PC.
Have you ever wished you could make a phone call with an iPad? If you have both an iPad and an iPhone, you can actually make phone calls from the iPad, with the call being relayed automatically through the iPhone. You can also use the iPad to receive calls too. This is a great feature for many Apple users with multiple devices, and it uses a similar approach that allows you to make phone calls from the Mac with the iPhone too.
To be able to make a phone call from the iPad, you will need an iPhone as well. Additionally, the iPad and iPhone must both be logged into the same iCloud account and Apple ID, and the devices must be on the same wi-fi network, and the devices must be in the same general proximity to each other. Other than that, it’s a matter of enabling the features and knowing how to use them.
How to Make Phone Calls with iPad
To make phone calls with iPad, you’ll first need to configure a few settings on the iPhone and iPad. After those configurations are set, making phone calls from iPad is simple.
First, enable iPad calls on the iPhone:
Open the Settings app on the iPhone
Go to “Cellular” and then tap on “Calls on Other Devices”
Toggle the setting for ‘Allow Calls on Other Devices’ to ON and make sure the iPad you want to make calls on is toggled ON as well
Exit Settings
Second, enable calls from iPhone on the iPad:
Open the “Settings” app on the iPad
Now go to “FaceTime” and toggle “Calls from iPhone” to the ON position
Making Phone Calls from iPad
Open the ‘FaceTime’ app on the iPad
Tap the + plus button to start a new call
Type a phone number to call, or choose a contact by tapping the (+) plus button
Tap on the green ‘Audio’ button to start the phone call from the iPad
Notice the ‘calling… using your iPhone’ message near the top of the iPad screen
Hang up the phone call by tapping on the red phone icon
You can also initiate and start phone calls on the iPad from the Contacts app, or by tapping on phone numbers on web pages that you see in Safari.
Receiving iPhone Calls on the iPad
With the above settings turned on, the iPad will ring when the iPhone gets an inbound call. You can then answer the phone call on the iPad just like you would on an iPhone. The sound will play by default in speaker mode, but you can use headphones or AirPods too.
By the way, if you also have a Mac and an iPhone, then you might be interested in enabling iPhone calls on the Mac so that you can make and receive phone calls on a computer as well. You can have the iPhone calling feature enabled on multiple Macs and iOS devices, even other iPhones.
Other options for using an iPad like a phone are available too, for example you can make FaceTime Audio calls or FaceTime Video calls (though neither of those are technically a phone call), and apps like Skype and Google Voice can also be used to make phone calls from an iPad, even using unique phone numbers if desired.
Advanced Mac users who are interested in the world of Information Security (InfoSec) can easily test out ParrotSec Linux in live boot mode by using a virtual machine.
In this particular walkthrough, we’ll show you how to quickly get ParrotSec running in live mode within the free Parallels Desktop Lite app, but if you want to try this with VirtualBox, VMware, or Parallels, you could do that just as easily too.
For some quick background; ParrotSec, or Parrot Security OS, is an increasingly popular infosec / security centric Linux distribution based on Debian, and it comes ready-made with a variety of security features and forensic tools. With a full suite of utilities for penetration testing, security research, digital forensics, vulnerability assessment, cryptography, software development, and anonymizing web browsers and privacy protection, ParrotSec can offer a simple to setup look into the world of tools and resources used by information security professionals.
This is obviously aimed at very advanced users, but because of how virtual machines work, just about any tech savvy Mac user can test out the ParrotSec operating system within a self-contained virtual machine, without having an impact on the underlying Mac operating system. You can simply toss the ISO into Parallels Desktop Lite and it boots to play around with, and you can just as simply shut down the Parallels Desktop Lite virtual machine and delete the ParrotSec ISO file and it will be removed from the computer completely. No need to partition any drives, format any disks, dual boot, etc.
How to Run ParrotSec Live on Mac with Parallels Desktop Lite
Parallels Desktop Lite is free to download, as is ParrotSec. Getting the live mode to boot within Parallels is quite easy, here’s all you need to do:
Get Parallels Desktop Lite free from the Mac App Store
Now get ParrotSec free from parrotsec.org, for the tutorial here we’re using the free Home Edition 64bit ISO, which is 1.8 GB. You can download the security centric build or other builds if you want
Run Parallels Desktop Lite and under “Create New” select the option to ‘Install Windows or another OS from a DVD or image file’
Parallels Desktop Lite should find the freshly downloaded ParrotSec ISO file (labeled Debian GNU/Linux Parrot-*.iso), so select it then click Continue to boot
At the Parrot home boot menu, choose “Live Mode” to boot into the ParrotSec desktop experience (or select another boot option if desired)
In a few moments you’ll be at the ParrotSec desktop in a live boot mode, where you can explore and play around with some of the tools available, as of this writing, the ParrotSec live username is “live” and the live password is “toor”
When finished, shut down the Parallels virtual machine or quit the app to leave ParrotSec
Remember this is a virtual machine, so the performance is not going to be anywhere close to what you’d expect if running system software natively on actual hardware. But for the curious, it should still be fun to explore and experiment with.
If you toyed around with ParrotSec and decided you have no use for it, you can just delete the ISO file you downloaded and that’ll be that. You could also remove Parallels Desktop Lite if you’d like, but it’s a handy app to have around for virtualizing various Linux and MacOS releases.
You can also use VirtualBox (free), VMware (paid), or Parallels (paid), but for our purposes here we are using Parallels Desktop Lite because it’s extremely simple. Parallels Lite is also cool because the free version also allows you to run MacOS Mojave in Parallels Desktop Lite, or MacOS High Sierra and Sierra in Parallels Desktop Lite too, as well as various other Linux distributions. You will have to pay to use Windows with Parallels, but if you’re committed to virtualizing Windows and want to use free software you can get preconfigured Windows 10 with Microsoft Edge virtual machines or simply install Windows 10 into VirtualBox too, whichever works for your needs.
This is obviously for Mac (though you can certainly use the same ParrotSec ISO on any other computer as a virtual machine), but if you’re an iOS user and you’re feeling left out, you could always ssh into a computer running ParrotSec, or if you’re adventurous you could try and build your own environment natively with something like iSH Linux shell on iPad or iPhone. That’s far beyond the scope of this particular article though.
Want to run a simple web server off of an iPad or iPhone? If you have iSH linux shell running in iOS then you can easily start and run a simple web server directly from an iPhone or iPad. By running iSH and starting a web server with python 3 you can then serve either HTML files or a directory listing to the same device via localhost, or to anyone on the same network with the iOS devices IP address. This is obviously not going to be as fully functional or featured as running apache or nginx, but if you want to geek around with a simple local html development environment or serve something via http from an iPhone or iPad, it’ll do the trick. Plus, it’s just plain cool.
How to Run a Web Server on iOS with iSH and python
Install iSH on the iPhone or iPad as directed here if you haven’t done so already, otherwise launch iSH
At the iSH command line in iOS, enter the following syntax and hit return:
python3 -m http.server
When you see the ‘Serving HTTP on 0.0.0.0 port 8000’ message, now you’re ready to connect the web server from either the same device or another:
To connect to the iOS web server from the same device (localhost), point any web browser to:
To connect to the iOS web server from another device on the same network, point any web browser to:
http://DEVICE-IP-ADDRESS:8000
Replacing ‘DEVICE-IP-ADDRESS’ with the IP address of the device running iSH and the python web server, you can find the iOS devices IP address in Network Settings if needed. (Example screenshot shows the iOS device IP of 192.168.1.10)
Pretty cool, right?
You’ll probably want to put some basic index.html file at the present working directory where you’re running the python server from. If you don’t have a simple index.html file in the current working directory on the iOS device where the python command is being run, then a simple directory listing is shown instead.
While the simple web server is running, you’ll see standard logging information appear in the iSH terminal window, showing access times, dates, IP addresses, GET and PUSH requests, 404 errors, and other typical access log information.
We’re obviously going with the python3 web server command here, but you can also use the Python 2 instant web server if you’d prefer, since both python2 and python3 are available on iSH.
Anyway, while the isn’t a particularly practical solution to web hosting or web development and you likely won’t be using this for anything too serious, it’s still fun and interesting as a proof of concept for us geekier folks. Perhaps one day we’ll get some easy web server setup in the iOS world like MAMP for Mac, but until then the solutions are fairly limited and most web workers and developers will continue to be using ssh to connect to a web server for the time being.
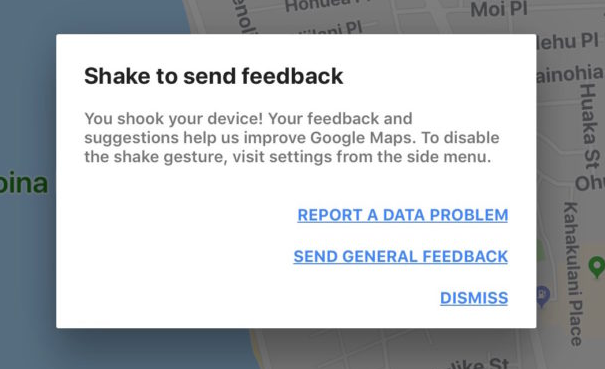
Have you ever been using Google Maps on iPhone or iPad and noticed a little pop-up alert message stating “Shake to send feedback – You shook your device! Your feedback suggestions help us improve Google Maps.” with options to report data problems, send feedback, or to dismiss the alert. Sometimes Google Maps users on iPhone or iPad can accidentally trigger the ‘Shake to send feedback’ feature, or they may unintentionally trigger that alert rather than the typical ‘Shake to Undo’ feature on iPhone and iPad.
If you don’t want to see the ‘Shake to send feedback’ alert come up in Google Maps for iOS, this article will show you how to turn that off.
How to Disable ‘Shake to Send Feedback’ in Google Maps for iOS
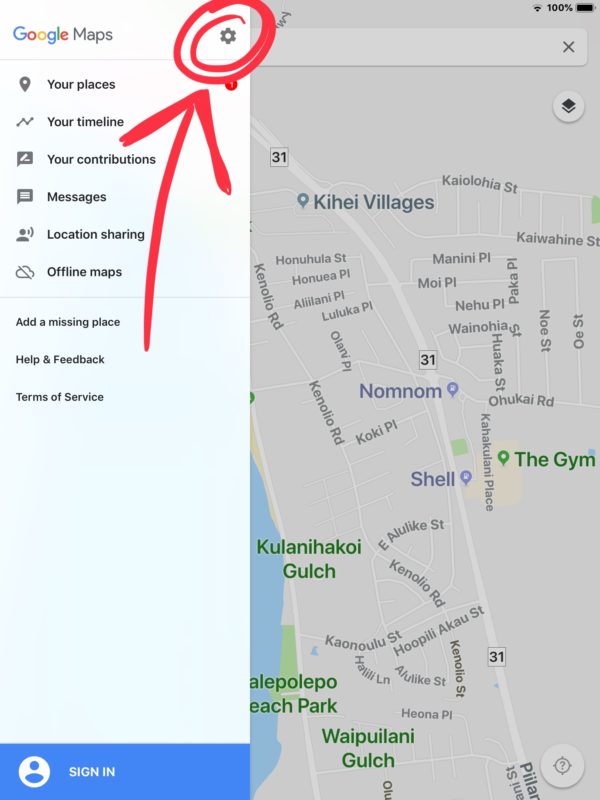
Open the Google Maps app, then tap on the three lines button in the upper left corner
Now tap on the Gear icon to access Settings in Google Maps
Locate the switch for “Shake to send feedback” and turn that to the OFF position to disable this feature in Google Maps for iOS
Once the feature is off, shaking the iPhone, iPad, or iPod touch will no longer trigger the ‘Shake to Send Feedback’ alert message on the screen.
If you disable the “Shake to send feedback” option in Google Maps instead shaking the device will result in triggering the Shake to Undo and Redo in iOS feature, unless of course you or someone else have disabled Shake to Undo in iOS on the iPhone or iPad.
Whether or not you want to turn this off or leave it on likely depends on how you use Google Maps, and how often you intentionally or unintentionally bring up the feedback dialog message. For the most part it should not trigger accidentally, though if you are using an iPhone or iPad on an extraordinarily bumpy road or terrain (like heavy unplowed snow, a poorly maintained winter road with bumpy ice ruts, an unpaved forest road, or some 4×4 trail), then you may see the alert message coming up on the Google Maps app in iOS when it’s unexpected to – those situations in particularly will likely benefit from turning off the feature if they find it to be frustrating.
But if you’re driving around and you see this on Google Maps for iOS:
And you don’t want to see that again, now you know how to turn it off!