Apple has released iOS 12.4.6 for older model iPhone and iPad devices that are not able to run iOS 13.4 and iPadOS 13.4.
The iOS 12.4.6 is said to include important security updates and thus is recommended for eligible users to download and install onto their devices. No new features are expected to be included with iOS 12.4.6.
Devices eligible for the iOS 12.4.6 update include iPhone 6 Plus, iPhone 6, iPhone 5s, iPod touch 6th generation, iPad Air 1, iPad Mini 2, and iPad Mini 3. Newer iPhone and iPad models are able to download iOS 13.4 and iPadOS 13.4 instead.
How to Update to iOS 12.4.6
Before anything else, backup the iPhone or iPad to iCloud, iTunes, or to MacOS before beginning any system software update. Failure to backup could lead to data loss.
The easiest way for most users to download iOS 12.4.6 is through the Software Update mechanism in Settings app on the iPhone, iPad, or iPod touch :
Open the “Settings” app
Go to “General” and then choose “Software Update”
Choose to “Download and Install” iOS 12.4.6
iOS 12.4.6 will download and install automatically, requiring a device reboot to complete. When the installation has finished, the iPhone, iPad, or iPod touch will automatically boot itself back up and be usable again as normal.
Release notes accompanying the iOS 12.4.6 update download are very brief stating that it “provides important security updates” and is therefore recommended for all users who are eligible for the update.
More advanced users can also choose to update iPhone or iPad manually by using IPSW as detailed here.
Separately, Apple has also released macOS Catalina 10.15.4 for Mac, along with Security Update 2020-002 for macOS Mojave and High Sierra, iPadOS 13.4 for newer iPad, iOS 13.4 for newer iPhone, along with updates for tvOS and watchOS.
Would you like to download music directly from Apple Music to iPhone or iPad? Doing so allows for offline listening, which is a really handy capability for many situations.
Like any other streaming service, by default Apple Music requires you to be connected to the internet. It’s all sunshine and rainbows as long as you’re streaming your music over Wi-Fi or cellular, but what if you lose connectivity? Or, what if you’re asked to switch your device to Airplane mode on a flight? The answer is pretty simple. You can’t stream music anymore. However, Apple does offer a solution in the form of Offline Listening, which lets you download music directly from Apple Music to iPhone or iPad.
Are you an Apple Music subscriber looking to download your favorite songs for listening offline? If so then you’ve come to the right place. In this article, we’ll be discussing exactly how you can download music from Apple Music to your iPhone or iPad for offline listening.
How to Download Music from Apple Music for Offline Listening on iPhone & iPad
Apple Music only allows you to download songs that are in your library. So, if you’re trying to download a song that you just looked up, make sure you add it to your Apple Music library first. Now, simply follow the steps below to download music to your iPhone or iPad.
Open “Music” app from the home screen of your iPhone or iPad.
Head over to the “Library” section within the app and select any album where you want to download your favorite song from.
Now, tap on the “cloud” icon located right next to the title of the song to start the download. Once complete, this icon will disappear, indicating that the song isn’t stored on the cloud anymore and is available for offline access.
Here’s another way to download a song. While you’re listening to a song in the playback menu, tap on the “triple dot” icon located next to the song title.
A menu will pop up from the bottom of your screen. Here, simply tap “Download” to store the song offline.
As for the last step, in order to access all the songs you’ve downloaded to your iPhone or iPad, head over to the “Library” section and tap on “Downloaded Music”.
That’s all there is to it. You’ll be able to listen to your favorite music even if you aren’t connected online.
It’s always nice to have a few songs downloaded as a backup just in case you lose connection, especially while travelling.
In addition to downloading songs available on the streaming platform, your Apple Music subscription gives access to iCloud Music Library. Thanks to this nifty feature, the songs you’ve added to your iTunes Library on a PC / Mac will be automatically available for download on the rest of your Apple devices.
Most streaming services including Apple’s primary competitor Spotify, allows you to consume media offline, so it’s nothing new. Despite all the advances in technology, it’s still pretty difficult to stay connected at all times. A power outage or loss of cellular coverage is all it takes to stop you from accessing internet.
Offline Listening is actually pretty useful for people living in rural areas with unreliable internet connections, regions with less than stellar internet service, and even developing countries where a majority of the people don’t have access to fast and reliable internet yet. Considering how streaming could get interrupted due to poor connectivity, it’s better to listen offline and avoid all the buffering issues.
Apple Music is a hugely successful music streaming service that was introduced back in 2015 to compete against the likes of Spotify and Pandora, and it’s a great service for many users because it’s baked into the stock Music app that’s available on all iOS devices. Additionally, the service is also accessible on Android devices via a standalone app, and available on Windows PC / Mac through iTunes and the Music app in MacOS Catalina or later.
Did you know that you could use your iPhone as a remote to control your iTunes library? If you regularly use iTunes on your Windows PC or Mac for listening to music or playing back content purchased from the iTunes Store, this feature will prove to be extremely useful.
Let’s say you’re away from the keyboard and you’re busy doing something else in the next room. You could use your iPhone to switch between songs in your library and continue listening without even having to move. Although this article focuses primarily on the iPhone, you could also use your iPad or iPod Touch to remotely control your iTunes library.
Are you interested in learning how this works, so you can set it up on your iOS device? Then you’re in the right place, because we’ll be discussing how you can set up and use your iPhone or iPad as an iTunes Remote on both the PC & Mac.
How to Setup & Use iPhone as iTunes Remote
In order to successfully connect your iPhone to iTunes on your computer, you need to make sure that both of the devices are connected to the same Wi-Fi network. You’ll also need to download and install the iTunes Remote app from the App Store. Once you’re ready, simply follow the steps below to set up and start using your iOS device as a remote control.
Open the “Remote” app from the home screen of your iPhone, iPad or iPod Touch. It will be indicated by the icon shown below.
Tap on “Settings” at the top-right corner of the screen.
Now, press “Add an iTunes Library” as shown in the screenshot below.
The app will now display a 4-digit code that you need to manually enter in the iTunes desktop client.
When you open iTunes on your computer, you’ll notice a tiny remote app icon right next to the music category, as shown below. Click on it to continue with the setup.
Now, simply type in the 4-digit code and click on done.
iTunes will now indicate that your device has successfully connected and paired with iTunes.
To start using the Remote app, tap on your iTunes Library within the app, which is usually indicated the username that you have on your computer.
Now, you’ll be able to navigate through the menus just like you normally would on iTunes, and control what’s being played back on your computer.
If you followed along you’re now set up to start using your iPhone, iPad or iPod Touch as an iTunes Remote with a Mac or Windows PC.
In addition to being able to control music and video content that’s stored in your iTunes library, you will also be able to edit and create new playlists which will automatically be updated in the desktop client immediately.
Since this is a wireless feature, you might be concerned about any sort of latency issues. However in our testing, the latency was very minimal and wasn’t really noticeable in most cases. That being said, the latency might heavily depend on the Wi-Fi range, so make sure you’re not too far away from the router.
This may be more useful on Windows PC and older Mac system software at this point since the latest versions of MacOS have deprecated iTunes, but the Music app still allows for similar capabilities on Mac.
Speaking of remote control, are you trying to remotely install apps on your iPhone using iTunes? Well, you don’t need iTunes Remote for that, as that’s a completely different capability. You simply need to make sure that you’re logged into the same Apple ID on both your device and iTunes and have the proper setting configured to have that feature work.
Need to clear up some disk space or get rid of some old iPhone or iPad backups on a Mac? With the latest versions of MacOS, managing iOS and iPadOS device backups is done entirely in Finder, including deleting and removing device backups.
Arguably the safest and most thorough way of backing up an iPhone or iPad is to do an encrypted backup via Mac Finder. When the backup is complete you’ll have a copy of all of your data on your computer, complete with encrypted keychain contents. But it all takes up space that you might want to reclaim. As you can imagine, doing a full backup of your iPhone or iPad can take a lot of space. That’s fine if you’re lucky enough to be using a Mac with a multi-terabyte SSD. But most of us aren’t, so we need a way to trip the amount of data used by backups. We need to delete old ones. And in macOS Catalina, that’s a whole new process compared to deleting backups with iTunes. As you’ll see, removing backups this way is similar, but since iTunes is no more in modern macOS versions, it’s obviously a bit different and using a different process.
Here’s how to go about deleting old iPhone or iPad backups in macOS Catalina.
How to Delete iOS & iPadOS Device Backups from MacOS Finder in Catalina
This assumes you have made a backup of iPhone or iPad to macOS before, if not there will not be any backup to remove.
Plug your iPhone or iPad into your Mac using a USB cable.
Open a Finder window by clicking its icon in the Dock and click your iPhone or iPad in the sidebar.
Make sure that the “General” tab is selected and then click “Manage Backups.” You’ll find it at the very bottom of the window.
Click to select the backup that you want to delete and then click “Delete Backup.”
You’ll need to confirm that you want to delete the selected backup before the action is carried out.
The selected backups will be deleted.
Depending on the size of the device backups you removed, you can possibly get a ton more space on your Mac drive, whether it’s a hard disk or SSD, just by removing backups this way. This is particularly nice to do with old device backups that are no longer needed.
Of course you don’t want to delete the only copy of a device backup you have, so be sure you have a backup of the iPhone or iPad somewhere before deleting one from the Mac.
As a bonus, you’ll still have these backups safe and sound if you’re using Time Machine, assuming you use that feature to backup the entire Mac anyway. You can then go about restoring the backup if you still need it, depending on how much time has passed and how long Time Machine keeps files around. Another handy trick for redundant backups is to manually copy a copy of the backed up devices to other external storage mediums, like an SD card, USB flash drive, or external hard drive, which you can then refer to if needed.
Using a Mac is just one way of backing up your iPhone or iPad. You can also use a Windows PC with iTunes if you want to. If you’d rather not have to plug them into a computer at all, you can use iCloud for backups instead as well. With iCloud, your device will back itself up overnight and you won’t need to connect to a computer to restore anything, either. And just like the Mac and iTunes approaches, you can also delete backups from iCloud too.
Finder in MacOS handles all device management now that iTunes used to, and that includes not only device backups but also syncing music to iPhone or iPad in MacOS with the Finder too, along with other device management options. Basically all that used to be device management in iTunes is now in Finder.
Would you like to turn off Netflix autoplay of previews and trailers? It’s fairly simple to disable preview autoplaying, and you can always reenable it again should you change your mind.
As you likely have noticed by now, Netflix automatically plays previews and trailers of shows and movies as you browse around. Some users may wish to disable preview autoplaying on Netflix however.
This tutorial will show you how quickly and easily you can turn off autoplaying previews and trailers for Netflix on any device, including iPhone, iPad, Apple TV, Android, Xbox, Switch, Roku, Amazon Fire TV, Netflix on the web on Mac or Windows, or anything else.
How to Disable Netflix Autoplay Previews & Trailers Videos
In order to turn off Netflix autoplaying previews, you must use a web browser on any internet connected device, here’s how it works:
Sign in to the Netflix account you wish to disable autoplay previews and trailers for
Choose “Manage Profiles” from the menu options
Select your user profile that you want to turn off autoplay previews for
Uncheck the option for “Autoplay previews while browsing on all devices”
Choose Save
Optionally, repeat the steps to disable autoplay previews and autoplay trailers on other users for the same Netflix account
Once you disable autoplay previews on Netflix you may have to wait a little bit for the setting to carry over to all of your other devices.
For example, if you use Netflix on a variety of devices like Apple TV, Amazon Fire TV, Xbox, Nintendo Switch, iPhone, iPad, Android, Roku, as well as a computer or tablet web browser, you may find it takes a little bit for the setting to take effect.
If you’re impatient, Netflix says you can switch Netflix profiles and switch back again to forcibly reload the profile with the updated autoplay setting, so give that a try if the autoplay preview setting hasn’t updated yet.
You can always re-enable autoplaying previews and trailers on Netflix again by returning to the Netflix.com profile settings and adjusting the checkbox for “Autoplay previews while browsing on all devices” so that it’s enabled again.
Whether or not you want to turn off autoplaying previews likely depends on your personal preferences, but if you’re trying to conserve bandwidth you may be more inclined to do so as well.
Another way around autoplaying previews is if you download Netflix shows for offline viewing to iPhone or iPad you will find that once the device is not connected to the internet, the random previews will not play since they’re not able to load, but that’s obviously not a settings option.
Are you an Apple TV+ subscriber looking to download your favorite shows and content onto your devices? You can easily download locally Apple TV+ shows to iPhone and iPad so that you can enjoy them offline, this is perfect for long trips, plane flights, train rides, or just posting up on your couch or in bed to binge-watch.
As you perhaps already know, Apple, in a move to compete against the likes of Netflix, Disney+ and other video streaming services, launched Apple TV+ some time ago (and if you recently bought an Apple device you can get a free Apple TV subscription for a year). Sure, it doesn’t (yet) boast a huge content library like Netflix and Prime Video, but they do have some of the biggest names in the film industry producing original content and that’s actually pretty impressive for a service that’s so new.
Although streaming content might be the way to go, not everyone can stay connected to the internet at all times. That’s exactly when offline viewing comes in. Apple TV allows you to download shows onto your iPhone or iPad, so you can watch them while you’re on the move or when your Wi-Fi is down.
In this article, we’ll be discussing exactly how to download Apple TV+ shows on your iPhone or iPad. Let’s see how this process works.
How to Download and Access Apple TV+ Shows on iPhone & iPad
Apple TV+ service is baked into the default TV app on your iPhone and iPad, where content purchased or rented from the iTunes store is normally stored. Simply follow the steps below to start downloading the content you want to watch offline.
Open the default “TV” app from the home screen of your iPhone or iPad.
In the “Watch Now” section, tap on the show or movie that you want to watch offline, as shown in the screenshot below.
Select any episode that you want to download onto your iPhone or iPad and tap on the “Cloud” icon located right next to the name of the episode.
Once downloaded, you’ll notice the iPhone or iPad icon right next to the name of the episode, indicating that it has been saved to your device for offline viewing. In order to view all your downloaded content, tap on “Library”.
Now, tap on “Downloaded”.
Here, you’ll be able to access all of your downloaded content, grouped by the title of the TV shows.
That’s all you need to do in order to download and view your favorite Apple TV+ shows for offline viewing.
From now on, you don’t have to always rely on your internet connectivity to watch your favorite TV shows. If you want to watch a show offline, just run through the process detailed above and you can download some Apple TV+ content to view on your device at any time, regardless of internet connectivity.
The ability to watch content offline is extremely handy for travelers, people living in rural areas with less reliable internet connections, people developing countries where a majority of the people don’t really have access to fast and stable internet, and for myriad other occasions. Considering how streaming could get interrupted due to poor connectivity, it can be better to watch shows offline and avoid the buffering issues that comes with streaming altogether. That being said, Apple doesn’t let you download multiple episodes of a show simultaneously at the moment just like downloading Netflix shows for offline viewing, but that could potentially change at some point down the line.
Apple TV+ might have a comparable shortage of content at the moment, but it offers a free trial and costs just $4.99 a month, which is considerably lower compared to the competition like Netflix and Disney+. However, Apple is betting on top-tier production and casting some of the biggest names in the industry, and over time it’s likely their streaming library will grow as they cut new deals and create new shows unique to the Apple TV+ platform. The company has also suggested they’ll be adding a new show or movie every single month to keep users engaged, so if you’re already hooked on Apple TV+ content you should get a regular stream coming in, so whether you want to watch it live or download it to your iPhone or iPad you’ll be able to enjoy plenty of TV shows and content into the future.
Did you know that Apple Maps has a feature that lets you ‘look around’ as if on the ground in some regions? Indeed it does, available for iPhone and iPad.
Most of us are familiar with Google’s “Street View”, a nifty feature within Google Maps that lets you view panoramic street-level images of various cities across the globe. When Street View was first introduced back in 2007, it was ahead of its time, but today, Google isn’t the only player in this space with plenty of competition to look out for, the latest one being Apple.
The Cupertino-based company recently started rolling out a similar functionality to Apple Maps in the United States, simply called “Look Around”. Quite frankly, Apple has taken their sweet time to add this functionality, considering how it has been seven years since Apple replaced Google Maps across iOS devices with their own web mapping service.
If you’re one of those iOS users interested in trying out this feature and see how it compares to Street View, you’ve come to the right place. In this article, we’ll be discussing exactly how you can use Look Around on Apple Maps for iPhone & iPad.
How to Use Look Around on Maps for iPhone & iPad.
Currently, the new “Look Around” feature is only available for select locations and larger cities, including popular cities like Los Angeles, New York, Las Vegas, and San Francisco, but the feature will grow so it’s worth checking out other locations too. So, if you’re interested in learning how to access this feature, simply follow the steps below.
Open the stock “Maps” app from the home screen of your iPhone or iPad.
Type any of the supported locations in the search bar and tap search on your keyboard.
Maps will now take you to the searched location. Here, simply zoom in slowly until you a “binocular” icon at the top-right edge of the screen.
As you can see in the screenshot below, it’s located right below navigation icon. Tap on the “binocular icon” to proceed to the next step.
Now, you’ll see a preview of the “Look Around” feature right at the top of your screen. The pin on the map will now be indicated by a binocular icon, which can be dragged around to get a street view preview of the pinpointed location. If you want to use Look Around in fullscreen mode, tap on the “stretch” icon at the top-left corner of your screen.
Here, if you want to look around the streets, simply tap anywhere on the screen and pan around for a 360-degree view. When you’re ready to exit Look Around mode, tap “Done” in order switch back to regular maps.
That’s pretty much all there is to it.
If you’re lucky enough to be residing in any of the currently supported locations, you’d be glad to know that the feature works seamlessly. Significant points of interests like businesses, restaurants, landmarks, etc. are all highlighted in Look Around for quick access.
If you live in a city, region, or country where Look Around isn’t available yet, don’t fret. You could take advantage of other handy Apple Maps features like “Look Inside” that lets you access indoor maps of Airports, shopping malls and other notable landmarks while you patiently wait for its roll-out. Or you could just use Google Street View, which is a bit more ubiquitous for all sorts of global locations.
Compared to Google Street View, Apple Maps Look Around is a bit limited with fewer cities and locations supported at the moment, so it may take a while for Apple to catch up to the expectations set by Google Street View.
Apple has promised to roll out this feature to additional countries and areas over time, but we’ll just have to wait and see how fast they can expand the coverage. Look Around has been made possible with the help of Apple’s own mapping vehicles that are equipped with several cameras and lidar sensors that help capture street-level imagery as they traverse through various locations.
Did you know you can now use custom fonts with iPhone and iPad? If there is one thing that iPhones and iPads have been lacking for too long, it’s support for custom fonts. Apple’s iPad, in particular, should have had custom fonts a long time ago, especially given its focus on productivity since the arrival of iPad Pro. But as of iOS and iPadOS 13 and newer, custom font support is here. And as you might expect, they’re pretty easy to get up and running.
While not all apps support custom fonts out of the gate, all of the main players have already released updates that add that support. Others are presumably still coming, but don’t expect to use custom fonts in things like Instagram and Facebook. It’s just not going to happen (yet anyway, who knows what the future holds for those apps).
Apple’s support for custom fonts is a system-wide solution, which means all of the font-handling is taken care of by Apple and the Settings app. You just need a way to get them there, first. Perhaps the easiest way is to download Adobe’s Creative Cloud app because it comes with a ton of free fonts. If you’re a Creative Cloud subscriber you get access to even more, but it isn’t required.
We’re going to focus on Creative Cloud here because it’s free and everyone has probably already heard of it. Many of you probably already have it installed so that’s going to be what we cover here. Downloading apps that can install custom fonts works like other apps, and the process for installing them will largely be the same regardless of the developer.
With all that said, and assuming you’re using an iPhone or iPad running iOS or iPadOS 13 or later, let’s get started.
How to Use Custom Fonts on iPhone & iPad with Adobe Creative Cloud
Download and install the Adobe Creative Cloud app (free) and log in with your account. If you don’t have one, creating one is easy and free.
Tap the “Fonts” tab at the bottom of the screen.
Tap “Install Fonts” under any that take your fancy and then tap “Install” to confirm.
Open the Settings app and tap “General” followed by “Fonts.” You’ll see all of your installed fonts right there, ready to be used.
Open any app that supports custom fonts and take them for a spin. The process for selecting a font will differ for all apps, but the latest versions of Pages, Keynote, Mail, and more are all ready to get in on the custom font awesomeness.
And that’s all there is to it, really. Your iPhone or iPad now has custom fonts installed, ready for use in many apps.
You can download others from the likes of Font Diner if you’re still looking for more fonts to try out, too. There are a lot of places to find free fonts and they should all work with ease on the iPhone and iPad now, so try them out.
Presumably custom font support will enhance over time with iOS and iPadOS. Remember the Mac also supports custom fonts, and it’s incredibly simple to install new fonts on Mac (and remove them too for that matter), so if you work with various Apple devices you should be able to enjoy many font options now.
There are tons of other new features in the latest iOS versions that are well worth checking out, including the much-vaunted Dark Mode.
Have you deleted or lost Safari bookmarks from iPhone, iPad, or Mac somehow? If so you can use a procedure we’ll outline here to restore and recover lost Safari bookmarks back to your device.
Most iPhone and iPad owners make use of Safari to browse the web, and creating bookmarks of favorite sites (like SydneyCBD.repair of course) is a common procedure. Since it’s the web browser that comes pre-installed on iOS and iPadOS, Safari works seamlessly with other devices in the Apple ecosystem, and iCloud can help sync your bookmarks too.
Bookmarks, History, and other data are synced automatically across your devices as long as iCloud is enabled, so regardless of whether you’re browsing on your iPhone, iPad, or a MacBook, all your Safari data is readily available. However, it’s always possible to to accidentally delete a bookmark, or have some other action occur where you lose your Safari bookmarks.
Did you lose your bookmarks in Safari for whatever reason? Perhaps after an accident, a corrupted iOS update, some other error on the device? If so, look no further. Thanks to Apple’s iCloud service, it’s fairly easy to restore your lost Safari bookmarks data. In this article, we’ll be discussing how you can recover all your lost Safari bookmarks using iCloud using a process similar to restoring lost contacts with iCloud, restoring lost Calendars and Reminders with iCloud, and recovering lost iCloud Drive documents and files.
How to Recover Lost Safari Bookmarks with iCloud
By default, iCloud backup is enabled on all Apple devices, so restoring your bookmarks shouldn’t be a tedious process. However, if you ever manually disabled backups at some point for whatever reason, this procedure will not help you recover your lost Safari bookmarks data.
Open any web browser like Chrome, Safari, Firefox, etc. from your PC, Mac, or iPad and head over to iCloud.com. Sign in to iCloud by clicking on the “arrow icon” once you’ve typed in your Apple ID and password.
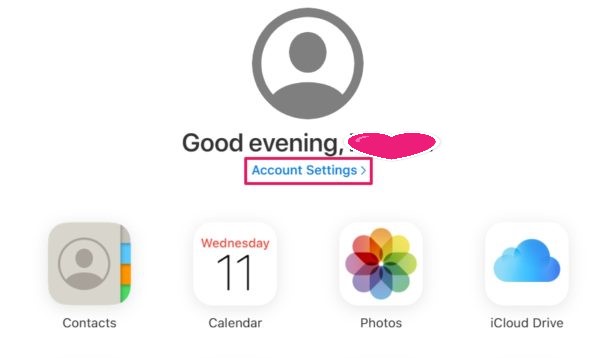
Click on “Account Settings” once you’re in the iCloud homepage.
Here, just click on “Restore Bookmarks” under the Advanced section located at the bottom of the page, as shown in the screenshot below.
You’ll get a new pop-up window where iCloud will start searching for the Safari bookmarks that are stored on the cloud. Wait for a few seconds. Once the search is complete, you’ll get a list of all the bookmarks that can be restored. Simply select the bookmarks which you want to recover by checking the boxes and click on “Restore” as shown in the screenshot below.
The restoration process will take a few seconds to finish. Once it’s done, the window will display how many bookmarks were restored in the process. Click “Done” to close this window and end the procedure.
Those are the steps required to recover and restore your lost Safari bookmarks.
This recovered data will be accessible immediately across all your supported Apple devices, as long as they’re logged into the same iCloud account, which is one of the many reasons you must use the same Apple ID on all of your own personal devices.
To use the data recovery features available on iCloud.com, you need to use the iCloud.com desktop site, meaning you can use an iPad or computer that features a desktop-class web browser. You can also use this trick to access and login to iCloud.com from iPhone with full access by requesting the desktop site. If you’re trying to perform this restoration process on your iPhone’s mobile browser without requesting the desktop site, you’re out of luck. It’d be reasonable to expect Apple to add this functionality to mobile devices at some point down the line however, so that limitation may change in the future..
By default, Apple provides 5 GB of free cloud storage with every iCloud account. As long as you’re not backing up tons of files and photos, this should be adequate to store most of basic stuff like bookmarks, documents, files, contacts, calendars, and other data on Apple’s cloud servers. If you do need to update to a larger iCloud storage capacity, they’re available at monthly costs of $0.99, $2.99 and $9.99 for 50 GB, 200 GB and 2 TB storage space respectively.
For the majority of users, you’ll want to have iCloud backups enabled, so unless you have serious privacy concerns or some other compelling reason it may be a good idea to shell out for an iCloud paid plan if needed to backup your devices.
The convenience that iCloud brings to the table and how it works seamlessly across iOS and macOS devices is simply unmatched. Users don’t have to heavily rely on physical storage anymore, as valuable information like contacts, photos, files, etc. are automatically backed up to the cloud when their devices are turned on and connected to power. You can always manage your iCloud backups too from the devices, if you need to delete an iCloud backup from iPhone or iPad for example to make space for a fresh backup.
You can easily create zip archives on iPhone and iPad of any files or folders through the Files app. For example, if you have a folder or file you want to compress and archive, share, or upload somewhere, you can easily create a .zip of that data right from the iPhone or iPad, and without needing any additional software.
This approach to making a zip file archive works in Files app for data stored locally, on a remote server, external device, or on iCloud Drive, as long as it can be accessed through the Files app of iOS or iPadOS it can be made into a zip file.
This tutorial will walk through the steps of how to create a zip file on iPhone or iPad, which is the process of compressing a file, folder, or multiple files into a single zip archive.
How to Zip Files on iPhone or iPad to Compress into Archives
Open the Files app on iPhone or iPad
Navigate to the file or folder you want to create a zip archive from in Files app, it can be locally or on iCloud Drive
Tap and hold on the file or folder you want make a zip, then choose “Compress” from the pop-up menu
Wait a moment or few and the freshly created zip archive will appear in the same folder of Files app
Repeat with other items you wish to create a zip archive for if desired
Any zip archive can be shared, moved, uploaded, copied, or modified like any other file within the Files app on iPhone or iPad.
The screenshot examples above show a single file being compressed into a zip archive, but it works the same for multiple files stored in a folder. You can always create a new folder in Files app and put items to turn into a zip archive too.
This zip feature was introduced in in modern iOS and iPadOS releases, so you’ll need to be running 13 or later to have the compress and uncompress options for unzip and zip. Earlier versions of iOS could zip (and unzip) files and data through third party applications, whereas only the latest releases have the native compress and uncompress options in Files app.
Of course these capabilities are not limited to iPhone and iPad. If you’re a MacOS user, you’ll find that both making zip files on Mac and opening zip files on Mac is super easy, with the former being a simple contextual menu option, and the latter just being a matter of opening the file like any other in Finder.
And naturally you can also easily unzip zip archives on iPhone and iPad through the similar Files app contextual menu.
Files app is turning into a more powerful file system browser over time with a lot of features that have long existed on the desktop side of things. Don’t miss other tips about Files app and if you use iPadOS with an external keyboard then you’ll likely find these handy keyboard shortcuts for Files app on iPad to be worth knowing too.
For what it’s worth, if you don’t use the Files app or you don’t want to for some reason or another, then you can still use third party apps for zipping and unzipping files in iOS and iPadOS, it’s just that’s no longer necessary now that the compress and uncompress features are built natively into this software.