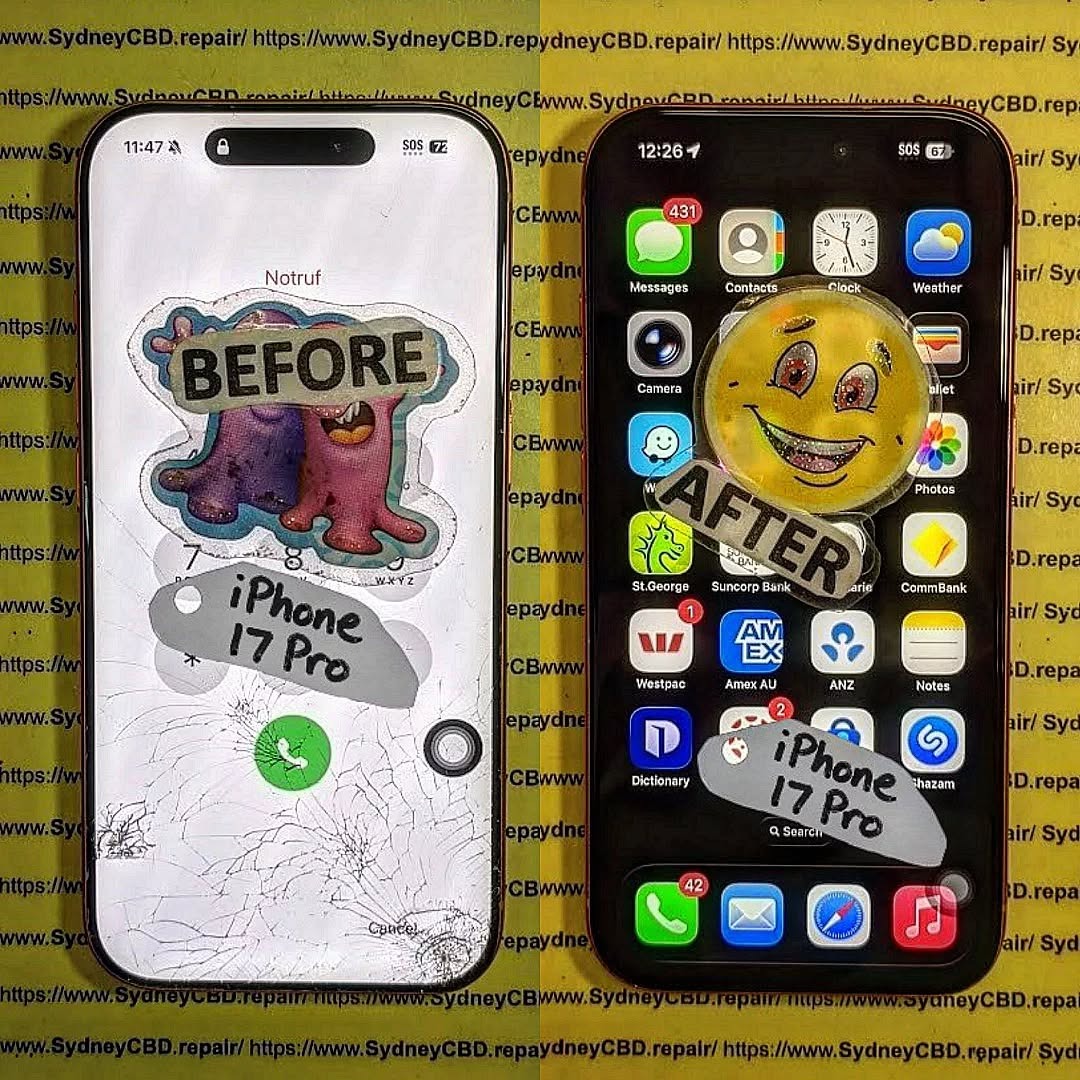
The Step by Step Guide to the First Ever iPhone 17 Pro Screen Replacement – Ultimate Expert Guide (2026)
📱 Introduction to iPhone 17 Pro Screen Replacement
The first ever iPhone 17 Pro screen replacement is already becoming a hot topic among repair technicians and DIY enthusiasts. With the latest innovations from Apple, screen repair isn’t what it used to be.
Let’s face it—dropping your phone happens to the best of us. But when it comes to replacing the display of the iPhone 17 Pro, things have evolved. This guide walks you through every step in a clear, easy-to-follow way.
Whether you’re a beginner or an experienced technician, you’ll find this guide practical, detailed, and worth your time.
These tools can make your iPhone 17 Pro screen replacement smoother and safer.
⚠️ Safety Precautions Before Starting
Personal Safety Tips
Always power off the device
Work in a clean, well-lit space
Wear anti-static gloves
Device Protection Measures
Avoid overheating the phone
Handle connectors gently
Keep screws organized
Skipping these steps can damage your phone permanently.
🔧 Step-by-Step iPhone 17 Pro Screen Replacement Guide
Step 1: Power Off the Device
Turn off your phone completely. This prevents electrical damage.
Step 2: Remove Screws
Use a pentalobe screwdriver to remove the bottom screws near the charging port.
Step 3: Heat and Lift Display
Apply gentle heat around the edges. Then:
Use a suction cup
Insert a plastic pry tool
Slowly lift the screen
Take your time here—rushing can crack the display further.
Step 4: Disconnect Battery
Before touching any internal parts:
Locate the battery connector
Carefully disconnect it
This is critical for safety.
Step 5: Remove Display Connectors
Next, disconnect:
Display cable
Touch sensor cable
Face ID components
Handle these with extreme care.
Step 6: Install New Screen
Now comes the exciting part:
Align the new screen
Reconnect all cables
Secure the display
Replace screws
Congratulations—you’ve completed the iPhone 17 Pro screen replacement!
❌ Common Mistakes to Avoid
Even pros slip up sometimes. Watch out for:
Using too much heat
Pulling cables too hard
Forgetting to disconnect the battery
Mixing up screws
Avoiding these mistakes saves time and money.
💰 Cost Analysis: DIY vs Professional Repair
Option
Cost
Risk Level
Time
DIY Repair
$150–$300
High
1–2 hours
Professional Repair
$300–$600
Low
30–60 mins
If you’re unsure, professional repair is often the safer bet.
⏱️ How Long Does the Repair Take?
Typically:
Beginners: 1–2 hours
Experts: 30–45 minutes
Your first iPhone 17 Pro screen replacement might take longer—and that’s perfectly okay.
✅ Testing the New Screen
Before sealing everything:
Turn on the phone
Check touch responsiveness
Test brightness and colors
Verify Face ID functionality
If something feels off, reopen and check connections.
🔋 Maintenance Tips After Replacement
Keep your new screen in top shape:
Use a screen protector
Avoid drops
Clean regularly
Use a protective case
Simple habits go a long way.
🧑🔧 When to Seek Professional Help
DIY isn’t always the best route. Consider professional repair if:
Screen is completely unresponsive
Internal damage is suspected
You lack proper tools
Sometimes, it’s smarter to leave it to experts.
❓ FAQs
1. Is iPhone 17 Pro screen replacement difficult?
Yes, it’s more complex than older models due to advanced technology.
2. Can I replace the screen myself?
You can, but it requires skill, patience, and the right tools.
3. Will replacing the screen affect Face ID?
It might, especially if sensors are damaged or misaligned.
4. How much does iPhone 17 Pro screen replacement cost?
DIY costs around $150–$300, while professional repair can reach $600.
5. Is the new screen as good as the original?
If you use high-quality parts, performance should be very close.
6. How do I know if my screen needs replacement?
Signs include cracks, unresponsive touch, flickering, or black display.
🏁 Conclusion
The first ever iPhone 17 Pro screen replacement is a blend of precision, patience, and technical know-how. While it’s possible to do it yourself, it’s not without risks.
If you follow this guide carefully, you’ll improve your chances of a successful repair. Still, don’t hesitate to seek professional help when needed.
At the end of the day, keeping your device in top condition ensures it serves you well for years to come.
David from Sydney CBD Repair Centre – The Best place to fix mobile phones as 7 Years In A Row! Top Mobile Phone Repair In Sydney. More than 2000 Positive Reviews on Google and Same Day Repairs.
We take pride in delivering exceptional repair services for all major phone brands including Apple, Samsung, Google, and more. Our expert technicians use only genuine parts and offer 90days warranty on repairs. Located in the heart of Sydney CBD, we’re your one-stop solution for all mobile device repairs.
Our commitment to excellence has earned us the trust of thousands of satisfied customers. Whether it’s a cracked screen, battery replacement, or water damage repair, we handle it all with professional care and expertise. Walk in today and experience why we’re Sydney’s #1 choice for mobile phone repairs.
Visit us for:
✓ Same Day Express Repairs
✓ Genuine Parts Guarantee
✓ Professional Technicians
✓ Competitive Pricing
✓ 2000+ 5-Star Google Reviews
✓ 7-Time Award Winner for Best Phone Repairs
Replacing the Titanium Frame and Screen on a Mangled iPhone 17 Pro: Ultimate Expert Guide with 12 Professional Repair Insights
Introduction
Modern flagship smartphones are stronger than ever, but they’re not indestructible. Replacing the titanium frame and screen on a mangled iPhone 17 Pro is among the most complex repairs technicians perform. While titanium offers exceptional strength compared to aluminium or stainless steel, a severe impact can still bend the frame, shatter the display, damage internal brackets, and even affect sensitive components.
Unlike a simple screen replacement, repairing a severely damaged iPhone requires a complete teardown. Every component—from the cameras and battery to the logic board and wireless charging coil—must be carefully transferred into a brand-new frame without causing additional damage.
Professional technicians follow strict procedures using specialised equipment to restore the phone to factory-level performance. This guide explains exactly how experts complete this intricate repair while maintaining safety, reliability, and long-term durability.
Titanium has transformed premium smartphone construction. Its remarkable strength-to-weight ratio allows manufacturers to create lighter devices without sacrificing durability.
Some major advantages include:
Higher resistance to bending
Reduced overall weight
Excellent corrosion resistance
Improved structural rigidity
Premium finish and feel
However, titanium behaves differently from previous frame materials.
Instead of flexing like aluminium, titanium often transfers impact energy into other areas of the phone. During a hard drop, technicians commonly observe:
Cracked OLED displays
Bent internal brackets
Broken camera mounts
Deformed frame rails
Damaged rear housing
Misaligned buttons
Once the frame bends beyond acceptable tolerances, replacing only the screen usually isn’t enough. The entire chassis must often be replaced to ensure perfect alignment and reliable operation.
Many people assume a frame replacement simply involves swapping the outside shell. In reality, it is one of the most labour-intensive repairs available.
Nearly every internal component must be removed before the damaged frame can be discarded.
These include:
Display assembly
Rear cameras
Front camera
Face ID components
Speakers
Taptic Engine
Battery
Charging port
Wireless charging coil
Logic board
Buttons
Flex cables
Antennas
Microphones
SIM or eSIM hardware
Each part contains delicate connectors that can easily tear if handled incorrectly.
Professional repair centres use anti-static workstations, precision screwdrivers, calibrated heating equipment, suction fixtures, and microscope inspection throughout the repair.
Even experienced technicians work slowly because one mistake may require replacing additional expensive components.
Common Causes of Severe Frame and Screen Damage
Not every cracked screen requires a frame replacement. However, several situations almost always result in major structural damage.
High-Speed Vehicle Accidents
Phones launched across a vehicle cabin often strike hard surfaces with tremendous force.
This frequently causes:
Bent titanium rails
Crushed corners
Detached display
Camera damage
Internal board stress
Heavy Object Compression
Industrial workplaces sometimes expose phones to forklifts, machinery, or heavy tools.
Compression damage typically includes:
Twisted chassis
Broken internal supports
Cracked OLED layers
Pressure damage to batteries
Staircase Falls
Multiple impacts during a long fall can gradually deform the frame.
Instead of one large dent, technicians often find:
Several corner impacts
Frame distortion
Display separation
Loose camera lenses
Motorcycle and Bicycle Crashes
Modern smartphones carried in pockets frequently absorb impact during accidents.
Even if the glass appears repairable, technicians may discover:
Bent internal frame
Broken camera stabilisers
Torn flex cables
Misaligned charging ports
Extreme Corner Impacts
Corner impacts concentrate enormous force into a tiny area.
This can create:
Permanent frame deformation
Screen lifting
Button alignment issues
Waterproof seal failure
These repairs require complete disassembly to restore the device properly.
Professional Initial Inspection Process
Before replacing any parts, experienced technicians perform a comprehensive inspection. This step determines whether additional components have been damaged beyond the obvious cracked screen.
A structured assessment helps avoid surprises during the repair and ensures customers receive an accurate diagnosis.
External Examination
The repair begins with a careful visual inspection of the entire device.
Technicians check for:
Bent frame edges
Cracked front glass
Rear glass damage
Camera lens cracks
Button operation
Speaker grille damage
Charging port deformation
Display separation
Signs of water ingress
Photographs are often taken before work begins to document the phone’s condition.
Functional Testing
Whenever the device still powers on, technicians test as many features as possible before opening it.
Typical checks include:
Component
Inspection
Display
Brightness, colour accuracy, dead pixels
Touchscreen
Multi-touch responsiveness
Cameras
Focus, stabilisation, image quality
Face ID
Authentication performance
Speakers
Audio clarity
Microphones
Voice recording quality
Charging
Wired charging operation
Wireless Charging
Coil functionality
Buttons
Volume, power, mute responsiveness
Vibration
Taptic Engine performance
Documenting these results provides a valuable reference after the repair is complete.
Internal Diagnostic Planning
After confirming external damage, technicians determine whether the phone requires:
Screen replacement only
Complete frame replacement
Battery replacement
Camera replacement
Rear glass replacement
Charging port repair
Internal bracket replacement
This planning stage reduces repair time and ensures all required replacement parts are available before the teardown begins.
A professional assessment also helps identify hidden damage that may not be visible until the device has been fully disassembled.
Tools Required for Titanium Frame Replacement
Replacing the titanium frame and screen on a mangled iPhone 17 Pro isn’t a job for household tools. Professional repair technicians rely on specialised equipment to safely remove delicate components and rebuild the phone without causing further damage.
Using the wrong tool can easily tear a flex cable, puncture the battery, or damage the logic board. That’s why experienced repair centres invest in precision equipment designed specifically for modern smartphones.
Essential Professional Tools
A typical workstation includes:
Precision screwdriver set
Anti-static (ESD) workstation
Microscope for board inspection
Heated display separator
Plastic opening picks
Suction cups
Nylon spudgers
Precision tweezers
Display adhesive remover
Isopropyl alcohol (99%)
Battery removal solution
Waterproof adhesive templates
Torque-controlled screwdrivers
Dust removal blower
Soft cleaning brushes
Every tool has a specific purpose. For example, nylon tools reduce the risk of short circuits, while microscope inspections help identify tiny cracks or damaged connectors that aren’t visible to the naked eye.
Removing the Damaged Screen Safely
The display is usually the first major component removed during the repair.
Although the front glass may already be shattered, technicians must still remove the display carefully because important sensors are attached to it.
Step 1: Controlled Heating
Special heating equipment softens the factory adhesive.
Too much heat can damage:
OLED layers
Face ID components
Front camera
Ambient light sensor
Battery
Professional repairers carefully monitor the temperature throughout the process.
Step 2: Creating an Opening
A suction tool gently lifts the display while plastic picks slice through the softened adhesive.
Metal tools are avoided because they can:
Scratch the frame
Cut flex cables
Damage waterproof seals
Slow and steady movement is the key to preventing accidental damage.
Step 3: Disconnecting the Display
Once opened, the battery is disconnected first to eliminate the risk of electrical short circuits.
Afterwards, technicians disconnect:
Display flex cables
Touch digitiser
Front sensor assembly
Face ID module
These connectors are extremely delicate, and excessive force can permanently damage them.
Disassembling the Entire Device
A titanium frame replacement requires almost every internal component to be transferred into the new housing.
This stage demands patience, organisation, and attention to detail.
Battery Removal
Modern smartphone batteries are secured using stretch-release adhesive.
If these strips break, technicians use specialised techniques to remove the battery safely without bending or puncturing it.
Battery safety is critical because damaged lithium-ion cells can become hazardous.
Logic Board Removal
The logic board is the heart of the phone.
Before removing it, technicians disconnect:
Rear cameras
Front camera
Charging port
Wireless charging assembly
Antennas
Microphones
Display connectors
Button flex cables
Every screw is stored in labelled trays because even screws that appear identical may vary in length.
Installing the wrong screw in the wrong location can permanently damage the logic board.
Camera System Transfer
The advanced camera system requires extra care.
Technicians inspect:
Camera stabilisation units
Lens alignment
Dust contamination
Connector integrity
Protective brackets
Even a tiny speck of dust can affect image quality after reassembly.
Replacing the Titanium Mid-Frame
Once the original housing has been completely stripped, technicians prepare the replacement frame.
A quality replacement frame should include:
Correct mounting points
Factory-level machining
Accurate screw holes
Proper antenna windows
Button supports
Camera alignment brackets
Every transferred component must fit perfectly.
Component-by-Component Installation
Professionals rebuild the phone in a systematic order.
Typical installation sequence:
Charging assembly
Bottom microphones
Loudspeaker
Taptic Engine
Wireless charging coil
Logic board
Rear cameras
Front camera
Battery
Flex cables
Internal shields
Buttons
Display assembly
This organised approach reduces mistakes and simplifies troubleshooting if an issue arises later.
Installing the New Display
The new OLED display is one of the final major components installed.
Before sealing the phone, technicians inspect:
Connector alignment
Flex cable routing
Display bracket positioning
Sensor placement
Camera alignment
The display is then connected and tested before adhesive is permanently applied.
Preliminary Testing
Professional repair centres power the device on before final sealing.
They verify:
Screen brightness
OLED colour accuracy
Touch responsiveness
Face ID operation
Front camera
Rear cameras
Audio playback
Charging
Vibration
Button response
If any issue is detected, it’s far easier to correct before the waterproof adhesive has fully bonded.
Internal Component Inspection
A severely damaged phone often suffers from more than cosmetic issues.
During reassembly, technicians carefully inspect every internal component for hidden damage.
Logic Board Inspection
Using a microscope, professionals examine the board for:
Cracked solder joints
Bent connectors
Corrosion
Missing components
Burn marks
Liquid residue
Minor issues discovered during this stage can often be repaired before they become major failures.
Battery Health Assessment
Although the battery may survive the impact, technicians also check for:
Swelling
Capacity loss
Physical dents
Torn insulation
Connector damage
Replacing a compromised battery during the repair helps ensure long-term reliability and safety.
Camera Calibration Check
Premium smartphone cameras rely on precise alignment.
Technicians confirm:
Sharp focus
Optical image stabilisation
Zoom performance
Lens cleanliness
Sensor positioning
A perfectly installed camera should perform exactly as it did before the accident.
Waterproofing and Device Resealing
Modern flagship smartphones use precision adhesive to help resist dust and moisture. Once the phone has been opened, the original adhesive can no longer provide the same seal.
Professional technicians thoroughly clean the frame before applying a fresh waterproof adhesive gasket.
Important steps include:
Removing all old adhesive residue
Cleaning contact surfaces with high-purity isopropyl alcohol
Installing a correctly aligned adhesive seal
Applying even pressure during final assembly
Allowing sufficient curing time before returning the device
While professional resealing restores a high-quality seal, it’s important to understand that no repair centre can guarantee the exact factory water-resistance rating after a device has been opened. For this reason, customers are generally advised to avoid intentionally exposing a repaired phone to water.
Careful resealing protects the device against everyday dust and accidental splashes, helping maximise the lifespan of the repair.
Final Quality Testing
After replacing the titanium frame and screen on a mangled iPhone 17 Pro, professional repair work is not considered complete until the device has passed a comprehensive series of quality control tests. These tests ensure that every transferred component functions exactly as intended and that the rebuilt phone performs reliably in everyday use.
Unlike a quick parts swap, a full frame replacement involves reconnecting dozens of delicate components. Even a single loose connector or slightly misaligned cable can affect performance. This is why experienced technicians never skip the testing phase.
Display Testing
The newly installed display is examined for:
OLED brightness consistency
Colour accuracy
True Tone functionality (where applicable)
Touch responsiveness across the entire screen
Dead or stuck pixels
Flickering
Display alignment
The technician also checks the screen under different brightness levels to ensure there are no pressure marks or light leakage.
Camera Testing
Every camera is tested individually.
Checks include:
Autofocus speed
Optical image stabilisation
Portrait mode
Video recording
Flash operation
Front camera quality
Zoom functionality
Any unusual vibration, blurred images, or focusing issues are investigated before the phone is returned to the customer.
Audio and Connectivity
Technicians also verify:
Feature
Test Performed
Speakers
Audio clarity and volume
Microphones
Voice recording and call quality
Wi-Fi
Stable connection
Bluetooth
Device pairing
NFC
Contactless communication
Cellular
Signal reception
Charging Port
Fast charging and data transfer
Wireless Charging
Charging pad compatibility
Face ID
Secure facial recognition
A successful repair means every feature operates as expected—not just the display.
Why Professional Repairs Matter
Many online videos make advanced smartphone repairs appear simple. In reality, replacing the titanium frame and screen on a mangled iPhone 17 Pro requires extensive training, specialist tools, and considerable experience.
Attempting a repair without the proper knowledge can lead to:
Torn display flex cables
Damaged Face ID components
Broken camera connectors
Punctured batteries
Stripped screw holes
Logic board damage
Loss of water resistance
These mistakes often cost far more than the original repair.
Benefits of Choosing a Professional Repair Centre
Professional technicians provide several important advantages:
Accurate diagnostics
High-quality replacement parts
Proper ESD-safe workstations
Precision tools
Experienced workmanship
Comprehensive testing
Repair warranty
Faster turnaround times
Perhaps most importantly, experienced technicians understand how each component interacts with the others. This knowledge reduces the risk of hidden problems appearing weeks after the repair.
Preventing Future Damage
Although today’s flagship smartphones are more durable than previous generations, accidents can still happen. Fortunately, a few preventative measures can significantly reduce the likelihood of severe damage.
Invest in a Quality Protective Case
A well-designed case absorbs impact energy and helps protect the titanium frame from bending.
Look for features such as:
Reinforced corners
Raised screen bezels
Shock-absorbing materials
Secure button covers
Use a Tempered Glass Screen Protector
A premium screen protector adds an additional layer of defence against scratches and minor impacts. While it won’t prevent every crack, it can reduce the risk of direct damage to the display.
Avoid Extreme Conditions
Keep your phone away from:
Excessive heat
Heavy machinery
Tight back pockets
High places without secure handling
Water beyond its rated resistance
Handle With Care
Simple habits can make a big difference:
Use both hands when taking photos.
Avoid placing the phone on unstable surfaces.
Store it in a secure pocket or bag.
Don’t place heavy objects on top of it.
A little care today can prevent an expensive repair tomorrow.
Frequently Asked Questions
1. Can a bent titanium frame be repaired without replacing it?
Minor bends may sometimes be corrected, but a significantly deformed titanium frame is usually replaced. Straightening a severely bent frame can weaken the material and affect the alignment of internal components.
2. Is replacing the frame more difficult than replacing the screen?
Yes. A screen replacement involves removing and replacing the display assembly, while a frame replacement requires transferring nearly every internal component into a new chassis.
3. Will Face ID continue working after the repair?
If the original Face ID components are transferred carefully without damage, Face ID should continue functioning normally. Damaging these components during repair can permanently disable the feature.
4. How long does a complete titanium frame replacement take?
The repair time varies depending on the extent of the damage and the availability of parts. A professional repair centre can often complete the work on the same day or within one to two business days for more complex cases.
5. Is the phone still water-resistant after the repair?
Professional technicians replace the waterproof adhesive during reassembly. However, because the original factory seal has been broken, the exact manufacturer water-resistance rating cannot be guaranteed.
6. Should I replace the battery while the phone is already open?
If the battery shows reduced health, swelling, or signs of impact damage, replacing it during the frame repair is often the most cost-effective option since the device is already fully disassembled.
7. Can all damaged parts be reused?
Not always. Components such as cameras, charging ports, antennas, or internal brackets may need replacement if they were damaged during the original impact.
8. Is a genuine-quality display worth the extra cost?
Yes. High-quality displays typically offer better brightness, colour accuracy, touch responsiveness, durability, and compatibility compared with low-quality alternatives.
Conclusion
Replacing the titanium frame and screen on a mangled iPhone 17 Pro is one of the most demanding smartphone repairs performed today. While titanium provides exceptional strength and a premium feel, a severe impact can still compromise the frame, display, and many internal components.
A successful repair requires far more than replacing broken glass. It involves a complete teardown, careful inspection of every internal part, precise transfer into a new titanium frame, installation of a high-quality display, meticulous waterproof resealing, and extensive quality testing before the phone is returned to its owner.
Choosing an experienced repair centre ensures that your device receives the attention it deserves. Professional technicians use specialised equipment, follow proven repair procedures, and perform rigorous testing to restore functionality while minimising the risk of future issues.
With expert workmanship and quality replacement parts, even a badly damaged iPhone 17 Pro can often be restored to excellent working condition, giving you confidence that your investment is protected for years to come.
David from Sydney CBD Repair Centre – The Best place to fix mobile phones as 7 Years In A Row! Top Mobile Phone Repair In Sydney. More than 2000 Positive Reviews on Google and Same Day Repairs.
We take pride in delivering exceptional repair services for all major phone brands including Apple, Samsung, Google, and more. Our expert technicians use only genuine parts and offer 90 days warranty on repairs. Located in the heart of Sydney CBD, we’re your one-stop solution for all mobile device repairs.
Our commitment to excellence has earned us the trust of thousands of satisfied customers. Whether it’s a cracked screen, battery replacement, or water damage repair, we handle it all with professional care and expertise. Walk in today and experience why we’re Sydney’s #1 choice for mobile phone repairs.
Visit us for:
✓ Same Day Express Repairs
✓ Genuine Parts Guarantee
✓ Professional Technicians
✓ Competitive Pricing
✓ 2000+ 5-Star Google Reviews
✓ 7-Time Award Winner for Best Phone Repairs
Sydney CBD Repair Centre – Where Quality Meets Reliability.
Step By Step iPhone 17 Pro Screen Replacement for Advanced DIY Enthusiasts: 17 Powerful Expert Techniques
Introduction
The iPhone 17 Pro screen replacement process has become one of the most searched repair topics among advanced DIY enthusiasts. Modern smartphones are more powerful than ever, but they’re also more fragile. A single drop onto concrete can crack the expensive OLED panel instantly.
Fortunately, experienced DIY repairers can replace the display successfully with the right tools, patience, and technical understanding. While the process isn’t easy, it’s definitely achievable for skilled enthusiasts who understand electronics repair fundamentals.
In recent years, smartphone manufacturers have improved repairability slightly, yet premium devices like the iPhone 17 Pro still require careful handling. Tiny screws, delicate flex cables, and waterproof seals demand attention to detail at every stage.
This comprehensive guide walks you through the entire iPhone 17 Pro screen replacement procedure step by step. You’ll also discover advanced repair techniques used by professionals to avoid common failures and maintain display performance after installation.
For official repair information and Apple repair policies, visit Apple Support.
DIY smartphone repair has exploded in popularity. Rising repair costs and improved access to replacement parts have encouraged many enthusiasts to learn advanced repair techniques.
Several factors contribute to this trend:
Repair videos are easier to access
Premium phones cost more than ever
Consumers want longer device lifespans
Environmental awareness is increasing
Repair communities share valuable knowledge
An iPhone 17 Pro screen replacement performed correctly can save hundreds of dollars compared to buying a new device. Moreover, many repair enthusiasts enjoy the technical challenge itself.
Still, DIY repair isn’t risk-free. A mistake can damage:
Before beginning your iPhone 17 Pro screen replacement, gather all necessary tools. Missing even one item can slow down the process or increase damage risk.
Recommended Tool Kit
Tool
Purpose
Pentalobe screwdriver
Removes bottom screws
Tri-point screwdriver
Internal bracket removal
Precision tweezers
Handling tiny components
Plastic opening picks
Separating adhesive safely
Heat pad or heat gun
Softening display adhesive
Suction cup
Lifting display assembly
Magnetic project mat
Organizing screws
Isopropyl alcohol
Cleaning adhesive residue
Replacement adhesive
Restoring water resistance
Anti-static wrist strap
Preventing ESD damage
Professional technicians also recommend using:
OLED-safe pry tools
Microscope lighting
Battery disconnect picks
Display testing equipment
Cheap tools often create problems. Stripped screws and damaged connectors frequently result from low-quality screwdriver sets.
Understanding the iPhone 17 Pro Display Technology
The iPhone 17 Pro features a sophisticated OLED display with advanced touch and brightness technologies.
Key Display Features
High refresh rate OLED panel
Ceramic Shield protection
Integrated touch digitizer
Adaptive brightness system
Dynamic Island integration
Because modern OLED displays are extremely thin, excessive bending can permanently damage them.
Additionally, the screen assembly contains:
Ambient light sensors
Proximity sensors
Front-facing camera components
Earpiece speaker connections
During your iPhone 17 Pro screen replacement, preserving these components is critical.
Safety Precautions Before Starting
Repairing smartphones requires proper safety procedures. Skipping these precautions can lead to injury or device destruction.
Important Safety Tips
1. Power Off Completely
Never attempt an iPhone 17 Pro screen replacement while the device is powered on.
2. Discharge the Battery
Reduce battery charge below 25% to minimize thermal runaway risk.
3. Avoid Metal Pry Tools Near the Battery
Lithium-ion batteries can puncture easily.
4. Use Eye Protection
Tiny glass shards may fly during removal.
5. Work Slowly
Rushing is the number one cause of repair failure.
A clean workspace also reduces contamination risks inside the device.
Preparing Your Workspace Properly
Professional-level repairs begin with proper organization.
Ideal Workspace Conditions
Workspace Feature
Benefit
Bright LED lighting
Better visibility
Anti-static surface
Reduces ESD damage
Magnetic screw tray
Prevents lost screws
Dust-free environment
Cleaner installation
Comfortable seating
Reduces fatigue
Many advanced DIY enthusiasts underestimate workspace preparation. However, organization dramatically improves repair accuracy.
Backing Up Your iPhone Before Repair
Before any iPhone 17 Pro screen replacement, create a complete backup.
You can back up using:
iCloud
Finder on Mac
iTunes on Windows
A backup protects your:
Photos
Contacts
App data
Passwords
Settings
Hardware repairs always carry some risk, even for professionals.
How to Power Down and Open the Device
Opening the device is one of the most delicate stages.
Step-by-Step Opening Procedure
Step 1: Remove Bottom Screws
Use a precision pentalobe screwdriver to remove the two charging-port screws.
Step 2: Apply Controlled Heat
Warm the display edges for 1-2 minutes.
Avoid overheating because OLED panels are heat-sensitive.
Step 3: Use a Suction Cup
Lift gently near the bottom edge.
Step 4: Insert Plastic Picks
Slide carefully around the perimeter.
Step 5: Open Like a Book
Do not pull the display completely away.
Internal flex cables remain attached.
This stage of the iPhone 17 Pro screen replacement requires patience more than force.
Removing the Damaged Display Carefully
Once opened, disconnect the battery immediately.
Internal Disconnection Process
Remove protective brackets
Disconnect battery flex
Disconnect display cables
Disconnect sensor assemblies
Professional technicians always disconnect power first.
Failing to disconnect the battery can short sensitive components instantly.
Inspect for Hidden Damage
Look carefully for:
Bent pins
Torn flex cables
Corrosion
Loose shielding
Missing screws
If the phone suffered a hard impact, internal frame damage may also exist.
Disconnecting Internal Components Safely
The front sensor assembly is one of the most sensitive parts during an iPhone 17 Pro screen replacement.
Components Requiring Extra Care
Component
Risk Level
Face ID sensors
Very high
Proximity sensor
High
OLED connector
High
Front camera flex
High
Earpiece speaker
Medium
Face ID damage can permanently disable biometric authentication.
Always use plastic tools when disconnecting flex cables.
Inspecting the Internal Frame and Connectors
Before installing the new display, inspect the housing thoroughly.
Important Inspection Areas
Frame Alignment
Bent frames create pressure points on OLED panels.
Connector Integrity
Use magnification if available.
Adhesive Residue
Old adhesive prevents proper sealing.
Water Damage Indicators
Check for red liquid contact markers.
A professional-quality iPhone 17 Pro screen replacement depends heavily on proper inspection.
Installing the New OLED Screen
Now comes the most exciting part: installing the replacement display.
Installation Steps
Step 1: Dry Test the Screen
Connect the display temporarily before sealing.
Step 2: Check Touch Functionality
Test all corners thoroughly.
Step 3: Verify Brightness
Ensure OLED output looks even.
Step 4: Confirm Sensor Operation
Test Face ID and proximity sensors.
Step 5: Install Fresh Adhesive
Apply evenly around the frame.
Step 6: Reassemble Carefully
Avoid pinching flex cables.
A high-quality OLED replacement significantly affects final results. Cheap aftermarket screens often suffer from:
Poor brightness
Weak touch sensitivity
Battery drain
Color inaccuracies
Premature failure
Reconnecting Flex Cables Correctly
Connector alignment is critical.
Never force connectors into place.
Proper Connector Technique
Align carefully
Press gently from center
Listen for soft clicking
Avoid side pressure
Many failed iPhone 17 Pro screen replacement attempts occur because connectors were partially seated.
Improper connections may cause:
Ghost touch
Green screen issues
Flickering
No display output
Sensor failures
Replacing Adhesive and Waterproof Seals
Modern smartphones rely heavily on adhesive sealing.
Why Waterproofing Matters
The iPhone 17 Pro includes strong water resistance protections, but opening the device compromises factory sealing.
Professional repairers replace:
Perimeter adhesive
Dust barriers
Mesh protection seals
Adhesive Application Tips
Tip
Benefit
Clean thoroughly first
Better adhesion
Use OEM-grade adhesive
Stronger seal
Apply evenly
Consistent pressure
Avoid stretching strips
Better alignment
Even after careful repair, water resistance may not fully match factory specifications.
Testing the Screen Before Final Assembly
Testing before complete sealing saves enormous frustration later.
Complete Functional Checklist
Display Tests
Brightness consistency
Dead pixels
Color uniformity
Refresh smoothness
Touch Tests
Edge responsiveness
Multi-touch support
Gesture operation
Sensor Tests
Face ID
Ambient light sensor
Proximity sensor
Audio Tests
Earpiece sound
Speaker clarity
A complete iPhone 17 Pro screen replacement should include comprehensive testing before final closure.
Common Mistakes During iPhone 17 Pro Screen Replacement
Even experienced enthusiasts sometimes make errors.
Most Common DIY Repair Mistakes
Using Excessive Heat
Too much heat damages OLED layers.
Mixing Screws
Incorrect screw placement can puncture the motherboard.
Skipping Battery Disconnect
This can cause catastrophic shorts.
Poor Adhesive Cleaning
Old residue weakens waterproof sealing.
Buying Cheap Displays
Low-grade parts create long-term reliability issues.
Avoiding these mistakes dramatically improves success rates.
Professional Tips for Better Repair Results
Professional repair shops follow strict procedures for consistency.
Expert Techniques
Use Screw Maps
Organize screws by location.
Photograph Every Stage
Reference photos help during reassembly.
Test Before Sealing
Never skip dry testing.
Use OEM-Quality Parts
Higher-quality components reduce callbacks.
Maintain Cleanliness
Dust under OLED panels is extremely noticeable.
These habits separate average repairs from truly professional-quality work.
DIY Repair vs Professional Repair Services
DIY repair offers advantages, but professional repair still has major benefits.
DIY Advantages
Lower cost
Learning experience
Personal satisfaction
Flexible timing
Professional Repair Advantages
Warranty coverage
Specialized tools
Faster turnaround
Reduced risk
Water resistance testing
If you’re uncertain about performing an iPhone 17 Pro screen replacement, professional repair may ultimately save money and stress.
Frequently Asked Questions
Is iPhone 17 Pro screen replacement difficult?
Yes, it’s considered an advanced repair because modern iPhones contain delicate flex cables, strong adhesive, and complex sensor systems.
Can Face ID stop working after screen replacement?
Absolutely. Damaging the sensor assembly during repair can permanently disable Face ID functionality.
How long does an iPhone 17 Pro screen replacement take?
Advanced DIY enthusiasts usually need between 1-3 hours depending on experience level.
Is waterproofing maintained after repair?
Not perfectly. New adhesive helps restore resistance, but factory-level sealing is difficult to replicate completely.
Should I use aftermarket OLED displays?
High-quality aftermarket displays can work well, but premium OEM-quality parts generally offer better brightness and durability.
Can replacing the screen damage the motherboard?
Yes. Improper tool usage, screw placement, or connector handling can damage motherboard components.
Do I need special software calibration?
Some advanced display features may require calibration tools used by professional repair technicians.
Conclusion
Performing an iPhone 17 Pro screen replacement is a challenging but rewarding project for advanced DIY enthusiasts. With the correct tools, organized preparation, and professional-level patience, you can successfully restore a damaged device to excellent working condition.
The key to success lies in careful handling, proper adhesive replacement, thorough testing, and using high-quality components. While modern smartphones are more complex than ever, skilled repair enthusiasts can still achieve impressive results at home.
Whether you choose DIY repair or professional service, understanding the repair process gives you greater confidence and appreciation for modern smartphone engineering.
David from Sydney CBD Repair Centre – The Best place to fix mobile phones as 7 Years In A Row! Top Mobile Phone Repair In Sydney. More than 2000 Positive Reviews on Google and Same Day Repairs.
We take pride in delivering exceptional repair services for all major phone brands including Apple, Samsung, Google, and more. Our expert technicians use only genuine parts and offer 90days warranty on repairs. Located in the heart of Sydney CBD, we’re your one-stop solution for all mobile device repairs.
Our commitment to excellence has earned us the trust of thousands of satisfied customers. Whether it’s a cracked screen, battery replacement, or water damage repair, we handle it all with professional care and expertise. Walk in today and experience why we’re Sydney’s #1 choice for mobile phone repairs.
Visit us for:
✓ Same Day Express Repairs
✓ Genuine Parts Guarantee
✓ Professional Technicians
✓ Competitive Pricing
✓ 2000+ 5-Star Google Reviews
✓ 7-Time Award Winner for Best Phone Repairs