Safari on the Mac can resume stopped downloads and restart failed downloads rather easily. For example, if you were downloading Xcode from Apple but your internet connection was interrupted and the download stopped, you can resume the download where it left off rather than restart the entire download over again. This is a great way to restart and resume incomplete downloads, regardless of the reason the file download failed, was interrupted or otherwise halted, and it’s available in the Safari download manager on Mac OS.
How to Resume Incomplete Downloads in Safari on Mac
From Safari on the Mac, click the Downloads button in the Safari toolbar, it looks like an arrow pointing downwards
Locate the stopped, stalled, or failed download, then click the orange circular arrow button to attempt to restart the download
The file should resume downloading where it was otherwise interrupted
Once the file, archive, image, or whatever else has completed downloading, it will appear in the Downloads folder on the Mac.
Note that Safari defaults to downloading things into the user Downloads folder, but you change the Safari download location on Mac if desired. Thus if you had previously changed the download location, you’d need to find the item there instead.
If you do need to start the download over from scratch, often an easy way to do that is to copy the downloaded files original direct download URL from Safari and simply paste that address back into the URL bar. Note that approach doesn’t always work with randomly generated CDN address downloads however. Similarly, you can find out where a file was downloaded from on the Mac by using Get Info in the Finder on the file, even if the file is only partially downloaded and incomplete.
Some other web browsers also support file download resuming as well, including Chrome, though how you go about resuming downloads in Chrome is different than what is discussed here in Safari.
Huawei has seen its smartphone strategy flipped on its head in recent weeks. Despite its issues with the US trade ban, the Huawei P30 Pro is an incredible device which can compete with the likes of the Samsung Galaxy S10 and many other flagship devices we’ve seen this year. The Huawei P30 Pro goes beyond featuring some of the best hardware packed into a smartphone, including optics which redefine expectations for a smartphone camera. But there’s much more than just the lenses to be impressed by.
Huawei P30 Pro Review: Optical Excellence!
SAMSUNG GALAXY S10 plus VS HUAWEI P30 PRO
Huawei P30 Pro vs Samsung S10 Plus vs iPhone XS Max Camera Test Comparison
Hardware and Design
Huawei has been refining the look of its P-series smartphones over the years, improving its screen-to-body ratio, rounding out the hard edges and delivering a device that’s as good to look at as it is to hold. The first thing you’ll notice about the Huawei P30 Pro is the reduction of the notch found on the Mate 20 Pro in favor of a waterdrop design with a smaller footprint. There are fewer sensors packed into the notch, unavoidable given the reduction in space, but It’s a much cleaner and less intrusive design.
The second thing you’ll notice, which is a less attractive feature, is how the P30 Pro preserves fingerprints. While the glass finish on the rear of the device makes for a premium feeling smartphone, it gets grubby very quickly without a case. It’s not so much of a problem if you carry your device with a case or skin, but running it naked will leave a very smudgy layer of prints.
The camera array on the back of the device is a satisfying vertical arrangement but does protrude so will wobble when used flat on a desk. The aluminum frame feels solid in the hand, with the heft of a premium device at 192g with a profile of 158 x 73.4 x 8.4 mm and IP68 water resistance. I’m a big fan of the glass Huawei uses on the P30 Pro and the quality feel this gives the device, but it also does mean that any drop will likely be fatal so I would recommend using a case.
There’s the standard USB Type-C charging port on the bottom of the device along with the SIM card slot that supports either 2 SIM cards or a single SIM and Huawei’s proprietary micro memory card.
Huawei has kept the external buttons to a minimum with just the volume rocker and a single button on the right-hand side of the device. Rather than include a dedicated button to trigger an assistant, like some OEM’s have, Huawei has embedded a trigger to call Google Assistant in the power button itself. Complimented by a red accent, the textured button will call Google Assistant with a single press and then trigger the power options with a long press. It is quite tough to get to the power menu without triggering Google Assistant; I’m pretty sure during my time with the device I never actually succeeded in turning off the device without the inadvertent trigger, but how often do you turn your device off these days?
The Huawei P30 Pro is certainly a head turner and, in my opinion, the perfect blend of maximum screen real-estate without the need for a pop-up camera or a notch that takes up the entire status bar. The device feels very tall and narrow in comparison to, for example, the Galaxy S10+, which some may prefer. It does make one-handed operation pretty impossible without giant hands, but Huawei has included accessibility features as part of EMUI to help with that.
Display and Specs
With a 6.47-inch display, the P30 Pro has an impressive 88.6% screen-to-body ratio with extremely slim bezels and a subtle chin at the bottom of the device. It’s not quite as impressive as the full-screen display on the OnePlus 7 Pro but then there are no mechanical moving parts to have to deal with. While the display is certainly sufficient, the OLED display provides a 1080 x 2340 resolution, which is a step down when compared with the likes of the S10+. It provides sufficient performance and quality with 398 pixels-per-inch but for those who care about the low-level specs of the display, the P30 Pro cannot compete with the flagship competition. The P30 Pro out of the box comes preset to a zoom level that made the images and text on the device appear massive, which personally I found uncomfortable. It meant that only 5 or 6 emails would appear on the screen at once in the Gmail app. Some may prefer this zoomed in look but I found it a waste of the big screen. Thankfully, Huawei allows you to configure this and reduce the text size and screen zoom but the default setting seems more aggressive than other OEM’s.
The P30 Pro is powered by Huawei’s in-house HiSilicon Kirin 980 using the 7nm manufacturing process and paired with either 6 or 8GB of RAM depending on storage configuration, which comes in 128, 256, or 512 GB options. Throughout our use of the P30 Pro, it handled everything we threw at it without hesitation. The experience was not limited by the hardware but rather Huawei’s aggressive memory management that would close background apps in favor of preserving battery life.
The 4200mAh battery, while not the largest on paper, in practice, is an absolute powerhouse. The P30 Pro could easily achieve 2 days of light-medium use and even heavy use would allow me to reach the evening with 40% left. This is in no small part due to the power management employed by Huawei’s software that sacrifices background flexibility to extend battery life. This preservation is intrusive but completely customizable and could be a trade-off that most are willing to make to get this kind of battery performance.
On the topic of battery, despite only really needing to charge every other day, the P30 Pro has 40W fast-charging for quickly topping up the battery when you’re in a hurry and also features 15W wireless fast-charging. The P30 Pro also features reverse wireless charging, which while a novelty and not really practical for charging any significant battery, such as a smartphone, can be helpful to top-up accessories like Bluetooth headphones.
Huawei has continued its fingerprint implementation of positioning the sensor under the display. The optical sensor is equally as unreliable as other implementations but much more accurate than the ultrasonic sensor on the S10+.
Camera
The Huawei P30 Pro is an impressive device with a spec sheet to support a modern flagship even without considering the camera. However, when the DxOMark-topping optics of the Huawei P30 Pro are brought into the mix, the smartphone is elevated to one of the best of 2019.
The P30 Pro comes equipped with a 40-megapixel f/1.6 27mm wide-angle lens with OIS, a 20-megapixel f/2.2 16mm ultra-wide lens, and the pièce de résistance – an 8-megapixel f/3.4 125mm lens capable of 5x optical zoom and up to 50x digital zoom. All of this is paired with a 3D ToF sensor, dual LED flash, and phase-detection autofocus.
The camera app is packed with Huawei’s AI features, which are capable of automatically detecting scenes to optimize the settings for things like food, animals, HDR, and others. This enables even photographic amateurs to capture amazing shots by not having to fiddle with a ton of camera settings. The app itself is well organized, which allows users to easily switch between the wide-angle modes, as well as engaging the 5x and 10x zoom modes.
Overall, there are very few complaints about the images produced by the P30 Pro. Eagle-eyed viewers would notice that the Huawei image processing often made the images look a bit washed out. Detail, on the other hand, thanks to its excellent sensor capabilities are preserved even at 10x zoom thanks to the AI processing and RYYB sensor. Things become a little unstable as you progress through to the maximum 50x and at that highest zoom setting, the images are relatively unusable without a tripod, and even then don’t expect to preserve much detail. Even so, the capabilities of what the camera on the P30 Pro can do completely change the landscape for smartphone photography across the board.
Software
EMUI has progressed significantly over the years and version 9.1, which is based on Android 9.0, is packed full of features but is a stark departure from a stock Android experience. Many will find the software a steep learning curve with Huawei skinning elements throughout, while others will enjoy the larger fonts, lack of app drawer, and rearranged menus.
Historically, the software has been a stumbling block that would detract from the excellent hardware, but EMUI has evolved and can be managed to no longer make it a deal-breaker. Of course, the elephant in the room means the software on the Huawei P30 Pro is at risk and will cease to function as we know it given recent developments. We’ll keep things short and simple in this section since this landscape is set to drastically change in the coming months.
Conclusion
If camera performance is important to you then the Huawei P30 Pro is a no-brainer. The versatility of the hardware means that the camera is capable of performing and yielding impressive results throughout a number of different scenarios and the AI software doesn’t get in the way, instead, helping the user avoid the need to adjust settings for the optimal shot.
EMUI is a tough learning curve, but its nothing a third-party launcher cannot fix and you soon begin to learn the system. The Huawei P30 Pro takes everything that was good about the Mate 20 Pro and bolts an amazing camera on. Make no mistake, the main talking point about this device is the camera. It does that brilliantly while doing everything else just ok. The battery performance is a strong positive of the P30 Pro but this is at the cost of multitasking and memory management.
The P30 Pro is a well-rounded device that I would have recommended to anyone looking for a flagship device, but the recent sanctions placed on Huawei mean that future and current devices are left in a state of limbo. We will have to see how this plays out and what it means for the wider ecosystem before confidently recommending a Huawei device going forward.
The Bottom Line
An excellent device that takes what was good about the Mate 20 Pro and bolts a game-changing camera on the rear. There are still areas of improvement that could make the P30 Pro even better, but will all be overshadowed by the recent developments with Huawei’s relationship with Google and Android.
Knowing how to put an iPhone 7 Plus or iPhone 7 into Recovery Mode can be valuable knowledge, as it is sometimes necessary for troubleshooting purposes.
Typically the need to use Recovery Mode is limited to troubleshooting some more unusual scenarios like when a device is completely stuck on an Apple logo, or if the screen shows a “Connect to iTunes” screen, but it can be used sometimes for downgrading of iOS versions too.
This tutorial will demonstrate you how to enter Recovery Mode on iPhone 7 and iPhone 7 Plus. This guide also applies to putting iPod touch (7th generation) into Recovery Mode too.
How to Enter Recovery Mode on iPhone 7 Plus & iPhone 7
Be sure you have a backup of iPhone before entering recovery mode, failure to do so may result in permanent data loss.
Press and hold the Side Power button on the iPhone until you see the slide-to-power off screen
Drag the slider to turn off the iPhone
Hold down the Volume Down button while connecting the iPhone to the computer with a USB cable
Continue holding Volume Down button until you see the Recovery Mode screen as you open iTunes on the computer (Mac or Windows, or in macOS Catalina open Finder)
iTunes (or Finder) will detect the iPhone in Recovery Mode
After the iPhone is successfully detected and in Recovery Mode, it can be restored with iTunes (or Mac Finder in 10.15+), or updated.
You can also use IPSW files if needed after an iPhone is in recovery mode.
It’s important to note that putting the iPhone 7 Plus and iPhone 7 into recovery mode is a different process from using Recovery Mode on prior iPhone models, and also from using Recovery Mode on later models. So if you’re accustomed to one method, recall that it can be a unique procedure depending on the actual iPhone model itself.
Sometimes an iPad must be placed into Recovery Mode before it can be restored or updated successfully with a computer. For example, if an iPad gets stuck on a black screen with an Apple logo for a very long time, Recovery Mode can usually remedy that. Typically Recovery Mode is used for a troubleshooting endeavor, but it can also be used for downgrading from iOS beta / iPadOS beta versions as well.
The instructions here will show how to enter Recovery Mode on iPad, iPad Air, iPad mini, and the earlier iPad Pro models with a Home button. Basically if the iPad has a Home button, the instructions detailed here will work to put the iPad into Recovery Mode. However, any newer model iPad Pro without any front buttons and with Face ID instead must use these instructions to enter Recovery Mode instead on iPad Pro 2018 and newer devices.
How to Enter Recovery Mode on iPad, iPad Air, iPad mini, early iPad Pro
To enter Recovery Mode on iPad, iPad Air, iPad mini, and earlier iPad Pro with Home button (2017 and earlier models, this will not work on the modern iPad Pro 2018 and later models), you will need a computer (Mac or Windows PC) with iTunes and a USB cable to connect the device to the Mac or PC with.
First turn the iPad off, do this by pressing and holding the Power button until the Power Off slider appears on the screen and then sliding on that to power it off
Launch iTunes on the computer *
Hold down the Home button while connecting the iPad to the computer with a USB cable
Continue holding the Home button until iTunes (or Mac Finder) shows a message stating that an iPad in Recovery Mode has been detected
After the iPad, iPad mini, or iPad Air has been detected by iTunes (or Finder), it can be restored with iTunes, or updated as usual. If you’re on a beta iOS version, you can also downgrade to the last stable build while in Recovery Mode.
* Use iTunes for MacOS Mojave 10.14 and earlier, and all Windows PC computers will use iTunes too. If the Mac is on MacOS Catalina 10.15 or later, then use the Mac Finder instead of iTunes.
Exiting Recovery Mode on iPad, iPad Air, iPad mini
If you want to exit out of Recovery Mode without performing any action in iTunes, you can do so with a simple force restart of the iPad.
Hold down the POWER button and the HOME button concurrently until the Apple logo appears on the screen, signifying it has been force restarted
After you reboot the device to exit recovery mode, it will boot as normal. Or if it was experiencing difficulty, like getting stuck on the Apple logo screen, it will probably just boot directly back into that if you didn’t actually run through recovery to restore the iPad.
Almost all serious issues with an iPad can be resolved through Recovery Mode, but rarely in some very stubborn cases you may need to put the iPad into DFU mode instead and restore from there. That’s quite rare however, and is really only applicable for when Recovery Mode is not working successfully for a restore or device update.
All iPad, iPhone, and iPod touch models can be placed into Recovery Mode, though the instructions for doing so differs per device.
You may have noticed that sometimes you can not power on and boot a MacBook Pro when it doesn’t have a battery installed. Let’s say you had to remove the battery of an older MacBook Pro because it was swelling, or the battery failed for some other reason, but when you go to power on the MacBook Pro, nothing happens. (To be clear, this article is aimed at older MacBook Pro model years, like a 2006, 2007, 2008, 2009, 2010, 2011, back when replacing a battery, hard disk, RAM, was all fairly easy to do by opening the bottom case).
In this situation, if a battery is removed or totally dead and you attempt to start the MacBook Pro, nothing happens – there is no sound, no system boot, no startup chime, nothing. It turns out that some model year MacBook Pro computers will not boot with a simple power button press after the battery has been physically removed or disconnected.
Of course if you happen to have a replacement battery then you can typically just replace the missing battery with a working battery and the MacBook Pro will boot, but that is not always an option. So let’s discuss how to boot an older MacBook Pro when there is no battery present at all.
How to Boot MacBook Pro with No Battery Installed
We are assuming the MacBook Pro has no battery installed in the computer, meaning there physically is no battery installed. Then, when attempting to boot the Mac or pressing the start button, nothing happens. In this case, you can force the MacBook Pro to boot by following these steps:
Unplug the MagSafe power cable
Hold down the Power button for 10 seconds and continue to hold it down
While still holding the Power button, connect the MagSafe power cable to the MacBook Pro and continue to hold the Power button for another 10 seconds
Release the Power button, then press the Power button as usual to power on the computer and boot the Mac
When the MacBook Pro does boot, the fans will be blasting at full speed for the entire time you are using the Mac (resetting SMC or PRAM does not stop the fans running, only replacing the battery will).
Also it appears that the MacBook Pro will reduce its own clock speed in this situation, thereby reducing performance.
The only way to stop the fans from running at full speed and to return the clock speed to regular performance is to install a new battery into the MacBook Pro.
As some experienced this scenario on an old MacBook Pro 2010 model after removing a swollen battery. Once the battery was removed you can press the power button but nothing happens. However, the above method of disconnecting and reconnecting MagSafe while holding the Power button was successful in starting up the Mac – with fans running at full speed and at reduced clock speed however. Nonetheless, Snow Leopard still runs well!
As you can see in the screenshot below, the “No Battery” indicator is visible, but the MacBook Pro is booted and working.
And indeed, this particular MacBook Pro has no physical battery installed as you can see the internals in this picture:
Powering Up a MacBook Pro After Replacing Battery, Logic Board, Hard Drive, RAM, etc too
Apparently the same aforementioned scenario of the MacBook / MacBook Pro not starting up can also unfold when replacing other internal components on these older model year MacBook Pro (2006, 2007, 2008, 2009, 2010, 2011, etc), including replaced logic boards, internal hard drives, RAM, battery, and perhaps other hardware components too.
With some other internal component replacements, sometimes simply plugging in the MagSafe adapter and holding the power button for 10 seconds is enough to cause the MacBook Pro to start.
Also, Check the Power Adapter Wattage
For what it’s worth, in some scenarios where the battery appears dead but is not actually (ie, the charge is long drained but the battery itself isn’t completely useless yet), then you may be able to successfully boot the MacBook Pro with a proper wattage MagSafe power adapter of 85W. These older model year MacBook Pro computers use 85W power adapters, whereas the MacBook and MacBook Air of the same generation used 60W power adapters. Sometimes simply plugging in the proper higher wattage power adapter will allow the MacBook Pro to boot.
This MagSafe power button pressing solution was found on iFixIt forums and it worked for me, so if you’re in a similar scenario with an older MacBook Pro then try it out yourself. If for some reason the above method does not work, the original forum poster does state the following possible workaround involving moving a RAM module to a different slot (if applicable):
“If that doesn’t work then try to remove one RAM memory [module] and switch places and [repeat] the method”
In my case this juggling of the RAM module was not necessary to boot the MacBook Pro (a 2010 model year) without a battery, but that additional tidbit may be valid to you.
This article is obviously aimed at older MacBook Pro hardware, but it may be relevant to other older MacBook models too, including similar model year (2006, 2007, 2008, 2009, 2010, 2011) MacBook and MacBook Air, and perhaps even some newer MacBook Pro models too. By the way, if you’re rocking an older Mac and want to speed it up, check out these tips.
Of course newer model year MacBook (Pro & Air too) hardware does not have user serviceable batteries and in some cases the battery is glued to the top case, so in those situations the ability to end up in a situation where the computer doesn’t have a battery is much less likely, and any troubleshooting scenario is going to be much more extreme requiring a more thorough hardware repair that is far beyond the scope of this particular article. In those situations, take the Mac to a certified Apple Repair Specialist or an Apple Store instead.
Long live the old Macs! Does this qualify for retro status yet? Probably not… give it a bit longer.
iCloud backup restores can be stopped at any time on newer iOS devices. This means that if you have chosen to restore an iPhone, iPad, or iPod touch from an iCloud backup, either when setting up a device with a prior iOS backup, or to restore a problematic device as a troubleshooting method, you can stop the iCloud Restore process at anytime. This article will explain how to stop an iCloud backup restore to an iPhone, iPad, or iPod touch.
Stopping an iCloud Restore is generally not recommended and should not be taken lightly, as it may result in data loss.
Rarely, an iCloud Restore can get stuck, or the process take so long that it’s impractical to complete, thus it may need to be stopped as a troubleshooting method.
If you stop an iCloud Restore from iOS backup, any data that has not been restored will not be restored to the device in the future, nor will that missing data be backed up in the future, and therefore the unrestored data may become lost permanently if the restore is not allowed to complete.
Additionally, stopping an iCloud Restore to an iOS device offers no information as to what information was or was not restored to the iPad, iPhone, or iPod touch. In other words, you’ll have no idea what data was restored versus what data was not, so you could theoretically be missing photos, videos, notes, contacts, apps, app data, files, documents, or other important information by stopping the iCloud Restore.
How to Stop an iCloud Restore on iPhone or iPad
Warning: stopping an iCloud Restore may result in data loss.
Open the “Settings” app in iOS
Tap on “Your Name” at the top of the Settings list to access iCloud settings
Next tap on “iCloud”
Now tap on and choose “iCloud Backup”
Tap on “Stop Restoring iPad” (or “Stop Restoring iPhone”)
Confirm that you want to stop restoring from iCloud by tapping on “Stop”
As the final confirmation dialog message suggests, stopping an iCloud Restore to an iPhone or iPad will stop any data that has not yet been downloaded from being downloaded, and that missing data will not be restored or backed up again in the future.
Currently, iOS does not provide a list of data that has been restored, or has not yet been restored, and so if you stop the restore process from iCloud you will not have any idea as to what was restored or what wasn’t. This is one of many reasons why it is not recommended to stop an iCloud Restore, as you may permanently lose data or other important stuff.
Broadly speaking, it is recommended to let the entire iCloud Restore process complete, regardless of the scenario, or whether setting up a new iOS device from a previously made backup to iCloud, or restoring a device for troubleshooting, or whatever other purpose. iCloud Restore can take a long time depending on the size of the backup being restored, and the speed of the internet connection that the iPhone or iPad is connected to. You may notice that the “Ongoing Restore” process is causing battery drain of a newly setup iOS device, but that will stop when the backup has completed.
If you are going to stop an iCloud Restore because it’s stuck or for some other reason and thus want to start the entire iCloud Restore from a backup process over again, you may want to reset the iPhone to factory default settings or reset the iPad to factory settings, and then during the fresh device setup, choose to restore the appropriate iOS backup again, either from iCloud or from iTunes. If you’re using iCloud Restore, be sure to have a fast and reliable high speed internet connection.
If you have an iPhone or iPad with Face ID you may want to toggle the devices Attention Aware Features setting to be enabled or disabled. The Attention Aware Features uses the iPhone or iPad camera to check if you are looking at the device before dimming the display, or lowering the volume of alerts on the device.
For example, if you have Attention Aware Features enabled, then you may notice that the iPhone XS, XR, X ringer volume is low when you pick up the phone or look at it, and that happens automatically. If you don’t want that to happen, you can disable the feature. And likewise, if you had previously turned this off, you can re-enable Attention Aware Features of Face ID to turn those features back on again.
How to Turn Attention Aware Features OFF or ON on iPhone & iPad
Open the Settings app in iOS
GO to “General” and then go to “Accessibility”
Tap on “Face ID and Attention”
Toggle the setting for “Attention Aware Features” to the ON position to enable this feature, or the OFF position to disable it
The description under this particular Face ID attention setting is as follows:
“IPhone / iPad will check for attention before dimming the display and lowering the volume of alerts”
As mentioned before, one of the more common examples of users noticing this feature is if they have an iPhone with Face ID and they notice the ringer volume is lowering itself seemingly out of nowhere. Likewise, many iPad users may notice the feature if they discover their screen is not dimming or turning off automatically as expected, because they are looking at the device.
You can choose whichever setting you want for this feature, so if you like it, leave it enabled, and if you don’t, turn it off. It’s easy to change again at anytime.
The default setting on Face ID equipped iPhone and iPad models is to have Attention Aware Features enabled, and the features work even if you are not using Face ID on the device for unlocking and authentication of the iPhone or iPad.
If you’ve finally tired of watching the selfie camera on your brand new OnePlus 7 Pro pop up and down again, you’ll be pleased to note that there are a ton of ways that you can personalize and change the handset to your taste. Whether it’s enabling the system-wide dark theme, altering the temperature of the display, setting up Zen Mode or even changing the resolution of the Fluid AMOLED display, check out our list of essential tips and tricks for the OnePlus 7 Pro (and OnePlus 7) after the break.
Oneplus 7 Pro Unboxing
Oneplus 7 Pro Review
Dark Mode
If the shiny whiteness of OxygenOS is too bright for you, why not switch over to using the built-in, system-wide dark mode on your new phone. Besides being easier on the eyes, Dark Mode also helps with battery life on AMOLED displays.
Open Settings
Navigate to Display Settings
Scroll down to Theme and select Dark
Zen Mode
If you are spending too much time on your phone and desperately need a time out, activating Zen Mode will disable everything on your phone apart from phone calls, emergency calls, and the camera app for 20-minutes. You can chill out and regain some semblance of equilibrium without a smartphone display in your face, at least for a short time. Word of warning: Once Zen Mode is activated, it can’t be stopped.
Pull down your notification shade to open up Quick Settings
Click Edit and scroll down until you see the Zen Mode tile
Tap-and-hold the Zen Mode tile to drag it to your Quick Settings panel
Exit the editing mode
Pull down the notification shade to access Quick Settings again
Tap on the Zen Mode tile
Tap Let’s Go
Press Start to confirm Zen Mode activation
Display Temperature
Some of us prefer saturated colors, others a more natural hue. Whatever your preference, you can choose between the display showing warmer or coolers in a matter of seconds.
Open Settings
Select Display Settings
Tap on Screen Calibration
Choose between Vivid and Natural or click on Advanced for more options, including the ability to manually adjustthe temperature slider
Display Resolution
The OnePlus 7 Pro is the first OnePlus smartphone to launch boasting a better than Full HD+ display thanks to its QHD+ resolution. If you are trying to make the most of your battery life, switching down to FHD+ resolution can result in slightly improved usage. You can also select the Auto Switch option that will automatically change the phone’s resolution as required.
Open Settings
Scroll down to Display Settings
Tap on Resolution
Choose between Auto Switch, QHD+ or FHD+ Resolution
Accent Color
The standard theme is perfectly fine, but you can add a touch of personality to proceedings by changing the Accent color on your brand new handset, without needing to install a third-party launcher.
Open Settings
Scroll down to Accent Color
Select one of the stock colors or click on the palette icon to create your perfect shade
Customize the Alert Slider
OnePlus is known for including an Alert Slider on its handsets, allowing you to switch between Silent, Vibrate, and Sound On modes without needing to unlock the phone. The Alert Slider can also mute the sound from content that is playing.
Open Settings
Select Buttons & Gestures
Tap on Alert Slider
Tap on Silent
Choose whether the Alert Slider controls media volume
DC Dimming
DC Dimming is a new method of adjusting the screen brightness by changing the circuit power of the display, reducing flickers at low brightness levels and increasing power efficiency slightly.
Open Settings
Scroll down and select Utilities
Tap on OnePlus Laboratory
Select DC Dimming and tap the Activate toggle
Navigation Bar
Everyone has their personal preferences when it comes to navigating their smartphone, whether it’s by way of the on-screen buttons, gestures, or somewhere in-between. You’ve got the whole gamut of options available to you on your new OnePlus 7 or 7 Pro.
Open Settings
Tap on Buttons & Gestures
Select Navigation Bar & Gestures
Toggle between Back, Home, and Recents, Swiping up on the Home Button or using Gestures entirely
Battery Saver
As good as the battery life is on the OnePlus 7 Pro with its 4,000mAh battery, sometimes you need a little bit more, which means you’ll be looking to toggle the Battery Saver option.
Open Settings
Select Battery
Tap on Battery Saver
Toggle Battery Saver on
Customize Gaming Mode
When you are in the middle of an intense gaming session, the last thing you need is the display suddenly dimming or being interrupted by a flood of notifications. Gaming mode brings the ability to route calls directly to the loudspeaker, block notifications, disable notifications for third-party apps, disable automatic brightness, as well as enhancing haptic feedback for supported games. You’ll need to activate Gaming Mode to turn on Fnatic Mode.
Open Settings
Select Utilities
Tap on Gaming Mode
Toggle the appropriate options
Fnatic Mode
If Gaming Mode isn’t quite robust enough for your needs, Fnatic Mode (not a typo) will ensure that you get the absolute best gaming experience possible by blocking all notifications and calls, focusing performance on gameplay, and prioritizing the primary SIM card to achieve low-latency, and disabling the secondary SIM.
Pull down the Quick Settings panel
Activate Gaming Mode
From the resulting pop-up, toggle Fnatic Mode on or off
Click OK
Icon Pack
We all have our personal preferences when it comes to app icons; some of us prefer square icons, while others prefer round ones. It’s easy enough to change the icon pack on the phone by choosing one of the stock options or your favorite third-party design from the Play Store.
Long-press an empty area on the Home Screen
Select Home Settings
Click on Icon Pack
Choose between the default OnePlus icon theme, Square, Circle, or a Third-party design
Display Refresh Rate
The OnePlus 7 Pro features a Fluid AMOLED display that offers the choice between a 90Hz and a 60Hz refresh rate. Toggling the 90Hz refresh rate will result in a smooth viewing experience with slightly increased battery usage.
Open Settings
Tap on Display
Select Screen Refresh Rate
Toggle the 60Hz or 90Hz options
Customize status bar
The status bar can get a little crowded at times, but you can make it a little roomier by customizing how the battery percentage is displayed. You can choose whether to show a battery bar or circle to reflect battery life, or you can hide the icon. You can also choose to disable the battery percentage, thereby removing an additional element from the status bar. You can also choose to show the network speed and the format that the time is displayed.
Open Settings
Select Display
Scroll down and tap on Status Bar
Toggle the Battery Style to choose the style of the battery icon or to hide it
Toggle the Battery Percentage on or off
Choose to display the Network Speed
Choose your preferred TimeFormat
Change Fingerprint animation
If the fingerprint animation doesn’t quite suit your preferences, you’ll be glad to find out that there are a couple of different animations to choose between. You’ll need to have previously enrolled your fingerprint before you can change the effect.
Open Settings
Tap on Security & Privacy
Select Fingerprint
Enter your Pin Code/Pattern/Password
Tap on Fingerprint Animation Effect
Choose between Cosmo, Ripple, Stripe or No Animation
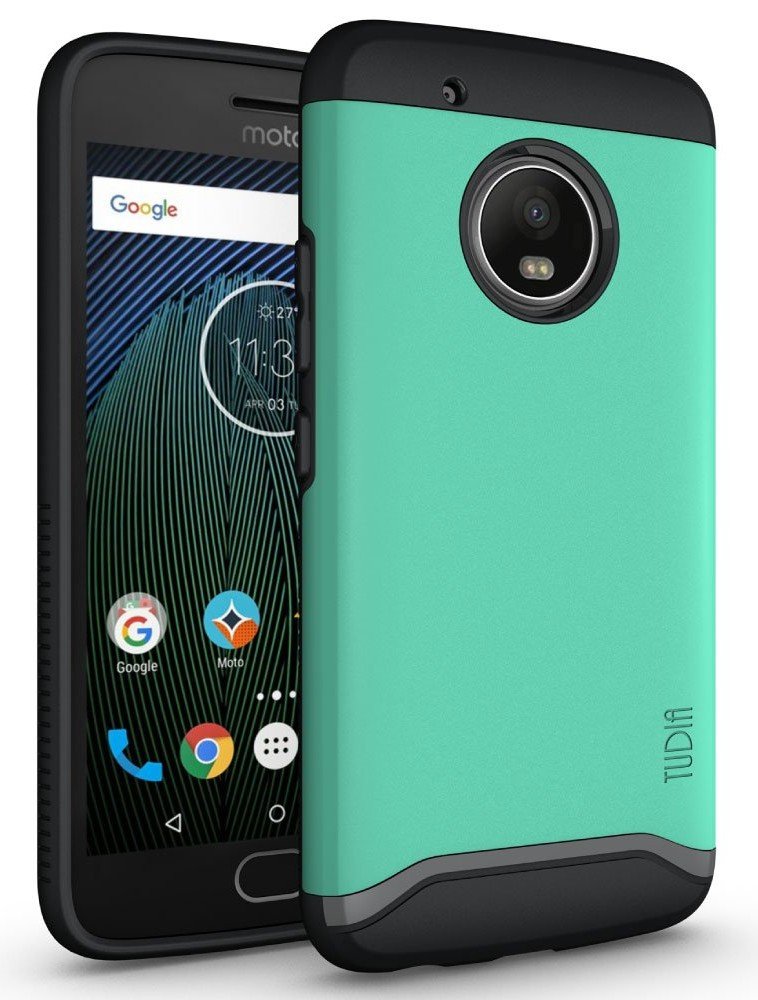
If you recently bought a Moto G5 Plus at a discount, you should reinvest some of that money you saved on a case to keep it in tip-top condition. I’ve rounded up a wide variety of cases here —from heavy duty and rugged to slim and sleek — but I don’t think you can do much better than the exceptional Spigen Rugged Armor.
Spigen Rugged Armor
Spigen’s Rugged Armor lineup offers a great balance between style and functionality without adding a ton of bulk to your phone. This is one of the most popular cases in the world for a reason.
Striking the right balance between protection and thickness, the Ringke Fusion series is one of the most popular for a reason. Get the Moto G5 Plus version in one of three awesome colors: Smoke Black, Rose Gold Crystal, and Clear.
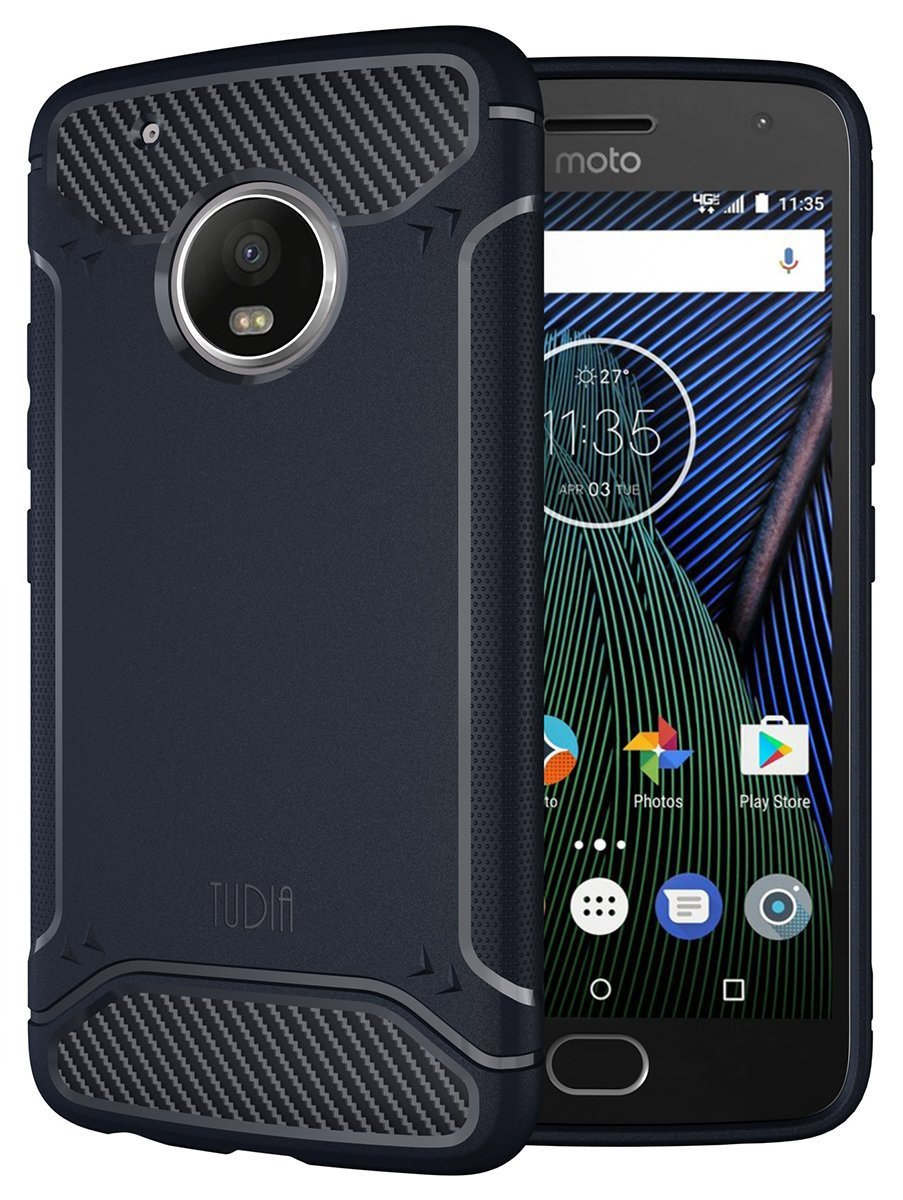
Tudia’s Merge Series may not be the most imaginative style in the world, but it’s dependable, affordable, and offers some distinctive color combos like the grey/green seen here. Get a protective case with personality like the Merge Series.
Supcase Unicorn Beetle Pro with Built-in Screen Protector
The Supcase Unicorn is thick and bulky for a reason: it’ll protect your Moto G5 Plus from anything life throws at you. It comes with a built-in screen protector, too, so you can protect that shiny metal back and shiny glass back in one complete package.
If you’re looking for a lightweight rugged case, Incipio’s NGP case is the right voice for you. It’s a no-fuss choice that provides considerable protection, specifically around the sides and back. The black is more reserved, but it also comes in hot pink.
If rugged protection is the name of the game for you, you’ll want to consider this Poetic Revolution case for the Moto G5 Plus. It offers full protection for your phone, including a front plate with a built-in screen protector that also adds water resistance to the mix.
These thin hardshell cases from ORNARTO may not offer as heavy-duty protection as Poetic Revolution, but it will protect that shiny metal finish from scratches while adding a bit of grip and a lot of color. I’m partial to this genie blue, but the green and red pop, too.
While the Moto G5 Plus may not have quite a much room for card carrying as other phones, that doesn’t mean you can’t find a cute folio case that can carry the essentials. Skip the purse and grab this slim magnetic folio in one of six colors instead.
Tudia’s carbon fiber Ultra Slim case is the perfect way to cover your Moto G5 Plus with minimal bulk. A stylish and inexpensive solution for not a lot of money, and it’s available in three colors to give you a choice beyond the Spigen Rugged Armor’s boring black.
The Moto G5 Plus is one excellent-looking all-metal budget phone, but that shiny metal finish is very easily scratched. While all of these choices are fantastic, I really love the Spigen Rugged Armor, which offers the best of all worlds of protection for your phone.
If you want a little more flair in your case, there are still great options out there like the clear-backed Ringke Fusion or the TUDIA Merge Series, which has some muted and bold color options. After all, life’s too short for boring tech, so get a case with some personality to it!
If you have recently setup a new iPad Pro, iPad mini, or iPad and discovered the battery is draining unusually fast leading to subpar battery life on the device, don’t fret, there’s probably a good reason for it.
In fact, if during your recent setup or restore of the iPad you decided to restore from an iCloud backup, that very well could be the reason the device battery is draining down so much faster than expected. We’ll show you how to check if this restore process is happening in the background, and what to do about it.
Note: this is aimed at users who recently setup new devices. If you did not recently restore the iPad, iPad Pro, or iPad mini from a backup, or set up the device and transfer data from another iPad, then you might want to follow more general tips on improving battery life with iOS 12. And yes while we’re focusing on iPad here, this same material applies to the iPhone and iPod touch as well.
How to Check if “Ongoing Restore” is Draining iPad Battery Life
Open the “Settings” app in iOS
Go to “Battery”
Wait a moment for the “Insight and Suggestions” section to populate, if you see “Ongoing Restore” then that’s why your battery life is draining much faster than usual
Confirm this is the cause of the battery drain by scrolling down and looking for “Restore” in the battery usage section
Optionally, investigate and take action on other Battery suggestions and insights for other apps or behaviors draining down battery (like background app activity)
iCloud Backup Restore will complete over time as it completes downloading all pictures, photos, images, videos, apps, local files and data, contacts, music, podcasts, and anything else that was contained within the iCloud backup which is being restored.
How long does “Ongoing Restore” take to complete?
How long it takes an Ongoing Restore of an iCloud Backup to complete depends on several factors, but the two prominent components are the size of the iCloud backup being restored from, and the speed of the internet connection which the iPad is connected to.
The larger the iCloud Backup that is being restored from, the longer it will take to complete the restore process, and the longer it will take for the battery to stop draining faster than usual.
The iCloud backup restore must complete for the ‘Ongoing Restore’ process to complete and thereby restore expected battery longevitity to the iPad, iPad Pro, or iPad mini.
OK, my iPad shows “Ongoing Restore” so what should I do?
Let the backup restore complete!
Make sure the iPad is connected to a high speed internet connection (as fast a connection as is available) and then let it sit connected to that internet connection for as long as it takes to complete the restore process.
In the screenshot examples here, the “Ongoing Restore” process from iCloud backup to a freshly setup iPad Pro has taken several days restoring a 25GB backup and has still not yet complete. This is because the internet connections network speed which the iPad Pro is using is not particularly fast. Unfortunately there’s nothing that can be done in that scenario other than wait, and while that ongoing restore takes place on the iPad the battery will continue to drain faster than expected.
Once the restore has completed, battery life will return to normal.
iCloud Backup and restore is an excellent feature for iPhone and iPad users, but because it’s reliant on a good internet connection it has notable downfalls to users who are not based in a place like San Francisco, California or other similarly major metro regions with highly developed broadband internet infrastructure. That includes much of the USA, and virtually any smaller sized city, many suburbs, and many semi-rural or rural locations, which often have 3mbps to 20mbps broadband offerings at best. The lack of sufficient high-speed internet infrastructure in much of a country or any given region obviously has nothing to do with iCloud or Apple however, so if you’re one of the millions of people who has a slower internet connection, that’s just the way it will be until some entity decides to invest in higher speed local internet service.
OK but my internet connection is horrible and this is taking forever, is there a way to get around this never-ending “Ongoing Restore” process?
Aside from finding a higher speed internet connection to use until the backup restore completes to the iPad (or iPhone), the only other option would be to start over and use an iTunes backup restore instead of the iCloud backup restore.
Restoring from iTunes backups require a Mac or Windows PC with the latest version of iTunes, and a USB cable to connect the iPad Pro, iPad, or iPad mini to the computer. Then a backup is made to the computer with iTunes (assuming the computer has sufficient disk space available to store the backup), and then that same iTunes backup is used to restore to the iPad during the setup and restore process. This is usually much faster because a direct USB connection between devices is typically much faster than downloading data from the internet. Sometimes iTunes backups can take a very long time too, but usually that’s due to some easily troubleshooted issue.