It sounds less drastic than the visual changes seen in the iOS 6 to iOS 7 transition, though. He writes “the company is indeed working to update the design of iOS as early as this year, but I don’t believe it will be a total overhaul that mirrors visionOS”. While Gurman says we can expect to see changes in iOS 18 this summer, the work on macOS has only just started and won’t be ready until 2025 or 2026.
Since Apple Vision Pro operating system was first unveiled, many people have wondered whether Apple will update the design of its other operating systems to match the visionOS aesthetic of 3D buttons and and glassy background textures. This doesn’t necessarily hold, as the visionOS design is specific to a platform that revolves around passthrough video. Being able to see the context of the world around you ‘through’ the open app windows is a concept that doesn’t really apply to iOS.
However, it has been a while since we’ve seen major design changes come to the iPhone and iPad. A visual refresh of any kind would make for an exciting release, that is also set to include significant AI-powered features.
Indeed, Mark Gurman previously said that Apple sees iOS 18 as its “ambitious and compelling” with major new features and designs. The company will officially unveil its next-generation operating systems at the annual WWDC conference in June. iOS 18 will be in beta over the summer and release for everyone in September, assuming Apple follows its usual traditions.
Apple is continuing to push into health care, this time striking a deal with Epic Systems for a Mac-friendly version of its health records app. As reported by Axios,the deal will see Epic Systems create a version of its health records tool that “is easier to run on Apple devices.”
Apple had reportedly pushed for Epic to create a “native version of the service” for Apple devices, but the two companies settled on this compromise of a version that is “easier to run on Apple devices” instead. Apple hasn’t acknowledged this deal, but Axios says it was confirmed by a “source inside Epic.”
The deal comes despite previous disagreements between Epic and Apple over health records and data sharing, Axios explains. Apple has pushed for easing health record sharing requirements, something that Epic is firmly opposed to. Epic argued that rule changes focused on “interoperability” will be “overly burdensome on our health system and will endanger patient privacy.”
Epic Systems is the largest electronic health records vendor in the United States, with “roughly half the population’s medical records” being stored in a system powered by Epic software and technology. The lack of well-developed Mac, iPad, and iPhone software from Epic has put inhibited Apple’s ability to tap further into the health records industry.
Given the pace at which things in the healthcare industry move — especially around medical records technology — it’ll likely be awhile before we see any results of this new deal. None the less, it could end up being good for the industry and consumers, particularly if it improves data integration with other Apple platforms and services.
One day after seeding iOS 15.6 beta 1 to developers, Apple is now releasing the public beta version to users enrolled in the Apple Beta Software Program. Alongside the first public beta of iOS 15.6, Apple is also making available the new versions of tvOS 15.6, macOS 12.5, and watchOS 8.7.
Today’s iOS 15.6 beta 1 build is 19G5027e. Different from past versions, Apple hasn’t made available any important features so far. This will likely be the latest iOS 15 major update before the release of iOS 16 later in the fall.
Here’s what Apple announced with iOS 15.5 early this week:
Wallet now enables Apple Cash customers to send and request money from their Apple Cash card
Apple Podcasts includes a new setting to limit episodes stored on your iPhone and automatically delete older ones
Fixes an issue where home automation, triggered by people arriving or leaving, may fail.
Alongside iOS 15.6 beta 1, Apple is also seeding macOS 12.5 beta 1 (build 21G5027d), tvOS 15.6 beta 1(build 19M5027c), and watchOS 8.7 beta 1 (build 19U5027c) to public testers.
In a few weeks from now, Apple will hold its WWDC 2022 event, where the company will announce the next milestone for iOS, macOS, iPadOS, tvOS, and watchOS. Rumors so far believe iOS 16 will bring nice improvements.
According to recent rumors, iOS 16 is expected to bring significant improvements to notifications as well as a new interface for iPadOS multitasking. Reported earlier this year that Apple has been working on adding expanded settings for Focus Mode in iOS 16.
With the latest version of macOS, dubbed Monterey, one of the apps that saw a handful of upgrades was Reminders. A once rather basic task and to-do application, Reminders is now a powerhouse application with new features include Smart List, tags, and more. Head below for a deeper look at these new features.
The new features in Reminders
First off, the Reminders app in macOS Monterey is the first version to support tags. As the name implies, tags allow you to organize and categorize your reminders and tasks. This means you can tag tasks with bits of information to help you keep track of categories, groups, and more.
Tags are a fast and flexible way to organize your reminders. Add one or more tags, like #errands, to your reminders to make them easy to search and filter for across your Reminders lists.
In macOS Monterey, you can add tags to your tasks when you create them. Simply look for the “Add Tags” field when creating a new reminder.
But while tags themselves are a notable addition to the Reminders application, they are really powerful when combined with Smart Lists.
Without a doubt, the biggest new addition to the Reminders app in macOS Monterey is a new feature that Apple is calling Smart Lists. Essentially, Smart Lists are a way to create custom lists that include reminders that meet certain criteria.
Here’s how Apple explains the feature:
Create your own Smart Lists to automatically include reminders that matter most to you by selecting for tags, dates, times, locations, flags, and priority. Choose more than one tag (such as #gardening and #errands) and combine them with other setting filters for more specific lists.
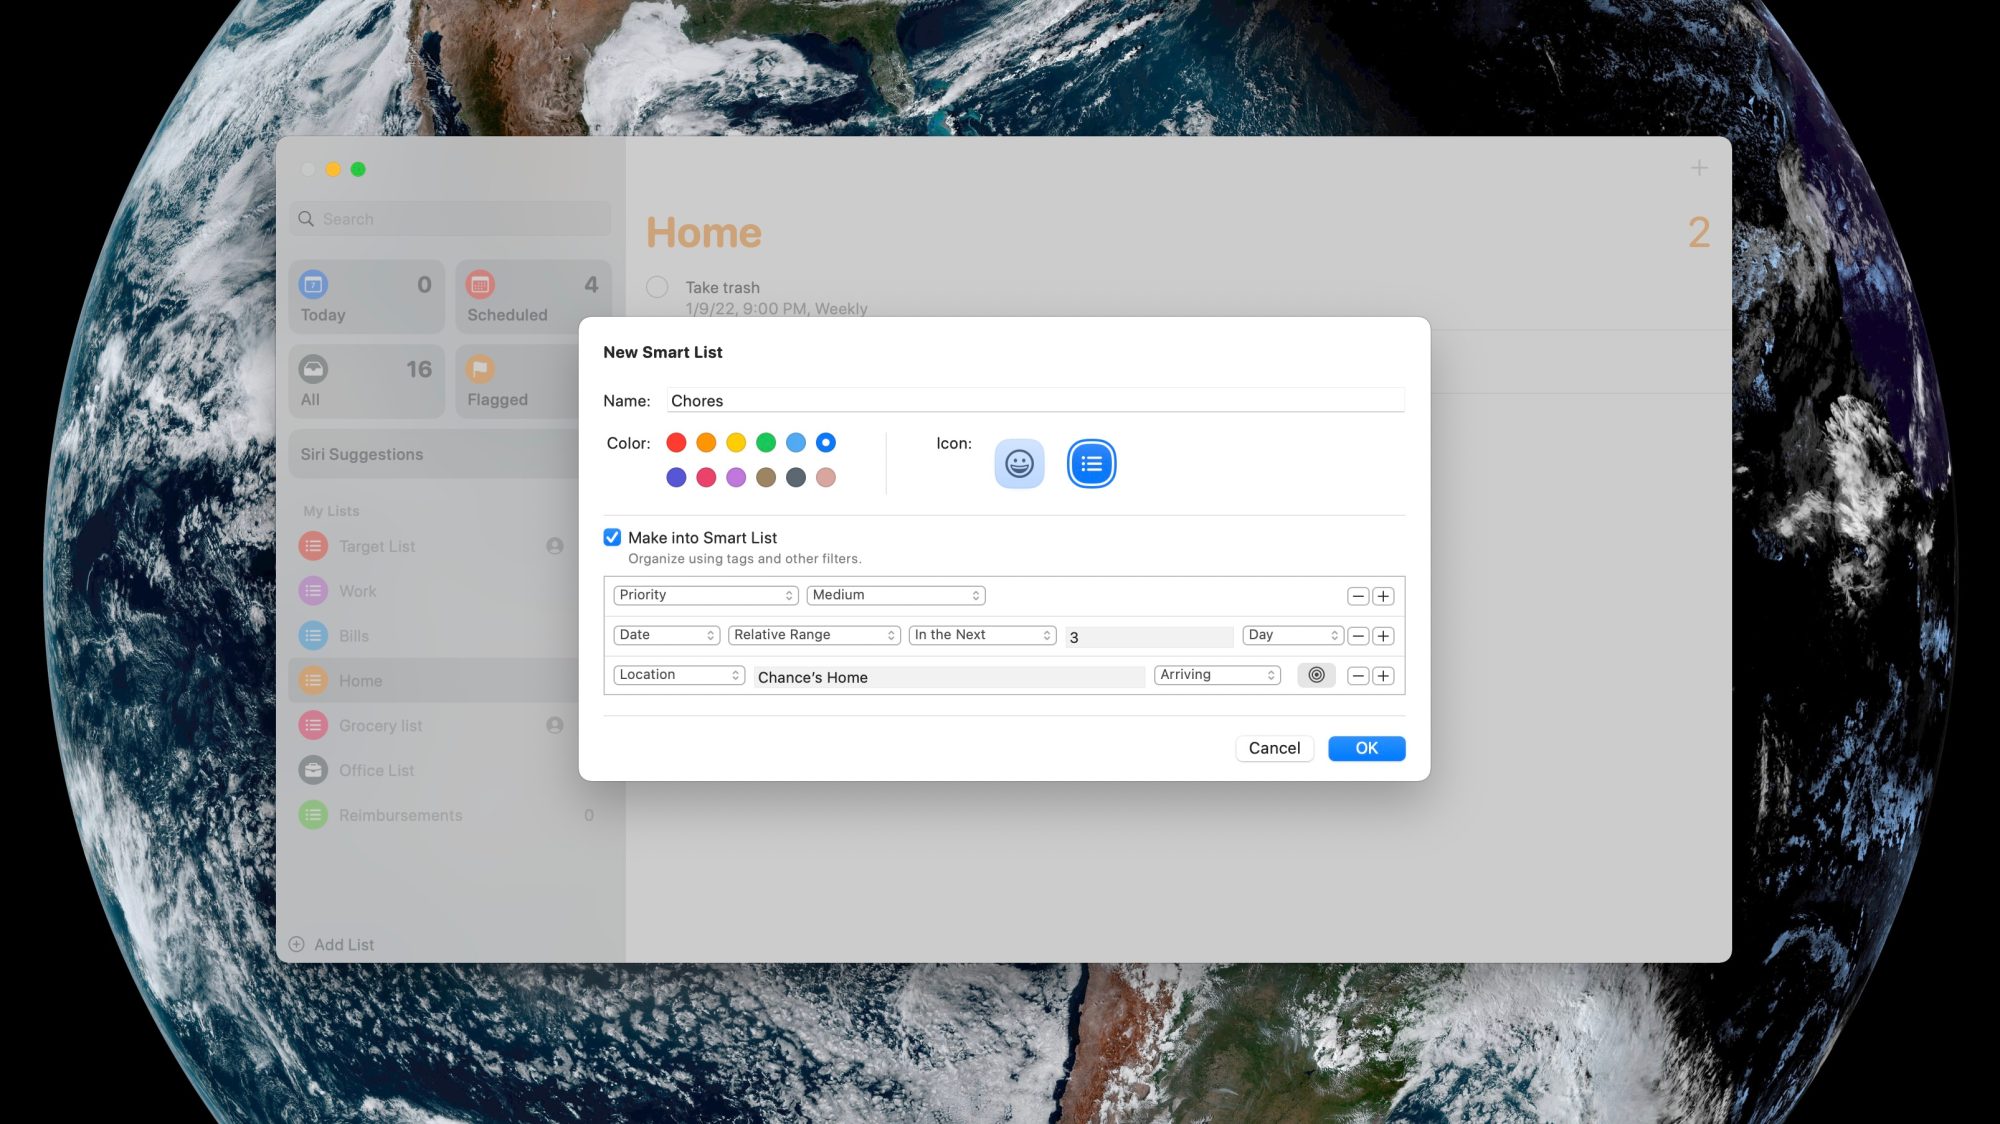
So how does this work in practice? It’s actually not as complex as it might sound. In the Reminders app on your Mac, you can start by clicking the “Add List” button, just like you would for creating any sort of to-do list. While you’re creating your list, look for the “Make into Smart List” checkbox.
Once you select this checkbox, you can select criteria for your Smart List. The criteria can be different tags, the due date for the task, the time, the priority, the location, and whether or not the task is flagged. Once you’ve done this, the Reminders will automatically create a Smart List of the tasks that meet your defined criteria.
Once you’ve created a custom Smart List in the Reminders app, it will sync to your other Apple devices and be added to the app’s sidebar. In the sidebar, it will be denoted with a small gear icon in the bottom-right corner, indicating that it is a Smart List.
And while Smart Lists and tags are the top new features of the Reminders app in macOS Monterey, there’s more to try out:
A Tag Browser in the sidebar lets you click any tag or combination of tags to quickly view tagged reminders.
Access quick options to easily delete your completed reminders.
Choose tags, flags, priority, and people you message with from the Quick Toolbar when creating a reminder.
Type more advanced phrases to create reminder settings. Try something like “Jog every other morning” for a specific, recurring reminder.
Apple released iOS 14.5 beta 1 to developers, and as you’ve no doubt heard, it’s quite the update. Headlined by the ability to unlock your iPhone with Apple Watch while wearing a face mask, iOS 14.5 beta 1 brings forth a number of practical improvements and overall enhancements to iPhone. Watch our hands-on commentary as we discuss the top iOS 14.5 beta 1 changes and features.
What’s new in iOS 14.5 beta 1?
Updated Software Update screens
Both the Software Update page in the Settings app and the Watch app have received more informative details regarding updates. Apple now includes a green check mark to indicate that you’re on the latest version of software, along with a message stating that “Your iPhone is up to date with all of the latest bug fixes and security enhancements.” In addition, iOS 14.5 now displays a time stamp that shows the last time you successfully checked for an update.
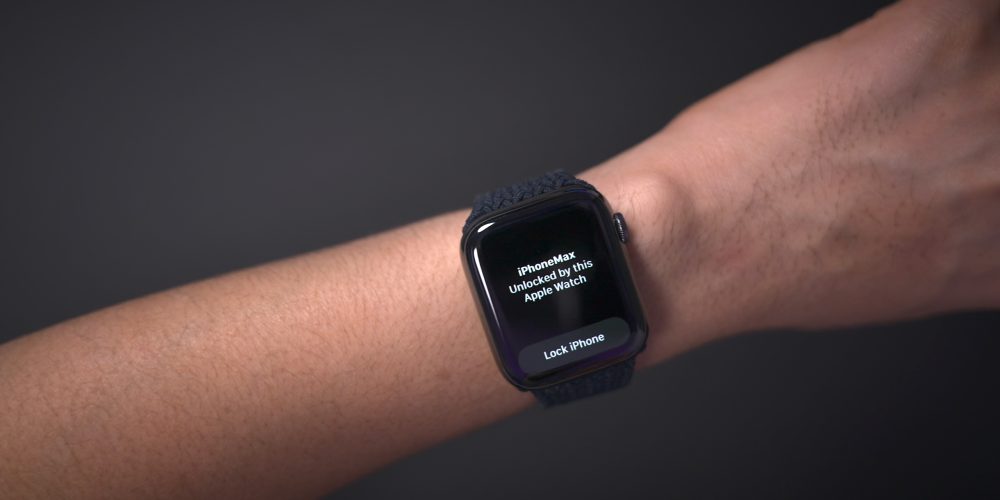
Unlock with Apple Watch
As noted, the biggest feature to come to iOS 14.5 is support for Apple Watch Unlock when Face ID detects a face with a mask. Users must be wearing an unlocked Apple Watch protected by a passcode in order for the feature to work. When attempting to unlock your iPhone using Face ID while wearing a face mask, you’ll feel a vibration on your Apple Watch, along with a notification that your iPhone was unlocked successfully.
Horizontal boot screen iPad
When connected to the Magic Keyboard, iPadOS 14.5 will display the startup Apple logo in horizontal/landscape mode instead of the default portrait orientation. If you restart your iPad when disconnected from the Magic Keyboard, even if you’re holding the device in landscape mode, the startup screen will appear in portrait mode.
As a side note, iPadOS 14.5 now supports emoji search, which iPhone users have been enjoying since iOS 14’s release, but has been inexplicably missing on iPad up until now.
Cellular connectivity updates
One of the biggest changes found in iOS 14.5 is the ability to enable dual SIM functionality while maintaining 5G connectivity. In previous versions of iOS, enabling the iPhone 12’s dual SIM feature would cause cellular connectivity to fall back to standard LTE. With iOS 14.5, users have the option of keeping both connections active simultaneously while still enjoying the benefits of 5G.
In addition to 5G dual SIM support, iOS 14.5 surfaces a new 5G Standalone cellular switch in system settings. Initial 5G implementations piggybacked on existing LTE networks to speed up adoption of 5G, but this method imposes propagation limits based on the LTE limitations. With Standalone (or SA) 5G, the limits of LTE are no longer in play. Keep in mind that your carrier will need to support 5G SA, and Apple warns that enabling SA at this early stage may cause degraded performance.
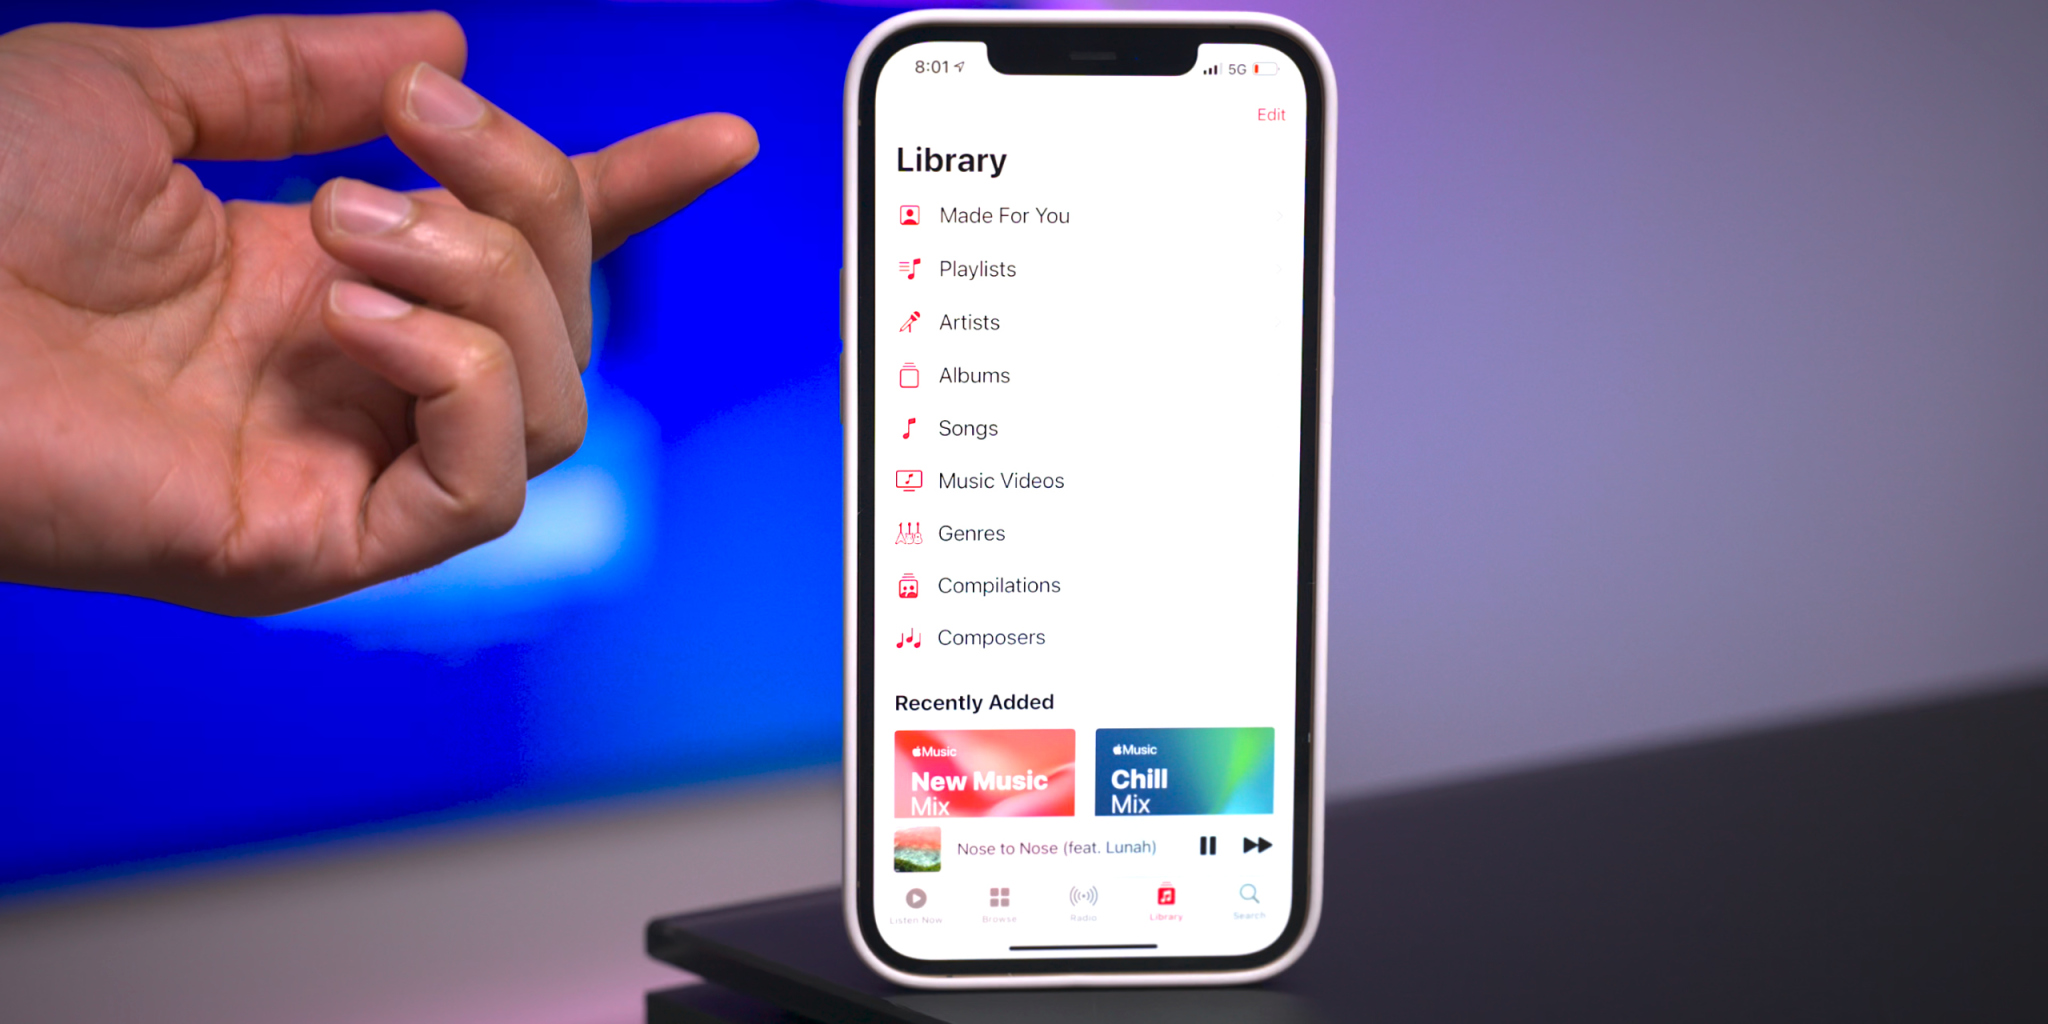
Apple Music updates
Apple Music gets some noteworthy updates in iOS 14.5, headlined by a new “Made For You” section under the Library tab. Made For You houses all of the algorithmic-curated music suggestions that are normally found within playlists like Favorites Mix, Chill Mix, and New Music Mix within the Listen Now tab.
Another handy feature found in iOS 14.5 is the inclusion of release dates for all music content featured on Apple Music. Prior versions of iOS would showcase release info, but in this latest beta version of iOS, users are treated with the exact release month, day, and year.
Users will also be happy to know that the scrolling metadata view on the Now Playing Lock Screen interface has now returned. This is a big improvement over the truncated metadata view that’s been around in the last few versions.
Reminders app enhancements
It’s crazy that we’ve not been able to sort Reminders based on parameters like modification date or title up until now, but at least we finally receive such features in iOS 14.5. Users can still sort reminder lists manually, but now there are several metadata sorting options, along with ascending and descending preferences.
The ability to directly print a reminders list joins the updated sorting options, allowing users to quickly send a list to a configured AirPrint printer.
Updated Podcast app
The stock Podcasts app gets lots of subtle changes and enhancements alongside a bigger update to the look and feel of the official show page for each podcast. New enhancements include a full-bleed header with color-matched backgrounds and a refreshed Library page with new glyphs.
Apple Fitness+ Workouts AirPlay 2 support
AirPlay 2 compatibility comes to Apple Fitness+ workouts, allowing users to stream workouts directly to an AirPlay 2-compatible set-top box or television. The problem with this method, as opposed to just playing on an Apple TV or iPad, is that you lose on-screen metric support. But that might not be a huge deal since metric details remain readily available on your Apple Watch.
Maps app redesigned guides
Apple has redesigned the Guides feature on the Maps app, which now includes a full-bleed header, redesigned buttons, and beautiful animations when minimizing and maximizing each guide.
PS5 / Xbox Series X controller support
Support for next-generation console controllers, including the Playstation 5 Dual Sense controller and the Xbox Series X controller, is now available in 14.5. Next-gen controller support is a welcome new addition for controller-compatible Apple Arcade games, and for taking advantage of console-centric remote play features.
Dedicated Search tab in News app
Similar to the Search tab in the Music app and TV app, the News app gains a dedicated search interface for quickly finding channels, topics, or stories.
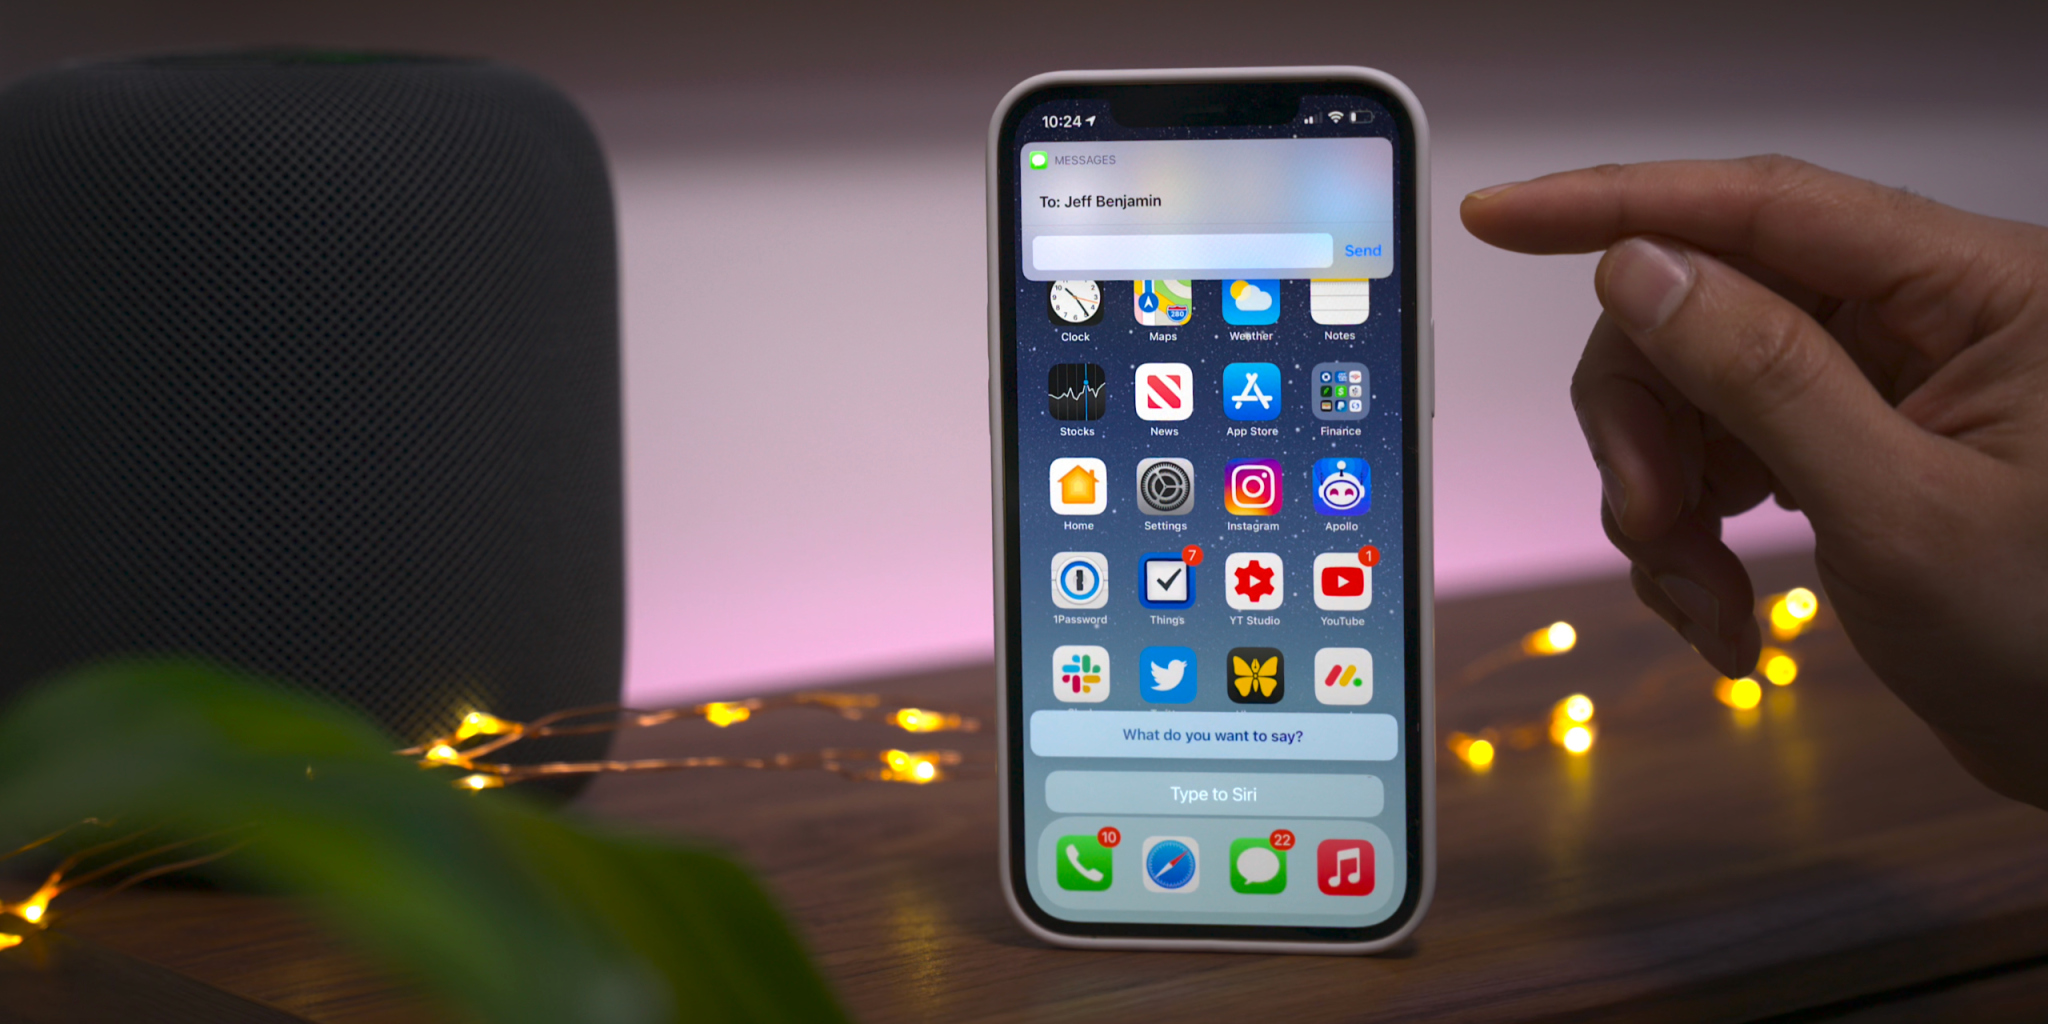
Siri interface updates
Those using the Type to Siri accessibility option will notice an updated interface that no longer opens to a dedicated Siri screen, allowing the user to maintain context of their current position in iOS. This update is similar to the changes first implemented in iOS 14 when invoking Siri using voice. You’ll also find an updated interface that appears when sending iMessages via Siri.
Apple Card updates
Although these updates are not-yet user facing, we’ve also highlighted a couple of forthcoming changes related to Apple Card:
Apple Card Family feature for multi-user accounts
New financial health features coming to the Wallet app
The Image Capture app comes pre-installed with every Mac, allowing users to easily import photos and videos from other devices.
How Apple is filling your hard drive with empty data.
Apples Image Capture.app is a very nice and simple tool to transfer photos from attached cameras to your Mac without the need to use heavy and slow launching apps like Apples “Fotos.app”.
Most unfortunately, in every single release since Mac OS X 10.10, Apple has added a lot of very embarrassing bugs to Image Capture.
Some of them got quickly fixed after we told Apple about them, but at the same time, Apple was very busy adding new bugs.
By pure chance, we have discovered a very disturbing bug recently that is able to quickly fill your macOS volumes with empty data.
Here is what happens.
If you connect an iPhone or iPad to your Mac, and use Image Capture to transfer the photos you took with the device to the Mac, you have the option to convert the HEIC photos taken by iOS to more standard JPG files. This requires you to uncheck the “Keep Originals” option in the settings for that iOS device, as shown here.
More specifically, the issue only affects users who import photos from an iPhone or iPad using Image Capture. Let’s say you want to manually transfer photos from your iPhone to a Mac via USB, and your photos are saved with the High Efficiency option (which is basically the HEIF format).
By unchecking the “Keep originals” option, macOS converts all HEIF image files to JPG automatically as you might expect.
The problem discovered by the NeoFinder team is that the Mac adds 1.5MB of empty data to each converted photo, making the imported files larger for no reason. By looking inside these photos through a Hex-Editor, you can find a section full of zeroes, which results in unnecessarily larger files.
With that said, if you import 1,000 images from your iPhone or iPad to your Mac using the Image Capture app, the bug will take up an additional 1.5GB of storage — which can be a lot for someone who owns a MacBook with 128GB of storage.
Apples Image Capture will then happily convert the HEIF files to JPG format for you, when they are copied to your Mac.
But what is also does is to add 1.5 MB of totally empty data to every single photo file it creates!
We found that massive bug by pure chance when working on further improving the metadata editing capabilities in NeoFinder, using a so-called Hex-Editor “Hex Fiend“.
Here is how the end of every single JPG file created by Apples buggy Image Capture.app looks like:
Apple has already been notified about the problem, but we don’t know when the company plans to release a macOS update to fix that bug. Until then, users can try the latest beta version of the Graphic Converter app, which removes the unwanted empty data from the JPG files. Of course, this is a colossal waste of space, especially considering that Apple is seriously still selling new Macs with a ridiculously tiny 128 GB internal SSD. Such a small disk is quickly filled with totally wasted empty data.
With just 1000 photos, for example, this bug eats 1.5 GB off your precious and very expensive SSD disk space.
We have notified Apple of this new bug that was already present in macOS 10.14.6, and maybe they will fix it this time without adding yet additional new bugs in the process.
Need to clear up some disk space or get rid of some old iPhone or iPad backups on a Mac? With the latest versions of MacOS, managing iOS and iPadOS device backups is done entirely in Finder, including deleting and removing device backups.
Arguably the safest and most thorough way of backing up an iPhone or iPad is to do an encrypted backup via Mac Finder. When the backup is complete you’ll have a copy of all of your data on your computer, complete with encrypted keychain contents. But it all takes up space that you might want to reclaim. As you can imagine, doing a full backup of your iPhone or iPad can take a lot of space. That’s fine if you’re lucky enough to be using a Mac with a multi-terabyte SSD. But most of us aren’t, so we need a way to trip the amount of data used by backups. We need to delete old ones. And in macOS Catalina, that’s a whole new process compared to deleting backups with iTunes. As you’ll see, removing backups this way is similar, but since iTunes is no more in modern macOS versions, it’s obviously a bit different and using a different process.
Here’s how to go about deleting old iPhone or iPad backups in macOS Catalina.
How to Delete iOS & iPadOS Device Backups from MacOS Finder in Catalina
This assumes you have made a backup of iPhone or iPad to macOS before, if not there will not be any backup to remove.
Plug your iPhone or iPad into your Mac using a USB cable.
Open a Finder window by clicking its icon in the Dock and click your iPhone or iPad in the sidebar.
Make sure that the “General” tab is selected and then click “Manage Backups.” You’ll find it at the very bottom of the window.
Click to select the backup that you want to delete and then click “Delete Backup.”
You’ll need to confirm that you want to delete the selected backup before the action is carried out.
The selected backups will be deleted.
Depending on the size of the device backups you removed, you can possibly get a ton more space on your Mac drive, whether it’s a hard disk or SSD, just by removing backups this way. This is particularly nice to do with old device backups that are no longer needed.
Of course you don’t want to delete the only copy of a device backup you have, so be sure you have a backup of the iPhone or iPad somewhere before deleting one from the Mac.
As a bonus, you’ll still have these backups safe and sound if you’re using Time Machine, assuming you use that feature to backup the entire Mac anyway. You can then go about restoring the backup if you still need it, depending on how much time has passed and how long Time Machine keeps files around. Another handy trick for redundant backups is to manually copy a copy of the backed up devices to other external storage mediums, like an SD card, USB flash drive, or external hard drive, which you can then refer to if needed.
Using a Mac is just one way of backing up your iPhone or iPad. You can also use a Windows PC with iTunes if you want to. If you’d rather not have to plug them into a computer at all, you can use iCloud for backups instead as well. With iCloud, your device will back itself up overnight and you won’t need to connect to a computer to restore anything, either. And just like the Mac and iTunes approaches, you can also delete backups from iCloud too.
Finder in MacOS handles all device management now that iTunes used to, and that includes not only device backups but also syncing music to iPhone or iPad in MacOS with the Finder too, along with other device management options. Basically all that used to be device management in iTunes is now in Finder.
Interested in disabling Launchpad on Mac? If you want to turn off the Launchpad for whatever reason or to stop accidentally opening Launchpad in MacOS, you can turn the feature off completely.
For some quick background, Launchpad is a feature in MacOS that reveals a screen of app icons, sort of reminiscent to the appearance of an iPad or iPhone. Launchpad can be accessed by gesture, F button, or by opening the Launchpad app from the Dock or Applications folder. Some users may find this feature to be really helpful, whereas others may find it to be less useful particularly if they’re accessing Launchpad through an accidental pinch gesture on trackpad, or tapping on the F4 key, or clicking the app Dock icon.
This article will show how to disable the Launchpad gesture, remove the Launchpad Dock icon, and disable remove the Launchpad F button trigger on Mac to turn Launchpad off.
How to Disable Launchpad Gesture on Mac
This applies to turning off the Launchpad gesture on all Macs using a Trackpad :
Pull down the Apple menu and go to “System Preferences”
Choose “Trackpad” then choose “More Gestures”
Locate “Launchpad” in the list of gestures and uncheck the box next to “Launchpad” to disable the Launchpad pinch gesture on Mac
Close System Preferences
That will disable the Launchpad pinch gesture.
You may also want to remove the Launchpad app icon from the Mac Dock.
How to Remove Launchpad from Mac Dock
Click and hold on the Launchpad icon, then drag it out of the dock and wait a moment for the ‘Remove’ label to appear, then drop the Launchpad icon
That will remove Launchpad from the Dock on the Mac.
Finally, you may be interested in changing or removing the keyboard shortcut for Launchpad on the Mac.
How to Change or Remove Launchpad Keyboard Shortcut on Mac
Pull down the Apple menu and go to “System Preferences”
Go to “Keyboards” and then to “Shortcuts” and choose “Launchpad & Dock”
Uncheck the box for “Show Launchpad” to disable it, otherwise click the keyboard shortcut to set it to something else
This process should be familiar to anyone who has set a custom keyboard shortcut on Mac except that rather than creating a new one you’re either disabling or changing an existing keystroke combination.
Obviously this is geared towards disabling Launchpad, but if you don’t want to turn off the feature and you instead enjoy it, then there are plenty of Launchpad tips we’ve discussed before to browse through.
Apple completely changed the way that we sync data to our iPhones and iPads with the arrival of macOS 10.15 Catalina and later versions of MacOS. The removal of iTunes is something that has been a long time coming, but now that it’s here a ton of people are left wondering – just how do I sync music from Mac to my iPhone or iPad now?
The short answer is that you use the macOS Finder, just as you would if you were moving files to an external SSD or memory stick, and much like when backing up iPhone or iPad to Mac Finder.
But things do differ slightly with iPhone and iPad because you get a refreshed version of the old iTunes interface thrown in, too. Confused? You needn’t be.
Here we’re going to run through the steps that need to be taken to sync your music with an iPhone or iPad when using macOS Catalina.
How to Sync Music from iPhone to MacOS with Finder
First, make sure that your device is connected to your computer via a USB cable. You aren’t going to get very far if it isn’t.
Click on the Finder icon in your Mac’s Dock to open a new window.
Select your iPhone or iPad in the sidebar.
Make sure that the tab named “Music” is selected over in the main window.
Make sure that the “Sync Music onto your device” is checked. If it isn’t, check it.
You can now decide whether you want to sync your entire music library, or just selected albums, playlists, artists, or genres. If you choose to sync your entire library, you’re done. Click “Apply” followed by “Sync” and wait for everything to finish. If you chose to selectively sync your music, continue with this guide.
Now you can select which playlists, artists, albums, and genres you want to sync. Make all of your selections and then click “Apply” followed by “Sync.”
The initial syncing process might take some time depending on the amount of data that needs to be transferred.
Don’t disconnect your iPhone (or iPad) device until Finder tells you that syncing has finished. When it’s done, you will have synced music to the iPhone from the Mac.
This obviously applies to the latest and most modern macOS versions from Catalina 10.15 onward. If you’re using a Mac with an older version of macOS installed, you can still use iTunes as always.
If you’re going to attempt to install MacOS Catalina on an unsupported Mac, do so at your own risk.
Then you may be interested in a third party tool that allows advanced uses to patch the MacOS Catalina installer so that it works on otherwise unsupported Macs.
Whether or not you should install MacOS Catalina onto an unsupported Mac is another question entirely, as performance may not be up to par, and some things may not work as expected (or at all, since features like Sidecar are compatible with specific Macs only), but if you’re an advanced user who is interested in running macOS 10.15 on unsupported hardware this patcher utility makes it easy to do so.
If this sounds interesting to you, check out the link below to learn more about the DosDude Catalina Patcher utility, and you can view a video tutorial further below showing how it works.
If you’re going to attempt to run this patcher and install MacOS Catalina on an unsupported Mac, be sure you have full complete backups of the computer and understand that running unsupported system software on an unsupported Mac has obvious risks.
DosDude has been tweaking with the MacOS system installers for a while, and you may recall a past article discussing running macOS Mojave on unsupported Macs too using a similar patch.
Which Unsupported Macs Can Install MacOS Catalina with the DosDude Tool?
According to DosDude, the MacOS Catalina Patcher will work to install MacOS Catalina on the following list of otherwise unsupported Macs:
Early-2008 or newer Mac Pro, iMac, or MacBook Pro:
MacPro3,1
MacPro4,1
MacPro5,1
iMac8,1
iMac9,1
iMac10,x
iMac11,x (systems with AMD Radeon HD 5xxx and 6xxx series GPUs will be almost unusable when running Catalina.)
iMac12,x (systems with AMD Radeon HD 5xxx and 6xxx series GPUs will be almost unusable when running Catalina.)
MacBookPro4,1
MacBookPro5,x
MacBookPro6,x
MacBookPro7,x
MacBookPro8,x
Late-2008 or newer MacBook Air or Aluminum Unibody MacBook:
MacBookAir2,1
MacBookAir3,x
MacBookAir4,x
MacBook5,1
Early-2009 or newer Mac Mini or white MacBook:
Macmini3,1
Macmini4,1
Macmini5,x (systems with AMD Radeon HD 6xxx series GPUs will be almost unusable when running Catalina.)
MacBook5,2
MacBook6,1
MacBook7,1
Early-2008 or newer Xserve:
Xserve2,1
Xserve3,1
As you can see, that list is significantly broader than what is on the list of MacOS Catalina compatible Macs.
It goes without saying that just because you can do something doesn’t mean you should, and some Macs may not perform well, and not all features may work as expected if trying to run MacOS Catalina on unsupported hardware. This is very much a third party tweak, and is of course not supported by Apple in any way.
The video below demonstrates a tutorial walking through the process of using the DosDude Catalina patcher tool to install the macOS 10.15 system software on an unsupported Mac.