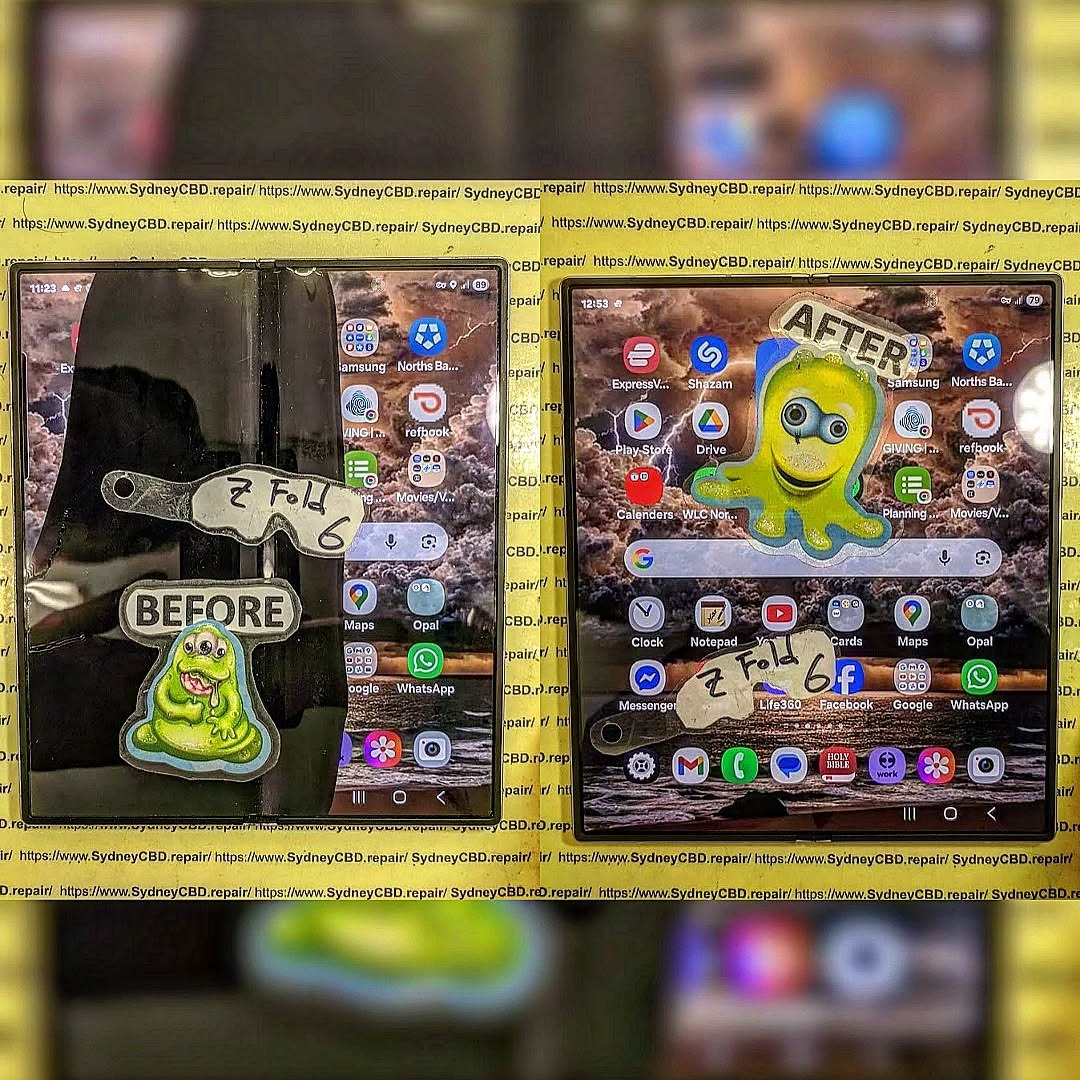
Samsung’s Galaxy Z Fold 7 is one of the most advanced foldable smartphones ever released, blending cutting-edge design with powerful performance. But like any intricate piece of technology, it hides a complex network of parts that can wear down, break, or require delicate repairs over time. A teardown not only reveals the device’s engineering marvels but also shows where hidden repair challenges might be lurking.
While Samsung has improved hinge durability, it’s still one of the first points of failure in foldables. Dust intrusion, drops, or wear can cause stiffness or misalignment. Repairing the hinge often means partial or full disassembly of the phone — a complex and time-consuming task.
2. Inner Display Vulnerabilities
The foldable screen is more delicate than traditional glass displays. Crease wear, dead pixels, and touch sensitivity issues may arise. Even replacing the inner screen demands careful handling to avoid damaging the folding mechanism.
3. Adhesive-Heavy Construction
Samsung uses strong adhesives to secure the Z Fold 7’s internal parts for water resistance. While this helps in daily use, it makes repairs trickier, requiring heat tools and precision to avoid breaking other components during disassembly.
4. Battery Placement and Risks
The Z Fold 7 houses two separate batteries — one in each half of the device. Replacing them involves disconnecting flex cables routed around the hinge, increasing the risk of accidental damage.
5. Under-Display Camera Repairs
The Z Fold 7’s under-display camera is hidden beneath the foldable screen. Accessing it requires removing the display, making even small repairs more complicated.
The Importance of Professional Repair for Foldables
DIY repair on a Z Fold 7 is risky. Without the right tools, you could damage the flexible OLED, snap ribbon cables, or compromise the hinge’s dust protection. That’s why Sydney CBD Repair Centre is the go-to choice in Sydney for delicate foldable repairs.
Our technicians:
Use genuine Samsung parts for reliable performance.
Follow manufacturer-recommended repair processes to preserve water resistance.
Offer same-day service for common Z Fold repairs where possible.
Sydney CBD Repair Centre – Your Foldable Experts
David and his expert team have years of experience repairing Samsung Galaxy Z Fold models, from early versions to the latest Z Fold 7. Whether it’s a screen replacement, hinge service, or camera repair, we deliver results that meet or exceed factory standards.
Final Thoughts – What to Expect in Z Fold 7 Repairs
The Samsung Z Fold 7 is a remarkable piece of technology — but its complexity makes professional repair essential. From the intricate hinge to the ultra-thin glass display, every component demands precision. Choosing a trusted repairer like Sydney CBD Repair Centre ensures your foldable stays in peak condition for years to come.
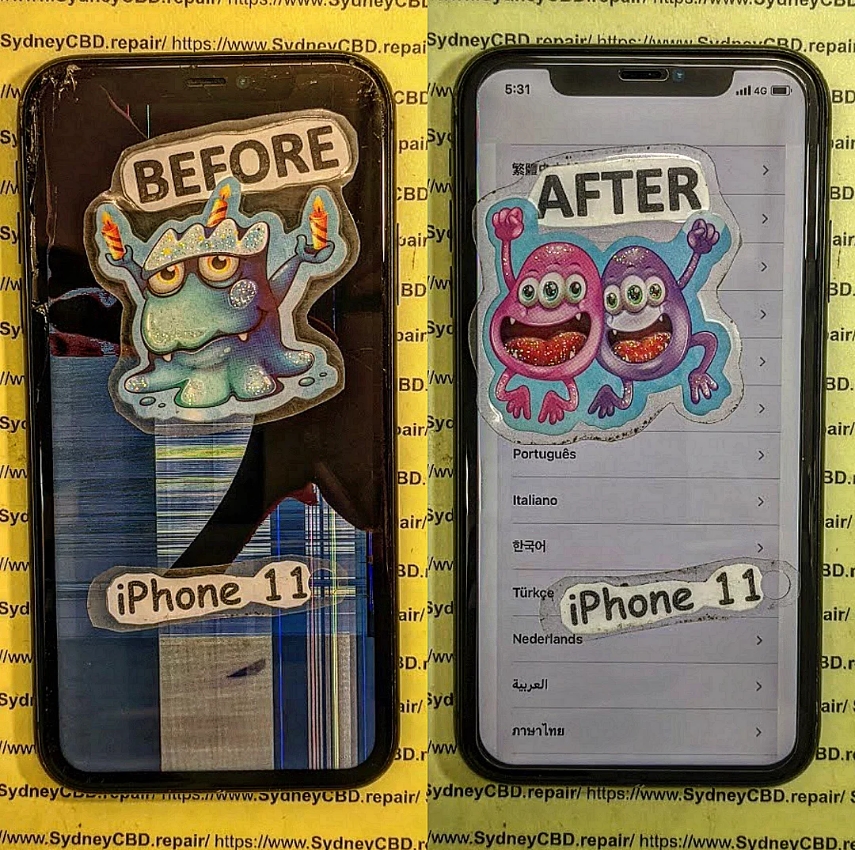
CRITICAL iPHONE 11 SCREEN REPAIR: WHAT WENT WRONG? (7 Common Mistakes You Must Avoid)
Introduction
Cracked screens, unresponsive touch panels, and dull displays — these are some of the most common issues iPhone 11 users face. While the iPhone 11 is known for its durability and vibrant display, even the most careful users can’t always avoid accidental drops or impacts. When that happens, the first instinct is to get the screen fixed quickly and cheaply. But here’s the catch — not all screen repairs are created equal.
Many iPhone 11 owners learn this the hard way: after a poorly done repair, their device may develop new issues such as Face ID failure, flickering screens, color inaccuracy, or loss of water resistance. What was supposed to be a simple fix turns into an expensive and frustrating experience.
In this article, we’ll uncover what often goes wrong during iPhone 11 screen repairs, explore the most common mistakes made by DIY enthusiasts and unqualified technicians, and show you how to avoid these pitfalls. You’ll also discover why choosing a trusted and certified service provider — like Sydney CBD Repair Centre, a six-time award-winning repair shop — ensures your iPhone gets back to perfect working condition safely and efficiently.
Whether you’re considering a DIY replacement or searching for a reputable Sydney repair shop, this guide will help you make informed decisions, protect your investment, and keep your iPhone 11 looking and functioning like new.
When your iPhone 11 screen cracks or stops responding, the urge to fix it immediately is understandable. However, a quick or cheap repair often leads to further damage, especially when the technician isn’t trained or uses non-genuine parts. The iPhone 11 is a high-precision device, and its screen system includes sensors, cameras, and complex connectors that require expertise to handle.
This article reveals the 7 most common mistakes people make during iPhone 11 screen repairs — and how you can avoid them by choosing professional repair services like Sydney CBD Repair Centre, Sydney’s top-rated phone repair shop six years in a row.
Unlike older iPhone models, the iPhone 11’s screen integrates several high-tech components:
OLED or Liquid Retina Display (LCD) technology
True Tone and Haptic Touch features
Face ID sensors and front camera module
Water-resistant adhesive seals
Because of this complexity, replacing an iPhone 11 screen isn’t just about removing glass. It’s about maintaining display accuracy, water resistance, and functionality. That’s why professional handling is critical.
🔍 OLED vs LCD – Why It Matters
Apple’s iPhone 11 uses a Liquid Retina HD (LCD) display, unlike its Pro models that feature OLED. But both screen types are sensitive to improper repairs.
Feature
OLED
LCD
Display Type
Organic Light-Emitting Diode
Liquid Crystal Display
Color Accuracy
Superior
Very Good
Repair Cost
Higher
Moderate
Durability
Slightly lower
Better resistance
Common Issue
Burn-in risk
Backlight bleeding
Choosing the wrong screen type or using low-quality third-party panels often results in dull colors, poor brightness, or dead pixels — problems that only worsen over time.
⚠️ Common Mistakes During iPhone 11 Screen Repairs
Even small repair errors can cause irreversible damage. Below are seven critical mistakes every iPhone 11 owner should know.
⚙️ Mistake #1: Using Cheap Replacement Screens
While it’s tempting to save money, cheap screens lack Apple’s calibration and quality control. These parts often:
Display inaccurate colors
Reduce touch sensitivity
Fail True Tone detection
Break more easily under slight pressure
A genuine iPhone screen may cost more upfront but saves money long-term by lasting longer and maintaining resale value.
🌈 Mistake #2: Ignoring True Tone Calibration
True Tone automatically adjusts color temperature based on ambient lighting. When you replace your screen, this calibration is lost unless transferred correctly using specialized tools.
Untrained technicians often skip this step, causing the screen to appear unnaturally blue or yellow, especially in low light.
😷 Mistake #3: Damaging the Face ID Module
The iPhone 11’s Face ID sensor sits dangerously close to the display flex cables. If mishandled during a screen swap, it can disable Face ID permanently.
Repairing Face ID damage often requires logic board work, which is expensive and complex — something only expert technicians like those at Sydney CBD Repair Centre can handle safely.
💧 Mistake #4: Poor Adhesive Application
Apple uses precision waterproof adhesives to maintain water resistance. Incorrect or uneven application leads to:
Gaps around the frame
Dust or moisture ingress
Reduced structural integrity
A professional repairer uses factory-grade adhesive strips and presses to ensure a perfect seal, keeping your device resistant to spills and rain.
⚡ Mistake #5: Static Discharge and Motherboard Damage
Static electricity can fry delicate components on the iPhone’s logic board. Many DIY repairers forget ESD (electrostatic discharge) precautions. A single spark can destroy touch controllers or cause ghost-touch problems.
Professional shops use anti-static workbenches, gloves, and grounded mats to prevent this.
🧰 Mistake #6: Incorrect Tools Used
Using screwdrivers or pry tools not designed for Apple devices often strips screws or cracks internal glass shields. Precision tools like tri-point and pentalobe drivers are essential to avoid permanent damage.
🔄 Mistake #7: Skipping Post-Repair Testing
Some repairs end with screen replacement but skip diagnostics. Without testing:
Proximity sensors might fail
Display may flicker or freeze
Face ID might not align
A professional repair shop conducts a complete 15-step diagnostic before returning your iPhone — ensuring every feature functions properly.
🧩 The Importance of Genuine Parts
Genuine parts not only fit perfectly but also maintain Apple’s color accuracy, responsiveness, and durability.
Non-genuine screens often lead to:
Shorter lifespan
Uneven brightness
Overheating issues
Sydney CBD Repair Centre sources authentic and OEM-grade parts, ensuring your device performs just like new. That’s backed by their 90-day repair warranty.
📍 Choosing the Right Repair Shop in Sydney
With so many repair options available, it’s vital to choose a service that guarantees transparency and reliability.
🧾 Certification, Warranty, and Reviews
Before trusting your iPhone to any repairer, check:
Certifications for Apple or electronic repair standards
Warranty coverage on parts and labor
Google Reviews and local reputation
A trustworthy repair shop should provide clear pricing, a written warranty, and same-day repair options.
🏆 Why Sydney CBD Repair Centre Excels
Located in the heart of Sydney, Sydney CBD Repair Centre has:
2000+ verified 5-star Google reviews
6-time “Best Mobile Phone Repair” award
Expert Apple-certified technicians
Genuine parts guarantee
Same-day express repairs
They’ve built their reputation on transparency, quality, and trust, making them the go-to repair centre for iPhone 11 screen replacements.
Once repaired, you can extend your iPhone 11 screen’s life by:
Using a tempered glass protector
Avoiding exposure to heat or moisture
Keeping the device in a protective case
Cleaning the display with a microfiber cloth
Getting minor cracks repaired immediately before spreading
Simple precautions go a long way toward keeping your device in top shape.
❓ FAQs About iPhone 11 Screen Repair
1. How long does an iPhone 11 screen repair take?
Most professional repairs, including testing, take under 1 hour at Sydney CBD Repair Centre.
2. Does replacing the screen affect Face ID?
Not if done correctly by experts. Mishandling flex cables, however, can cause Face ID failure.
3. Is the new screen water-resistant?
Yes, when installed with original-grade adhesives by certified technicians.
4. Can I keep True Tone after a screen replacement?
Absolutely — if your repair shop uses data transfer tools to copy True Tone calibration.
5. Why does my new screen look dimmer?
This usually happens with cheap aftermarket panels that lack Apple’s brightness specs.
6. What warranty does Sydney CBD Repair Centre offer?
All repairs come with a 90-day warranty covering workmanship and parts.
🏁 Conclusion: Professional Repair for Peace of Mind
Your iPhone 11 deserves the best care. Avoiding cheap parts, untrained technicians, and improper repairs ensures long-lasting performance and perfect display quality.
Trust Sydney CBD Repair Centre — Sydney’s most reviewed and award-winning mobile repair shop — for your next screen replacement.
David from Sydney CBD Repair Centre – The best place to fix mobile phones for six years in a row!
Top-rated mobile phone repair in Sydney with 2000+ positive reviews, genuine parts, and same-day repairs.
When your smartphone breaks, it’s easy to turn to quick fixes, online tips, or well-meaning advice from friends. But not all information out there is accurate. In fact, some phone repair myths can do more harm than good, potentially causing further damage to your device. At Sydney CBD Repair Centre, we’ve seen countless phones brought in after failed DIY attempts or misguided repair solutions. Let’s set the record straight by debunking the most common myths about phone repairs.
This is one of the most widespread myths. While rice may absorb some surface moisture, it’s not effective at drying out internal components. In reality, rice can leave dust particles inside the device and delay the time it takes for proper drying. The best solution is professional cleaning using specialized drying equipment and ultrasonic machines.
Not always true. If you choose a trusted and certified repair centre that uses genuine parts, your warranty is typically still valid. The problem arises when unqualified technicians or cheap counterfeit parts are used. At Sydney CBD Repair Centre, we only use original manufacturer parts to ensure compatibility and long-term performance.
Myth 3: Cracked Screens Are Just a Cosmetic Problem
A cracked screen isn’t just about looks. Over time, cracks can:
Spread further and cause touch sensitivity issues.
Expose your phone to dust and moisture.
Lead to deeper internal damage.
Getting a cracked screen fixed early prevents bigger (and more expensive) problems down the line.
Myth 4: DIY Repairs Save You Money
Watching a few YouTube videos might make repairs look simple, but smartphones today are incredibly compact and complex. Without the right tools, you risk:
Damaging flex cables and connectors.
Losing water resistance.
Causing permanent motherboard damage.
In many cases, DIY attempts end up costing more when professionals have to undo mistakes.
Myth 5: Your Phone Is Waterproof Forever
Even if your phone has an IP67 or IP68 rating, water resistance decreases over time. Everyday wear and tear, accidental drops, or previous repairs can weaken seals. No smartphone is completely waterproof. Always be cautious around water and never rely entirely on factory ratings.
Myth 6: Battery Replacements Are Unsafe Outside Official Stores
This isn’t true if you visit a reliable repair centre. The key is ensuring the battery used is genuine and installed by an expert. At Sydney CBD Repair Centre, we’ve safely replaced thousands of smartphone batteries, restoring performance and extending device lifespan.
Why Trust Sydney CBD Repair Centre?
Unlike myths and quick fixes, we offer:
✅ Same Day Express Repairs
✅ Genuine Parts Guarantee
✅ Professional Technicians with years of expertise
✅ Competitive Pricing
✅ 2000+ 5-Star Google Reviews
✅ 6-Time Award Winner for Best Phone Repairs
We’ve built our reputation on trust, reliability, and transparency. When you bring your device to us, you’ll always get an honest diagnosis and the best repair solution.
Final Thoughts
When it comes to phone repairs, don’t fall for myths that can cause further harm to your device. Whether it’s cracked screens, water damage, or battery issues, the safest option is always to consult professionals who use genuine parts and proven methods.
If you’re in Sydney and need expert help, visit David and the team at Sydney CBD Repair Centre today—the city’s #1 choice for mobile phone repairs.
Can You Fix a Water-Damaged Phone? 7 Proven Solutions That Work
Understanding Water Damage in Smartphones
Smartphones today are engineered with advanced technology, but they remain vulnerable to one common hazard: water damage. Whether it’s an accidental drop in the sink, pool, or a sudden rainstorm, moisture can wreak havoc on delicate circuits and components.
If you’re asking yourself, “Can you fix a water-damaged phone immediately?” the answer depends on how fast you act.
Powering Off Immediately
The first step is to turn the device off. This prevents electricity from running through wet circuits, which could permanently damage the motherboard.
Removing SIM and Memory Cards
Take out your SIM card, memory card, and accessories to allow better airflow and reduce the risk of data loss.
Drying Techniques You Should Try
Pat dry with a microfiber cloth.
Use silica gel packets instead of rice—they absorb moisture more effectively.
Place the phone in front of a fan for consistent airflow.
What NOT to Do After Water Damage
Mistakes in handling can make the situation worse.
Avoiding Heat Sources
Never use a hair dryer or microwave. Extreme heat can warp circuits and damage seals.
Why Rice Isn’t Always the Best Solution
While popular, rice absorbs moisture slowly and may leave behind dust. A better alternative is silica gel packets or professional drying tools.
Can You Fix a Water-Damaged Phone at Home?
DIY Repair Kits
Some online kits promise quick solutions with specialized drying agents and tools. These can sometimes work for minor splashes.
When DIY Repairs Make Things Worse
Opening your phone without expertise can:
Break waterproof seals.
Damage delicate flex cables.
Void warranty.
If the damage seems severe, it’s safer to visit a professional repair centre.
Professional Repair for Water-Damaged Phones
Ultrasonic Cleaning Explained
Experts often use ultrasonic cleaning machines that remove corrosion and restore circuit functionality.
How Technicians Diagnose Water Damage
Technicians check Liquid Contact Indicators (LCIs)—tiny stickers that change color when exposed to water.
Average Repair Costs
Depending on the brand and extent of damage, repairs can range from $100 to $600. iPhones and flagship Samsung devices are usually on the higher end.
Data Recovery from Water-Damaged Devices
Tools Used by Professionals
Repair centres use chip-off recovery methods and specialized software to retrieve data.
When Data is Beyond Recovery
If the NAND chip is physically destroyed, recovering photos, contacts, and files may be impossible.
Waterproof vs. Water-Resistant Phones
IP Ratings and What They Mean
IP67: Can withstand immersion in water up to 1 meter for 30 minutes.
IP68: Can survive deeper depths for longer durations.
Why “Waterproof” Doesn’t Mean Indestructible
Even with high IP ratings, phones can still suffer water damage over time due to wear and tear on seals.
Prevention Tips: Protecting Your Phone from Water Damage
Using Waterproof Cases
Invest in high-quality cases if you swim, surf, or work outdoors.
Smart Habits to Reduce Risk
Avoid using phones near pools or sinks.
Keep a dry bag handy during rainy weather.
Schedule regular maintenance checks at trusted repair shops.
FAQs
1. Can you fix a water-damaged phone that won’t turn on?
Yes, but it depends on the severity of the damage. Professional ultrasonic cleaning often revives phones that seem completely dead.
2. Is rice still effective for drying phones?
Rice can help, but silica gel packets or professional drying machines work much faster and safer.
3. How long should I leave my phone to dry?
At least 24–48 hours, but the sooner you bring it to a repair shop, the higher your chances of recovery.
4. Will my data be safe after water damage?
Not always. If your phone doesn’t power on, data recovery services may still extract your files.
5. How much does water damage repair cost in Sydney?
On average, between $150–$400 depending on the model and damage severity.
6. Does warranty cover water damage?
Most warranties don’t cover liquid damage, even for water-resistant phones.
Conclusion
Water damage doesn’t have to mean the end of your smartphone. With quick action, the right first-aid steps, and professional repair services, you can often save your device and recover valuable data.
If you’re in Sydney and need urgent help, David from Sydney CBD Repair Centre is your go-to expert. With over 2000 positive Google reviews, genuine parts, and award-winning service, your phone is in safe hands.
Smartphone Repair Tips For Beginners: 15 Essential Steps You Can’t Miss
📱 Introduction
Smartphones are essential tools in modern life, and when they break, it can feel like everything comes to a halt. The good news? With the right guidance, even beginners can handle basic smartphone repairs. This guide will walk you through 15 essential steps to repair your phone safely and effectively.
Whether it’s a cracked screen, fading battery, or speaker issue, knowing how to troubleshoot and fix common problems will save you money and extend your phone’s life. So grab your toolkit and let’s get into the essentials.
💡 Always cross-check part numbers and ensure warranty terms are provided.
❌ 14. Common Mistakes to Avoid
Rushing the process
Using the wrong tools
Not disconnecting the battery first
Skipping screen tests before final assembly
Forgetting screws or mixing them up
Take your time and double-check each step.
🧑🔧 15. Benefits of Professional Repair Services
Sometimes, DIY isn’t the best option. Professional repair services offer:
Genuine parts with warranties
Trained technicians with specialized tools
Faster turnaround times
Better diagnostics for deep hardware issues
📍 If you’re in Sydney, visit David at Sydney CBD Repair Centre—trusted by over 2000 customers and 6-time award winner for best phone repair!
❓ FAQs
1. Is it safe to repair my phone at home?
Yes, if you follow safety procedures and use proper tools. Avoid complex motherboard repairs unless you’re trained.
2. What’s the hardest part of smartphone repair?
Handling delicate parts like flex cables and reassembling the phone without damaging components.
3. Will DIY repair void my warranty?
Yes. Once the device is opened, most manufacturers void the warranty.
4. Can I repair a water-damaged phone myself?
Minor water damage can sometimes be fixed, but extensive corrosion requires professional care.
5. How do I know if my battery needs replacement?
If your phone shuts off randomly, charges slowly, or the battery swells, it’s time to replace it.
6. Where can I get quality phone parts in Sydney?
Sydney CBD Repair Centre sources genuine parts and offers 90-day warranties on repairs.
✅ Conclusion
Smartphone repairs may seem intimidating, but with the right knowledge and tools, you can handle many common issues yourself. Whether you’re replacing a screen, fixing a charging port, or recovering from water damage, always proceed with care.
However, for more complex problems, trusting professionals like Sydney CBD Repair Centre ensures your device gets the expert attention it needs.
Why Your Foldable Hinge Grinds: Deep Cleaning the Galaxy Z Fold 6 Mechanism + 10 Expert Tips
Introduction: Understanding the Foldable Hinge
The Galaxy Z Fold 6 is a marvel of modern engineering, but its complex hinge mechanism is also its most delicate component. Over time, the foldable hinge may begin to grind, squeak, or resist smooth movement, which can be alarming for users. Understanding why this happens is the first step in preventing permanent damage. The hinge isn’t just a simple pivot—it’s a network of micro-gears, cams, and tension springs that allow the flexible display to open and close flawlessly. Even minor debris or lack of lubrication can disrupt its delicate balance, leading to grinding sounds and uneven folding.
To properly clean and maintain your foldable hinge, you need to understand what’s inside. The Galaxy Z Fold 6 hinge is engineered for precision, with multiple moving parts working in perfect harmony.
Key Components of the Hinge
Gears and Cams: These distribute folding force evenly across the hinge.
Micro-Springs: Maintain tension and help the fold “snap” into open or closed positions.
Protective Covers: Shield the hinge from dust and moisture while allowing airflow.
Lubricant Channels: Tiny grooves designed to hold factory-applied lubricants.
How the Hinge Mechanism Works
When you fold your Galaxy Z Fold 6, the cams rotate and compress the springs, guiding the screen along a controlled path. The gears synchronize the movement so that one side of the screen doesn’t fold faster than the other. Even a small speck of dust can disrupt this balance, causing grinding or resistance.
Several factors contribute to hinge grinding, and understanding them can prevent future issues.
Dust and Debris Accumulation
Tiny particles from pockets, bags, or the environment often accumulate inside the hinge. Over time, this buildup creates friction and leads to a noticeable grinding noise.
Lubrication Issues
The hinge is coated with a specialized lubricant at the factory. Frequent use, dust, or exposure to heat can degrade or dry out the lubricant, increasing resistance during folding.
Physical Damage and Misalignment
Dropping your foldable or applying excessive pressure can bend or misalign hinge components. Even small misalignments can produce grinding, and persistent damage may worsen over time.
Signs Your Foldable Hinge Needs Cleaning
Audible grinding or squeaking when folding/unfolding.
Uneven folding or resistance along the hinge.
Visible debris or dust along the hinge seam.
Slight misalignment of the flexible screen edges.
Stiff movement requiring extra force to open or close.
Safety Precautions Before Cleaning
Before attempting any cleaning, safety is crucial:
Power off your Galaxy Z Fold 6.
Remove any case or accessory that may obstruct access.
Work on a clean, static-free surface.
Avoid excessive pressure on the hinge to prevent damage.
Wear gloves or use anti-static measures if possible.
Tools and Materials Needed
Soft microfiber cloths
Soft-bristled brush (anti-static if available)
Compressed air canister
Isopropyl alcohol (90% or higher)
Precision lubricant recommended by Samsung
Tweezers or small picks (plastic recommended)
Cotton swabs
Step-by-Step Guide: Cleaning the Hinge
Cleaning your hinge properly requires patience and precision. Follow these steps carefully.
Removing Surface Debris
Use a soft brush to dislodge dust along the hinge.
Wipe gently with a microfiber cloth.
Avoid pushing debris deeper into the mechanism.
Using Compressed Air
Hold the can upright to avoid moisture spraying.
Blow air along the hinge from multiple angles.
Do not insert objects into the hinge.
Applying Lubricant Properly
Select a small amount of precision lubricant.
Apply along the hinge’s moving parts using a toothpick or fine applicator.
Open and close the hinge gently to distribute the lubricant.
Testing and Adjusting
Slowly fold and unfold the device multiple times.
Check for smooth motion and absence of grinding.
Repeat cleaning if necessary.
Maintenance Tips for Long-Term Hinge Health
Clean the hinge every 2-3 months or after heavy dust exposure.
Avoid folding the phone with wet or dirty hands.
Keep your device away from sand, food particles, or small debris.
Store the phone in a protective case when not in use.
Troubleshooting Persistent Grinding
If grinding persists despite cleaning:
Verify lubrication coverage.
Check for visible damage or bent components.
Ensure no debris is lodged deep inside.
Consider professional assessment to prevent further damage.
When to Seek Professional Repair
Some hinge issues are beyond DIY repair:
Persistent resistance or grinding after thorough cleaning.
Misalignment that affects the screen or causes damage.
Water or liquid exposure inside the hinge.
Warranty-covered repairs are preferable to prevent voiding.
Samsung official hinge maintenance guide: Samsung Care+
YouTube tutorials from certified repair centers
Forums for Galaxy Z Fold 6 users sharing hinge tips
FAQs
1. How often should I clean my Galaxy Z Fold 6 hinge?
Every 2-3 months, or immediately if you notice dust or grinding.
2. Can I use household lubricants on the hinge?
No, always use manufacturer-recommended or precision lubricants.
3. Will cleaning the hinge void my warranty?
Careful cleaning using non-invasive methods typically doesn’t void warranty; avoid disassembly.
4. What if my hinge still grinds after cleaning?
Persistent grinding may indicate misalignment or damage—consult a professional.
5. Can debris inside the hinge damage the screen?
Yes, prolonged friction can stress the foldable display over time.
6. Is it safe to clean the hinge with water?
No, never use water; use isopropyl alcohol and dry methods only.
Conclusion
Deep cleaning your Galaxy Z Fold 6 hinge not only restores smooth motion but also prolongs the lifespan of your foldable device. By understanding the mechanism, recognizing early signs, and following proper cleaning and maintenance routines, you can avoid costly repairs and enjoy a seamless folding experience. Regular maintenance combined with professional inspections when needed ensures your hinge remains reliable and quiet for years to come.
David from Sydney CBD Repair Centre – The Best place to fix mobile phones as 7 Years In A Row! Top Mobile Phone Repair In Sydney. More than 2000 Positive Reviews on Google and Same Day Repairs.
We take pride in delivering exceptional repair services for all major phone brands including Apple, Samsung, Google, and more. Our expert technicians use only genuine parts and offer 90days warranty on repairs. Located in the heart of Sydney CBD, we’re your one-stop solution for all mobile device repairs.
Our commitment to excellence has earned us the trust of thousands of satisfied customers. Whether it’s a cracked screen, battery replacement, or water damage repair, we handle it all with professional care and expertise. Walk in today and experience why we’re Sydney’s #1 choice for mobile phone repairs.
Visit us for:
✓ Same Day Express Repairs
✓ Genuine Parts Guarantee
✓ Professional Technicians
✓ Competitive Pricing
✓ 2000+ 5-Star Google Reviews
✓ 7-Time Award Winner for Best Phone Repairs
Why Your Camera Is Blurry: Deep Cleaning and Lens Glass Replacement Techniques + Proven 9-Step Fix Guide
Introduction to Blurry Camera Problems
If you’ve ever opened your camera app only to find that your photos look foggy, hazy, or simply out of focus, you’re not alone. Many users ask the same frustrating question: why your camera is blurry and how can you fix it?
A blurry camera can affect everything—from personal memories to professional photography. Whether you’re using an iPhone, Samsung, or Google device, image clarity matters. After all, in today’s digital world, sharp images aren’t optional—they’re expected.
The good news? Most blurry camera issues can be solved with proper deep cleaning and lens glass replacement techniques. Sometimes it’s a quick fix. Other times, it requires professional repair. Either way, understanding the cause is the first step.
Let’s dive deep into the real reasons behind blurry camera problems and the proven solutions that actually work.
Understanding why your camera is blurry starts with identifying the root cause. Not all blurry images come from the same problem. In fact, several factors can contribute.
Dirty Camera Lens
This is the most common cause. Your phone lives in your pocket, bag, or hand all day. It collects:
Fingerprints
Dust
Oil residue
Makeup smudges
Pocket lint
Even a thin layer of grease can distort light entering the lens, causing a blurry camera effect. It may seem minor, but it significantly impacts image sharpness.
Scratched or Cracked Lens Glass
If your phone has been dropped, the outer lens glass might be cracked or scratched. When this happens:
Light scatters before reaching the sensor
Images appear hazy
Autofocus struggles
Night photos look worse
In such cases, simple cleaning won’t fix the problem. Lens glass replacement may be necessary.
Internal Dust and Debris
Sometimes the issue isn’t external. Dust can enter through micro gaps, especially after screen replacements or heavy impact. Internal dust leads to:
Persistent blur
Dark spots
Uneven focus
Deep internal cleaning is required in these situations.
Software or Focus Errors
Occasionally, the problem is digital rather than physical. Causes include:
Autofocus malfunction
Outdated software
Camera app glitches
Corrupted firmware
A software reset or update may resolve these issues quickly.
Deep cleaning goes beyond wiping the lens with your shirt. It’s a precise process designed to remove microscopic debris affecting image quality.
Tools Needed for Deep Cleaning
Professional technicians typically use:
Microfiber cloth
99% isopropyl alcohol
Precision brushes
Compressed air
Anti-static gloves
Magnifying inspection tools
These tools ensure safe and effective cleaning without damaging the lens coating.
Step-by-Step Deep Cleaning Process
Here’s a simplified professional-level process:
Power off the device
Remove protective case
Inspect lens under magnification
Apply small amount of isopropyl alcohol
Wipe gently using circular motion
Use compressed air to remove debris
Inspect for micro-scratches
Reassemble and test camera
Calibrate autofocus if needed
When done correctly, deep cleaning often restores clarity instantly.
However, if the blur persists, the issue likely involves lens damage.
When Lens Glass Replacement Is Necessary
Sometimes, no amount of cleaning will fix the issue. That’s when lens glass replacement becomes essential.
Signs You Need Lens Replacement
You may require replacement if:
Visible cracks on camera lens
Permanent foggy appearance
Scratches affecting center of lens
Autofocus constantly hunting
Blurry images even after cleaning
If you’ve tried everything and still wonder why your camera is blurry, lens damage is likely the culprit.
Risks of DIY Lens Replacement
While DIY kits are available online, replacing camera lens glass is delicate work. Risks include:
Damaging camera sensor
Breaking internal connectors
Misaligning autofocus module
Losing water resistance
Professional technicians use controlled heat tools and alignment fixtures to ensure precision.
Professional Repair vs DIY Fix
You might be tempted to repair it yourself. After all, how hard can it be?
The truth is, modern smartphone cameras are extremely complex. Multi-lens systems in devices like iPhones and Samsung Galaxy phones require:
Laser alignment
Dust-free environments
High-precision adhesive
Calibration software
DIY repairs may save money upfront but can cause expensive long-term damage.
Professional repair ensures:
Correct lens alignment
Clean internal components
Proper sealing
Warranty protection
In many cases, same-day repair is available.
Cost of Camera Lens Glass Replacement
Prices vary depending on brand and model. Generally:
Device Type
Estimated Cost Range
Entry-Level Smartphones
$80 – $120
Premium Smartphones
$120 – $250
Multi-Lens Systems
$150 – $300
Keep in mind that replacing just the outer lens glass is cheaper than replacing the entire camera module.
Preventing Future Blurry Camera Issues
Prevention is better than cure. Here’s how to protect your camera:
Use high-quality protective case
Install lens protector
Avoid placing phone face-down
Clean lens weekly
Keep phone away from sand and dust
Avoid DIY internal repairs
Small habits make a big difference.
Expert Insights from Professional Technicians
From real-world repair experience, over 60% of blurry camera cases are solved with deep cleaning alone. Around 30% require lens glass replacement, and less than 10% involve full camera module failure.
Professional repair centers follow strict quality control measures to ensure:
Dust-free repairs
Accurate lens positioning
Camera testing under various lighting conditions
Experience matters. Certified technicians understand how delicate camera systems are and handle them with precision.
FAQs About Blurry Camera and Lens Repair
1. Why is my camera blurry even after cleaning the lens?
Internal dust or scratched lens glass may be the cause. Professional inspection is recommended.
2. Can a cracked lens cause blurry photos?
Yes. Cracks distort light and affect image clarity significantly.
3. Is lens glass replacement expensive?
It depends on the model, but it’s usually more affordable than replacing the entire camera module.
4. Can software updates fix a blurry camera?
If the issue is software-related, updates can resolve autofocus problems.
5. How long does lens replacement take?
Most professional repair shops complete it within 1–2 hours.
6. Is it safe to use alcohol to clean the camera lens?
Yes, but only 99% isopropyl alcohol and in small amounts.
Conclusion
If you’ve been wondering why your camera is blurry, now you know the real causes and solutions. In most cases, deep cleaning restores clarity. When damage is present, lens glass replacement is the best long-term solution.
Don’t ignore blurry images. Clear photography isn’t just about aesthetics—it preserves memories.
With proper care, professional repair when needed, and preventive habits, your camera can stay sharp for years.
David from Sydney CBD Repair Centre – The Best place to fix mobile phones as 7 Years In A Row! Top Mobile Phone Repair In Sydney. More than 2000 Positive Reviews on Google and Same Day Repairs.
We take pride in delivering exceptional repair services for all major phone brands including Apple, Samsung, Google, and more. Our expert technicians use only genuine parts and offer 90days warranty on repairs. Located in the heart of Sydney CBD, we’re your one-stop solution for all mobile device repairs.
Our commitment to excellence has earned us the trust of thousands of satisfied customers. Whether it’s a cracked screen, battery replacement, or water damage repair, we handle it all with professional care and expertise. Walk in today and experience why we’re Sydney’s #1 choice for mobile phone repairs.
Visit us for:
✓ Same Day Express Repairs
✓ Genuine Parts Guarantee
✓ Professional Technicians
✓ Competitive Pricing
✓ 2000+ 5-Star Google Reviews
✓ 7-Time Award Winner for Best Phone Repairs
Why Your Charging Port Failed After a Screen Repair: Avoid This Costly DIY Disaster with 7 Proven Fixes
Introduction: When a Simple Screen Repair Turns Into a Charging Nightmare
You fixed your cracked screen. Everything looks perfect. Then suddenly, your phone won’t charge. If your charging port failed after screen repair, you’re not alone. This frustrating issue happens more often than most people expect.
At first glance, a screen replacement seems unrelated to charging. However, modern smartphones—like the iPhone 15 Pro and Samsung Galaxy S24 Ultra—are built with tightly integrated internal components. One small mistake during disassembly can affect multiple systems.
When a charging port failed after screen repair, it’s rarely a coincidence. Smartphone components are interconnected. During screen replacement, technicians must disconnect several flex cables and remove internal brackets. The charging assembly often sits near the display connectors.
What Happens During a Screen Replacement?
Screen repair involves:
Powering down the device
Opening the housing
Disconnecting battery connectors
Removing display flex cables
Detaching protective shields
Reassembling in reverse order
If any connector is misaligned or damaged, problems arise.
How the Charging Assembly Is Connected
In many phones, the charging port connects via:
Flex ribbon cable
Daughterboard assembly
Soldered motherboard connections
For example, devices running Android often use modular charging boards, while iOS devices may integrate components more tightly.
That’s why a charging port failed after screen repair can be traced back to assembly errors.
Even a millimeter misalignment can break connectivity.
2. Damaged Charging Port Ribbon
During screen removal, prying tools can accidentally nick the ribbon cable. The damage may not be visible immediately but can worsen over time.
3. Pin Misalignment or Debris Intrusion
If debris enters during repair:
Charging becomes inconsistent
Cable won’t sit properly
Sparks may occur
4. Short Circuit from Improper Reassembly
Failure to disconnect the battery before screen removal can cause a short circuit. This is a leading reason why charging port failed after screen repair incidents occur.
5. Low-Quality Replacement Parts
Cheap screens may:
Draw incorrect voltage
Cause overheating
Affect motherboard stability
6. Static Discharge Damage
Without ESD protection, static electricity can damage microcomponents.
7. Hidden Motherboard Damage
In worst cases, the charging IC (Integrated Circuit) gets damaged. This requires advanced microsoldering repair.
DIY vs Professional Repairs: The Hidden Risks
When DIY Makes Sense
DIY may work if:
You have proper tools
You’ve repaired devices before
You follow manufacturer guides
However, even experienced hobbyists sometimes face issues where the charging port failed after screen repair.
When to Call the Experts
Professional technicians:
Use diagnostic tools
Test voltage flow
Ensure secure cable seating
Offer warranties
At established repair centers, quality checks reduce risk dramatically.
How Professionals Prevent Charging Port Failure
Diagnostic Testing Procedures
Before returning a device, experts:
Run charging cycle tests
Measure voltage output
Inspect flex connections
Quality Control and Warranty Standards
Trusted repair centers use:
Genuine parts
ESD-safe equipment
Post-repair testing
This dramatically lowers the chance that a charging port failed after screen repair.
Step-by-Step Troubleshooting Guide
If your charging port failed after screen repair, follow this safe checklist:
Visual Inspection Checklist
Check charging cable
Inspect port for debris
Look for bent pins
Software Reset Options
Restart device
Perform factory reset
Update firmware
Safe Hardware Checks
⚠️ Only attempt if confident.
Reopen device
Reseat connectors
Inspect ribbon cables
If unsure, stop immediately.
The Role of Genuine Parts in Long-Term Performance
Genuine parts:
Match original voltage specs
Fit precisely
Reduce overheating
Third-party components may save money short-term but cause long-term issues.
Preventive Measures Before and After Screen Repairs
Before repair:
Backup data
Power off device
Use anti-static protection
After repair:
Test charging immediately
Monitor battery performance
Avoid cheap cables
Cost Comparison: DIY Mistakes vs Professional Repairs
Repair Type
Average Cost
Risk Level
DIY Screen Replacement
Low
High
Professional Screen Repair
Moderate
Low
Charging IC Repair
High
Very High
Fixing a charging port failed after screen repair often costs more than the original screen repair.
FAQs About Charging Port Failed After Screen Repair
1. Why did my phone stop charging after screen replacement?
Most likely a loose connector or damaged ribbon cable.
2. Can a screen replacement damage the charging port?
Yes. Internal components are closely linked.
3. Is this covered under warranty?
Only if performed by authorized technicians.
4. Can I fix it without reopening the phone?
Sometimes cleaning or restarting helps, but often internal inspection is needed.
5. How much does charging port repair cost?
It varies by model and damage severity.
6. Should I replace the charging port or motherboard?
A technician must diagnose first. Motherboard repair is more complex.
Conclusion: Protect Your Device the Smart Way
When your charging port failed after screen repair, it’s not just bad luck. It’s often the result of internal misalignment, component damage, or improper assembly.
The good news? It’s preventable.
Choose skilled technicians, use quality parts, and avoid rushed DIY repairs. Your smartphone is an investment—treat it like one.
External Resource:
For more technical repair insights, visit the official iFixit repair guides.
David from Sydney CBD Repair Centre – The Best place to fix mobile phones as 7 Years In A Row! Top Mobile Phone Repair In Sydney. More than 2000 Positive Reviews on Google and Same Day Repairs.
We take pride in delivering exceptional repair services for all major phone brands including Apple, Samsung, Google, and more. Our expert technicians use only genuine parts and offer 90days warranty on repairs. Located in the heart of Sydney CBD, we’re your one-stop solution for all mobile device repairs.
Our commitment to excellence has earned us the trust of thousands of satisfied customers. Whether it’s a cracked screen, battery replacement, or water damage repair, we handle it all with professional care and expertise. Walk in today and experience why we’re Sydney’s #1 choice for mobile phone repairs.
Visit us for:
✓ Same Day Express Repairs
✓ Genuine Parts Guarantee
✓ Professional Technicians
✓ Competitive Pricing
✓ 2000+ 5-Star Google Reviews
✓ 7-Time Award Winner for Best Phone Repairs
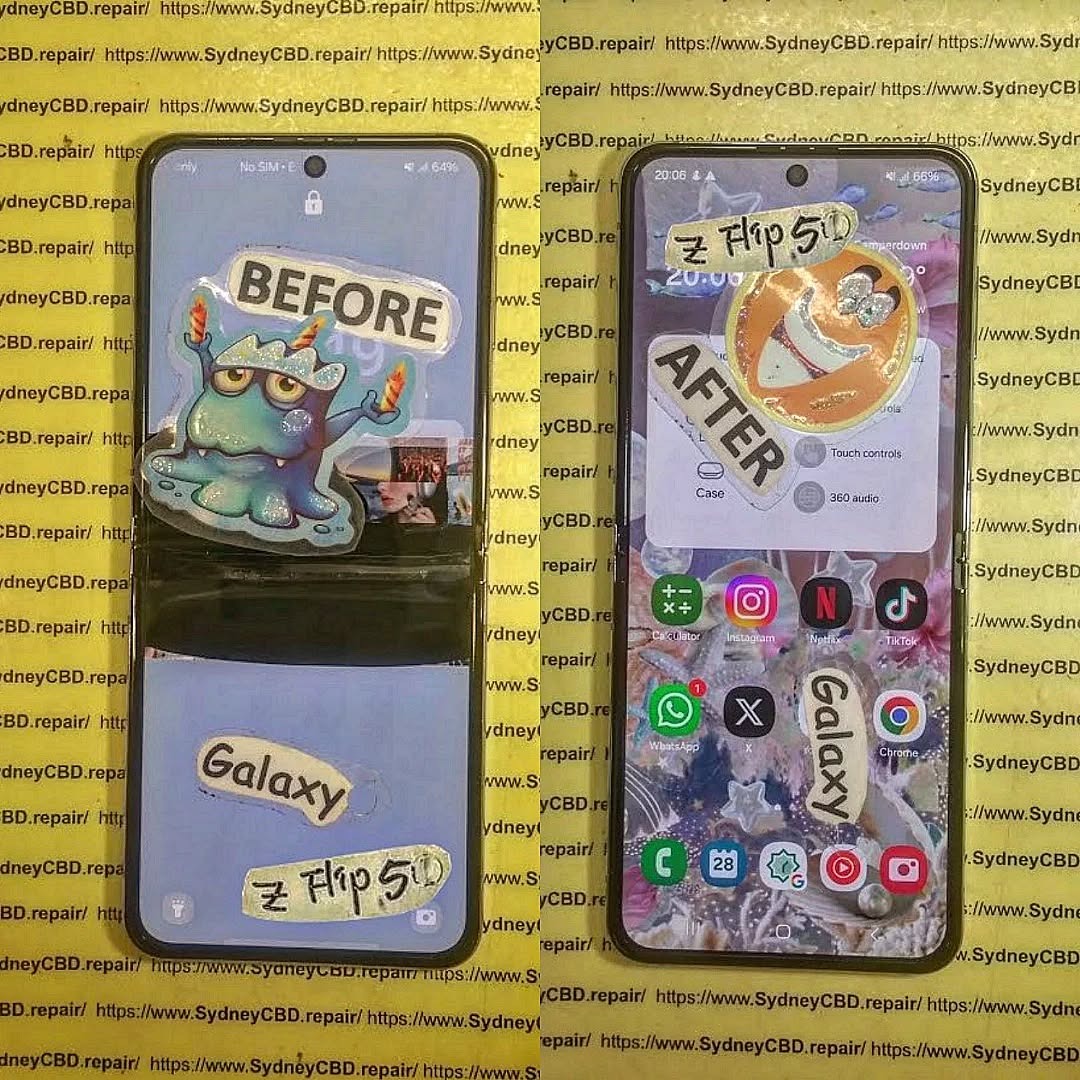
Step by Step Samsung Galaxy Z Flip 5 Internal Folding Screen Replacement Guide + Proven Expert Method (2026)
Introduction to Samsung Galaxy Z Flip 5 Internal Folding Screen Replacement
The Samsung Galaxy Z Flip 5 internal folding screen replacement is one of the most delicate smartphone repairs available today. Unlike traditional slab smartphones, the Samsung Galaxy Z Flip 5 features a flexible AMOLED panel that bends along a hinge system. That innovation makes it exciting—but also more complex to repair.
If your Flip 5 shows black lines, dead pixels, flickering, touch failure, or a crease crack along the fold, you may need a full Samsung Galaxy Z Flip 5 internal folding screen replacement. While it’s possible to attempt this repair yourself, it requires precision, patience, and professional-grade tools.
Before attempting a Samsung Galaxy Z Flip 5 internal folding screen replacement, it’s essential to understand how the screen is constructed.
AMOLED Technology Explained
The Flip 5 uses a flexible Dynamic AMOLED 2X panel. Unlike LCD displays, AMOLED screens don’t require a backlight. Each pixel produces its own light. That’s why blacks are deeper and colors look vibrant.
However, AMOLED layers are extremely thin and sensitive to:
Pressure damage
Moisture intrusion
Heat exposure
Hinge stress
When damaged, the entire panel typically needs replacement.
Ultra Thin Glass (UTG) Structure
Samsung reinforced the folding display with Ultra Thin Glass (UTG). While stronger than plastic, it’s still flexible and layered:
Protective film
Ultra Thin Glass
OLED layer
Touch digitizer
Flexible substrate
Damage to any internal layer requires a complete Samsung Galaxy Z Flip 5 internal folding screen replacement.
Common Causes of Internal Screen Failure
Dropping the device while open
Pressure at the crease
Hinge debris buildup
Manufacturing fatigue
Removing factory screen protector
Foldable phones are advanced, but they’re not invincible.
However, many customers prefer trusted third-party specialists.
When to Choose Professional Repair Services
If you’re unsure about performing a Samsung Galaxy Z Flip 5 internal folding screen replacement, professional repair is safer.
At Sydney CBD Repair Centre, we’ve handled thousands of complex foldable repairs. Our team specializes in Samsung foldable models including:
Samsung Galaxy Z Fold 5
Samsung Galaxy Z Flip 4
Samsung Galaxy Z Flip 5
We use genuine-grade parts, offer same-day service, and provide warranty coverage.
Foldables aren’t just phones—they’re precision-engineered devices. Professional handling matters.
FAQs About Samsung Galaxy Z Flip 5 Internal Folding Screen Replacement
1. How long does Samsung Galaxy Z Flip 5 internal folding screen replacement take?
Professional repair typically takes 2–4 hours. DIY may take much longer.
2. Can I replace only the glass layer?
No. The internal layers are fused. Full display assembly replacement is required.
3. Will water resistance remain after repair?
IP rating may be reduced unless resealed professionally.
4. Is it worth repairing instead of replacing the phone?
Yes, if motherboard and hinge are intact.
5. Why is the folding screen so expensive?
Flexible AMOLED technology and hinge integration increase cost.
6. Does removing the factory screen protector damage the screen?
It can. Samsung advises professional removal.
Conclusion
The Samsung Galaxy Z Flip 5 internal folding screen replacement is a high-level repair. While technically possible at home, it carries substantial risk.
Foldable phones represent the future—but they demand expert care.
If precision isn’t your forte, professional repair is often the smarter and safer choice.
David from Sydney CBD Repair Centre – The Best place to fix mobile phones as 7 Years In A Row! Top Mobile Phone Repair In Sydney. More than 2000 Positive Reviews on Google and Same Day Repairs.
We take pride in delivering exceptional repair services for all major phone brands including Apple, Samsung, Google, and more. Our expert technicians use only genuine parts and offer 90days warranty on repairs. Located in the heart of Sydney CBD, we’re your one-stop solution for all mobile device repairs.
Our commitment to excellence has earned us the trust of thousands of satisfied customers. Whether it’s a cracked screen, battery replacement, or water damage repair, we handle it all with professional care and expertise. Walk in today and experience why we’re Sydney’s #1 choice for mobile phone repairs.
Visit us for:
✓ Same Day Express Repairs
✓ Genuine Parts Guarantee
✓ Professional Technicians
✓ Competitive Pricing
✓ 2000+ 5-Star Google Reviews
✓ 7-Time Award Winner for Best Phone Repairs
Comparing Genuine Samsung Adhesive vs Generic Glue During Z Fold 6 Repairs: 7 Powerful Facts Every Owner Must Know
Introduction: Why Adhesive Choice Matters in Foldable Repairs
When it comes to Comparing Genuine Samsung Adhesive vs Generic Glue During Z Fold 6 Repairs, many users assume glue is just glue. However, that assumption couldn’t be further from the truth. The Samsung Galaxy Z Fold 6 is not a regular smartphone. It’s a highly engineered foldable device that relies heavily on precision adhesives for structure, durability, and water resistance.
Unlike traditional slab phones, foldables depend on flexible bonding materials that can endure thousands of folds without cracking, separating, or weakening. In fact, adhesive quality directly affects:
Structural stability
Hinge performance
Water resistance
Long-term durability
Screen alignment
So, when technicians are Comparing Genuine Samsung Adhesive vs Generic Glue During Z Fold 6 Repairs, the decision isn’t minor—it’s critical.
The Samsung Galaxy Z Fold 6 represents years of foldable innovation. It features:
Ultra-thin glass display
Advanced hinge mechanism
Multi-layer flexible OLED panel
Water-resistant sealing design
The Role of Adhesive in Foldable Structural Integrity
Adhesive in the Z Fold 6 does more than “stick parts together.” It:
Bonds flexible OLED to frame
Seals the hinge housing
Maintains even pressure distribution
Absorbs micro-movements during folding
In foldable phones, adhesive must stretch slightly yet return to form. Generic glue often becomes brittle over time. That’s where the first major difference appears when Comparing Genuine Samsung Adhesive vs Generic Glue During Z Fold 6 Repairs.
Waterproofing and Dust Resistance Challenges
Foldables have more entry points for dust and moisture. Genuine adhesive is engineered to maintain a tight seal under:
Heat expansion
Repeated folding
Pressure stress
If generic glue is used, water resistance can be compromised immediately.
Genuine Samsung adhesive is manufacturer-grade bonding material designed specifically for Samsung devices.
Composition and Factory Standards
Samsung adhesive is:
Pre-cut for precision alignment
Temperature-resistant
Flexible under stress
Engineered for OLED bonding
It’s tested in controlled environments to ensure consistent adhesion even after thousands of folds.
Manufacturer Testing and Certification
Samsung’s adhesives are validated through:
Heat cycle testing
Humidity resistance tests
Fold endurance simulations
According to industry durability benchmarks from Samsung Electronics, foldables undergo extensive mechanical stress testing before approval.
That level of certification simply doesn’t exist for most generic glues.
What Is Generic Glue in Smartphone Repairs?
Generic glue typically refers to:
Liquid adhesives
Universal bonding compounds
Aftermarket double-sided tapes
Common Types Used by Third-Party Shops
Technicians sometimes use:
B7000 adhesive
T7000 glue
Generic industrial double-sided tape
While these may work for basic smartphones, foldables demand more specialized bonding.
Cost vs Performance Trade-Off
Generic glue costs less upfront. However, cheaper adhesive can lead to:
Early screen lifting
Frame separation
Reduced water resistance
Dust intrusion
When Comparing Genuine Samsung Adhesive vs Generic Glue During Z Fold 6 Repairs, cost savings often disappear due to repeat repairs.
Head-to-Head Comparison: Genuine Samsung Adhesive vs Generic Glue
Let’s break it down clearly.
Feature
Genuine Samsung Adhesive
Generic Glue
Flexibility
High
Moderate to Low
Water Resistance
Maintains Seal
Often Compromised
Longevity
2–3+ Years
3–12 Months
Heat Resistance
Optimized
Inconsistent
Precision Fit
Pre-Cut
Manual Application
Warranty Safety
Yes
Often Void
Durability and Longevity
Genuine adhesive is built for long-term use. Generic glue may degrade faster due to heat and folding stress.
Water Resistance Performance
The Z Fold 6 relies on tight seals. Once compromised, even small moisture exposure can damage internal components.
Heat Resistance and Flexibility
Foldables generate heat around the hinge and processor. Adhesive must withstand thermal cycles without weakening.
Aesthetic and Structural Finish
Genuine adhesive provides:
Cleaner frame alignment
No glue overflow
Professional finish
Generic glue often leaves residue or uneven bonding.
Risks of Using Generic Glue on Z Fold 6
Screen Lifting and Panel Separation
Improper adhesive bonding can cause:
Display edge lifting
Crease stress
Touch sensitivity issues
Dust Ingress and Internal Damage
The hinge mechanism is vulnerable. Dust intrusion can:
Affect folding smoothness
Scratch internal layers
Cause display failure
Warranty and Insurance Implications
Using non-genuine materials may void warranty policies connected to Samsung Electronics.
That’s a serious financial risk.
Why Professional Repair Centers Choose Genuine Adhesive
Professional repair centers that value long-term quality consistently choose genuine parts.
For example, leading independent repair standards promoted by iFixit emphasize correct materials for structural repairs.
Precision Application Tools
Certified centers use:
Alignment frames
Controlled heating plates
Pressure calibration tools
Quality Control and Testing
Post-repair testing often includes:
Seal inspection
Fold-cycle simulation
Visual alignment check
This ensures durability beyond just “it sticks.”
Cost Analysis: Is Genuine Adhesive Worth It?
While genuine adhesive costs more upfront, it reduces:
Repeat repair visits
Display damage risks
Internal contamination
Long-term ownership costs
Think of it like this: saving $30 today might cost $600 tomorrow in screen replacement.
In the long run, genuine adhesive provides peace of mind—and that’s priceless.
FAQs About Adhesive Use in Z Fold 6 Repairs
1. Does adhesive really affect fold performance?
Yes. Foldables rely on flexible bonding. Incorrect adhesive can restrict movement and stress the display.
2. Can generic glue damage the OLED panel?
It can. Some adhesives release chemicals that weaken OLED layers over time.
3. Will water resistance remain after third-party repair?
Only if proper sealing materials are used. Generic glue often reduces original protection.
4. How long does genuine adhesive last?
Typically 2–3 years or more, depending on usage.
5. Is genuine adhesive required for warranty compliance?
In many cases, yes. Non-genuine materials may void coverage.
6. Why is foldable repair more complex than regular phones?
Foldables have moving components and flexible displays requiring precision engineering.
Conclusion: Making the Smart Repair Decision
When Comparing Genuine Samsung Adhesive vs Generic Glue During Z Fold 6 Repairs, the evidence is clear. Foldable smartphones demand precision-engineered bonding materials that match factory specifications.
Generic glue might seem convenient. It might even look fine at first. But over time, the risks multiply—screen lifting, dust damage, water exposure, and warranty voiding.
Choosing genuine adhesive isn’t just about sticking parts together. It’s about protecting your investment, ensuring long-term durability, and maintaining the premium experience the Z Fold 6 was designed to deliver.
When it comes to foldables, quality isn’t optional—it’s essential.
David from Sydney CBD Repair Centre – The Best place to fix mobile phones as 7 Years In A Row! Top Mobile Phone Repair In Sydney. More than 2000 Positive Reviews on Google and Same Day Repairs.
We take pride in delivering exceptional repair services for all major phone brands including Apple, Samsung, Google, and more. Our expert technicians use only genuine parts and offer 90days warranty on repairs. Located in the heart of Sydney CBD, we’re your one-stop solution for all mobile device repairs.
Our commitment to excellence has earned us the trust of thousands of satisfied customers. Whether it’s a cracked screen, battery replacement, or water damage repair, we handle it all with professional care and expertise. Walk in today and experience why we’re Sydney’s #1 choice for mobile phone repairs.
Visit us for:
✓ Same Day Express Repairs
✓ Genuine Parts Guarantee
✓ Professional Technicians
✓ Competitive Pricing
✓ 2000+ 5-Star Google Reviews
✓ 7-Time Award Winner for Best Phone Repairs